几何变换#
在此示例中,我们演示了 transforms 模块中的操作符,以及如何将它们用于变换图像和点云。
仿射变换#
transforms 模块中的操作符可以生成和组合用于不同类型仿射变换的变换矩阵。仿射变换由以下公式定义
其中 \(X_{in}\) 是输入点,\(X_{out}\) - 对应的输出,\(M\) - 变换的线性部分,\(T\) - 平移向量。
如果点在 2D 空间中,则公式可以写为
变换目录#
transforms 模块中有几种可用的变换。这些操作符中的每一个都可以生成仿射变换矩阵,并将其与预先存在的变换组合。以下是可用变换的列表
rotation- 绕给定点和轴(仅限 3D)旋转给定角度(以度为单位)translation- 按给定偏移量平移scale- 按给定因子缩放shear- 按给定因子或角度剪切;2D 有 2 个剪切因子,3D 有 6 个因子crop- 平移和缩放,使输入角 (from_start,from_end) 映射到输出角 (to_start,to_end)。
操作符的文档包含有关其参数的详细信息。
还有一个操作符 combine,它组合了多个仿射变换。
案例研究:变换关键点#
为了说明变换的功能,我们将它们应用于带有相应关键点数据的图像 - 在本例中为面部landmark。我们首先导入必要的模块,定义数据的位置,并编写一个实用程序来显示带有绘制在其上的关键点的图像。
[1]:
from nvidia.dali import pipeline_def
import nvidia.dali.fn as fn
import numpy as np
import matplotlib.pyplot as plt
import matplotlib.patches as patches
import math
import os

dali_extra_dir = os.environ["DALI_EXTRA_PATH"]
root_dir = os.path.join(dali_extra_dir, "db", "face_landmark")

# images are in JPEG format
image_files = ["{}.jpeg".format(i) for i in range(6)]
# keypoints are in NumPy files
keypoint_files = ["{}.npy".format(i) for i in range(6)]
[2]:
def show(images, landmarks):
    if hasattr(images, "as_cpu"):
        images = images.as_cpu()
    batch_size = len(images)

    import matplotlib.gridspec as gridspec

    fig = plt.figure(figsize=(16, 14))
    plt.suptitle(None)
    columns = 3
    rows = int(math.ceil(batch_size / columns))
    gs = gridspec.GridSpec(rows, columns)
    for i in range(batch_size):
        ax = plt.subplot(gs[i])
        plt.axis("off")
        plt.title("")
        img = images.at(i)
        r = 0.002 * max(img.shape[0], img.shape[1])
        for p in landmarks.at(i):
            circle = patches.Circle(p, r, color=(0, 1, 0, 1))
            ax.add_patch(circle)
        plt.imshow(img)
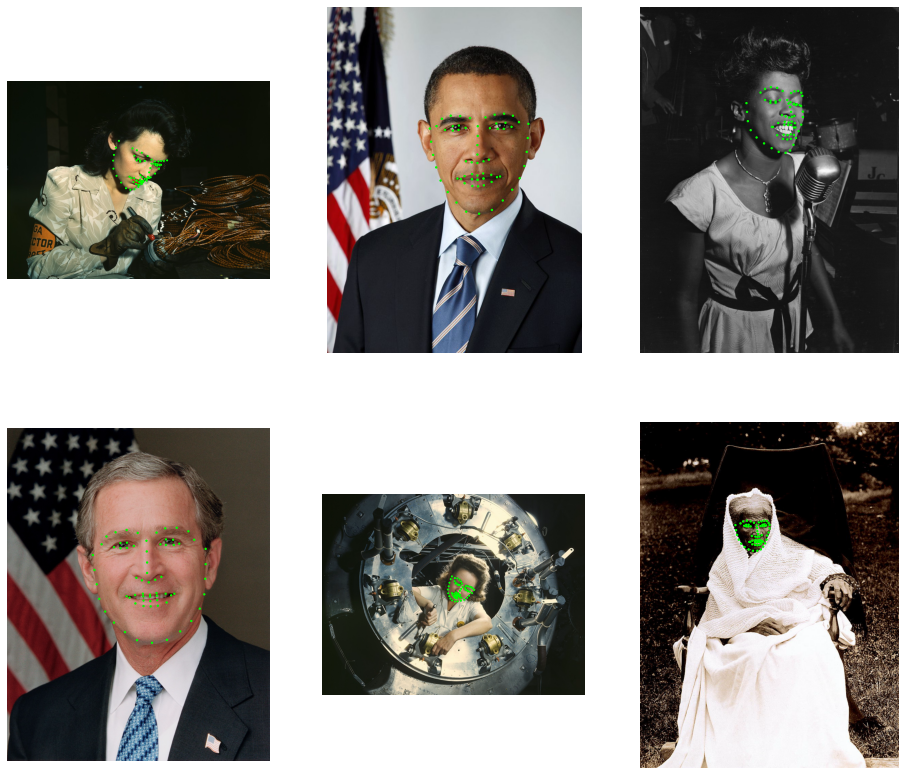
首先,让我们构建一个仅加载图像和关键点的 pipeline,不进行任何增强
[3]:
@pipeline_def
def basic_pipe():
    jpegs, _ = fn.readers.file(file_root=root_dir, files=image_files)
    images = fn.decoders.image(jpegs, device="mixed")
    keypoints = fn.readers.numpy(file_root=root_dir, files=keypoint_files)
    return images, keypoints


pipe = basic_pipe(batch_size=6, num_threads=3, device_id=0)
[4]:
pipe.build()
images, keypoints = pipe.run()
[5]:
show(images, keypoints)
向 Pipeline 添加变换#
在此步骤中,我们将变换应用于图像和关键点。我们使用 warp_affine 变换图像,使用 coord_transform 变换关键点。操作符 warp_affine 使用变换矩阵执行反向映射:目标像素坐标映射到源坐标。这有效地通过变换矩阵的逆矩阵变换图像特征的位置。为了使关键点和图像以相同的方式变换,我们需要在 warp_affine 中指定 inverse_map=False。
[6]:
@pipeline_def
def rotate_pipe():
    jpegs, _ = fn.readers.file(file_root=root_dir, files=image_files)
    images = fn.decoders.image(jpegs, device="mixed")
    keypoints = fn.readers.numpy(file_root=root_dir, files=keypoint_files)
    mt = fn.transforms.rotation(angle=fn.random.uniform(range=(-45, 45)))
    images = fn.warp_affine(images, matrix=mt, fill_value=0, inverse_map=False)
    keypoints = fn.coord_transform(keypoints, MT=mt)
    return images, keypoints


pipe = rotate_pipe(batch_size=6, num_threads=3, device_id=0, seed=1234)
pipe.build()
images, keypoints = pipe.run()
[7]:
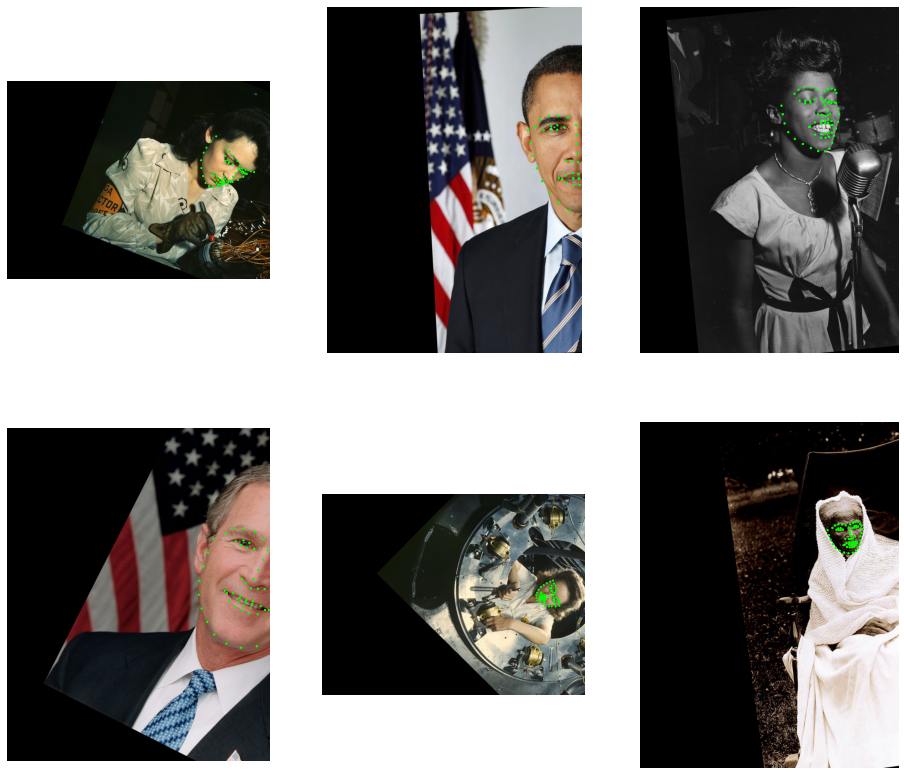
show(images, keypoints)
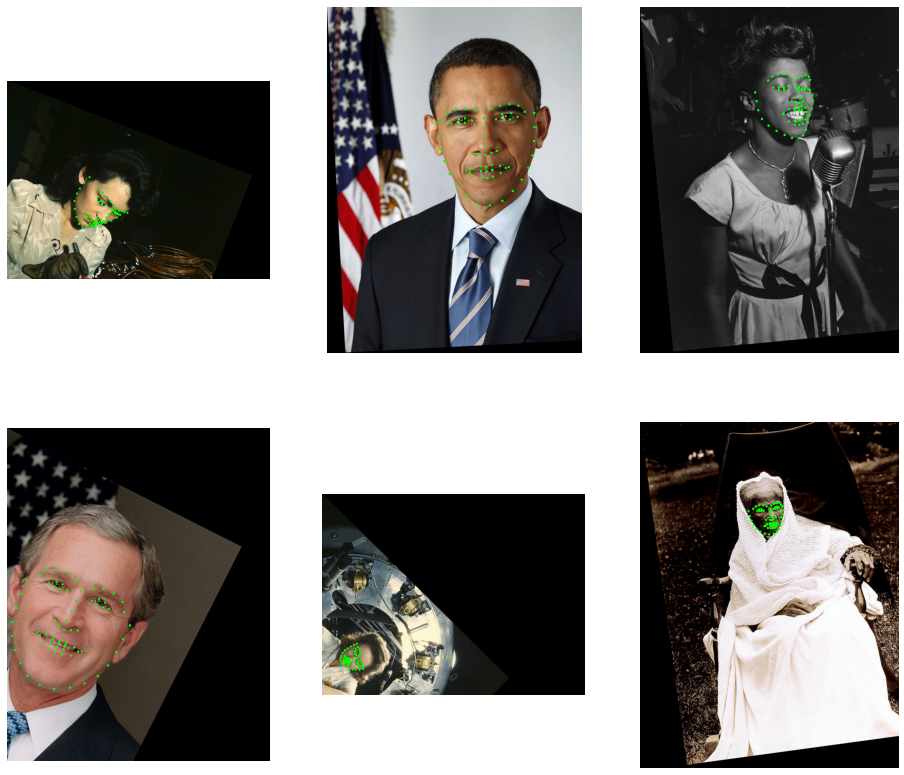
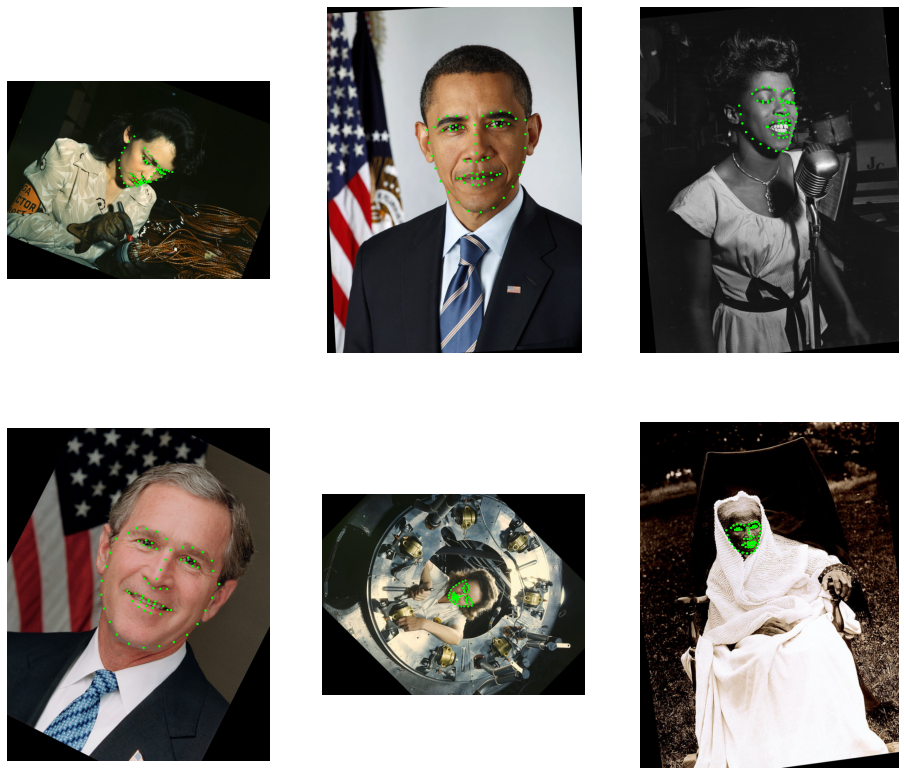
正如我们所看到的,图像已围绕点 (0, 0) 旋转,该点是左上角。要围绕中心旋转,我们可以将额外的 center 参数传递给 rotate。为了使用图像形状,我们必须使用动态执行器(它允许我们使用 GPU 张量的形状以用于 CPU 操作符)或在使用 peek_image_shape 操作符解码之前查找图像形状。
[8]:
@pipeline_def
def center_rotate_pipe():
    jpegs, _ = fn.readers.file(file_root=root_dir, files=image_files)
    images = fn.decoders.image(jpegs, device="mixed")

    # look up the shape of the encoded images and convert them from HWC to WH
    size = fn.peek_image_shape(jpegs)[1::-1]
    center = size / 2

    keypoints = fn.readers.numpy(file_root=root_dir, files=keypoint_files)
    mt = fn.transforms.rotation(
        angle=fn.random.uniform(range=(-45, 45)), center=center
    )
    images = fn.warp_affine(images, matrix=mt, fill_value=0, inverse_map=False)
    keypoints = fn.coord_transform(keypoints, MT=mt)
    return images, keypoints


pipe = center_rotate_pipe(batch_size=6, num_threads=3, device_id=0, seed=1234)
pipe.build()
images, keypoints = pipe.run()
[9]:
show(images, keypoints)
组合变换#
我们还可以组合多个变换。这可以通过两种方式实现
通过将现有变换矩阵作为输入传递给变换操作符,
通过显式使用
transforms.combine
在下面的示例中,我们应用旋转,然后进行水平平移。
[10]:
@pipeline_def(exec_dynamic=True)
def multi_transform_pipe():
    jpegs, _ = fn.readers.file(file_root=root_dir, files=image_files)
    images = fn.decoders.image(jpegs, device="mixed")

    # with exec_dynamic=True, we can just use the images' shape directly
    size = images.shape()[1::-1]  # get WH from HWC shape
    center = size / 2

    keypoints = fn.readers.numpy(file_root=root_dir, files=keypoint_files)
    mt = fn.transforms.rotation(
        angle=fn.random.uniform(range=(-45, 45)), center=center
    )
    mt = fn.transforms.translation(mt, offset=(300, 0))
    images = fn.warp_affine(images, matrix=mt, fill_value=0, inverse_map=False)
    keypoints = fn.coord_transform(keypoints, MT=mt)
    return images, keypoints


pipe = multi_transform_pipe(batch_size=6, num_threads=3, device_id=0, seed=1234)
pipe.build()
images, keypoints = pipe.run()
[11]:
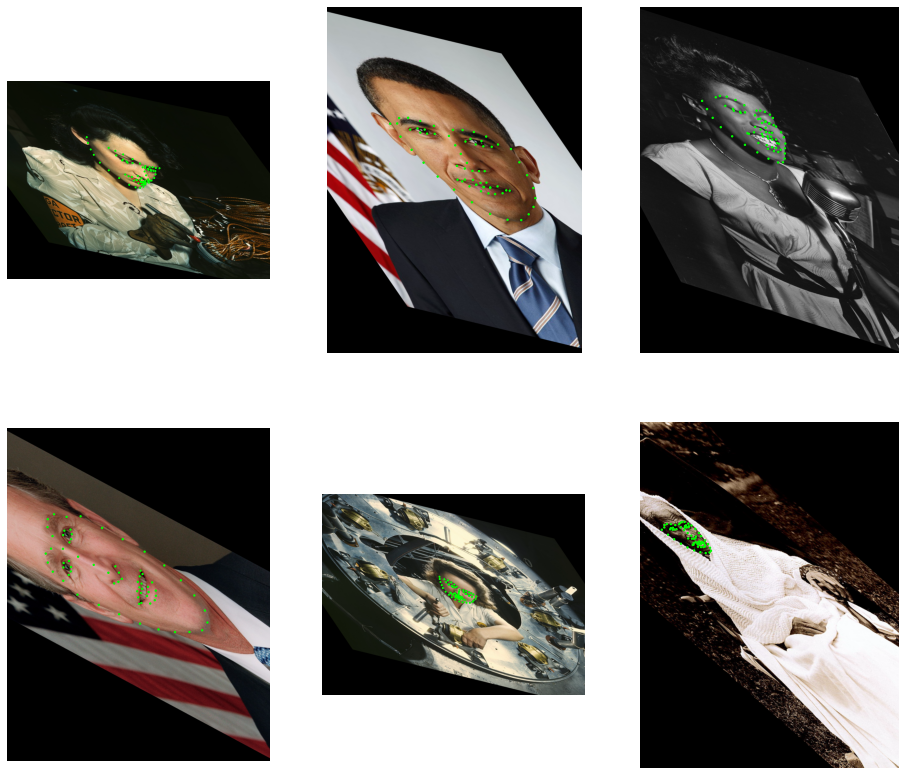
show(images, keypoints)
使用 transforms.combine 组合多个变换#
本节演示了 combine 操作符与其他变换和常数结果的用法。
[12]:
@pipeline_def(exec_dynamic=True)
def transform_combine_pipe():
    jpegs, _ = fn.readers.file(file_root=root_dir, files=image_files)
    images = fn.decoders.image(jpegs, device="mixed")

    size = images.shape()[1::-1]  # get WH from HWC shape
    center = size / 2

    keypoints = fn.readers.numpy(file_root=root_dir, files=keypoint_files)
    tr1 = fn.transforms.translation(offset=-center)
    tr2 = fn.transforms.translation(offset=center)
    rot = fn.transforms.rotation(angle=fn.random.uniform(range=(-45, 45)))
    mt = fn.transforms.combine(
        tr1, rot, np.float32([[1, 1, 0], [0, 1, 0]]), tr2
    )
    images = fn.warp_affine(images, matrix=mt, fill_value=0, inverse_map=False)
    keypoints = fn.coord_transform(keypoints, MT=mt)
    return images, keypoints


pipe = transform_combine_pipe(
    batch_size=6, num_threads=3, device_id=0, seed=1234
)
pipe.build()
images, keypoints = pipe.run()
[13]:
show(images, keypoints)
关键点裁剪#
在下面的示例中,我们应用一些随机变换并裁剪结果,使面部位于输出图像的中心。
[14]:
@pipeline_def
def crop_pipe():
    jpegs, _ = fn.readers.file(file_root=root_dir, files=image_files)
    images = fn.decoders.image(jpegs, device="mixed")
    keypoints = fn.readers.numpy(file_root=root_dir, files=keypoint_files)

    # This part defines the agumentations: shear + rotation
    mt = fn.transforms.shear(shear=fn.random.uniform(range=(-1, 1), shape=[2]))
    mt = fn.transforms.rotation(mt, angle=fn.random.uniform(range=(-45, 45)))

    # Now, let's see where the keypoints would be after applying this transform
    uncropped = fn.coord_transform(keypoints, MT=mt)

    # Find the bounding box of the keypoints
    lo = fn.reductions.min(uncropped, axes=[0])
    hi = fn.reductions.max(uncropped, axes=[0])
    # ...and get its larger extent (width or height)
    size = fn.reductions.max(hi - lo)
    center = (lo + hi) / 2
    # make a square region centered at the center of the bounding box
    lo = center - size  # full size - this adds 50% margin
    hi = center + size  # likewise

    # Now we can calculate a crop transform that will map the bounding box to
    # a 400x400 window and combine it with the previous transform.
    mt = fn.transforms.crop(
        mt, from_start=lo, from_end=hi, to_start=[0, 0], to_end=[400, 400]
    )

    # Apply the transform to the keypoints; specify the output size of 400x400.
    images = fn.warp_affine(
        images, size=[400, 400], matrix=mt, fill_value=0, inverse_map=False
    )
    keypoints = fn.coord_transform(keypoints, MT=mt)
    return images, keypoints


pipe = crop_pipe(batch_size=6, num_threads=3, device_id=0, seed=1234)
pipe.build()
images, keypoints = pipe.run()
[15]:
show(images, keypoints)
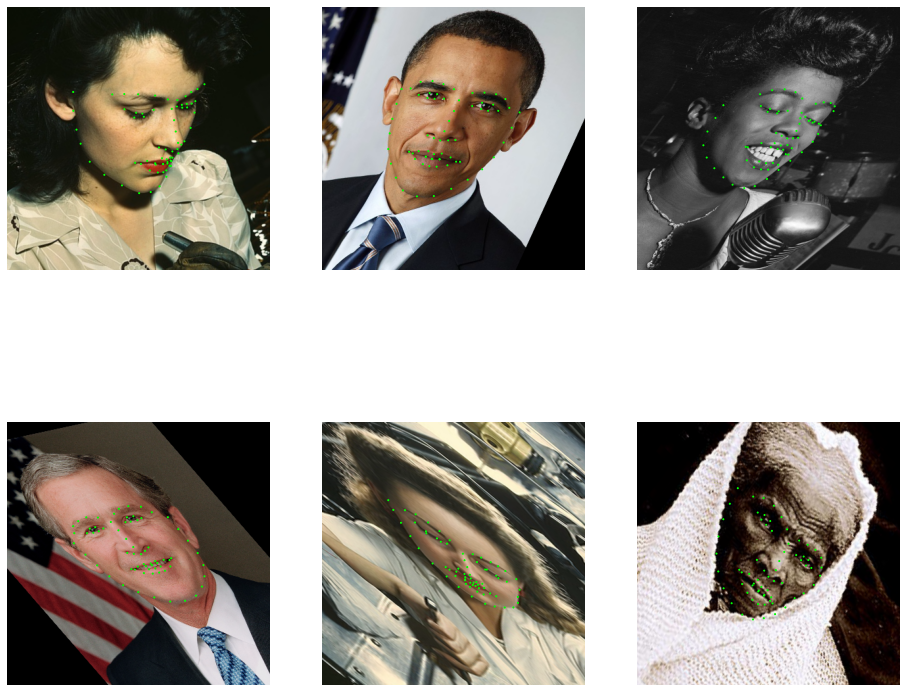
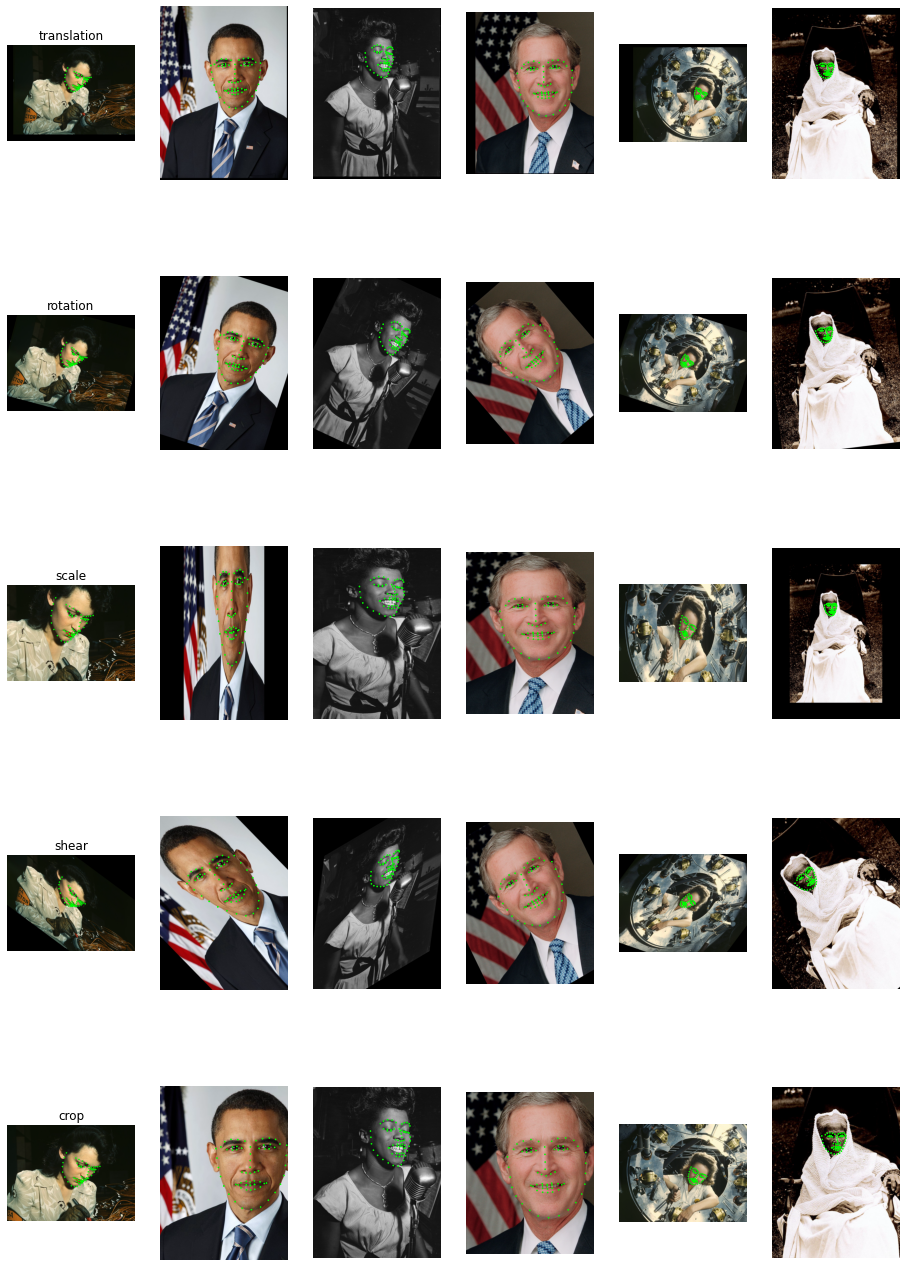
变换图库#
本节演示了应用于所有示例图像的每个变换。
[16]:
@pipeline_def(exec_dynamic=True)
def transforms_gallery_pipe():
    jpegs, _ = fn.readers.file(file_root=root_dir, files=image_files)
    images = fn.decoders.image(jpegs, device="mixed")
    keypoints = fn.readers.numpy(file_root=root_dir, files=keypoint_files)

    size = images.shape()[1::-1]
    center = size / 2

    outputs = []

    transforms = [
        fn.transforms.translation(
            offset=fn.random.uniform(range=(-100, 100), shape=2)
        ),
        fn.transforms.rotation(
            angle=fn.random.uniform(range=(-45, 45)), center=center
        ),
        fn.transforms.scale(
            scale=fn.random.uniform(range=(0.5, 2), shape=[2]), center=center
        ),
        fn.transforms.shear(
            shear=fn.random.uniform(range=(-1, 1), shape=[2]), center=center
        ),
        fn.transforms.crop(
            from_start=size * 0.1,
            from_end=size * 0.8,
            to_start=[0, 0],
            to_end=size * 1.0,
        ),
    ]

    for mt in transforms:
        out_img = fn.warp_affine(
            images, matrix=mt, fill_value=0, inverse_map=False
        )
        out_kp = fn.coord_transform(keypoints, MT=mt)
        outputs += [out_img, out_kp]
    return tuple(outputs)


pipe = transforms_gallery_pipe(
    batch_size=6, num_threads=3, device_id=0, seed=1234
)
pipe.build()
pipe_out = pipe.run()
[17]:
def gallery(pipe_out, titles):
    pipe_out = [x.as_cpu() if hasattr(x, "as_cpu") else x for x in pipe_out]

    batch_size = len(pipe_out[0])

    import matplotlib.gridspec as gridspec

    fig = plt.figure(figsize=(16, 24))
    plt.suptitle(None)
    columns = batch_size
    rows = len(pipe_out) // 2
    gs = gridspec.GridSpec(rows, columns)
    flat = 0
    for j in range(0, len(pipe_out), 2):
        for i in range(batch_size):
            ax = plt.subplot(gs[flat])
            plt.axis("off")
            plt.title("")
            img = pipe_out[j].at(i)
            r = 0.002 * max(img.shape[0], img.shape[1])
            for p in pipe_out[j + 1].at(i):
                circle = patches.Circle(p, r, color=(0, 1, 0, 1))
                ax.add_patch(circle)
            plt.imshow(img)
            if i == 0:
                plt.title(titles[j // 2])
            flat += 1


gallery(pipe_out, ["translation", "rotation", "scale", "shear", "crop"])