调整大小算子#
此笔记本演示了调整大小算子的用法。
调整大小算子重新采样图像、体数据* 和图像序列。它可以根据最终输出大小的计算方式以及应用的滤波或插值方法进行参数化。它还支持调整感兴趣区域 (RoI) 的大小。
注意
DALI_EXTRA_PATH环境变量应指向从 DALI extra repository 下载数据的位置。请确保已检出正确的发布标签。
注意 有关滤波方法的详细描述,请参阅“插值方法”教程。
* 您可以在 3D 变换教程中看到调整大小算子应用于体数据。
输出大小参数#
有几种方法可以定义如何调整图像大小。最简单的方法是显式指定所需的输出大小。这可以通过两种方式完成
使用
size参数,它可以是标量(所有范围相等)、列表/元组(每个维度指定大小)或DataNode(另一个 DALI 算子的结果)- 在这种情况下,它可以是包含各个样本输出大小的张量列表。使用单独的参数
resize_x、resize_y,(resize_z保留供将来使用)- 它们可以是 Python 标量或DataNode,用于每个样本的大小。
如果任何维度的范围缺失(0 或未指定),则会选择它来保持图像的纵横比。
在我们的第一个示例中,我们将使用默认的缩放模式(有关详细信息,请参阅有关缩放模式的部分)。
[1]:
from nvidia.dali.pipeline import Pipeline
import nvidia.dali as dali
import numpy as np
import matplotlib.pyplot as plt
import matplotlib.gridspec as gridspec
import math
import os.path
import PIL

test_data_root = os.environ["DALI_EXTRA_PATH"]
db_folder = os.path.join(test_data_root, "db", "lmdb")
[2]:
batch_size = 8

pipe = dali.pipeline.Pipeline(batch_size, 3, 0)
with pipe:
    files, labels = dali.fn.readers.caffe(
        path=db_folder, random_shuffle=True, seed=1234
    )
    images = dali.fn.decoders.image(files, device="mixed")

    width = 100
    height = 100

    out = [
        images,
        # use tensor extent order - height, width
        dali.fn.resize(images, size=[height, width]),
        dali.fn.resize(images, resize_x=width, resize_y=height),
        dali.fn.resize(images, resize_x=width),
        dali.fn.resize(images, size=[0, width]),
        dali.fn.resize(images, resize_y=height),
        dali.fn.resize(images, size=[height, 0]),
    ]

    pipe.set_outputs(*out)

pipe.build()
pipe_out = pipe.run()
让我们定义用于显示输出的实用程序
[3]:
def show_images(images, labels, size, columns=2):
    from synsets import imagenet_synsets
    import matplotlib.gridspec as gridspec

    num_img = len(images)
    fig = plt.figure(figsize=size)
    plt.suptitle(None)
    rows = int(math.ceil(num_img / columns))
    gs = gridspec.GridSpec(rows, columns)
    for i in range(num_img):
        plt.subplot(gs[i])
        plt.axis("off")
        plt.title(labels[i] if labels is not None else "")
        img_chw = images[i]
        plt.imshow((img_chw) / 255.0)


def show_outputs(pipe_out, idx, labels, size, columns=2):
    len_outputs = len(pipe_out)
    images = [
        out.as_cpu().at(idx) if hasattr(out, "as_cpu") else out.at(idx)
        for out in pipe_out
    ]
    show_images(images, labels, size, columns)


def show_batch(tlist, labels, size, columns=2):
    images = [
        tlist.as_cpu().at(idx) if hasattr(tlist, "as_cpu") else tlist.at(idx)
        for idx in range(len(tlist))
    ]
    show_images(images, labels, size, columns)
[4]:
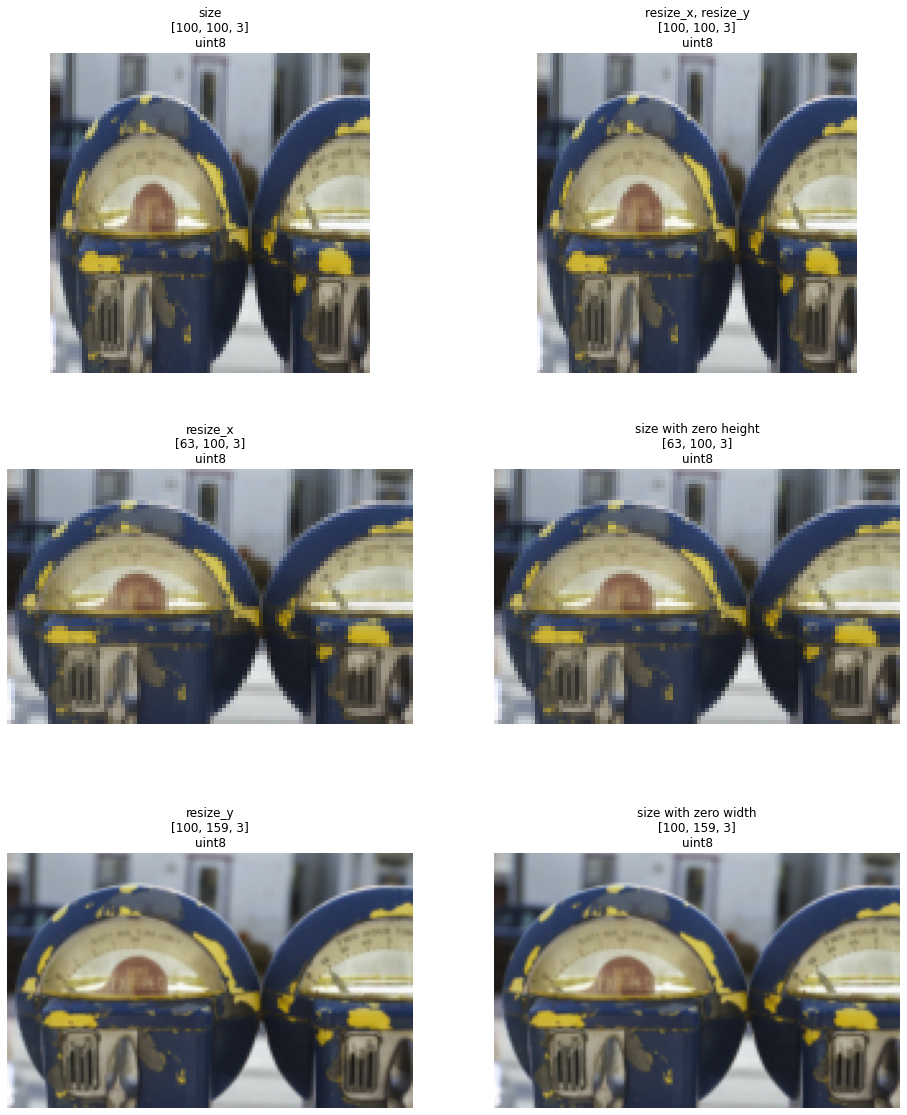
print("Original image")
idx = 5  # adjust to see other images
PIL.Image.fromarray(pipe_out[0].as_cpu().at(idx))
Original image
[4]:
[5]:
labels = [
    "size",
    "resize_x, resize_y",
    "resize_x",
    "size with zero height",
    "resize_y",
    "size with zero width",
]
for i in range(len(pipe_out) - 1):
    labels[i] += "\n{}".format(pipe_out[i + 1].at(idx).shape())
    cpu_out = pipe_out[i + 1].as_cpu()
    labels[i] += "\n{}".format(cpu_out.at(idx).dtype)
show_outputs(pipe_out[1:], idx, labels, (16, 20))
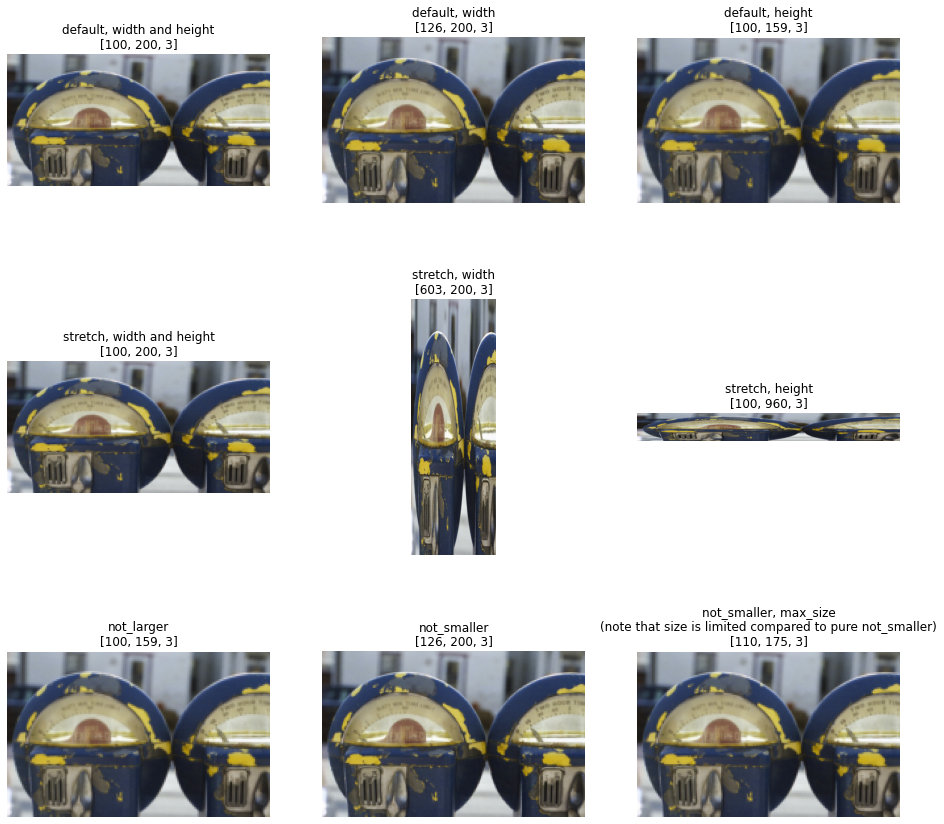
缩放模式#
调整大小算子支持四种调整大小模式
“default” - 指定的维度将缩放到请求的大小;缺失的范围通过应用所提供范围的平均比例来计算 - 对于 2D 和指定的一个范围,这意味着纵横比被保留
“stretch” - 指定的维度将缩放到请求的大小;缺失的维度根本不缩放
“not_larger” - 图像被缩放,使得没有维度超过指定的大小;纵横比被保留
“not_smaller” - 图像被缩放,使得没有维度小于指定的大小(此外,可以使用 max_size 参数来限制具有非常高纵横比的输入的放大)
旧版缩放模式
resize_shorter和resize_longer的工作方式就像为所有轴指定了相同的大小,并且模式分别为“not_smaller”和“not_larger”
[6]:
batch_size = 8

pipe = dali.pipeline.Pipeline(batch_size, 3, 0)
with pipe:
    files, labels = dali.fn.readers.caffe(
        path=db_folder, random_shuffle=True, seed=1234
    )
    images = dali.fn.decoders.image(files, device="mixed")

    width = 200
    height = 100

    out = [
        dali.fn.resize(images, size=[height, width]),
        dali.fn.resize(images, resize_x=width),
        dali.fn.resize(images, resize_y=height),
        dali.fn.resize(images, size=[height, width], mode="stretch"),
        dali.fn.resize(images, resize_x=width, mode="stretch"),
        dali.fn.resize(images, resize_y=height, mode="stretch"),
        dali.fn.resize(images, size=[height, width], mode="not_larger"),
        dali.fn.resize(images, size=[height, width], mode="not_smaller"),
        dali.fn.resize(
            images,
            size=[height, width],
            mode="not_smaller",
            max_size=[110, 200],
        ),
    ]

    pipe.set_outputs(*out)

pipe.build()
pipe_out = pipe.run()
[7]:
labels = [
    "default, width and height",
    "default, width",
    "default, height",
    "stretch, width and height",
    "stretch, width",
    "stretch, height",
    "not_larger",
    "not_smaller",
    "not_smaller, max_size\n(note that size is limited compared to pure "
    "not_smaller)",
]
for i in range(len(pipe_out)):
    labels[i] += "\n{}".format(pipe_out[i].at(idx).shape())
show_outputs(pipe_out, idx, labels, size=(16, 16), columns=3)
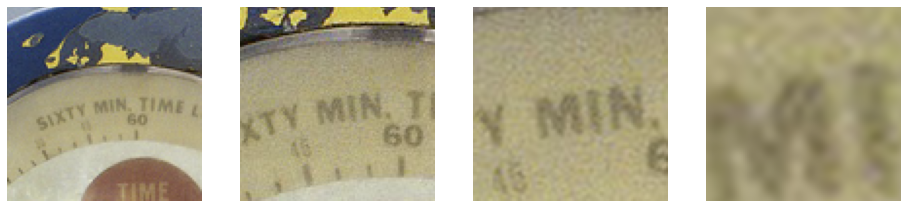
感兴趣区域 (RoI) 处理#
如果只需要缩放输入图像的一部分,可以使用 roi_start 和 roi_end 参数指定。如果指定了 roi_relative=True,则 RoI 可以以绝对(像素)坐标或相对坐标 (0..1) 指定。
[8]:
batch_size = 8

pipe = dali.pipeline.Pipeline(batch_size, 3, 0)
with pipe:
    files, labels = dali.fn.readers.caffe(
        path=db_folder, random_shuffle=True, seed=1234
    )
    images = dali.fn.decoders.image(files, device="mixed")

    cx = 270
    cy = 190
    out = [
        dali.fn.resize(
            images,
            interp_type=dali.types.INTERP_LANCZOS3,
            size=[100, 100],
            roi_start=[cy - r, cx - r],
            roi_end=[cy + r, cx + r],
        )
        for r in [100, 50, 30, 10]
    ]

    pipe.set_outputs(*out)

pipe.build()
pipe_out = pipe.run()

labels = [""] * 4
show_outputs(pipe_out, idx, labels, size=(16, 4), columns=4)
使用 RoI 进行翻转#
如果 roi_end[d] > roi_start[d],则图像在维度 d 中翻转。
超出范围和退化坐标#
超出范围的输入坐标将被钳制,导致重复边界像素。
如果 RoI 是退化的(具有零范围),则调整大小算子将沿退化轴广播在 RoI 坐标处采样的源图像。
[9]:
pipe = dali.pipeline.Pipeline(batch_size, 3, 0)
with pipe:
    files, labels = dali.fn.readers.caffe(
        path=db_folder, random_shuffle=True, seed=1234
    )
    images = dali.fn.decoders.image(files, device="mixed")

    width = 200
    height = 100

    out = [
        dali.fn.resize(
            images, size=[height, width], roi_start=[200, 0], roi_end=[0, 400]
        ),
        dali.fn.resize(
            images,
            size=[height, width],
            roi_start=[0, 0.5],
            roi_end=[0.5, 1.1],
            roi_relative=True,
        ),
        dali.fn.resize(
            images,
            size=[height, width],
            roi_start=[0.5, 0],
            roi_end=[0.5, 1],
            roi_relative=True,
        ),
    ]

    pipe.set_outputs(*out)

pipe.build()
pipe_out = pipe.run()

labels = [
    "Absolute RoI, flip Y",
    "Relative RoI, out of bounds",
    "Degenerate (single line)",
]
show_outputs(pipe_out, idx, labels, size=(16, 8), columns=3)

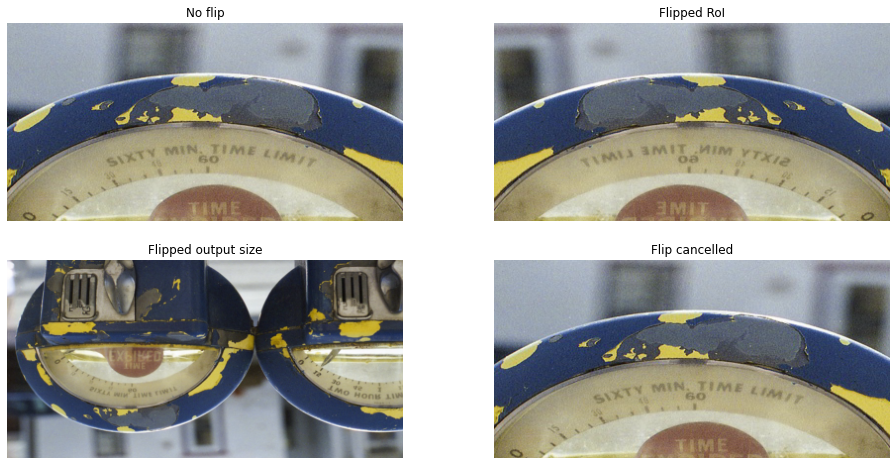
融合翻转#
调整大小算子可以通过两种方式之一翻转图像
使用
roi_start > roi_end指定 RoI指定负输出大小
如果 1 和 2 一致,则取消翻转。
[10]:
pipe = dali.pipeline.Pipeline(batch_size, 3, 0)
with pipe:
    files, labels = dali.fn.readers.caffe(
        path=db_folder, random_shuffle=True, seed=1234
    )
    images = dali.fn.decoders.image(files, device="mixed")

    width = 400
    height = 200

    out = [
        # Just resize the RoI, no flipping
        dali.fn.resize(
            images, size=[height, width], roi_start=[0, 100], roi_end=[300, 500]
        ),
        # Flip the RoI
        dali.fn.resize(
            images, size=[height, width], roi_start=[0, 500], roi_end=[300, 100]
        ),
        # Negative size also results in a flip
        dali.fn.resize(images, size=[-height, width]),
        # Flip cancelled by both negative size and flipped RoI
        dali.fn.resize(
            images,
            size=[height, -width],
            roi_start=[0, 500],
            roi_end=[300, 100],
        ),
    ]

    pipe.set_outputs(*out)

pipe.build()
pipe_out = pipe.run()

labels = ["No flip", "Flipped RoI", "Flipped output size", "Flip cancelled"]
show_outputs(pipe_out, idx, labels, size=(16, 8), columns=2)
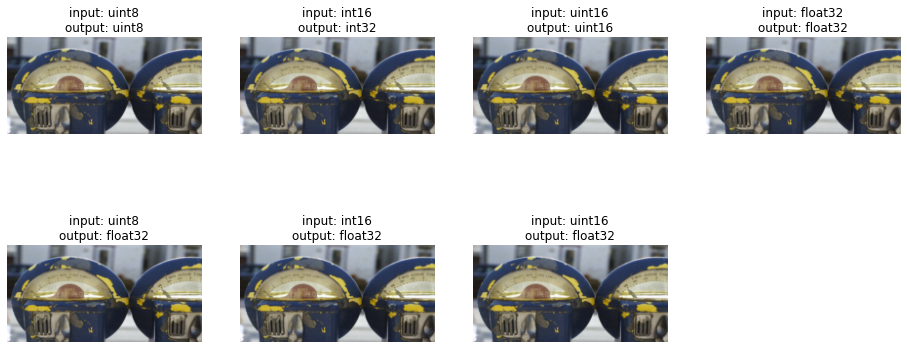
输入和输出类型#
调整大小算子可以处理以下类型的输入
uint8
int16
uint16
float 输出可以是 float 类型,与输入类型无关。
下面的示例演示了调整大小算子如何处理 INT16 的负值和 float 的扩展动态范围。
[11]:
batch_size = 8

pipe = dali.pipeline.Pipeline(batch_size, 3, 0)
with pipe:
    files, labels = dali.fn.readers.caffe(
        path=db_folder, random_shuffle=True, seed=1234
    )
    images = dali.fn.decoders.image(files, device="mixed")

    width = 200
    height = 100

    # make some pixels negative
    images_i16 = dali.fn.cast(images - 128, dtype=dali.types.INT16)
    images_u16 = dali.fn.cast(images, dtype=dali.types.UINT16)
    images_f32 = (
        images / 256.0
    )  # scale to 0..1 range, to demonstrate resizing with fractional intensities

    out = [
        dali.fn.resize(images, size=[height, width]),
        dali.fn.resize(images_i16, size=[height, width])
        + 128,  # back to positive values
        dali.fn.resize(images_u16, size=[height, width]),
        dali.fn.resize(images_f32, size=[height, width])
        * 256,  # scale back to 0..255 range for display
        dali.fn.resize(images, size=[height, width], dtype=dali.types.FLOAT),
        dali.fn.resize(images_i16, size=[height, width], dtype=dali.types.FLOAT)
        + 128,
        dali.fn.resize(
            images_u16, size=[height, width], dtype=dali.types.FLOAT
        ),
    ]

    pipe.set_outputs(*out)

pipe.build()
pipe_out = pipe.run()

labels = [
    "input: uint8",
    "input: int16",
    "input: uint16",
    "input: float32",
    "input: uint8",
    "input: int16",
    "input: uint16",
]
for i in range(len(pipe_out)):
    out_cpu = pipe_out[i].as_cpu()
    labels[i] += "\noutput: {}".format(out_cpu.at(idx).dtype)
show_outputs(pipe_out, idx, labels, size=(16, 7), columns=4)
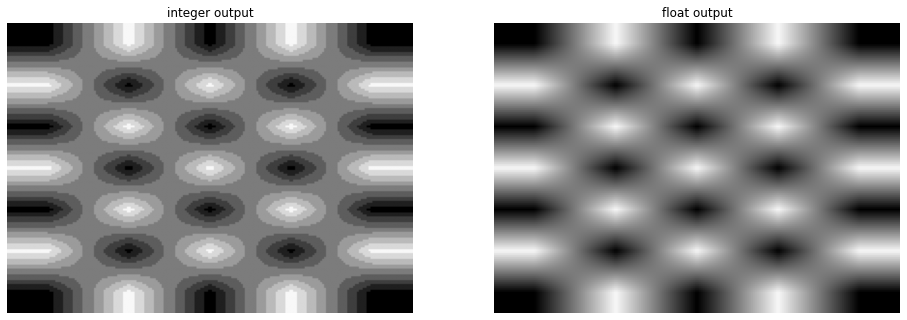
内部转换为 float#
当转换为 float 时,插值可能会导致输入类型中无法表示的小数值。下面的示例演示了使用双线性插值缩放棋盘格。对于整数输出,量化伪影清晰可见。
[12]:
batch_size = 1

checkerboard = (
    (
        np.array([[1, 0, 1, 0, 1]])
        ^ np.array([[1], [0], [1], [0], [1], [0], [1]])
    )
)[:, :, np.newaxis]
checkerboard = (checkerboard * np.array([[[8, 8, 8]]])).astype(np.uint8)


def get_batch():
    return [checkerboard] * batch_size


pipe = dali.pipeline.Pipeline(batch_size, 3, 0)
with pipe:
    images = dali.fn.external_source(get_batch, dtype=dali.types.UINT8)

    out = [
        dali.fn.resize(images, size=[150, 210]) * 31,
        dali.fn.resize(images, size=[150, 210], dtype=dali.types.FLOAT) * 31,
    ]
    pipe.set_outputs(*out)

pipe.build()
pipe_out = pipe.run()

labels = ["integer output", "float output"]
show_outputs(pipe_out, 0, labels, size=(16, 6), columns=2)
亚像素缩放#
如果输出大小不是整数 - 要么是因为它是这样指定的,要么是为了保持纵横比 - 有两种方法可以处理这种情况。默认情况下,使用亚像素缩放 - 即输出画布大小当然需要是整数,但输入 RoI 会进行调整以保持原始缩放因子。可以通过将 subpixel_scale 设置为 False 来禁用此功能,这将调整缩放因子以适应四舍五入的大小。这对于那些在亚像素级别保持纵横比至关重要的应用程序可能很重要。下面的示例通过缩放一个小的棋盘格图案来说明这种细微的差别。
[13]:
batch_size = 10

checkerboard = (
    (
        np.array([[1, 0, 1, 0, 1]])
        ^ np.array([[1], [0], [1], [0], [1], [0], [1]])
    )
    * 255
).astype(np.uint8)[:, :, np.newaxis]
checkerboard = checkerboard * np.array([[[1, 1, 1]]], dtype=np.uint8)


def get_batch():
    return [checkerboard] * batch_size


def get_widths():
    return (np.arange(batch_size) * 0.1 + checkerboard.shape[1]).astype(
        np.float32
    )


pipe = dali.pipeline.Pipeline(batch_size, 3, 0)
with pipe:
    images = dali.fn.external_source(get_batch, dtype=dali.types.UINT8)
    widths = dali.fn.external_source(get_widths, dtype=dali.types.FLOAT)

    out = [
        dali.fn.resize(images, resize_x=widths),
        dali.fn.resize(images, resize_x=widths, subpixel_scale=False),
    ]
    # pad the batch to uniform size, to avoid confusing additional scaling
    # by jupyter
    out = dali.fn.pad(out, fill_value=255)

    pipe.set_outputs(*out)

pipe.build()
pipe_out = pipe.run()

labels = ["width {:.1f}".format(w) for w in get_widths()]
show_batch(pipe_out[0], labels, size=(16, 10), columns=10)
show_batch(pipe_out[1], None, size=(16, 10), columns=10)


正如我们所见,在顶行中,启用亚像素缩放的图像逐渐变化。在底行中,后续量化输出大小之间存在硬过渡。