BrightnessContrast 示例#
此示例演示了 brightness_contrast 运算符的用法。
亮度和对比度调整#
可以使用三个参数调整亮度和对比度:contrast - 使暗部更暗,亮部更亮,同时保持灰色(在输入类型的半动态范围内)恒定,
brightness - 乘以强度,
brightness_shift - 移动像素强度。
公式如下:
\[Out = brightness\_shift \cdot {Max}_{out} + brighness \cdot ({contrast\_center} + {contrast} \cdot ({in} - {contrast\_center}))\]
其中 \({contrast\_center}\) 表示不受对比度变化影响的值;默认情况下,它位于输入动态范围的一半(例如,对于 uint8 为 128),\({Max}_{out}\) 是输出类型的最大正值(对于整数类型)或 1(对于浮点数)- 但也可以指定为运算符的参数。该运算符可用于调整对比度和亮度,以及计算负片(brightness = -1,brighness_shift = 1)。
分步指南#
让我们从导入必要的模块(以及 DALI 本身)开始。
[1]:
from nvidia.dali import pipeline_def
import nvidia.dali.fn as fn
import nvidia.dali.types as types
import matplotlib.pyplot as plt

batch_size = 10
image_filename = "../data/images"
batch_size 大于 1,以便在示例结尾处更轻松地切换图像。
接下来,让我们实现 pipeline。我们展示了 pipeline 的 2 个版本。CPU 版本在 CPU 上执行所有处理(即读取文件、解码文件和亮度/对比度操作),而另一个 pipeline 在 GPU 上执行这些操作。
[2]:
@pipeline_def()
def bc_cpu_pipeline():
    files, labels = fn.readers.file(file_root=image_filename)
    images = fn.decoders.image(files)
    converted = fn.brightness_contrast(
        images, brightness_shift=0.3, contrast=0.4, contrast_center=100
    )
    return images, converted


@pipeline_def()
def bc_gpu_pipeline():
    files, labels = fn.readers.file(file_root=image_filename)
    images = fn.decoders.image(files, device="mixed")
    converted = fn.brightness_contrast(
        # increase contrast  # invert...
        images,
        contrast=1.5,
        brightness_shift=1,
        brightness=-1,
    )  # ...colors
    return images, converted
以下函数用于实际显示操作结果。由于我们设置的 pipeline 返回 2 个输出:修改后的图像和原始图像,因此该函数从输出中获取它们并显示它们。指定了附加标志 (cpu),以确定 pipeline 输出是来自 CPU 还是 GPU。在后一种情况下,我们必须告诉输出返回数据的 CPU 可访问副本。
[3]:
def display(output, cpu=True):
    i = 2  # Tweak that to have various images from batch
    img1 = output[0].at(i) if cpu else output[0].as_cpu().at(i)
    img2 = output[1].at(i) if cpu else output[1].as_cpu().at(i)
    fig, ax = plt.subplots(1, 2)
    ax[0].imshow(img1)
    ax[1].imshow(img2);
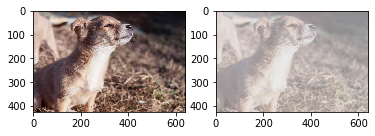
现在让我们构建 pipeline,运行它们并显示结果。首先是 GPU pipeline
[4]:
pipe_gpu = bc_gpu_pipeline(batch_size=batch_size, num_threads=1, device_id=0)
pipe_gpu.build()
[5]:
gpu_output = pipe_gpu.run()
[6]:
display(gpu_output, cpu=False)
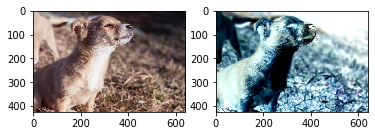
然后是 CPU pipeline
[7]:
pipe_cpu = bc_cpu_pipeline(batch_size=batch_size, num_threads=1, device_id=0)
pipe_cpu.build()
cpu_output = pipe_cpu.run()
[8]:
display(cpu_output)