WarpAffine#
在本笔记本中,您将学习如何使用 warp_affine 操作。
简介#
Warp 操作符#
所有 warp 操作符都通过在变换坐标处采样源图像来计算输出像素
这样,每个输出像素都只计算一次。
如果源坐标没有精确地指向像素中心,则相邻像素的值将被插值,或者采用最近的像素,这取决于 interp_type 参数中指定的插值方法。
仿射变换#
源样本坐标 \(x_{src}, y_{src}\) 根据以下公式计算
其中 \(x, y\) 是目标像素的坐标,矩阵表示逆(目标到源)仿射变换。\(\begin{vmatrix} m_{00} & m_{01} \\ m_{10} & m_{11} \end{vmatrix}\) 块表示组合的旋转/缩放/剪切变换,\(t_x, t_y\) 是平移向量。
使用示例#
首先,让我们导入必要的模块并定义数据集的位置。
DALI_EXTRA_PATH 环境变量应指向从 DALI extra repository 下载数据的位置。请确保已检出正确的发布标签。
[1]:
from nvidia.dali import pipeline_def
import nvidia.dali.fn as fn
import nvidia.dali.types as types
import numpy as np
import matplotlib.pyplot as plt
import math
import os.path

test_data_root = os.environ["DALI_EXTRA_PATH"]
db_folder = os.path.join(test_data_root, "db", "lmdb")
以下函数为一批图像定义仿射变换矩阵。每个图像都接收其自身的变换。变换矩阵应为形状为 \(batch\_size \times 2 \times 3\) 的张量列表
[2]:
def random_transform():
    dst_cx, dst_cy = (200, 200)
    src_cx, src_cy = (200, 200)

    # This function uses homogeneous coordinates - hence, 3x3 matrix

    # translate output coordinates to center defined by (dst_cx, dst_cy)
    t1 = np.array([[1, 0, -dst_cx], [0, 1, -dst_cy], [0, 0, 1]])

    def u():
        return np.random.uniform(-0.5, 0.5)

    # apply a randomized affine transform - uniform scaling + some random
    # distortion
    m = np.array([[1 + u(), u(), 0], [u(), 1 + u(), 0], [0, 0, 1]])

    # translate input coordinates to center (src_cx, src_cy)
    t2 = np.array([[1, 0, src_cx], [0, 1, src_cy], [0, 0, 1]])

    # combine the transforms
    m = np.matmul(t2, np.matmul(m, t1))

    # remove the last row; it's not used by affine transform
    return m[0:2, 0:3].astype(np.float32)


np.random.seed(seed=123)
现在,让我们定义 pipeline。它将对图像应用相同的变换,但选项略有不同。
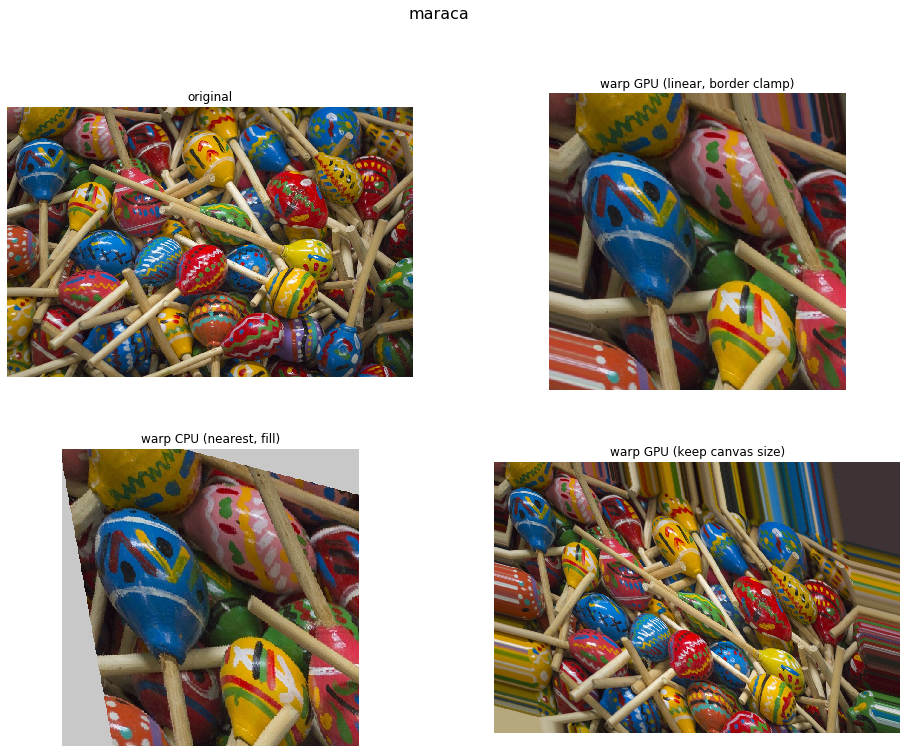
第一个变体在 GPU 上执行,并使用固定输出大小和线性插值。它没有指定任何填充值,在这种情况下,超出范围的目标坐标将被钳制到有效范围。
第二个变体在 CPU 上执行,并使用 fill_value 参数,该参数将超出范围的源像素替换为该值。
最后一个变体在 GPU 上执行,并且未指定新的 size,这将保持原始图像大小。
[3]:
@pipeline_def(seed=12)
def example_pipeline():
    # This example uses external_source to provide warp matrices
    transform = fn.external_source(
        batch=False, source=random_transform, dtype=types.FLOAT
    )

    # The reader reads raw files from some storage - in this case, a Caffe
    # LMDB container
    jpegs, labels = fn.readers.caffe(path=db_folder, random_shuffle=True)

    # The decoder takes tensors containing raw files and outputs images
    # as 3D tensors with HWC layout
    images = fn.decoders.image(jpegs)

    warped_gpu = fn.warp_affine(
        images.gpu(),
        transform.gpu(),  # pass the transform parameters through GPU memory
        size=(400, 400),  # specify the output size
        # fill_value,       # not specifying `fill_value`
        #  results in source coordinate clamping
        interp_type=types.INTERP_LINEAR,
    )  # use linear interpolation

    warped_cpu = fn.warp_affine(
        images,
        matrix=transform,  # pass the transform through a named input
        fill_value=200,
        size=(400, 400),  # specify the output size
        interp_type=types.INTERP_NN,
    )  # use nearest neighbor interpolation

    warped_keep_size = fn.warp_affine(
        images.gpu(),
        transform.gpu(),
        # size,        # keep the original canvas size
        interp_type=types.INTERP_LINEAR,
    )  # use linear interpolation
    return (
        labels,
        transform,
        images.gpu(),
        warped_gpu,
        warped_cpu.gpu(),
        warped_keep_size,
    )
处理 pipeline 现在已定义。为了运行它,我们需要实例化并构建它。
[4]:
batch_size = 32
pipe = example_pipeline(batch_size=batch_size, num_threads=2, device_id=0)
pipe.build()
最后,我们可以调用 pipeline 上的 run 来获取第一批预处理图像。
[5]:
pipe_out = pipe.run()
示例输出#
现在我们已经处理了第一批图像,让我们看看结果
[6]:
n = 0  # change this value to see other images from the batch;
# it must be in 0..batch_size-1 range

from synsets import imagenet_synsets
import matplotlib.gridspec as gridspec

len_outputs = len(pipe_out) - 2

captions = [
    "original",
    "warp GPU (linear, border clamp)",
    "warp CPU (nearest, fill)",
    "warp GPU (keep canvas size)",
]

fig = plt.figure(figsize=(16, 12))
plt.suptitle(imagenet_synsets[pipe_out[0].at(n)[0]], fontsize=16)
columns = 2
rows = int(math.ceil(len_outputs / columns))
gs = gridspec.GridSpec(rows, columns)

print("Affine transform matrix:")
print(pipe_out[1].at(n))

for i in range(len_outputs):
    plt.subplot(gs[i])
    plt.axis("off")
    plt.title(captions[i])
    pipe_out_cpu = pipe_out[2 + i].as_cpu()
    img_chw = pipe_out_cpu.at(n)
    plt.imshow((img_chw) / 255.0)
Affine transform matrix:
[[ 1.1964692  -0.21386066  3.4782958 ]
 [-0.27314854  1.0513147  44.366756  ]]