使用 Tensorflow DALI 插件:简单示例#
概述#
将我们的 DALI 数据加载和增强 pipeline 与 Tensorflow 结合使用非常简单。
我们可以将集成总结为 3 个步骤
定义 DALI Pipeline
将 pipeline 提供给
DALIIteratorop在 TensorFlow 图中实例化 op 并使用它
定义数据加载 Pipeline#
首先,我们从定义 DALI 和 Tensorflow 的一些参数开始。
在本教程中,我们将使用存储在 MXNet 的 RecordIO 中的 Imagenet 子样本。有关如何使用 readers.mxnet 以及其他读取器的详细信息,请参阅其他 示例。
DALI_EXTRA_PATH 环境变量应指向从 DALI extra repository 下载数据的位置。请确保检出正确的发布标签。
[1]:
import os.path

test_data_root = os.environ["DALI_EXTRA_PATH"]

# MXNet RecordIO
base = os.path.join(test_data_root, "db", "recordio")

idx_files = [base + "/train.idx"]
rec_files = [base + "/train.rec"]

BATCH_SIZE = 32
ITERATIONS = 32
BURNIN_STEPS = 16
为了使用 DALI,我们需要这 3 个导入
[2]:
from nvidia.dali import pipeline_def, Pipeline
import nvidia.dali.fn as fn
import nvidia.dali.types as types
然后我们可以通过将 rn50_pipeline 声明为 dali.pipeline.Pipeline 的子类来定义我们的 pipeline。我们在构造函数中声明 pipeline 将需要的操作符。然后在 define_graph 中定义图。
这是通常的 DALI Pipeline 创建。有关 DALI Pipeline 的更多信息,请查看 入门 notebook。
再次注意,我们正在使用 readers.mxnet,它读取 MXNet 的数据集格式 RecordIO。您可以将其更改为其他读取器操作符以使用任何受支持的数据集格式。
[3]:
@pipeline_def(batch_size=BATCH_SIZE, num_threads=4)
def rn50_pipeline(device):
    jpegs, labels = fn.readers.mxnet(
        path=rec_files, index_path=idx_files, name="Reader"
    )
    images = fn.decoders.image(
        jpegs, device="mixed" if device == "gpu" else "cpu"
    )
    images = fn.resize(
        images,
        resize_shorter=fn.random.uniform(range=(256.0, 480.0)),
        interp_type=types.INTERP_LINEAR,
    )
    images = fn.crop_mirror_normalize(
        images,
        crop_pos_x=fn.random.uniform(range=(0.0, 1.0)),
        crop_pos_y=fn.random.uniform(range=(0.0, 1.0)),
        dtype=types.FLOAT,
        crop=(224, 224),
        mean=[128.0, 128.0, 128.0],
        std=[1.0, 1.0, 1.0],
    )
    images = fn.cast(images, dtype=types.INT32)

    if device == "gpu":
        labels = labels.gpu()

    return images, labels
接下来,我们使用正确的参数实例化 pipeline。我们将为每个 GPU 创建一个 pipeline,方法是为每个 pipeline 指定正确的 device_id。
不同之处在于,我们将 pipeline 对象传递给 TensorFlow 操作符,而不是调用 pipeline.build 并使用它。
[4]:
pipe = rn50_pipeline(device_id=0, device="gpu")
使用 DALI TensorFlow 插件#
首先,我们导入 Tensorflow 和 DALI Tensorflow 插件作为 dali_tf。
[5]:
import tensorflow as tf
import nvidia.dali.plugin.tf as dali_tf
import time

from tensorflow.compat.v1 import GPUOptions
from tensorflow.compat.v1 import ConfigProto
from tensorflow.compat.v1 import Session
from tensorflow.compat.v1 import placeholder

tf.compat.v1.disable_eager_execution()
我们现在可以使用 nvidia.dali.plugin.tf.DALIIterator() 方法来获取 TensorFlow Op,它将生成我们将在 TensorFlow 图中使用的张量。
对于每个 DALI pipeline,我们使用 daliop,它返回一个 TensorFlow 张量元组,我们将存储在 image, label 中。每个都使用不同的 tf.device。
[6]:
daliop = dali_tf.DALIIterator()

images = []
labels = []
with tf.device("/gpu:0"):
    image, label = daliop(
        pipeline=pipe,
        shapes=[(BATCH_SIZE, 3, 224, 224), ()],
        dtypes=[tf.int32, tf.float32],
    )

    images.append(image)
    labels.append(label)
在简单 Tensorflow 图中使用张量#
我们将在 TensorFlow 图定义中使用 images 和 labels 张量列表。然后运行一个非常简单的单操作图会话,它将输出一批图像和标签。
[7]:
gpu_options = GPUOptions(per_process_gpu_memory_fraction=0.8)
config = ConfigProto(gpu_options=gpu_options)

with Session(config=config) as sess:
    all_img_per_sec = []
    total_batch_size = BATCH_SIZE

    for i in range(ITERATIONS):
        start_time = time.time()

        # The actual run with our dali_tf tensors
        res = sess.run([images, labels])

        elapsed_time = time.time() - start_time
        img_per_sec = total_batch_size / elapsed_time
        if i > BURNIN_STEPS:
            all_img_per_sec.append(img_per_sec)
            print("\t%7.1f img/s" % img_per_sec)

    print(
        "Total average %7.1f img/s"
        % (sum(all_img_per_sec) / len(all_img_per_sec))
    )
         1807.8 img/s
         1776.1 img/s
         1926.8 img/s
         1844.0 img/s
         1787.0 img/s
         1932.2 img/s
         1792.4 img/s
         1724.5 img/s
         1436.6 img/s
         1724.1 img/s
         1711.2 img/s
         1662.4 img/s
         1694.4 img/s
         1382.5 img/s
         1423.9 img/s
Total average  1708.4 img/s
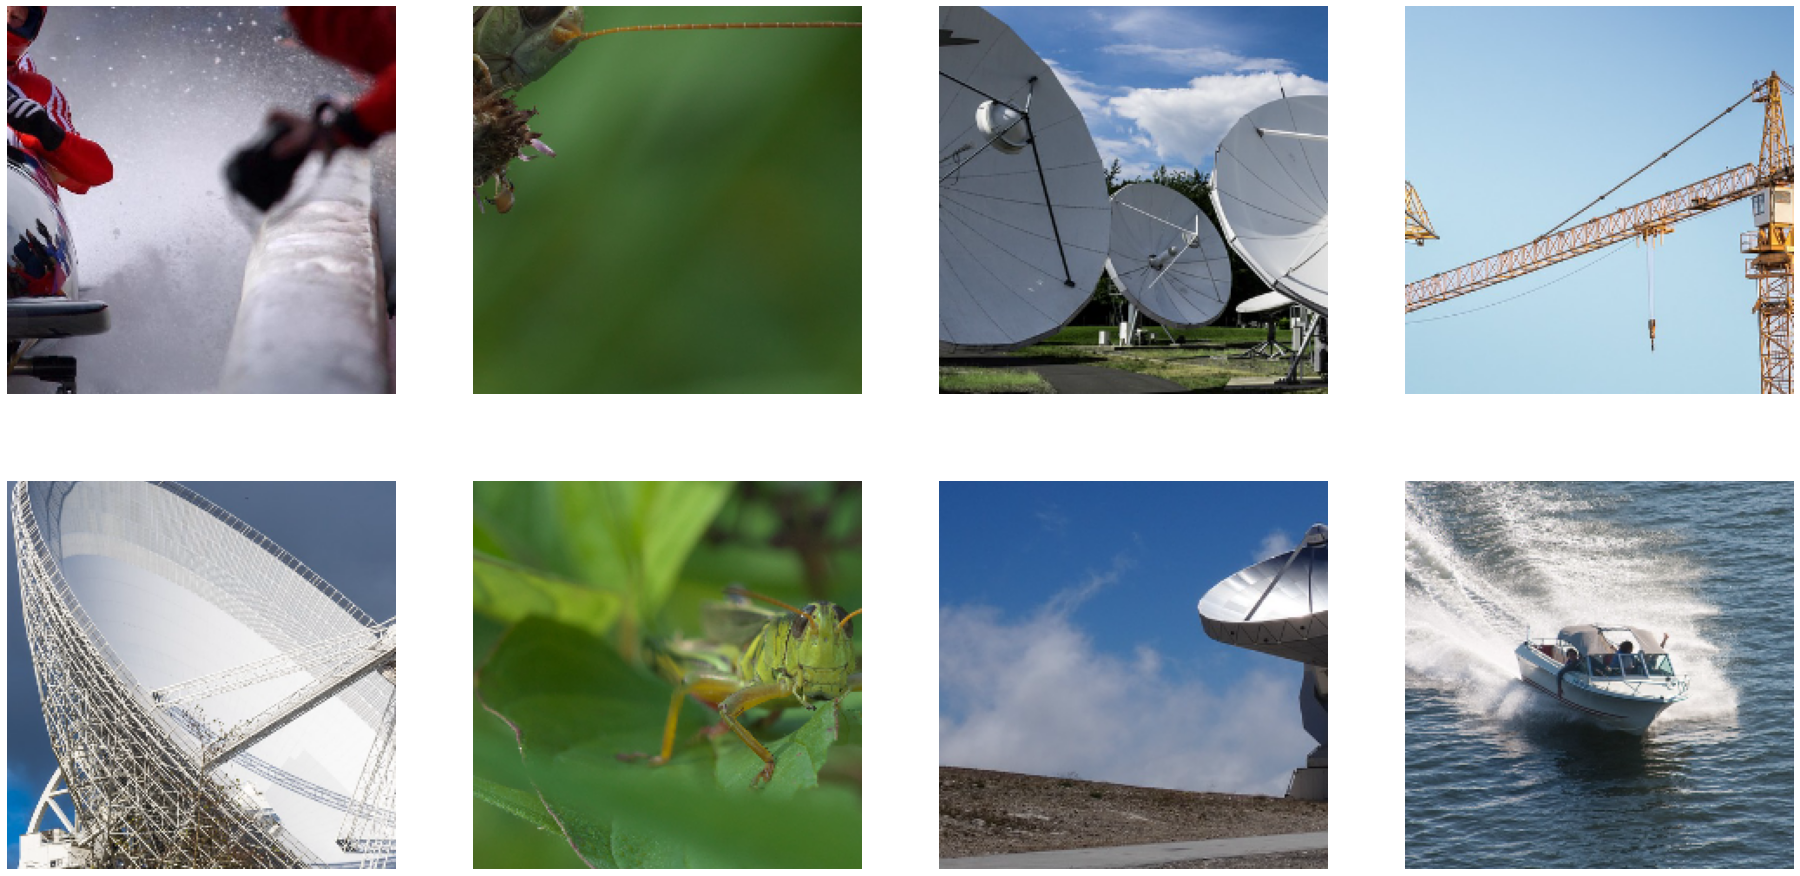
让我们检查一下输出图像及其增强效果!Tensorflow 输出 numpy 数组,因此我们可以使用 matplotlib 轻松地可视化它们。
我们定义一个 show_images 辅助函数,它将显示我们批次的样本。
批次布局是 NCHW,因此我们使用转置来获取 HWC 图像,matplotlib 可以显示这些图像。
[8]:
import matplotlib.gridspec as gridspec
import matplotlib.pyplot as plt

%matplotlib inline


def show_images(image_batch, nb_images):
    columns = 4
    rows = (nb_images + 1) // (columns)
    fig = plt.figure(figsize=(32, (32 // columns) * rows))
    gs = gridspec.GridSpec(rows, columns)
    for j in range(nb_images):
        plt.subplot(gs[j])
        plt.axis("off")
        img = image_batch[0][j].transpose((1, 2, 0)) + 128
        plt.imshow(img.astype("uint8"))


show_images(res[0], 8)
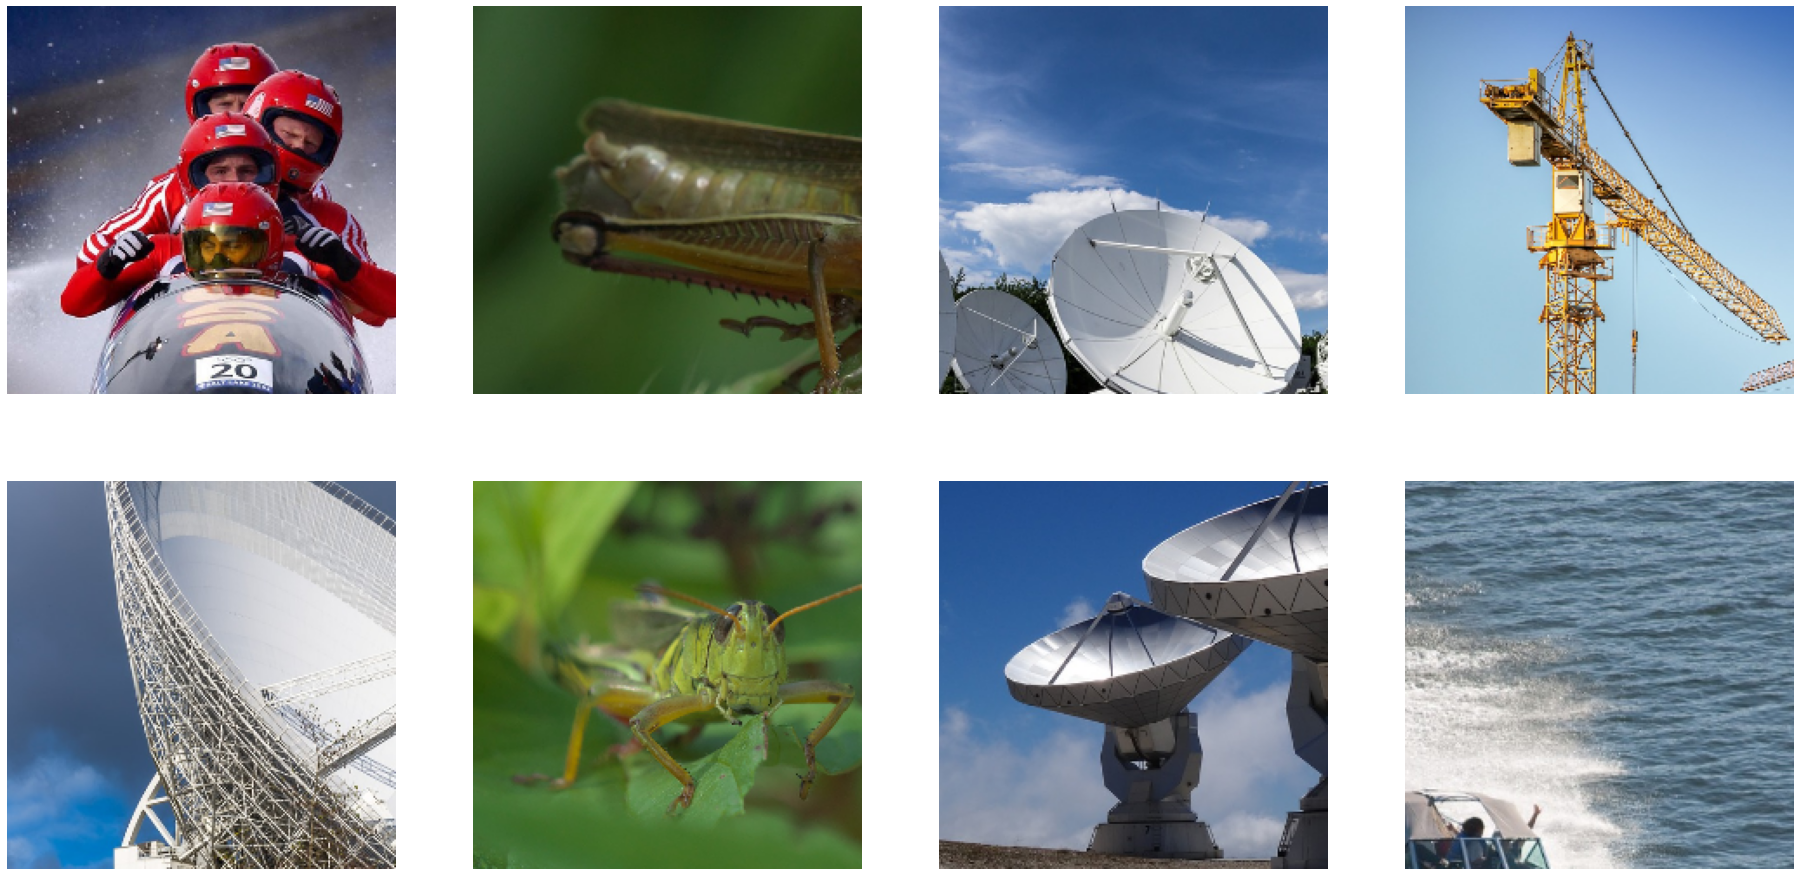
让我们为 CPU 创建相同的操作符
[9]:
cpu_pipe = rn50_pipeline(device="cpu", device_id=0)

daliop = dali_tf.DALIIterator()

images_cpu = []
labels_cpu = []
with tf.device("/cpu"):
    image_cpu, label_cpu = daliop(
        pipeline=cpu_pipe,
        shapes=[(BATCH_SIZE, 3, 224, 224), ()],
        dtypes=[tf.int32, tf.float32],
    )

    images_cpu.append(image_cpu)
    labels_cpu.append(label_cpu)

with Session() as sess:
    all_img_per_sec = []
    total_batch_size = BATCH_SIZE

    for i in range(ITERATIONS):
        start_time = time.time()

        # The actual run with our dali_tf tensors
        res_cpu = sess.run([images_cpu, labels_cpu])

        elapsed_time = time.time() - start_time
        img_per_sec = total_batch_size / elapsed_time
        if i > BURNIN_STEPS:
            all_img_per_sec.append(img_per_sec)
            print("\t%7.1f img/s" % img_per_sec)

    print(
        "Total average %7.1f img/s"
        % (sum(all_img_per_sec) / len(all_img_per_sec))
    )
show_images(res_cpu[0], 8)
          467.6 img/s
          445.4 img/s
          498.5 img/s
          436.1 img/s
          431.3 img/s
          478.7 img/s
          354.2 img/s
          417.8 img/s
          459.0 img/s
          685.4 img/s
          436.5 img/s
          465.8 img/s
          483.0 img/s
          434.8 img/s
          460.5 img/s
Total average   463.6 img/s
[ ]: