Python 运算符#
此示例向您展示了如何通过使用 DALI python_function 运算符系列来运行自定义 Python 代码,以原型化新的增强或调试 pipeline。这些运算符背后的想法是帮助您在 pipeline 执行中执行对 DALI 张量数据进行操作的 Python 代码。
定义操作#
我们将首先使用的运算符是 python_function,它包装了一个常规 Python 函数并在 DALI Pipeline 中运行它。
我们将此函数定义为一个示例,并将其称为 edit_images。
[1]:
from nvidia.dali.pipeline import pipeline_def
import nvidia.dali.fn as fn
import nvidia.dali.types as types
import numpy as np
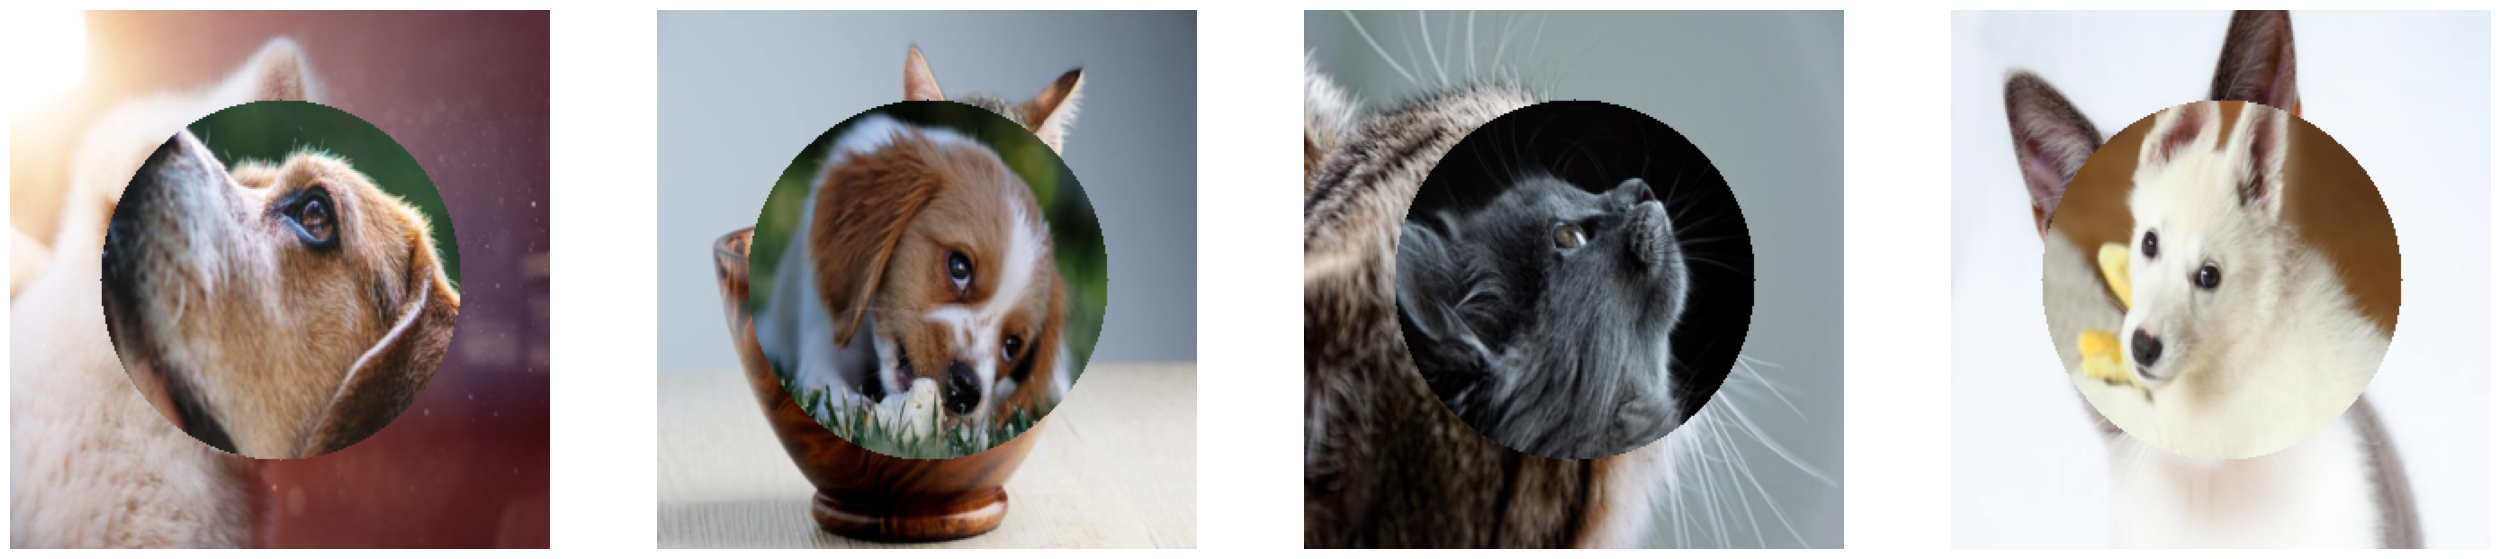
def edit_images(image1, image2):
assert image1.shape == image2.shape
h, w, c = image1.shape
y, x = np.ogrid[0:h, 0:w]
mask = (x - w / 2) ** 2 + (y - h / 2) ** 2 > h * w / 9
result1 = np.copy(image1)
result1[mask] = image2[mask]
result2 = np.copy(image2)
result2[mask] = image1[mask]
return result1, result2
在本例中,它接受两个数组作为输入并返回两个输出。
该代码创建了一个圆形蒙版,并使用它来交换两个输入之间的圆形部分。
python_function 使用 NumPy 数组作为 CPU 的数据格式,以及 CuPy 数组作为 GPU 的数据格式。
注意: 两个输入图像都被复制,因为输入数据不应被修改。
警告
当 pipeline 启用了条件执行时,必须采取额外的步骤来防止 function 被 AutoGraph 重写。有两种方法可以实现这一点
在全局范围内定义函数(即在
pipeline_def范围之外)。如果函数是另一个“工厂”函数的结果,则工厂函数必须具有
nvidia.dali.pipeline.do_not_convert属性。
更多详细信息可以在 nvidia.dali.pipeline.do_not_convert 文档中找到。
定义 Pipeline#
为了查看运算符的实际效果,我们实现一个简单的数据 pipeline
加载、解码并将图像调整为通用大小。
通过将
edit_images作为function参数传递给dali.fn.python_function来包装它。除了函数之外,我们还传递输出的数量作为参数。
我们像调用任何其他 DALI 运算符一样调用
python_function- 输入将传递给edit_images进行处理。
[2]:
image_dir = "../data/images"
batch_size = 4


@pipeline_def(batch_size=batch_size, num_threads=4, device_id=0, seed=99)
def pipeline_fn():
    input1, _ = fn.readers.file(file_root=image_dir, random_shuffle=True)
    input2, _ = fn.readers.file(file_root=image_dir, random_shuffle=True)
    im1, im2 = fn.decoders.image(
        [input1, input2], device="cpu", output_type=types.RGB
    )
    res1, res2 = fn.resize([im1, im2], resize_x=300, resize_y=300)
    out1, out2 = fn.python_function(
        res1, res2, function=edit_images, num_outputs=2
    )

    return out1, out2
运行 Pipeline 并可视化结果#
要查看结果,请运行 pipeline。
[3]:
import matplotlib.pyplot as plt
import matplotlib.gridspec as gridspec

%matplotlib inline


def show_images(image_batch):
    columns = 4
    rows = (batch_size + 1) // columns
    fig = plt.figure(figsize=(32, (32 // columns) * rows))
    gs = gridspec.GridSpec(rows, columns)
    for j in range(rows * columns):
        plt.subplot(gs[j])
        plt.axis("off")
        plt.imshow(image_batch.at(j))


pipe = pipeline_fn()
pipe.build()
ims1, ims2 = pipe.run()

show_images(ims1)
show_images(ims2)

各种 Python 运算符#
在 DALI 中,python_function 有不同的变体。基本思想保持不变,但实现操作的数据格式在以下方面有所不同
python_function- 处理数组。torch_python_function- 处理 PyTorch 张量。dl_tensor_python_function- 处理 DLPack 张量。
最通用的运算符是 dl_tensor_python_function。DLPack 是张量存储的开放标准,许多框架和库都实现了与 DLPack 张量之间的转换方法。它在内部用于实现所有其他类型的 Python 运算符。
TorchPythonFunction 和 DLTensorPythonFunction#
该示例提供了有关在 DALI pipeline 中使用 PyTorch 函数的信息。使用这些函数的理想方法是使用 torch_python_function 运算符,但我们也将使用 dl_tensor_python_function 来展示如何使用 DLPack 张量。
我们在 perspective 函数中使用 torchvision RandomPerspective 变换,我们将其包装在 torch_python_function 中。
dlpack_manipulation 函数向您展示了如何处理 DLPack 数据
输入批次转换为 PyTorch 张量列表。
转换后的输入被处理。
输出被转换回 DLPack 张量。
每个 Python 运算符都有 batch_processing 参数。此参数确定实现函数是将整个批次作为张量列表获取,还是将按每个样本调用。由于历史原因,对于 dl_tensor_python_function,此参数默认设置为 True。我们可以查看 dlpack_manipulation 以了解如何使用这种输入。
[4]:
import nvidia.dali.plugin.pytorch as dalitorch
import torch
import torch.utils.dlpack as torch_dlpack
import torchvision.transforms as transforms

transform = transforms.Compose(
    [
        transforms.ToPILImage(),
        transforms.RandomPerspective(p=1.0),
        transforms.ToTensor(),
    ]
)


def perspective_fn(t):
    return transform(t).transpose(2, 0).transpose(0, 1)


def dlpack_manipulation(dlpacks):
    tensors = [torch_dlpack.from_dlpack(dlpack) for dlpack in dlpacks]
    output = [(tensor.to(torch.float32) / 255.0).sqrt() for tensor in tensors]
    output.reverse()
    return [torch_dlpack.to_dlpack(tensor) for tensor in output]


@pipeline_def(batch_size=batch_size, num_threads=4, device_id=0, seed=99)
def torch_pipeline_fn():
    input, _ = fn.readers.file(file_root=image_dir, random_shuffle=True)
    im = fn.decoders.image(input, device="cpu", output_type=types.RGB)
    res = fn.resize(im, resize_x=300, resize_y=300)
    norm = fn.crop_mirror_normalize(res, std=255.0, mean=0.0)
    perspective = dalitorch.fn.torch_python_function(
        norm, function=perspective_fn
    )
    sqrt_color = fn.dl_tensor_python_function(res, function=dlpack_manipulation)

    return perspective, sqrt_color
[5]:
torch_pipe = torch_pipeline_fn()
torch_pipe.build()

x, y = torch_pipe.run()
show_images(x)
show_images(y)