重要提示
您正在查看 NeMo 2.0 文档。此版本引入了 API 的重大更改和一个新的库 NeMo Run。我们目前正在将 NeMo 1.0 的所有功能移植到 2.0。有关先前版本或 2.0 中尚不可用的功能的文档,请参阅NeMo 24.07 文档。
MCV 示例#
使用 Mozilla Common Voice 数据集的卢旺达语 ASR#
在此示例中,我们描述了为新语言(卢旺达语)训练 ASR 模型的基本步骤。即,
数据预处理
构建分词器
Tarred 数据集和分桶
从头开始训练和微调
推理和评估
卢旺达语语音数据集#
我们使用 Mozilla Common Voice 卢旺达语数据集,这是一个包含 2000 多个小时音频数据的大型数据集。
注意:您应该自行下载此数据集。
Mozilla 以 tsv+mp3 格式分发数据集。下载并解压后,数据集具有以下结构
├── cv-corpus-9.0-2022-04-27
│   └── rw
│       ├── clips [here are all audio files, e.g. common_voice_rw_26260276.mp3]
│       ├── dev.tsv
│       ├── invalidated.tsv
│       ├── other.tsv
│       ├── reported.tsv
│       ├── test.tsv
│       ├── train.tsv
│       └── validated.tsv
Mozilla 提供了数据的 train/dev/test 分割,因此我们可以直接使用它。让我们看看 .tsv 文件的格式
head train.tsv
client_id       path    sentence        up_votes        down_votes      age     gender  accents locale  segment
e2a04c0ecacf81302f4270a3dddaa7a131420f6b7319208473af17d4adf3724ad9a3b6cdee107e2f321495db86f114a50c396e0928464a58dfad472130e7514a        common_voice_rw_26273273.mp3    kandi tuguwe neza kugira ngo twakire amagambo y’ukuri,  2       0       twenties    male             rw
e2a04c0ecacf81302f4270a3dddaa7a131420f6b7319208473af17d4adf3724ad9a3b6cdee107e2f321495db86f114a50c396e0928464a58dfad472130e7514a        common_voice_rw_26273478.mp3    Simbi na we akajya kwiga nubwo byari bigoye     2       0       twenties        male        rw
e2a04c0ecacf81302f4270a3dddaa7a131420f6b7319208473af17d4adf3724ad9a3b6cdee107e2f321495db86f114a50c396e0928464a58dfad472130e7514a        common_voice_rw_26273483.mp3    Inshuti yanjye yaje kunsura ku biro byanjye.    2       0       twenties        male        rw
e2a04c0ecacf81302f4270a3dddaa7a131420f6b7319208473af17d4adf3724ad9a3b6cdee107e2f321495db86f114a50c396e0928464a58dfad472130e7514a        common_voice_rw_26273488.mp3    Grand Canyon ni ahantu hazwi cyane ba mukerarugendo.    2       0       twenties    male             rw
每行对应一个记录(通常是一个句子),并包含
音频文件名
相应的转录
元信息:client_id、年龄、性别等。
重采样和创建清单#
为了能够将数据集与 NeMo 工具包一起使用,我们首先需要
将 .tsv 文件转换为 .json 清单
将 .mp3 文件转换为采样率为 16000 的 .wav 文件
为了将 .tsv 文件转换为 .json 清单,我们使用了以下脚本
python tsv_to_json.py \
  --tsv=cv-corpus-9.0-2022-04-27/rw/train.tsv \
  --folder=cv-corpus-9.0-2022-04-27/rw/clips \
  --sampling_count=-1
tsv_to_json.py:
import pandas as pd
import json
import tqdm
import argparse

parser = argparse.ArgumentParser("MCV TSV-to-JSON converter")
parser.add_argument("--tsv", required=True, type=str, help="Input TSV file")
parser.add_argument("--sampling_count", required=True, type=int, help="Number of examples, you want, use -1 for all examples")
parser.add_argument("--folder", required=True, type=str, help="Relative path to folder with audio files")
args = parser.parse_args()

df = pd.read_csv(args.tsv, sep='\t')
with open(args.tsv.replace('.tsv', '.json'), 'w') as fo:
    mod = 1
    if args.sampling_count > 0:
        mod = len(df) // args.sampling_count
    for idx in tqdm.tqdm(range(len(df))):
        if idx % mod != 0:
            continue
        item = {
            'audio_filepath': args.folder + "/" + df['path'][idx],
            'text': df['sentence'][idx],
            'up_votes': int(df['up_votes'][idx]), 'down_votes': int(df['down_votes'][idx]),
            'age': df['age'][idx], 'gender': df['gender'][idx], 'accents': df['accents'][idx],
            'client_id': df['client_id'][idx]
        }
        fo.write(json.dumps(item) + "\n")
此脚本将在初始 train.tsv 附近创建一个对应的 train.json 清单。它看起来像这样
{"audio_filepath": "cv-corpus-9.0-2022-04-27/rw/clips/common_voice_rw_26273273.mp3", "text": "kandi tuguwe neza kugira ngo twakire amagambo y\u2019ukuri,", "up_votes": 2, "down_votes": 0, "age": "twenties", "gender": "male", "accents": NaN, "client_id": "e2a04c0ecacf81302f4270a3dddaa7a131420f6b7319208473af17d4adf3724ad9a3b6cdee107e2f321495db86f114a50c396e0928464a58dfad472130e7514a"}
{"audio_filepath": "cv-corpus-9.0-2022-04-27/rw/clips/common_voice_rw_26273478.mp3", "text": "Simbi na we akajya kwiga nubwo byari bigoye", "up_votes": 2, "down_votes": 0, "age": "twenties", "gender": "male", "accents": NaN, "client_id": "e2a04c0ecacf81302f4270a3dddaa7a131420f6b7319208473af17d4adf3724ad9a3b6cdee107e2f321495db86f114a50c396e0928464a58dfad472130e7514a"}
{"audio_filepath": "cv-corpus-9.0-2022-04-27/rw/clips/common_voice_rw_26273483.mp3", "text": "Inshuti yanjye yaje kunsura ku biro byanjye.", "up_votes": 2, "down_votes": 0, "age": "twenties", "gender": "male", "accents": NaN, "client_id": "e2a04c0ecacf81302f4270a3dddaa7a131420f6b7319208473af17d4adf3724ad9a3b6cdee107e2f321495db86f114a50c396e0928464a58dfad472130e7514a"}
{"audio_filepath": "cv-corpus-9.0-2022-04-27/rw/clips/common_voice_rw_26273488.mp3", "text": "Grand Canyon ni ahantu hazwi cyane ba mukerarugendo.", "up_votes": 2, "down_votes": 0, "age": "twenties", "gender": "male", "accents": NaN, "client_id": "e2a04c0ecacf81302f4270a3dddaa7a131420f6b7319208473af17d4adf3724ad9a3b6cdee107e2f321495db86f114a50c396e0928464a58dfad472130e7514a"}
对于重采样,我们使用了以下脚本
mkdir train
python ../decode_resample.py \
  --manifest=cv-corpus-9.0-2022-04-27/rw/train.json \
  --destination_folder=./train
decode_resample.py:
import argparse
import os
import json

import sox
from sox import Transformer
import tqdm
import multiprocessing
from tqdm.contrib.concurrent import process_map


parser = argparse.ArgumentParser()
parser.add_argument('--manifest', required=True, type=str, help='path to the original manifest')
parser.add_argument("--num_workers", default=multiprocessing.cpu_count(), type=int, help="Workers to process dataset.")
parser.add_argument("--destination_folder", required=True, type=str, help="Destination folder where audio files will be stored")
args = parser.parse_args()


def process(x):
    if not isinstance(x['text'], str):
        x['text'] = ''
    else:
        x['text'] = x['text'].lower().strip()
    _, file_with_ext = os.path.split(x['audio_filepath'])
    name, ext = os.path.splitext(file_with_ext)
    output_wav_path = args.destination_folder + "/" + name + '.wav'
    if not os.path.exists(output_wav_path):
        tfm = Transformer()
        tfm.rate(samplerate=16000)
        tfm.channels(n_channels=1)
        tfm.build(input_filepath=x['audio_filepath'],
                  output_filepath=output_wav_path)
    x['duration'] = sox.file_info.duration(output_wav_path)
    x['audio_filepath'] = output_wav_path
    return x


def load_data(manifest):
    data = []
    with open(manifest, 'r') as f:
        for line in tqdm.tqdm(f):
            item = json.loads(line)
            data.append(item)
    return data


data = load_data(args.manifest)

data_new = process_map(process, data, max_workers=args.num_workers, chunksize=100)

with open(args.manifest.replace('.json', '_decoded.json'), 'w') as f:
    for item in tqdm.tqdm(data_new):
        f.write(json.dumps(item) + '\n')
它会将重采样的 .wav 文件写入指定的目录,并保存一个新的 json 清单,其中包含更正的音频路径。
注意: 您需要对 test.tsv 和 dev.tsv 也重复这些步骤。
数据预处理#
在我们开始使用上述清单文件训练模型之前,我们需要预处理文本数据。进行数据预处理是为了减少转录中的歧义。这是一个必要的步骤,通常需要对该语言有一定的专业知识。
我们使用了以下脚本 prepare_dataset_kinyarwanda.py
import json
import os
import re
from collections import defaultdict
from nemo.collections.asr.parts.utils.manifest_utils import read_manifest, write_manifest
from tqdm.auto import tqdm

def write_processed_manifest(data, original_path):
    original_manifest_name = os.path.basename(original_path)
    new_manifest_name = original_manifest_name.replace(".json", "_processed.json")

    manifest_dir = os.path.split(original_path)[0]
    filepath = os.path.join(manifest_dir, new_manifest_name)
    write_manifest(filepath, data)
    print(f"Finished writing manifest: {filepath}")
    return filepath


# calculate the character set
def get_charset(manifest_data):
    charset = defaultdict(int)
    for row in tqdm(manifest_data, desc="Computing character set"):
        text = row['text']
        for character in text:
            charset[character] += 1
    return charset


# Preprocessing steps
def remove_special_characters(data):
    chars_to_ignore_regex = "[\.\,\?\:\-!;()«»…\]\[/\*–‽+&_\\½√>€™$•¼}{~—=“\"”″‟„]"
    apostrophes_regex = "[’'‘`ʽ']"
    data["text"] = re.sub(chars_to_ignore_regex, " ", data["text"])  # replace punctuation by space
    data["text"] = re.sub(apostrophes_regex, "'", data["text"])  # replace different apostrophes by one
    data["text"] = re.sub(r"'+", "'", data["text"])  # merge multiple apostrophes

    # remove spaces where apostrophe marks a deleted vowel
    # this rule is taken from https://hugging-face.cn/lucio/wav2vec2-large-xlsr-kinyarwanda-apostrophied
    data["text"] = re.sub(r"([b-df-hj-np-tv-z])' ([aeiou])", r"\1'\2", data["text"])

    data["text"] = re.sub(r" '", " ", data["text"])  # delete apostrophes at the beginning of word
    data["text"] = re.sub(r"' ", " ", data["text"])  # delete apostrophes at the end of word
    data["text"] = re.sub(r" +", " ", data["text"])  # merge multiple spaces
    return data


def replace_diacritics(data):
    data["text"] = re.sub(r"[éèëēê]", "e", data["text"])
    data["text"] = re.sub(r"[ãâāá]", "a", data["text"])
    data["text"] = re.sub(r"[úūü]", "u", data["text"])
    data["text"] = re.sub(r"[ôōó]", "o", data["text"])
    data["text"] = re.sub(r"[ćç]", "c", data["text"])
    data["text"] = re.sub(r"[ïī]", "i", data["text"])
    data["text"] = re.sub(r"[ñ]", "n", data["text"])
    return data


def remove_oov_characters(data):
    oov_regex = "[^ 'aiuenrbomkygwthszdcjfvplxq]"
    data["text"] = re.sub(oov_regex, "", data["text"])  # delete oov characters
    data["text"] = data["text"].strip()
    return data


# Processing pipeline
def apply_preprocessors(manifest, preprocessors):
    for processor in preprocessors:
        for idx in tqdm(range(len(manifest)), desc=f"Applying {processor.__name__}"):
            manifest[idx] = processor(manifest[idx])

    print("Finished processing manifest !")
    return manifest


# List of pre-processing functions
PREPROCESSORS = [
    remove_special_characters,
    replace_diacritics,
    remove_oov_characters,
]

train_manifest = "train_decoded.json"
dev_manifest = "dev_decoded.json"
test_manifest = "test_decoded.json"

train_data = read_manifest(train_manifest)
dev_data = read_manifest(dev_manifest)
test_data = read_manifest(test_manifest)

# Apply preprocessing
train_data_processed = apply_preprocessors(train_data, PREPROCESSORS)
dev_data_processed = apply_preprocessors(dev_data, PREPROCESSORS)
test_data_processed = apply_preprocessors(test_data, PREPROCESSORS)

# Write new manifests
train_manifest_cleaned = write_processed_manifest(train_data_processed, train_manifest)
dev_manifest_cleaned = write_processed_manifest(dev_data_processed, dev_manifest)
test_manifest_cleaned = write_processed_manifest(test_data_processed, test_manifest)
它执行以下操作
删除除撇号外的所有标点符号
用一个替换不同种类的撇号
小写
用变音符号替换稀有字符(例如 [éèëēê] => e)
删除所有剩余的词汇表外 (OOV) 字符
所有转录中的最终卢旺达语字母表由拉丁字母、空格和撇号组成。
构建分词器#
虽然可以训练基于字符的 ASR 模型,但通常如果我们预测更长的单元,我们会获得一些质量和速度的提升。常用的分词算法称为 字节对编码。这是一种基于语料库统计信息的确定性分词算法。它将单词拆分为子词,单词的开头用特殊符号标记,因此很容易恢复原始单词。NeMo 工具包支持即时子词分词,因此您无需修改转录,但需要通过模型配置传递您的分词器。NeMo 同时支持 Word Piece Tokenizer(通过 HuggingFace)和 Sentence Piece Tokenizer(通过 Google SentencePiece 库)。对于卢旺达语实验,我们对 CTC 模型使用了 128 个子词,对 Transducer 模型使用了 1024 个子词。这些模型的分词器是使用包含此脚本的训练集的文本转录构建的。对于 1024 大小的词汇表,我们将最大子词长度限制为 4 个符号(大小为 128 时为 2 个符号),以避免使用数据集中特定的常用词填充词汇表。这不会影响模型性能,并可能有助于适应其他领域而无需重新训练分词器。我们使用了 NeMo 工具包中的以下脚本来创建具有不同词汇表大小(128 和 1024 个子词)的 Sentencepiece 分词器
python ${NEMO_ROOT}/scripts/tokenizers/process_asr_text_tokenizer.py \
  --manifest=dev_decoded_processed.json,train_decoded_processed.json \
  --vocab_size=1024 \
  --data_root=tokenizer_bpe_maxlen_4 \
  --tokenizer="spe" \
  --spe_type=bpe \
  --spe_character_coverage=1.0 \
  --spe_max_sentencepiece_length=4 \
  --log

python ${NEMO_ROOT}/scripts/tokenizers/process_asr_text_tokenizer.py \
  --manifest=dev_decoded_processed.json,train_decoded_processed.json \
  --vocab_size=128 \
  --data_root=tokenizer_bpe_maxlen_2 \
  --tokenizer="spe" \
  --spe_type=bpe \
  --spe_character_coverage=1.0 \
  --spe_max_sentencepiece_length=2 \
  --log
大多数参数与 带有子词分词的 ASR 教程 中解释的参数类似。
生成的分词器是一个类似这样的文件夹
├── tokenizer_spe_bpe_v1024_max_4
│   ├── tokenizer.model
│   ├── tokenizer.vocab
│   └── vocab.txt
请记住,您需要在模型配置中传递分词器的路径。您可以在 vocab.txt 文件中看到所有子词。
Tarred 数据集和分桶#
以下是在大型数据集上进行训练的两个有用技术。
Tarred 数据集允许将数据集存储为大型 .tar 文件,而不是小的单独音频文件。它可以加快训练速度并最大限度地减少集群中网络上的负载。
分桶将具有相似持续时间的语句分组。它可以减少填充并加快训练速度。
NeMo 工具包提供了一个脚本来实现这两种技术。
## create tarred dataset with 1 bucket
python ${NEMO_ROOT}/scripts/speech_recognition/convert_to_tarred_audio_dataset.py \
  --manifest_path=train_decoded_processed.json \
  --target_dir=train_tarred_1bk \
  --num_shards=1024 \
  --max_duration=11.0 \
  --min_duration=1.0 \
  --shuffle \
  --shuffle_seed=1 \
  --sort_in_shards \
  --workers=-1


## create tarred dataset with 4 buckets
python ${NEMO_ROOT}/scripts/speech_recognition/convert_to_tarred_audio_dataset.py \
  --manifest_path=train_decoded_processed.json \
  --target_dir=train_tarred_4bk \
  --num_shards=1024 \
  --max_duration=11.0 \
  --min_duration=1.0 \
  --shuffle \
  --shuffle_seed=1 \
  --sort_in_shards \
  --workers=-1 \
  --buckets_num=4
注意:我们只需要处理训练数据,dev 和 test 通常小得多,可以直接使用。
我们的最终数据集文件夹看起来像这样
├── dev [15988 .wav files]
├── dev_decoded_processed.json   (dev manifest)
├── test [16213 .wav files]
├── test_decoded_processed.json   (test manifest)
└── train_tarred_1bk
    ├── metadata.yaml
    ├── tarred_audio_manifest.json
    └── [1024 .tar files]
如果是 4 个桶,它看起来像这样
└── train_tarred_4bk
    ├── bucket1
        ├── metadata.yaml
        ├── tarred_audio_manifest.json
        └── [1024 .tar files]
    ├── bucket2
        ...
    ├── bucket3
    └── bucket4
从头开始训练和微调#
ASR 模型#
我们的目标是训练两个具有不同架构的 ASR 模型:Conformer-CTC 和 Conformer-Transducer,参数约为 1.2 亿。CTC 模型预测每个时间步的输出令牌。假设输出彼此独立。因此,CTC 模型工作速度更快,但它们可能会产生彼此不一致的输出。CTC 模型通常与生产中的外部语言模型结合使用。相比之下,Transducer 模型包含解码部分,该部分逐个生成输出令牌,并且下一个令牌预测取决于此历史记录。由于解码的自回归性质,推理速度比 CTC 模型慢几倍,但质量通常更好,因为它可以在同一模型中包含语言模型信息。
训练脚本和配置#
为了训练 Conformer-CTC 模型,我们使用 speech_to_text_ctc_bpe.py 和默认配置 conformer_ctc_bpe.yaml。为了训练 Conformer-Transducer 模型,我们使用 speech_to_text_rnnt_bpe.py 和默认配置 conformer_transducer_bpe.yaml。默认配置的任何选项都可以从命令行覆盖。通常我们应该提供与数据集和分词器相关的选项。
这是一个关于我们如何运行训练脚本的示例
TOKENIZER=tokenizers/tokenizer_spe_bpe_v1024_max_4/
TRAIN_MANIFEST=data/train_tarred_1bk/tarred_audio_manifest.json
TRAIN_FILEPATHS=data/train_tarred_1bk/audio__OP_0..1023_CL_.tar
VAL_MANIFEST=data/dev_decoded_processed.json
TEST_MANIFEST=data/test_decoded_processed.json

python ${NEMO_ROOT}/examples/asr/asr_ctc/speech_to_text_ctc_bpe.py \
--config-path=../conf/conformer/ \
--config-name=conformer_ctc_bpe \
exp_manager.name="Some name of our experiment" \
exp_manager.resume_if_exists=true \
exp_manager.resume_ignore_no_checkpoint=true \
exp_manager.exp_dir=results/ \
model.tokenizer.dir=$TOKENIZER \
model.train_ds.is_tarred=true \
model.train_ds.tarred_audio_filepaths=$TRAIN_FILEPATHS \
model.train_ds.manifest_filepath=$TRAIN_MANIFEST \
model.validation_ds.manifest_filepath=$VAL_MANIFEST \
model.test_ds.manifest_filepath=$TEST_MANIFEST
选项 exp_manager.resume_if_exists=true 允许恢复训练。实际上,您可以随时停止训练,然后从最后一个检查点继续。当训练完成时,最终模型将作为 .nemo 文件保存在我们在 exp_manager.exp_dir 中指定的文件夹中。
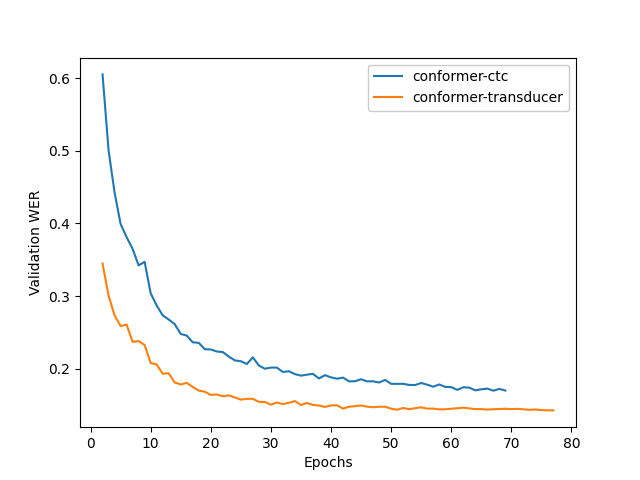
训练动态#
下图显示了我们从头开始训练卢旺达语模型时的训练动态。在这些实验中,我们使用了默认配置中的超参数,训练在 2 个节点上运行,每个节点 16 个 gpu,训练批大小为 32。我们看到 Transducer 模型比 CTC 模型实现了更好的质量。
从另一个模型微调#
通常,使用一些其他预训练模型的权重初始化我们的 ASR 模型是一个好主意,例如,另一种语言的模型。它通常使我们的模型更快地收敛并获得更好的质量,特别是如果我们的目标语言的数据集很小。
虽然卢旺达语数据集相当大,但我们也尝试从不同的预训练检查点微调卢旺达语 Conformer-Transducer 模型,即
英语 Conformer-Transducer 检查点
在英语数据上训练的自监督学习 (SSL) 检查点
在多语言数据上训练的 SSL 检查点
为了从 非 SSL 检查点 初始化,我们应该简单地添加选项 +init_from_pretrained_model
INIT_MODEL='stt_en_conformer_ctc_large'

python ${NEMO_ROOT}/examples/asr/asr_ctc/speech_to_text_ctc_bpe.py
...[same options as in the previous example]...
+init_from_pretrained_model=${INIT_MODEL}
在这种情况下,预训练模型 stt_en_conformer_ctc_large 将从 NVIDIA GPU Cloud(NGC) 自动下载,并在训练前用于初始化权重。
为了从 SSL 检查点 初始化,我们应该像以下代码一样编辑我们的训练脚本
import nemo.collections.asr as nemo_asr
ssl_model = nemo_asr.models.ssl_models.SpeechEncDecSelfSupervisedModel.from_pretrained(model_name='ssl_en_conformer_large')

# define fine-tune model
asr_model = nemo_asr.models.EncDecCTCModelBPE(cfg=cfg.model, trainer=trainer)

# load ssl checkpoint
asr_model.load_state_dict(ssl_model.state_dict(), strict=False)

del ssl_model
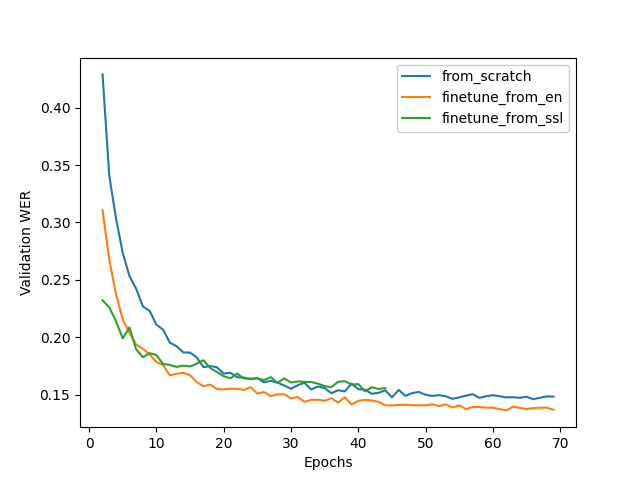
当使用微调时,您可能需要更改默认配置中的一些超参数,尤其是学习率和学习率策略。在下面的实验中,我们使用了 model.optim.sched.name=CosineAnnealing 和 model.optim.lr=1e-3。
下图比较了三个 Conformer-Transducer 模型的训练动态。它们的唯一区别在于它们的初始化方式。我们看到微调导致更快的收敛和更好的质量。从 SSL 初始化在早期阶段给出了最低的 WER,但在更长的时间内,它的表现更差。
推理和评估#
运行推理#
为了运行推理,我们需要一个预训练模型。这可以是我们在训练完成后获得的 .nemo 文件,也可以是来自 NGC 的任何已发布模型。我们使用以下脚本运行推理
python ${NEMO_ROOT}/examples/asr/transcribe_speech.py \
  model_path=<path_to_of_your_model>.nemo \
  dataset_manifest=./test_decoded_processed.json \
  output_filename=./test_with_predictions.json \
  batch_size=8 \
  cuda=1 \
  amp=True
为了使用 NVIDIA 的卢旺达语检查点 STT Rw Conformer-CTC Large 或 STT Rw Conformer-Transducer Large 运行推理,请使用
python ${NEMO_ROOT}/examples/asr/transcribe_speech.py \
  pretrained_name="stt_rw_conformer_ctc_large" \
  dataset_manifest=test_decoded_processed.json \
  output_filename=./pred_ctc.json \
  batch_size=8 \
  cuda=1 \
  amp=True
注意: 如果您想转录新的音频,您可以使用 audio_dir 参数而不是 dataset_manifest 传递包含音频文件的文件夹。
推理完成后,output_filename 是一个 .json 清单,其中新增了一个字段 pred_text,包含生成的转录。示例
{"audio_filepath": "test/common_voice_rw_19835615.wav", "text": "kw'ibumoso", "up_votes": 2, "down_votes": 0, "age": NaN, "gender": NaN, "accents": NaN, "client_id": "66675a7003e6baa3e7d4af01bff8324ac3c5f15e7f8918180799dd2928227c791f19e2811f9ec5779a2b06dac1b7a97fa7740dcfe98646ea1b5e106250c260be", "duration": 3.672, "pred_text": "n'ibumoso"}
{"audio_filepath": "test/common_voice_rw_24795878.wav", "text": "ni ryari uheruka kurya urusenda", "up_votes": 2, "down_votes": 0, "age": NaN, "gender": NaN, "accents": NaN, "client_id": "90e0438947a75b6c0cf59a0444aee3b81a76c5f9459c4b22df2e14b4ce257aeacaed8ac6092bfcd75b8e831633d58a84287fd62190c21d70d75efe8d93ed74ed", "duration": 3.312, "pred_text": "ni ryari uheruka kurya urusenda"}
{"audio_filepath": "test/common_voice_rw_24256935.wav", "text": "umunani", "up_votes": 2, "down_votes": 0, "age": NaN, "gender": NaN, "accents": NaN, "client_id": "974d4876e99e7437183c20f9107053acc9e514379d448bcf00aaaabc0927f5380128af86d39650867fa80a82525110dfc40784a5371c989de1a5bdf531f6d943", "duration": 3.24, "pred_text": "umunani"}
词错误率 (WER) 和字符错误率 (CER)#
一旦我们有一个包含 text 和 pred_text 的清单文件,我们就可以衡量模型预测的质量。
# Calculate WER
python ${NEMO_ROOT}/examples/asr/speech_to_text_eval.py \
  dataset_manifest=test_with_predictions.json \
  use_cer=False \
  only_score_manifest=True

# Calculate CER
python ${NEMO_ROOT}/examples/asr/speech_to_text_eval.py \
  dataset_manifest=test_with_predictions.json \
  use_cer=True \
  only_score_manifest=True
NVIDIA 卢旺达语检查点的评估#
如果您运行 NVIDIA 发布的卢旺达语模型的推理和评估,您应该获得如下指标
模型 |
WER % |
CER % |
|---|---|---|
stt_rw_conformer_ctc_large |
18.22 |
5.45 |
stt_rw_conformer_trasducer_large |
16.19 |
5.7 |
错误分析#
尽管如此,即使 16% 的 WER 也不如我们通常为使用 NeMo 工具包训练的其他语言获得的 WER 好,因此我们可能希望查看模型产生的错误,以便更好地了解问题所在。
我们可以使用 语音数据浏览器 来分析错误。
如果我们运行
python ${NEMO_ROOT}/tools/speech_data_explorer/data_explorer.py <your manifest file>
它将启动本地服务器,并提供一个 http 地址以从浏览器打开。在 UI 中,我们可以看到模型预测及其与参考的差异,并且我们还可以收听相应的音频。我们还可以按降序 WER 对句子进行排序,并查看其中的顶部。
错误分析显示了与卢旺达语数据集相关的几个问题
嘈杂的多说话人记录(例如 common_voice_rw_19830859.wav)
记录质量差(例如 common_voice_rw_24452415.wav)
- 与空格/无空格/撇号相关的正字法变异性
kugira ngo / kugirango
nkuko / nk’uko
n iyo / n’iyo
- 外来词的多种正字法变体
telefoni / telephone
film / filime
isiraheli / israel
radio / radiyo
kongo / congo
- l/r 变异性
abamalayika / abamarayika