构建低延迟语音到语音 RAG 机器人#
在本节中,我们将构建作为此版本一部分打包的 RAG 示例机器人 的副本。RAG 示例机器人利用 NVIDIA RAG 示例管线 来回答基于上传文档的问题。RAG 示例机器人展示了以下 ACE Agent 功能
集成来自 NVIDIA 的生成式 AI 示例 的 RAG 示例
低延迟,使用 ASR 2 遍结束语(EOU)
始终开启的 Barge-In 支持
使用插件处理对话历史记录
支持使用 事件架构 部署
与 基于 LangChain 的机器人的教程 类似,我们将使用插件与 RAG 服务器进行交互。此插件可以连接到聊天控制器或聊天引擎。然后,我们将利用 Colang 添加始终开启的 Barge-in 支持,提高机器人响应的端到端语音延迟,并添加长暂停处理选项。可以在 LangChain 代理或自定义 RAG 管线中以类似方式添加类似功能,以改善用户体验。
RAG 机器人的最小文件结构如下所示
samples
└── rag_tutorial_bot
    └── plugin
        └── rag.py
        └── schemas.py
    └── colang
        └── main.co
        └── speech.co
    └── plugin_config.yaml
    └── bot_config.yaml
    └── speech_config.yaml
    └── model_config.yaml
创建一个名为 samples/rag_tutorial_bot 的空目录,并执行以下步骤来更新机器人配置。
创建 RAG 插件#
在本节中,让我们构建自定义 RAG 插件并将其作为独立组件进行测试。
按照 RAG 示例机器人 或 NVIDIA 生成式 AI 示例存储库 中的说明部署 RAG 服务器。
定义 ACE Agent 用于与插件服务器和聊天控制器通信的输入和输出 API 模式。将
samples/rag_bot/plugin/schemas.py复制到samples/rag_tutorial_bot/plugin/schemas.py。让我们稍微了解一下 API 及其模式。聊天控制器微服务使用了两个 API:
/chat和/event。管道创建和删除等事件由聊天控制器发送到
/event端点。在大多数情况下,您不需要修改我们将在下一步中定义的默认/event端点。用户问题由聊天控制器发送到
/chat端点,以及UserId和可选的QueryId。此 API 的响应模式包含一个Response属性,其中包含响应的详细信息。在本教程中,我们只需要管理两个子字段:Response.Text(其中包含我们正在流式传输的块)和Response.IsFinal(指示流是否完成)。
使用 RAG 服务器 API 调用和
/chat和/eventAPI 创建实际的自定义插件。将samples/rag_bot/plugin/rag.py复制到samples/rag_tutorial_bot/plugin/rag.py。rag_stream函数接收查询和其他请求参数,并对 RAG 服务器执行 API 调用,并返回流式响应生成器,该生成器将 rag 响应格式化为ChatResponse模式,并将块推送到响应流中。如果您正在使用自定义 RAG 解决方案,或者您想修改调用 RAG 的方式,您只需要在generator方法中进行更改。async def rag_stream( question: Optional[str] = "", chat_history: Optional[List] = [], num_tokens: Optional[int] = MAX_TOKENS, ) -> int: """ Call the RAG chain server and return the streaming response. """ request_json = { "messages": chat_history + [{"role": "user", "content": question}], "use_knowledge_base": True, "temperature": TEMPERATURE, "top_p": TOP_P, "max_tokens": num_tokens, "seed": 42, "bad": [], "stop": STOP_WORDS, "stream": True, } # Method that forwards the stream to the Chat controller async def generator(): full_response = "" if question: async with aiohttp.ClientSession() as session: async with session.post(GENERATION_URL, json=request_json) as resp: async for chunk, _ in resp.content.iter_chunks(): try: chunk = chunk.decode("utf-8") chunk = chunk.strip("\n") try: if len(chunk) > 6: parsed = json.loads(chunk[6:]) message = parsed["choices"][0]["message"]["content"] else: logger.debug(f"Received empty RAG response chunk '{chunk}'.") message = "" except Exception as e: logger.warning(f"Parsing RAG response chunk '{chunk}' failed. {e}") message = "" if not message: continue full_response += message json_chunk = ChatResponse() json_chunk.Response.Text = message json_chunk.Response.CleanedText = message json_chunk = json.dumps(json_chunk.dict()) yield json_chunk except Exception as e: yield f"Internal error in RAG stream: {e}" break logger.info(f"Full RAG response for query `{question}` : {full_response}") json_chunk = ChatResponse() json_chunk.Response.IsFinal = True json_chunk = json.dumps(json_chunk.dict()) yield json_chunk return StreamingResponse(generator(), media_type="text/event-stream")
/chat端点调用rag_stream,其中包含用户查询和聊天历史记录(如果可用),并转发流式 RAG 响应。@router.post( "/chat", status_code=status.HTTP_200_OK, ) async def chat( request: Annotated[ ChatRequest, Body( description="Chat Engine Request JSON. All the fields populated as part of this JSON is also available as part of request JSON." ), ], response: Response, ) -> StreamingResponse: """ This endpoint can be used to provide response to query driven user request. """ req = request.dict(exclude_none=True) logger.info(f"Received request JSON at /chat_stream endpoint for RAG : {json.dumps(req, indent=4)}") try: chat_history = [] if "Metadata" in req: chat_history = req["Metadata"].get("ChatHistory", []) resp = await rag_stream(question=req["Query"], chat_history=chat_history) return resp except Exception as e: response.status_code = status.HTTP_500_INTERNAL_SERVER_ERROR return {"StatusMessage": str(e)}
/event端点仅在聊天控制器通过 插件服务器架构 直接连接时调用,对于我们的教程来说是可选的。
注册此插件。将以下内容添加到
plugin_config.yaml。config: workers: 1 timeout: 30 plugins: - name: rag path: ./plugin/rag.py
部署插件服务器进行测试。使用 Docker 环境 运行机器人。
export BOT_PATH=./samples/rag_tutorial_bot
source deploy/docker/docker_init.sh
docker compose -f deploy/docker/docker-compose.yml up --build plugin-server -d
通过访问
http://<your-ip>:8090/kb,根据您的用例需要,摄取文档。我们可以使用以下curl命令测试端点,询问与您的文档相关的问题。curl -X 'POST' \ 'https://:9002/rag/chat' \ -H 'accept: application/json' \ -H 'Content-Type: application/json' \ -d '{ "Query": "Who is the president of the United States?", "UserId": "user1" }'
完成插件测试后,停止服务器。
docker compose -f deploy/docker/docker-compose.yml down
将聊天控制器连接到 RAG 插件#
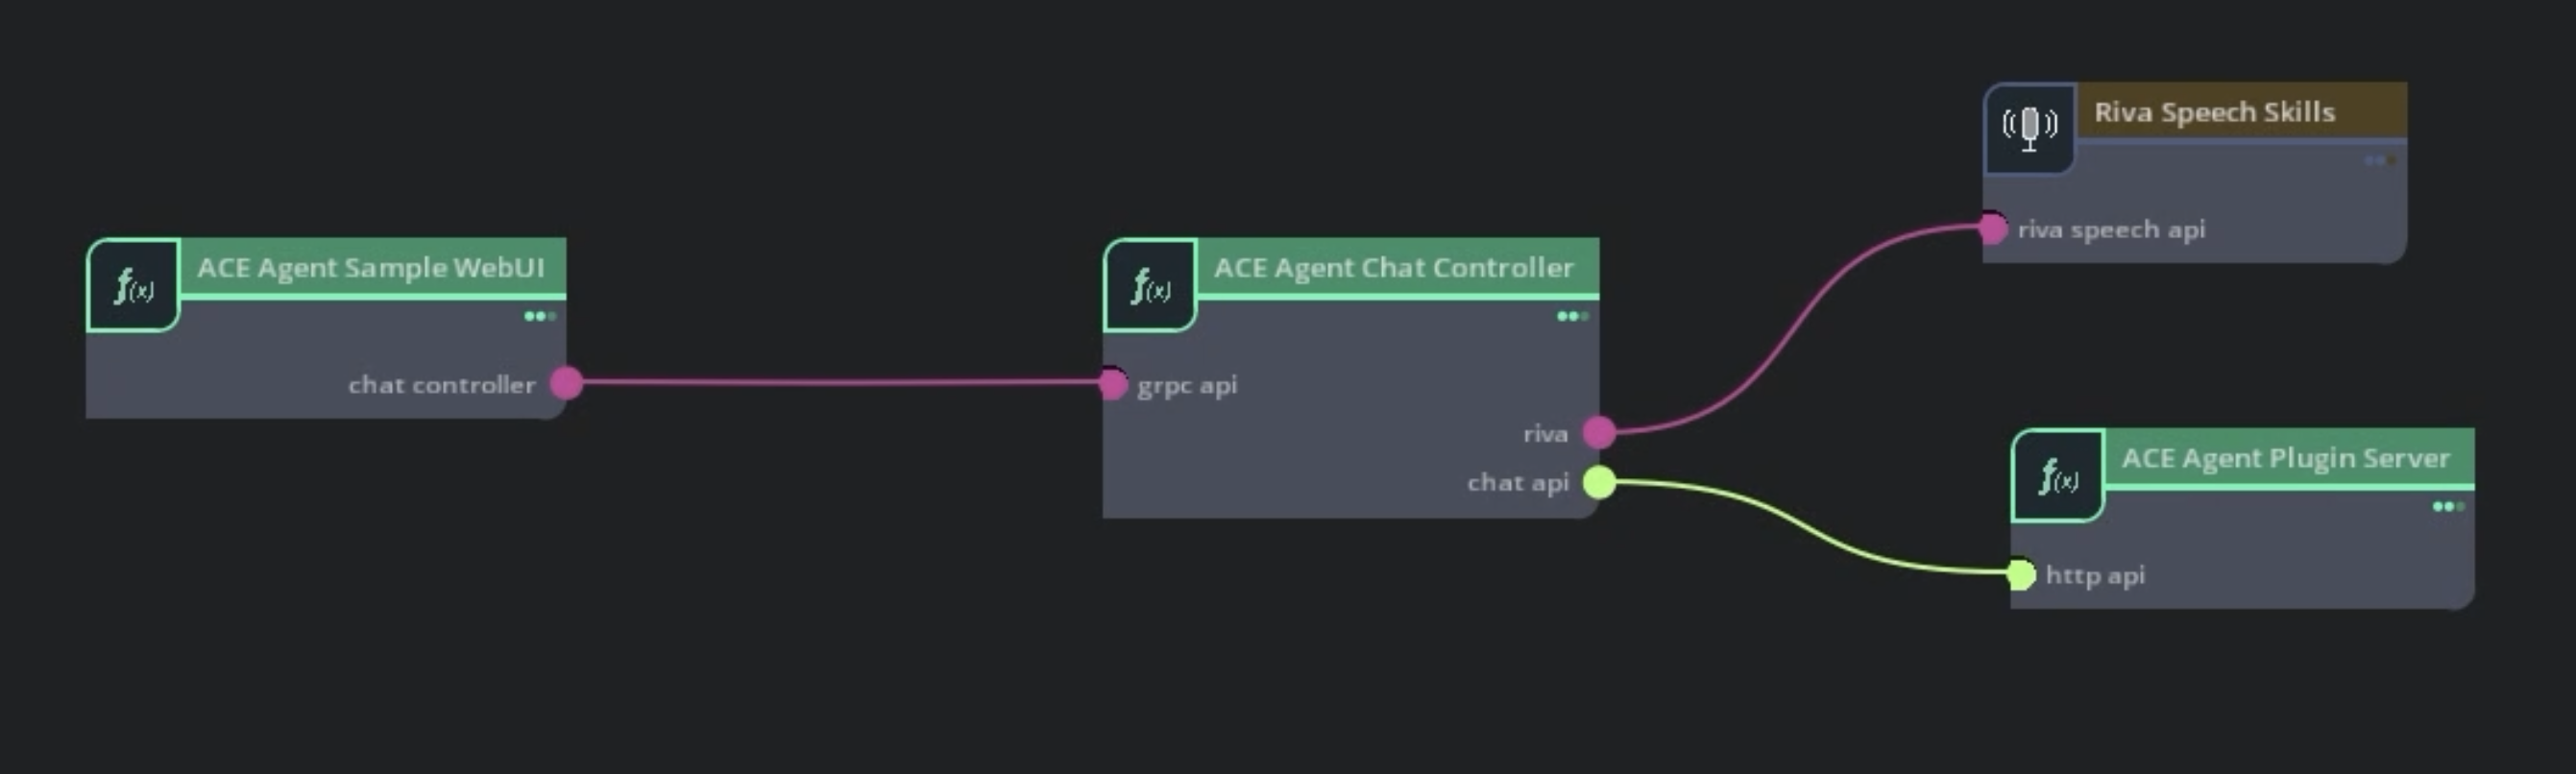
从
samples/chitchat_bot复制model_config.yaml和speech_config.yaml文件。它们代表语音管线的通用设置。更新
speech_config.yaml文件中dialog_manager组件中的serverURL,以指向我们在上一步中定义的预构建 RAG 插件。dialog_manager: DialogManager: server: "https://:9002/rag" use_streaming: true
通过此更改,聊天控制器将直接调用插件服务器的
/chat和/event端点。部署机器人。
设置
docker-compose.yml文件所需的环境变量。export BOT_PATH=./samples/rag_tutorial_bot/ source deploy/docker/docker_init.sh
对于基于 插件服务器架构 的机器人,我们需要为聊天控制器微服务使用
speech_lite管线配置。更新deploy/docker/docker_init.sh中的PIPELINE变量,或通过手动设置PIPELINE环境变量来覆盖它。export PIPELINE=speech_lite
部署 Riva ASR 和 TTS 语音模型。
docker compose -f deploy/docker/docker-compose.yml up model-utils-speech
部署带有 RAG 插件的插件服务器。
docker compose -f deploy/docker/docker-compose.yml up --build plugin-server -d
部署带有 gRPC 接口的聊天控制器微服务。
docker compose -f deploy/docker/docker-compose.yml up chat-controller -d
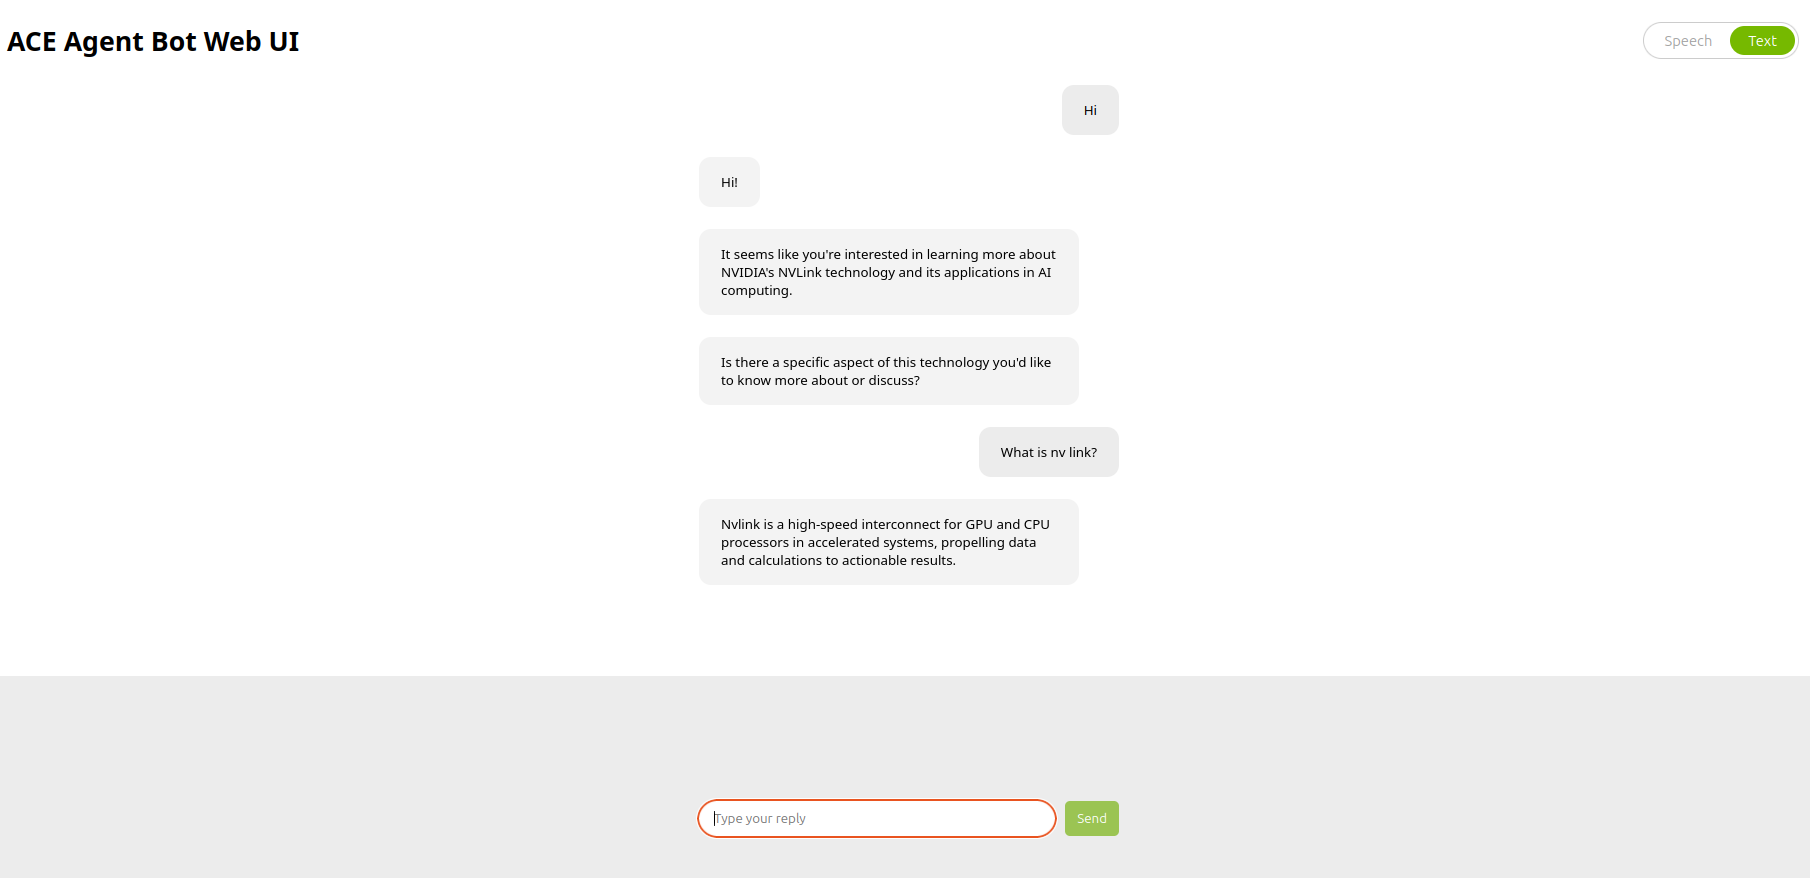
使用 语音 WebUI 应用程序 与机器人交互。
docker compose -f deploy/docker/docker-compose.yml up bot-web-ui-client bot-web-ui-speech -d
请注意,我们根本没有部署聊天引擎容器。
您可以使用浏览器在
http://<YOUR_IP_ADDRESS>:7006与机器人交互。
这是一个示例代码段
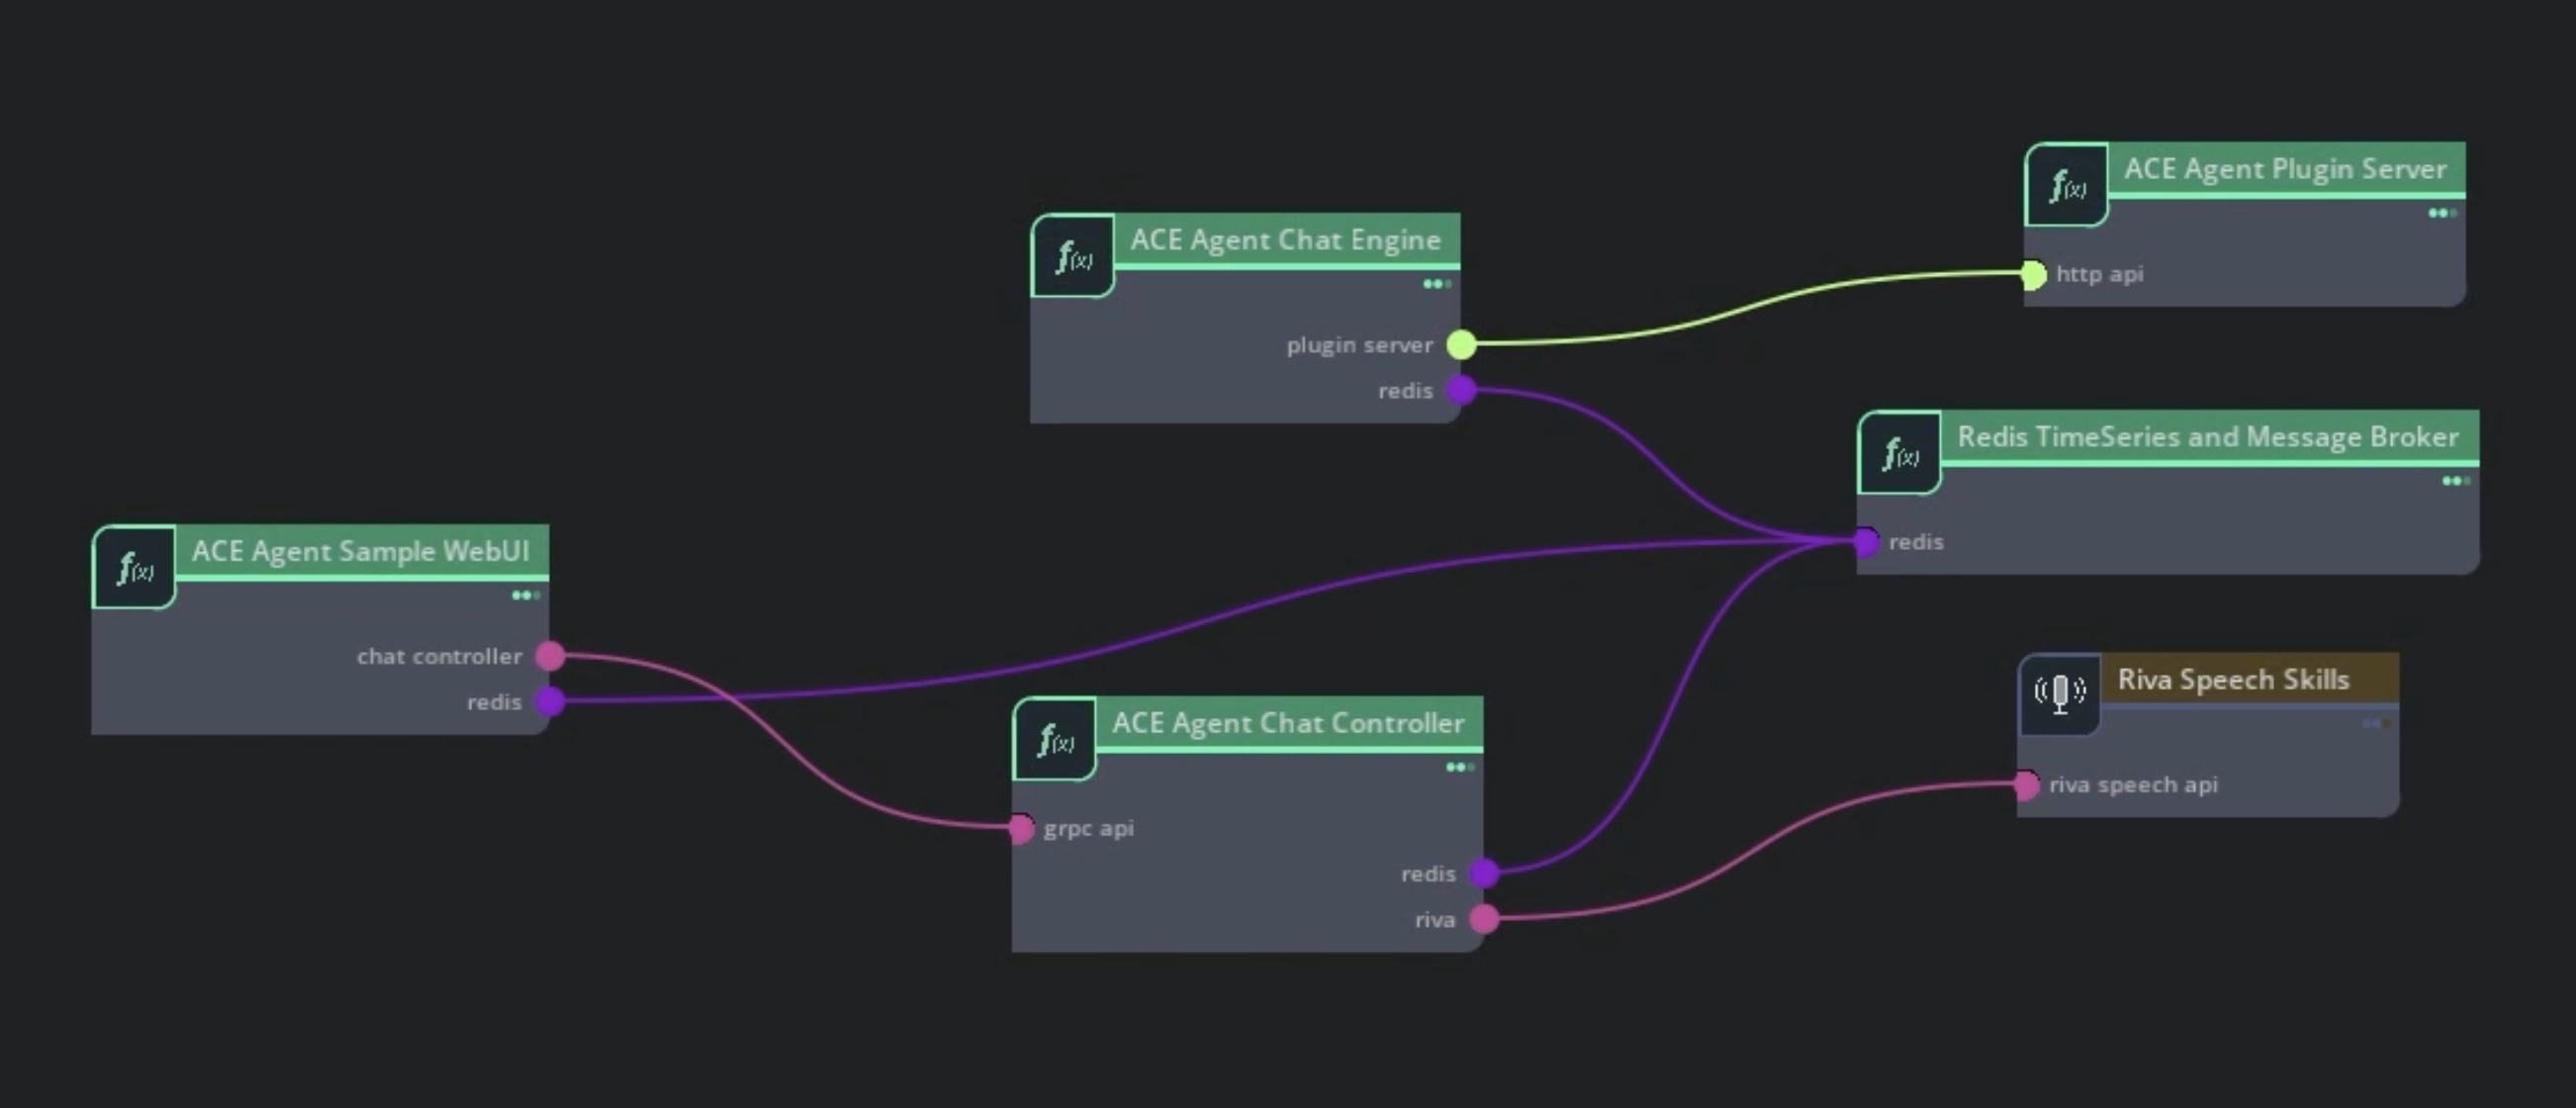
将插件连接到聊天引擎#
您可以通过创建聊天引擎所需的配置,并使用 事件接口架构 或 聊天引擎服务器架构 将插件服务器连接到聊天引擎,从而向机器人添加护栏或在 Colang 中添加任何自定义逻辑。
创建机器人和 Colang 配置#
bot_config.yaml 是任何机器人的配置入口点。让我们创建此文件并添加一些重要的配置参数。
为机器人命名。在
bot_config.yaml中,您需要为机器人添加唯一的名称。让我们将机器人命名为nvidia_rag_bot。在本教程中,我们将使用 Colang2.0-beta 语法。bot: nvidia_rag_bot colang_version: "2.x" storage: name: cache configs: use_stateful_guardrails: True
我们机器人中的所有智能都将存在于 RAG 服务器中。由于我们的 Colang 配置仅用于将查询路由到插件,因此让我们将模型部分留空。
models: []
创建一个名为
colang的文件夹和一个名为main.co的 Colang 文件,其中将包含所有 Colang 逻辑。让我们更新main.co以将所有查询路由到 RAG 插件。import core flow technical helper # Helper flows for notifying errors activate notification of undefined flow start "I have encountered some technical issue!" activate notification of colang errors "I have encountered some technical issue!" flow generate rag response $transcript # Invoke /chat endpoint from plugin $started = await InvokeStreamingChatAction(question=$transcript,endpoint="rag/chat",chat_history=True) if $started # Get first sentence from RAG response $response = await StreamingResponseChatAction(endpoint="rag/chat") while $response bot say $response # Check for next sentence $response = await StreamingResponseChatAction(endpoint="rag/chat") flow rag # Wait for user queries user said something as $ref # Generate RAG response when user query received generate rag response $ref.transcript flow main activate technical helper activate rag
上面的流将所有用户话语路由到插件服务器中名为
/rag/chat的 POST 端点。它将用户的问题以及session_id作为请求参数传递给端点。注意
如果要在 Colang 中添加更复杂的逻辑,则必须根据您的用例更新
main.co以及可能的机器人配置文件。有关更多信息,请参阅 使用 Colang。
测试机器人#
使用 Docker 环境 在 gRPC 接口中运行机器人。
设置
docker-compose.yml文件所需的环境变量。export BOT_PATH=./samples/rag_tutorial_bot/ source deploy/docker/docker_init.sh
对于基于 事件接口架构 的机器人,我们需要为聊天控制器微服务使用
speech_umim管线配置。更新deploy/docker/docker_init.sh中的PIPELINE变量,或通过手动设置PIPELINE环境变量来覆盖它。export PIPELINE=speech_umim
部署 Riva ASR 和 TTS 语音模型。
docker compose -f deploy/docker/docker-compose.yml up model-utils-speech
部署 ACE Agent 微服务。部署聊天控制器、聊天引擎、Redis、插件服务器和 NLP 服务器微服务。NLP 服务器将没有为此机器人部署任何模型。
docker compose -f deploy/docker/docker-compose.yml up --build speech-event-bot -d
使用 示例 WebUI 应用程序,通过浏览器在
http://<YOUR_IP_ADDRESS>:7006与机器人交互。
改善语音到语音对话的用户体验#
作为人类,当我们交谈时,我们会在对话中暂停,在其他人停止说话之前开始思考,甚至在对话中打断。如今,大多数代理/机器人都等待用户完成查询,然后再处理用户查询。检测用户语音的结束也是主观的,因为有些人可能会在单词之间长时间停顿。
默认情况下,Riva 自动语音识别 (ASR) 管线会等待用户音频中 800 毫秒的静音,以标记用户语音的结束。因此,用户感知的延迟至少为 800 毫秒 + 代理处理延迟(在本教程中为 RAG 延迟)。除此之外,我们还将有 ASR 处理延迟、文本到语音生成延迟、网络延迟等等。
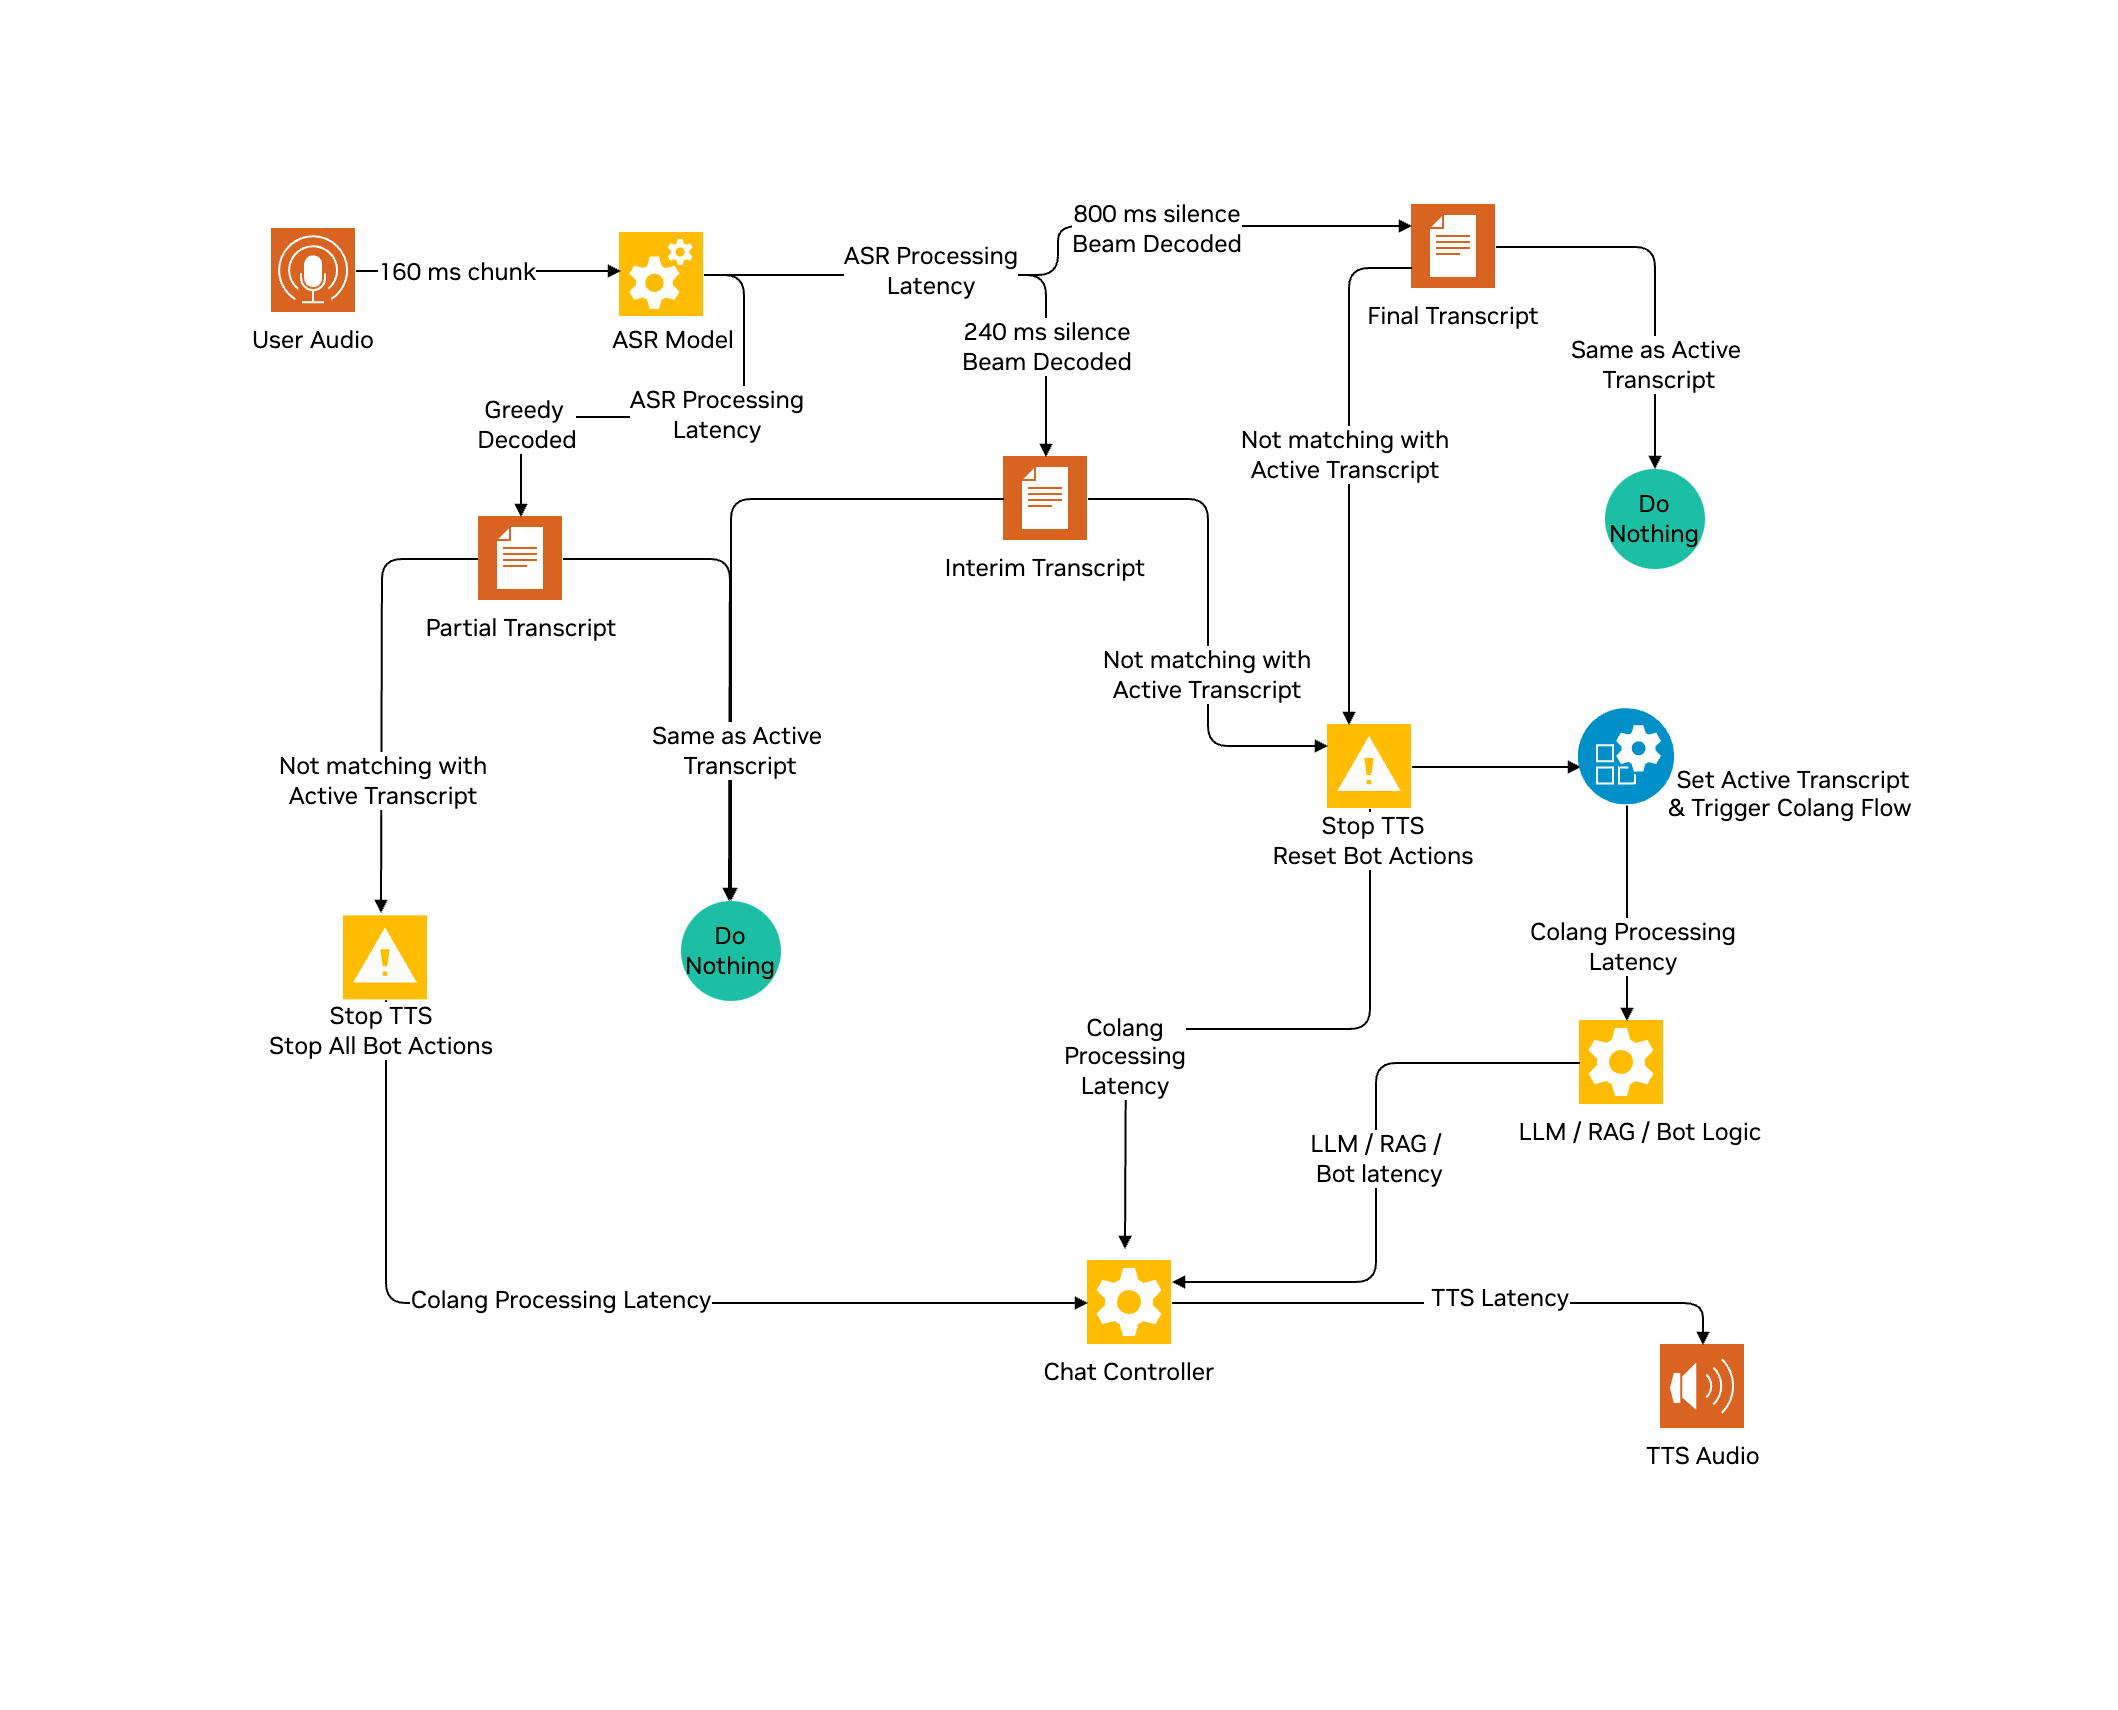
Riva ASR 管线 具有多个组件。为每个音频块运行完整的管线可能不是最佳选择。ASR 管线将在 800 毫秒后为每个用户音频块返回一个贪婪解码的部分文本记录。最终生成的文本记录将包括波束 LM 解码、标点符号和自定义词汇表。您可以选择将其配置为在小于 800 毫秒(例如 240 毫秒)的静音值后返回临时文本记录,其处理方式与最终文本记录相同。
在本节中,我们将重点关注以下用户体验改进
通过使用 240 毫秒静音作为 EOU 的临时文本记录而不是 800 毫秒来触发 RAG API,从而减少 560 毫秒的延迟
始终开启 Barge In 支持,基本上在用户中断时停止机器人响应
用于配置用户语音结束阈值(当前为 800 毫秒)的选项,用于处理用户音频中的长暂停。有关更多信息,请参阅 自定义 ASR 识别以处理长暂停。
更新机器人配置#
从 RAG 示例机器人目录
samples/rag_bot/复制speech.co。speech.co实现了 Colang 流,用于利用部分/临时文本记录并支持始终开启的 Barge In。请按照下图了解具有临时文本记录模式的流。
注意
我们将向 RAG 服务器发送早期触发器,如果用户在单词之间暂停超过 240 毫秒,则可能需要重新触发。平均而言,对于每个用户查询,您可能会执行两个额外的 RAG 调用,这将需要额外的计算/成本才能大规模部署。如果您的用例有外部 API 调用或任何不可逆转或成本高昂的动作,则不应使用两遍 EOU 方法。您可能需要额外的处理来确保为单个用户查询多次触发管线的后果。
更新
main.co以利用speech.coColang 文件中的流。流handle user transcript with interruption监听每个部分、临时和最终文本记录,并决定中断机器人响应,设置新的活动文本记录并忽略虚假文本记录。当设置新的活动文本记录时,流user partially said something返回。import core flow technical helper activate notification of undefined flow start "I have encountered some technical issue!" activate notification of colang errors "I have encountered some technical issue!" # activate interim transcript mode and add list of flows to stop during user interruption / Barge In activate handle user transcript with interruption $mode="interim" $stop_flows_list=["_bot_say","generate rag response"] flow generate rag response $transcript $started = await InvokeStreamingChatAction(question=$transcript,endpoint="rag/chat",chat_history=True) if $started $response = await StreamingResponseChatAction(endpoint="rag/chat") log "response from RAG: {$response}" while $response bot say $response $response = await StreamingResponseChatAction(endpoint="rag/chat") log "response from RAG: {$response}" flow rag # wait for new active transcript user partially said something as $ref generate rag response $ref.transcript flow main activate technical helper activate rag
我们在
stop_flows_list中添加了generate rag response以中断活动的 RAG 调用。确保在stop_flows_list中添加的任何流都没有使用 activate 关键字。在此示例中,我们设置了临时文本记录模式,但您甚至可以决定使用部分文本记录,或仅使用最终文本记录。Riva ASR 可能会检测到一些虚假文本记录,这可能会不必要地中断机器人响应。创建并更新
actions.py,其中包含虚假过滤器动作。import logging from nemoguardrails.actions.actions import action logger = logging.getLogger("nemoguardrails") # Transcript filtering for spurious transcript and filler words. Along with this any transcript less than 3 chars is removed FILTER_WORDS = [ "yeah", "okay", "right", "yes", "yum", "and", "one", "all", "when", "thank", "but", "next", "what", "i see", "the", "hmm", "mmm", "so that", "why", "that", "well", ] INCLUDE_WORDS = ["hi"] @action(name="IsSpuriousAction") async def is_spurious(query): """ Filter transcript less than 3 chars or in FILTER_WORDS list to avoid spurious transcript and filler words. """ if query.strip().lower() in FILTER_WORDS or (len(query) < 3 and query.strip().lower() not in INCLUDE_WORDS): return True else: return False
更新
speech_config.yaml参数以发送具有 240 毫秒用户静音的临时文本记录。有关更多信息,请参阅 自定义 ASR 识别以处理长暂停 部分。如下所示更新riva_asr组件配置。riva_asr: RivaASR: server: "localhost:50051" # Update interim and final transcript silence threshold endpointing_stop_history: 800 # Second pass End of User Speech endpointing_stop_history_eou: 240 # First pass End of User Speech
使用较高的
endpointing_stop_history值,我们可以避免因用户音频中的长暂停而将用户查询分解为多个查询。建议至少使用 800 毫秒的值,以避免 ASR 文本记录质量问题。
测试机器人#
使用 Docker 环境 在 gRPC 接口中运行机器人。
设置
docker-compose.yml文件所需的环境变量。export BOT_PATH=./samples/rag_tutorial_bot/ source deploy/docker/docker_init.sh
对于基于 事件接口架构 的机器人,我们需要为聊天控制器微服务使用
speech_umim管线配置。更新deploy/docker/docker_init.sh中的PIPELINE变量,或通过手动设置PIPELINE环境变量来覆盖它。export PIPELINE=speech_umim
部署 Riva ASR 和 TTS 语音模型。
docker compose -f deploy/docker/docker-compose.yml up model-utils-speech
部署 ACE Agent 微服务。部署聊天控制器、聊天引擎、Redis、插件服务器和 NLP 服务器微服务。NLP 服务器将没有为此机器人部署任何模型。
docker compose -f deploy/docker/docker-compose.yml up --build speech-event-bot -d
使用 示例 WebUI 应用程序,通过浏览器在
http://<YOUR_IP_ADDRESS>:7006与机器人交互。您应该能够观察到平均 500-600 毫秒的延迟改进,并且可以随时 Barge-in 以停止当前的机器人响应。