Kubernetes 环境#
ACE Agent 提供使用 NVIDIA 统一云服务 (UCS) 工具的 Kubernetes 部署。NVIDIA 统一云服务工具 (UCS 工具) 是一个用于开发云原生、实时和多模态 AI 应用程序的低代码框架。NVIDIA ACE Agent 版本包括以下 UCS 微服务
微服务名称 |
版本 |
描述 |
|---|---|---|
|
4.1.0 |
聊天引擎微服务 |
|
4.1.0 |
NLP 服务器微服务 |
|
4.1.0 |
插件服务器微服务 |
|
4.1.0 |
用于语音支持的聊天控制器微服务 |
|
4.1.0 |
示例 WebUI 应用程序 |
您可以使用 ACE Agent 微服务和 UCS 应用程序轻松创建自己的自定义应用程序 Helm chart。ACE Agent 快速入门包附带了许多用于示例 Bot 的 UCS 应用程序,这些应用程序可以在 ./deploy/ucs_apps/ 目录中找到。
先决条件
在开始使用 NVIDIA ACE Agent 之前,假定您满足以下先决条件。当前版本的 ACE Agent 仅在 NVIDIA 数据中心上受支持。
您已访问并登录到 NVIDIA GPU Cloud (NGC)。您已在本地系统上安装了 NGC CLI 工具,并且您已登录到 NGC 容器注册表。有关 NGC 的更多详细信息,请参阅 NGC 文档。
您已安装 UCS 工具以及 Helm、Kubernetes、GPU Operator 等先决条件设置。有关详细说明,请参阅 UCS 工具开发者系统和部署系统先决条件部分。最新的 UCS 2.5 工具需要 Ubuntu 22.04,或者您可以构建 Docker 镜像,以便使用 Ubuntu 22.04 基础镜像执行 UCS 命令。
您有权访问基于 NVIDIA Volta、NVIDIA Turing、NVIDIA Ampere、NVIDIA Ada Lovelace 或 NVIDIA Hopper 架构的 GPU。
设置
如果尚未完成,请运行以下命令安装本地路径 Provisioner
curl https://raw.githubusercontent.com/rancher/local-path-provisioner/v0.0.23/deploy/local-path-storage.yaml | sed 's/^ name: local-path$/ name: mdx-local-path/g' | kubectl apply -f -
注意
如果您错过了部署本地路径 provisioner Helm chart,您将在部署期间看到以下错误,并且某些 Pod 将卡在 pending 状态。
Warning  FailedMount  4m10s (x2 over 4m11s)  kubelet  MountVolume.SetUp failed for volume "workload-cm-volume" : failed to sync configmap cache: timed out waiting for the condition
Warning  FailedMount  4m10s (x2 over 4m11s)  kubelet  MountVolume.SetUp failed for volume "scripts-cm-volume" : failed to sync configmap cache: timed out waiting for the condition
Warning  FailedMount  4m10s (x2 over 4m11s)  kubelet  MountVolume.SetUp failed for volume "configs-volume" : failed to sync configmap cache: timed out waiting for the condition
设置部署所需的强制性 Kubernetes 密钥。
export NGC_CLI_API_KEY=...

kubectl create secret docker-registry ngc-docker-reg-secret --docker-server=nvcr.io --docker-username='$oauthtoken' --docker-password="${NGC_CLI_API_KEY}"

kubectl create secret generic ngc-api-key-secret --from-literal=NGC_CLI_API_KEY="${NGC_CLI_API_KEY}"
通过克隆 GitHub ACE 存储库下载 NVIDIA ACE Agent 快速入门脚本。
git clone git@github.com:NVIDIA/ACE.git
cd ACE
转到 ACE Agent
microservices目录。cd microservices/ace_agent
通过 UCS 应用程序部署 Bot#
我们将使用股票 Bot 应用程序规范作为示例,该规范位于 快速入门包的 ./deploy/ucs_apps/speech_bot 中。
股票 Bot 使用 OpenAI 的 gpt-4-turbo 模型作为主要模型。
为
OPENAI_API_KEY创建 Kubernetes 密钥。export OPENAI_API_KEY="sk-XXX" kubectl create secret generic openai-key-secret --from-literal=OPENAI_API_KEY=${OPENAI_API_KEY
使用工具生成 Helm Chart。
ucf_app_builder_cli app build deploy/ucs_apps/speech_bot/stock_bot/app.yaml deploy/ucs_apps/speech_bot/stock_bot/app-params.yaml
部署 Helm Chart。
helm install ace-agent deploy/ucs_apps/speech_bot/stock_bot/ucf-app-speech-bot-4.1.0
等待所有 Pod 准备就绪。
watch kubectl get pods
使用 Web 前端应用程序试用已部署的 Bot。使用
kubectl get svc获取ace-agent-webapp-deployment-service的nodeport,并使用 URLhttp://<工作站 IP>:<NodePort_for_7006>与 Bot 交互。
为了访问浏览器上的麦克风,我们需要通过添加 SSL 验证将 http 转换为 https 端点,或者更新您的 chrome://flags/ 或 edge://flags/ 以允许 http://<工作站 IP>:<nodeport_7006> 作为安全端点。
停止部署并删除持久卷。
helm uninstall ace-agent
kubectl delete pvc --all
使用 ACE Agent 微服务构建自定义 Helm Chart#
在本教程中,我们将展示如何使用 ACE Agent 微服务创建 Helm Chart,用于诸如基于文本的 Bot 和基于语音的 Bot 等用例,并将其扩展用于您的自定义应用程序。ACE Agent 提供使用 统一云服务 (UCS) 的 Kubernetes 支持。您可以将 UCS 文档中的构建 UCS 应用程序教程作为参考。
我们将使用
UCS CLI 界面,但是,您应该能够通过 UCS Studio 执行相同的步骤。
UCS 应用程序规范的各种自定义,以及
本教程中的各种 UCS 微服务。
构建聊天机器人 UCS 应用程序#
在本教程中,我们将使用 ./samples/stock_bot 中的股票示例 Bot 作为构建聊天机器人 UCS 应用程序的参考 Bot。我们已经在 ./deploy/ucs_apps/chat_bot/stock_bot/ 中为股票聊天机器人创建了一个 UCS 应用程序,您可以在本教程中使用它作为参考。
创建样板 UCS 应用程序规范。
ucf_app_builder_cli app create test-app
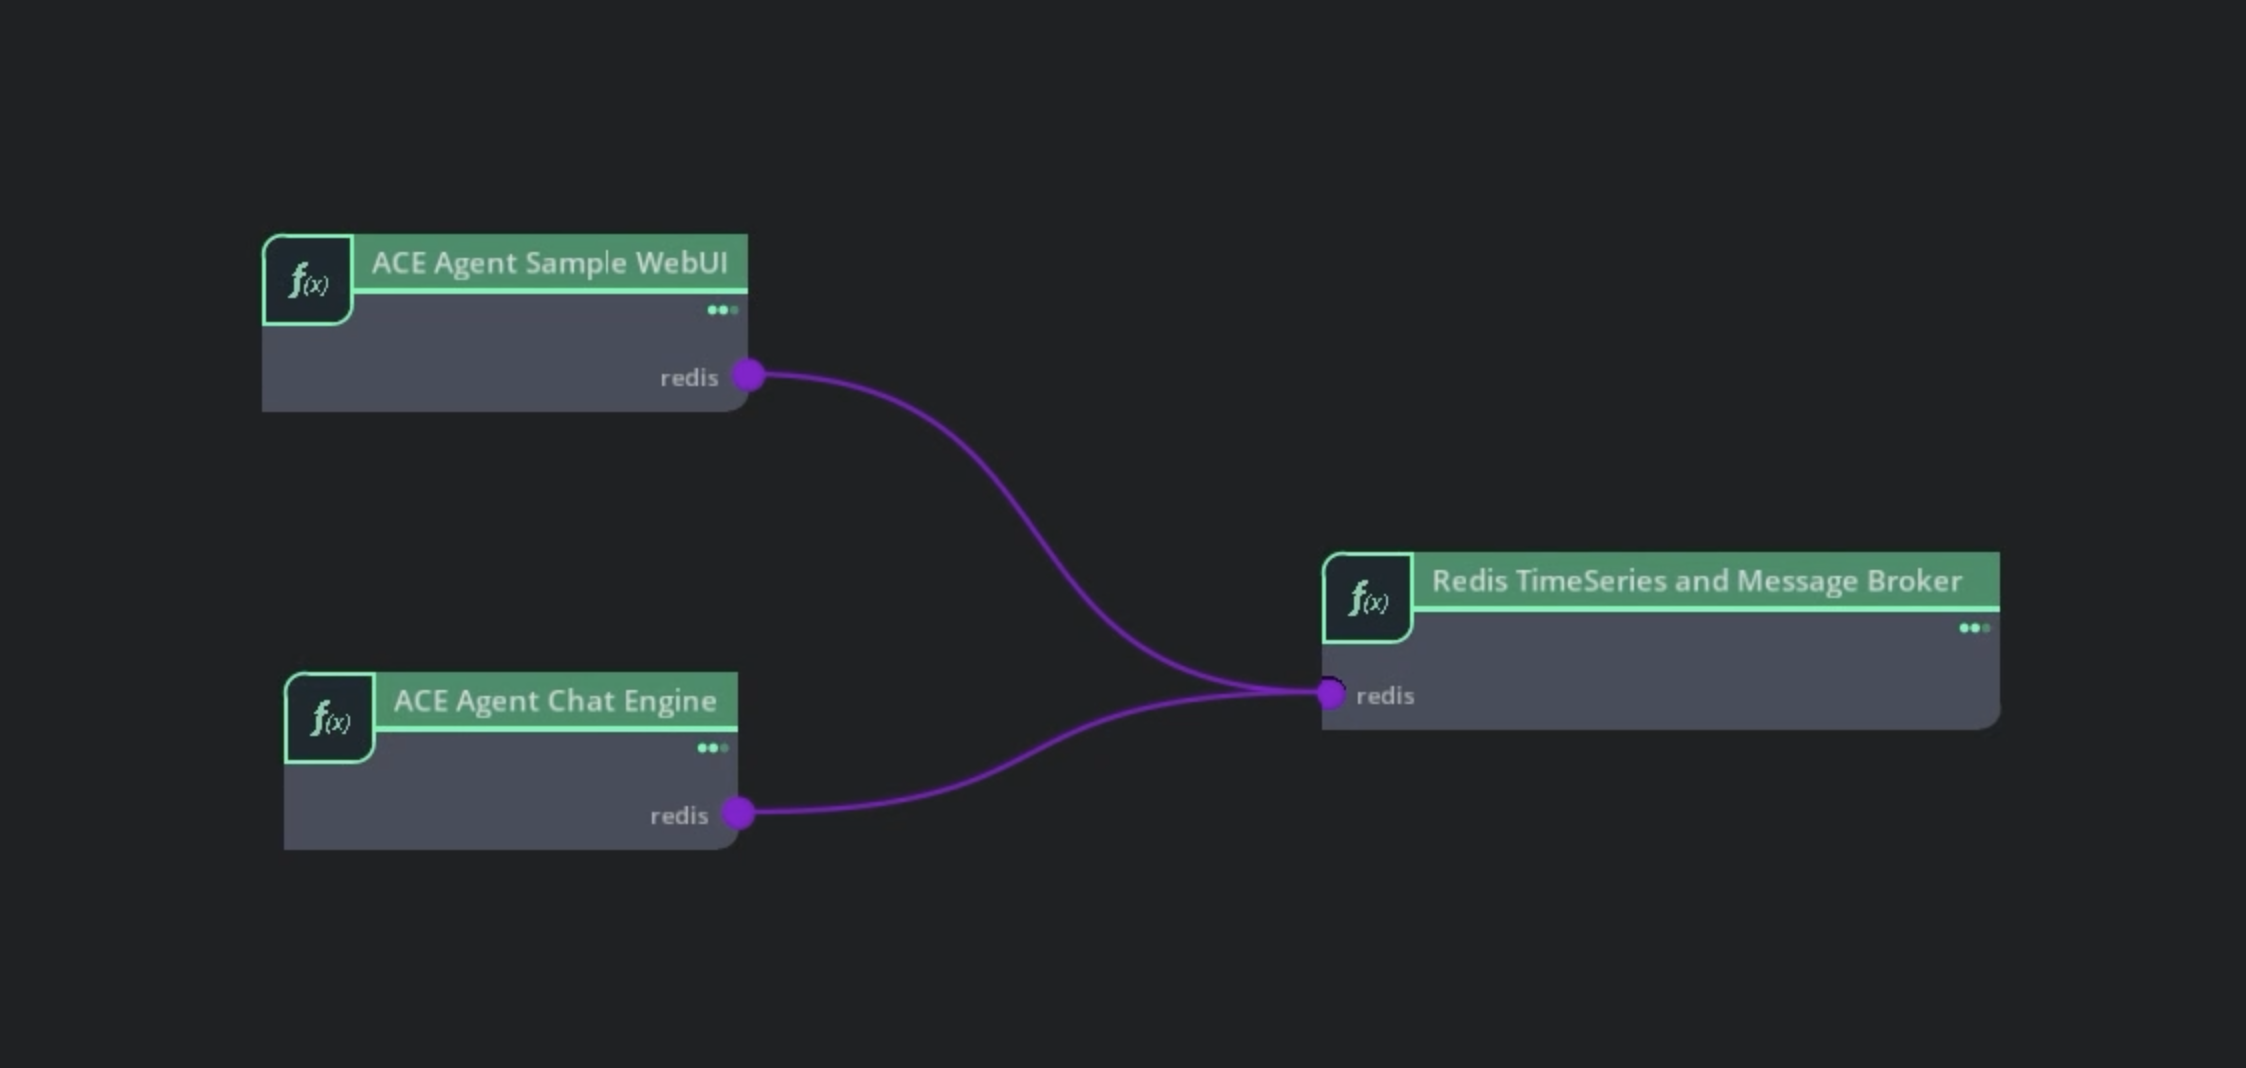
仅使用聊天引擎微服务构建 UCS 应用程序。按如下所示更新
test-app/app.yaml我们只需要聊天引擎微服务和 Redis 作为消息代理,但是,我们可以选择性地包含 Web App 微服务,以便 UI 与基于文本的 Bot 进行交互。我们需要的依赖项是
dependencies:
- ucf.svc.ace-agent.chat-engine:4.1.0
- ucf.svc.core.redis-timeseries:0.0.20
- ucf.svc.ace-agent.web-app:4.1.0
使用聊天引擎和 Web App 微服务更新组件部分。
components:
- name: chat-engine
  type: ucf.svc.ace-agent.chat-engine
  parameters:
    imagePullSecrets:
    - name: ngc-docker-reg-secret
- name: redis-timeseries
  type: ucf.svc.core.redis-timeseries
  parameters:
    imagePullSecrets:
    - name: ngc-docker-reg-secret
- name: webapp
  type: ucf.svc.ace-agent.web-app
  parameters:
    imagePullSecrets:
    - name: ngc-docker-reg-secret
更新聊天引擎和 Web App 微服务之间的连接。
connections:
  chat-engine/redis: redis-timeseries/redis
  webapp/redis: redis-timeseries/redis
股票 Bot 使用 OpenAI 的
gpt-4-turbo模型作为主要模型。为OPENAI_API_KEY创建 Kubernetes 密钥。export OPENAI_API_KEY="sk-XXX" kubectl create secret generic openai-key-secret --from-literal=OPENAI_API_KEY=${OPENAI_API_KEY}
检索用于下载 NGC 资源的 NGC CLI API 密钥。我们在
Prerequisites部分中创建了ngc-api-key-secret。删除vault部分,并使用ngc-api-key-secret和openai-key-secret更新secrets部分。secrets: k8sSecret/ngc-api-key-secret/NGC_CLI_API_KEY: k8sSecret: secretName: ngc-api-key-secret key: NGC_CLI_API_KEY k8sSecret/openai-key-secret/OPENAI_API_KEY: k8sSecret: secretName: openai-key-secret key: OPENAI_API_KEY
在
chat-engine部分中配置ngc-api-key-secret和openai-key-secret。- name: chat-engine type: ucf.svc.ace-agent.chat-engine parameters: imagePullSecrets: - name: ngc-docker-reg-secret secrets: ngc-api-key-secret: k8sSecret/ngc-api-key-secret/NGC_CLI_API_KEY openai-key-secret: k8sSecret/openai-key-secret/OPENAI_API_KEY
将 Bot 挂载到聊天引擎微服务。我们可以通过在应用程序规范的
chat-engine组件下提供本地目录来执行相同的操作。- name: chat-engine type: ucf.svc.ace-agent.chat-engine parameters: imagePullSecrets: - name: ngc-docker-reg-secret secrets: ngc-api-key-secret: k8sSecret/ngc-api-key-secret/NGC_CLI_API_KEY openai-key-secret: k8sSecret/openai-key-secret/OPENAI_API_KEY files: config_dir: ../samples/stock_bot/
指定 WebUI 和聊天引擎微服务的参数。您可以更新
chat-engine和webapp组件中的parameters部分,或者创建一个新文件test-app/params.yaml并对其进行更新。chat-engine: botConfigName: stock_bot_config.yml interface: "event" webapp: chatInterface: "event" speechFlags: ""
使用 UCS 工具生成 Helm Chart。
ucf_app_builder_cli app build test-app/app.yaml test-app/params.yaml
部署生成的 Helm Chart 并等待所有 Pod 准备就绪。使用
http://<NodeIP>:<NodePort_for_7006>/处的 Web 应用程序与 Bot 交互。您可以使用kubectl get svc获取NodePort。helm install test test-app/test-app-0.0.1/
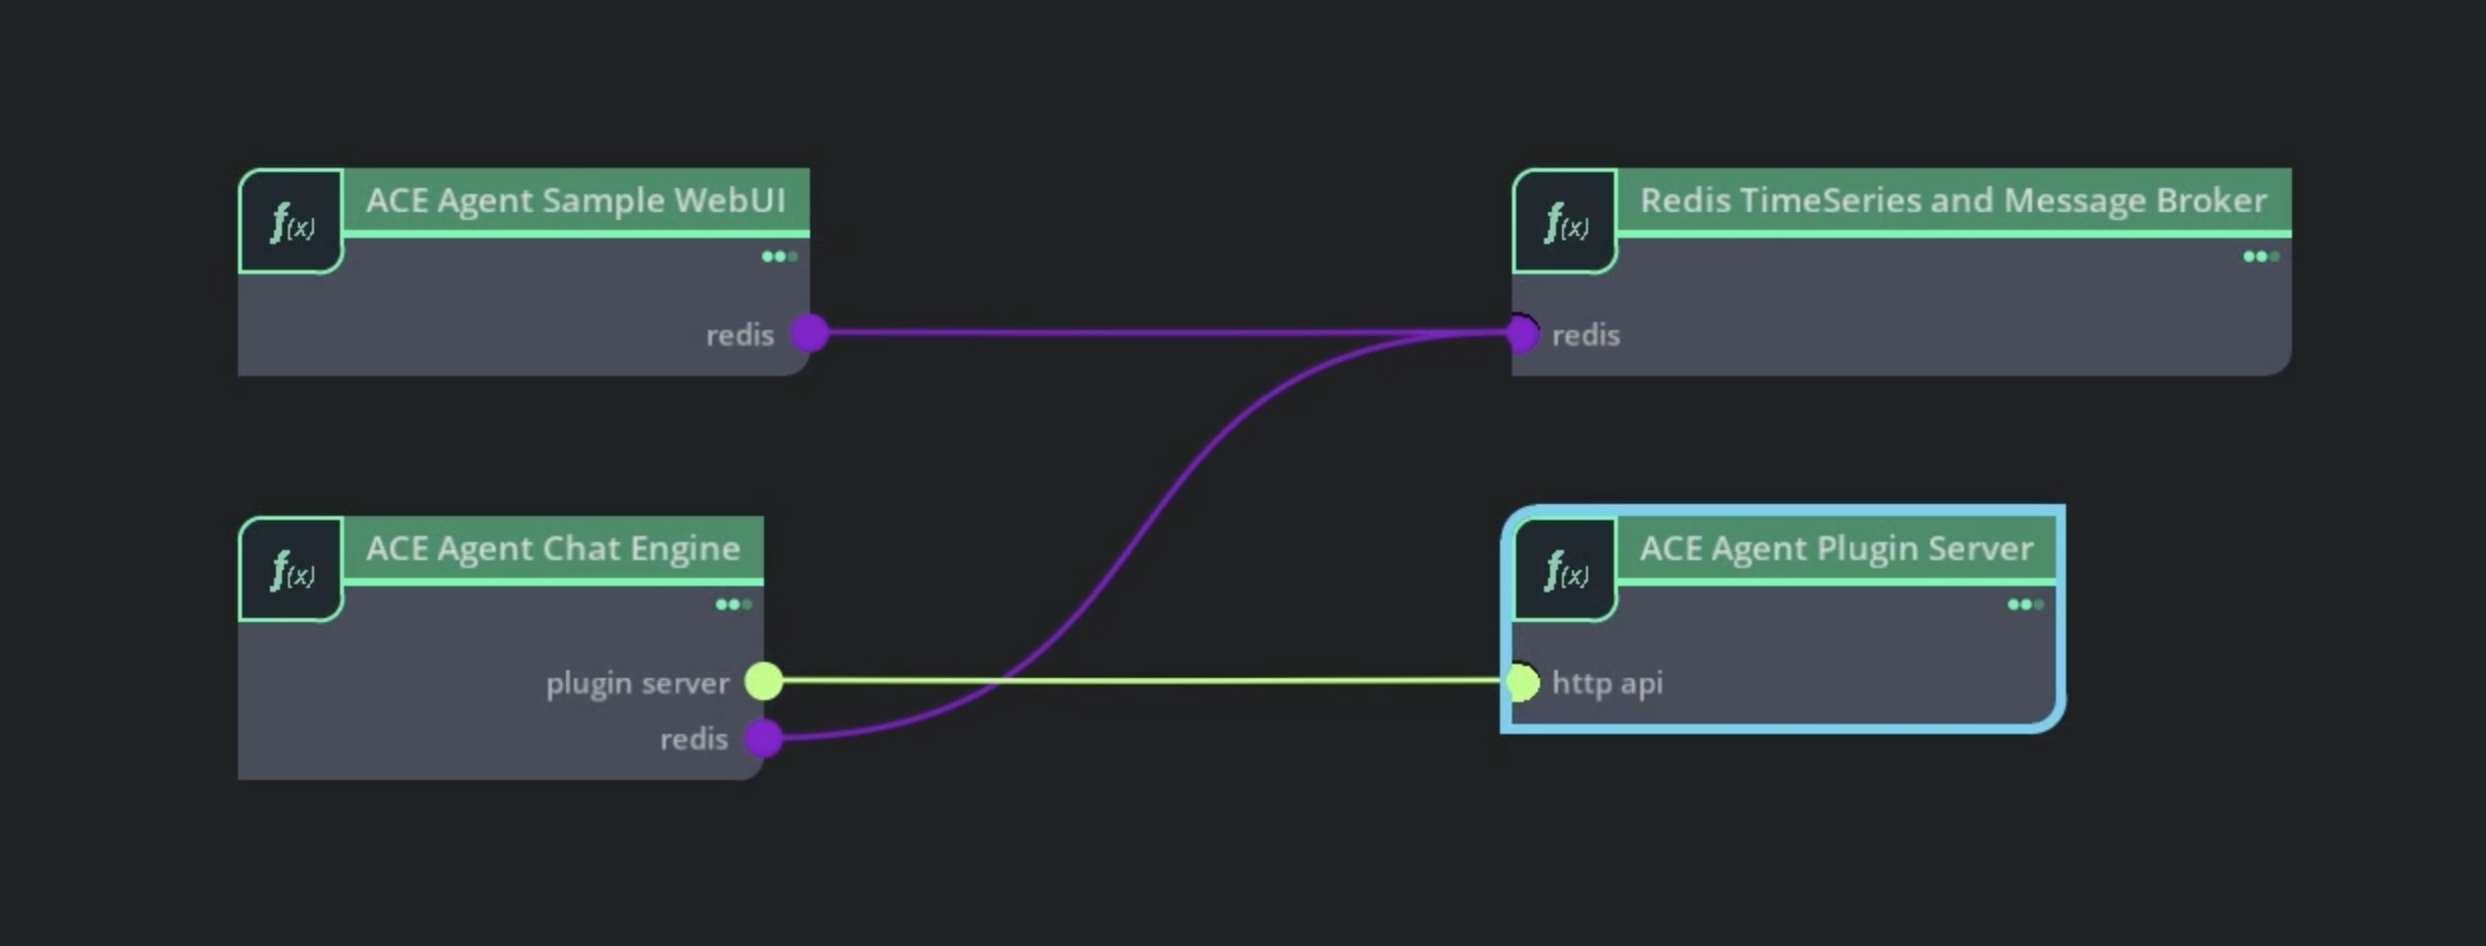
由于我们尚未部署插件服务器微服务,因此与实时股票价格相关的查询将不起作用。在 UCS 应用程序中添加 ACE Agent 插件服务器。更新
test-app/app.yaml。使用插件微服务更新
dependencies部分。dependencies: - ucf.svc.ace-agent.chat-engine:4.1.0 - ucf.svc.ace-agent.web-app:4.1.0 - ucf.svc.core.redis-timeseries:0.0.20 - ucf.svc.ace-agent.plugin-server:4.1.0
在组件中添加
plugin-server。- name: plugin-server type: ucf.svc.ace-agent.plugin-server parameters: imagePullSecrets: - name: ngc-docker-reg-secret secrets: ngc-api-key-secret: k8sSecret/ngc-api-key-secret/NGC_CLI_API_KEY
通过在
plugin-server组件下提供本地目录来挂载插件配置。- name: plugin-server type: ucf.svc.ace-agent.plugin-server parameters: imagePullSecrets: - name: ngc-docker-reg-secret secrets: ngc-api-key-secret: k8sSecret/ngc-api-key-secret/NGC_CLI_API_KEY files: config_dir: ../samples/stock_bot/
在聊天引擎和插件微服务之间添加连接。
connections: chat-engine/plugin-server: plugin-server/http-api chat-engine/redis: redis-timeseries/redis webapp/redis: redis-timeseries/redis
指定插件微服务的参数。您可以更新
plugin-server组件中的parameters部分,或者创建一个新文件test-app/params.yaml并进行更新。plugin-server: pluginConfigPath: "plugin_config.yaml" # relative path of the plugin_config.yaml
生成更新后的 Helm Chart 并部署应用程序。您应该能够使用
http://<NodeIP>:<NodePort>/处的 Web 应用程序与更新后的 Bot 交互。ucf_app_builder_cli app build test-app/app.yaml test-app/params.yaml # Uninstall existing deployment helm uninstall test kubectl delete pvc --all # Deploy updated helm chart helm install test test-app/test-app-0.0.1/
尝试 股票示例 Bot 支持的所有查询。
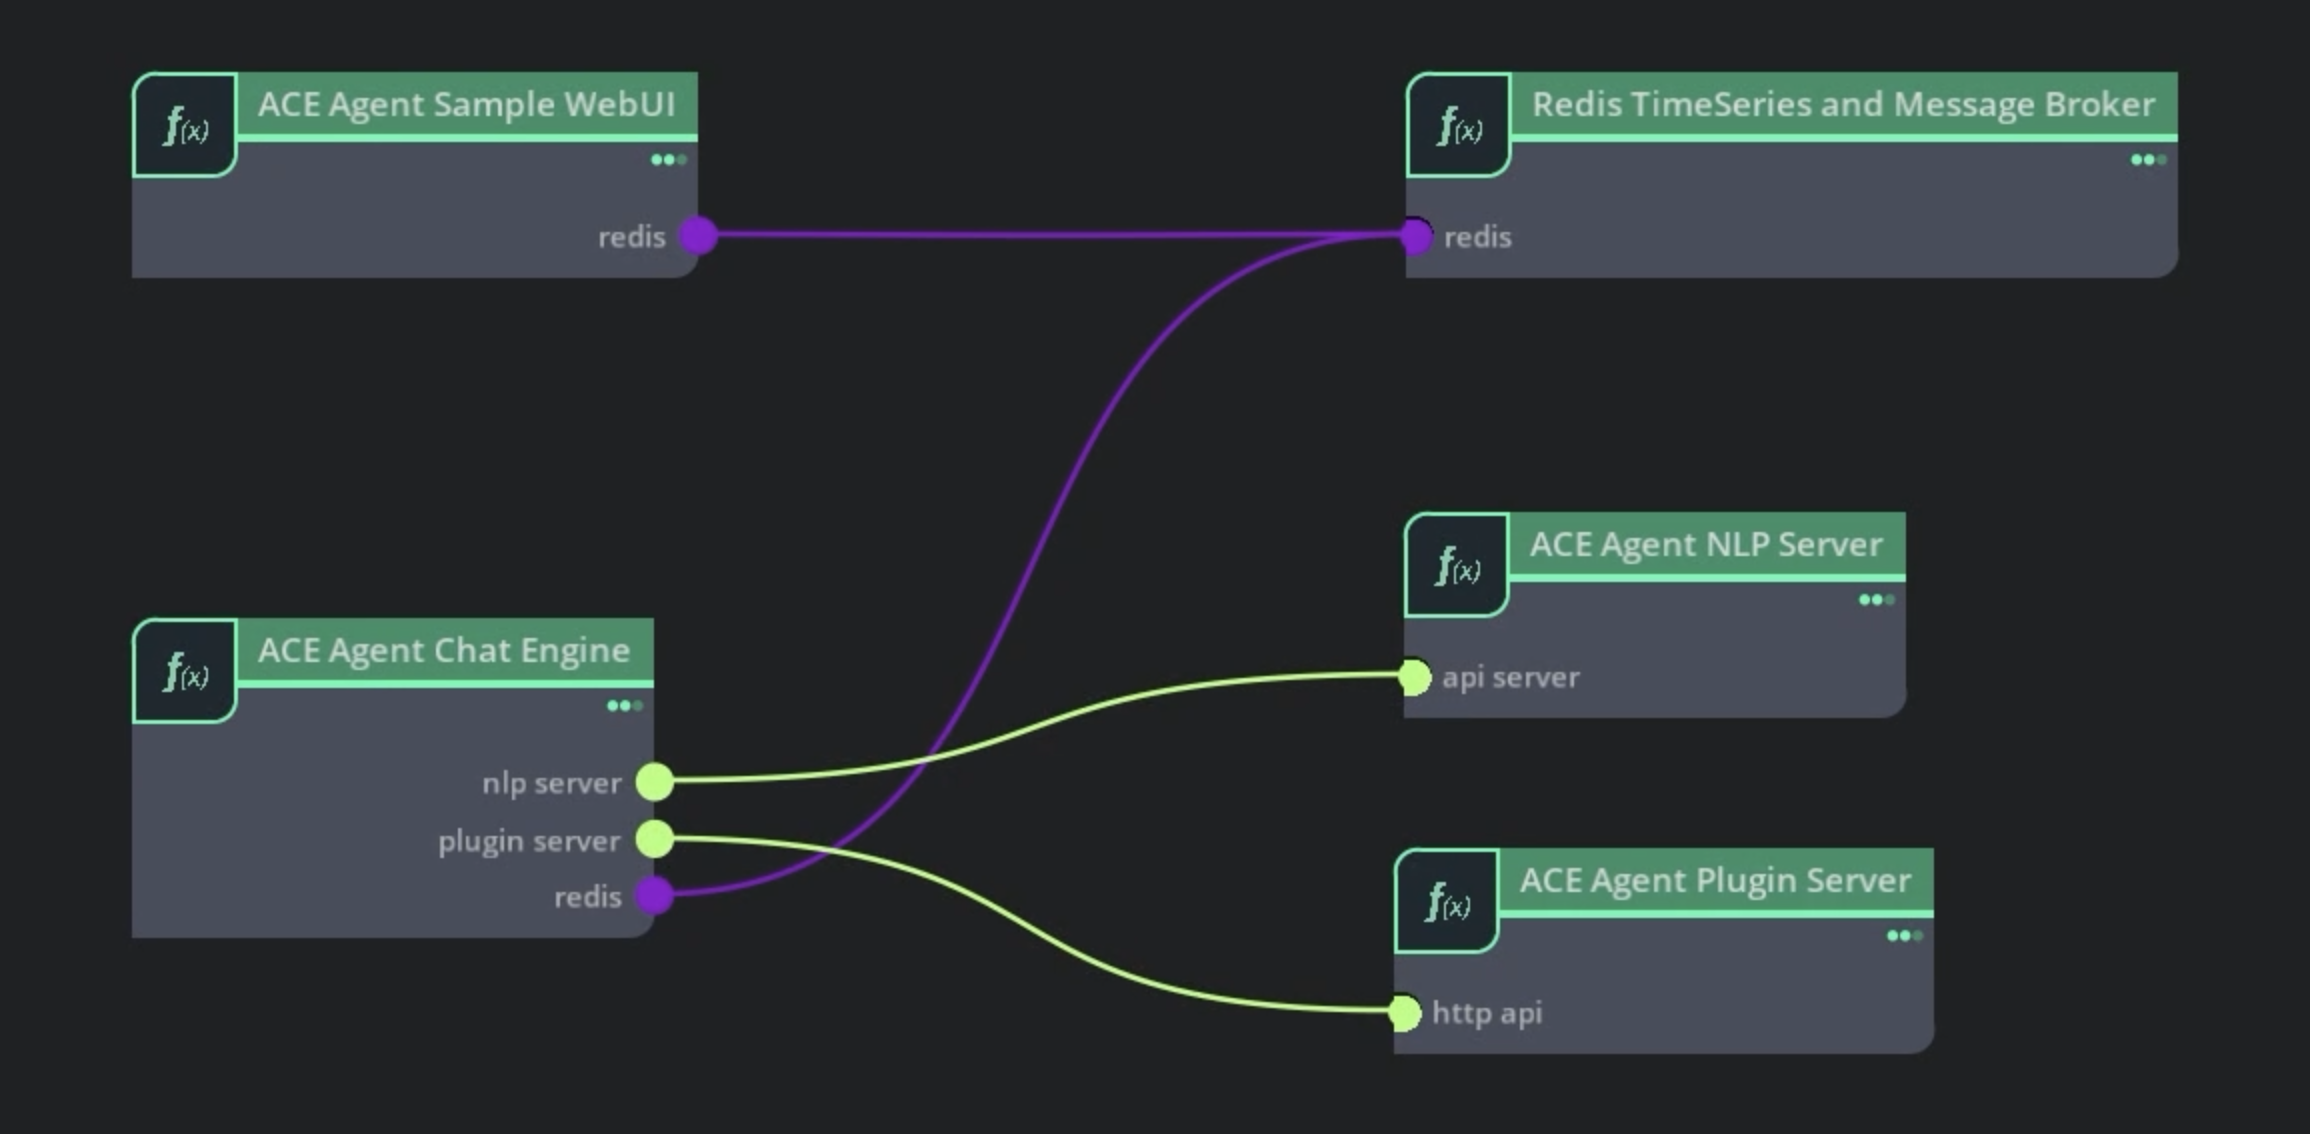
股票示例 Bot 不使用任何 NLP 模型,但是如果您在自定义 Bot 中添加 NLP 模型,则需要添加 NLP 服务器微服务。
在
dependencies组件中添加 NLP 服务器微服务。dependencies: - ucf.svc.ace-agent.chat-engine:4.1.0 - ucf.svc.ace-agent.web-app:4.1.0 - ucf.svc.core.redis-timeseries:0.0.20 - ucf.svc.ace-agent.plugin-server:4.1.0 - ucf.svc.ace-agent.nlp-server:4.1.0
更新组件。
- name: nlp-server type: ucf.svc.ace-agent.nlp-server parameters: imagePullSecrets: - name: ngc-docker-reg-secret secrets: ngc-api-key-secret: k8sSecret/ngc-api-key-secret/NGC_CLI_API_KEY
更新
connections。聊天引擎利用 NLP 服务器。connections: chat-engine/plugin-server: plugin-server/http-api chat-engine/redis: redis-timeseries/redis webapp/redis: redis-timeseries/redis chat-engine/nlp-server: nlp-server/api-server
我们可以通过在
nlp-server组件下提供本地目录来挂载模型配置。- name: nlp-server type: ucf.svc.ace-agent.nlp-server parameters: imagePullSecrets: - name: ngc-docker-reg-secret secrets: ngc-api-key-secret: k8sSecret/ngc-api-key-secret/NGC_CLI_API_KEY files: config_dir: ../samples/stock_bot/
更新
test-app/params.yaml的 NLP 服务器微服务参数和 GPU 设备。nlp-server: ucfVisibleGpus: [0] modelConfigPath: "model_config.yaml"
生成更新后的 Helm Chart 并部署应用程序。您应该能够使用
http://<NodeIP>:<NodePort>/处的 Web 应用程序与更新后的 Bot 交互。# Build updated helm chart ucf_app_builder_cli app build test-app/app.yaml test-app/params.yaml # Uninstall previous deployment helm uninstall test kubectl delete pvc --all # Install updated helm chart helm install test test-app/test-app-0.0.1/
构建语音 Bot UCS 应用程序#
在上一节中,我们为股票示例 Bot 创建了一个基于文本的 UCS 应用程序,并将更新 UCS 应用程序以支持语音到语音对话。我们已经在 ./deploy/ucs_apps/speech_bot/stock_bot/ 中为股票语音 Bot 创建了一个 UCS 应用程序,您可以在本教程中使用它作为参考。
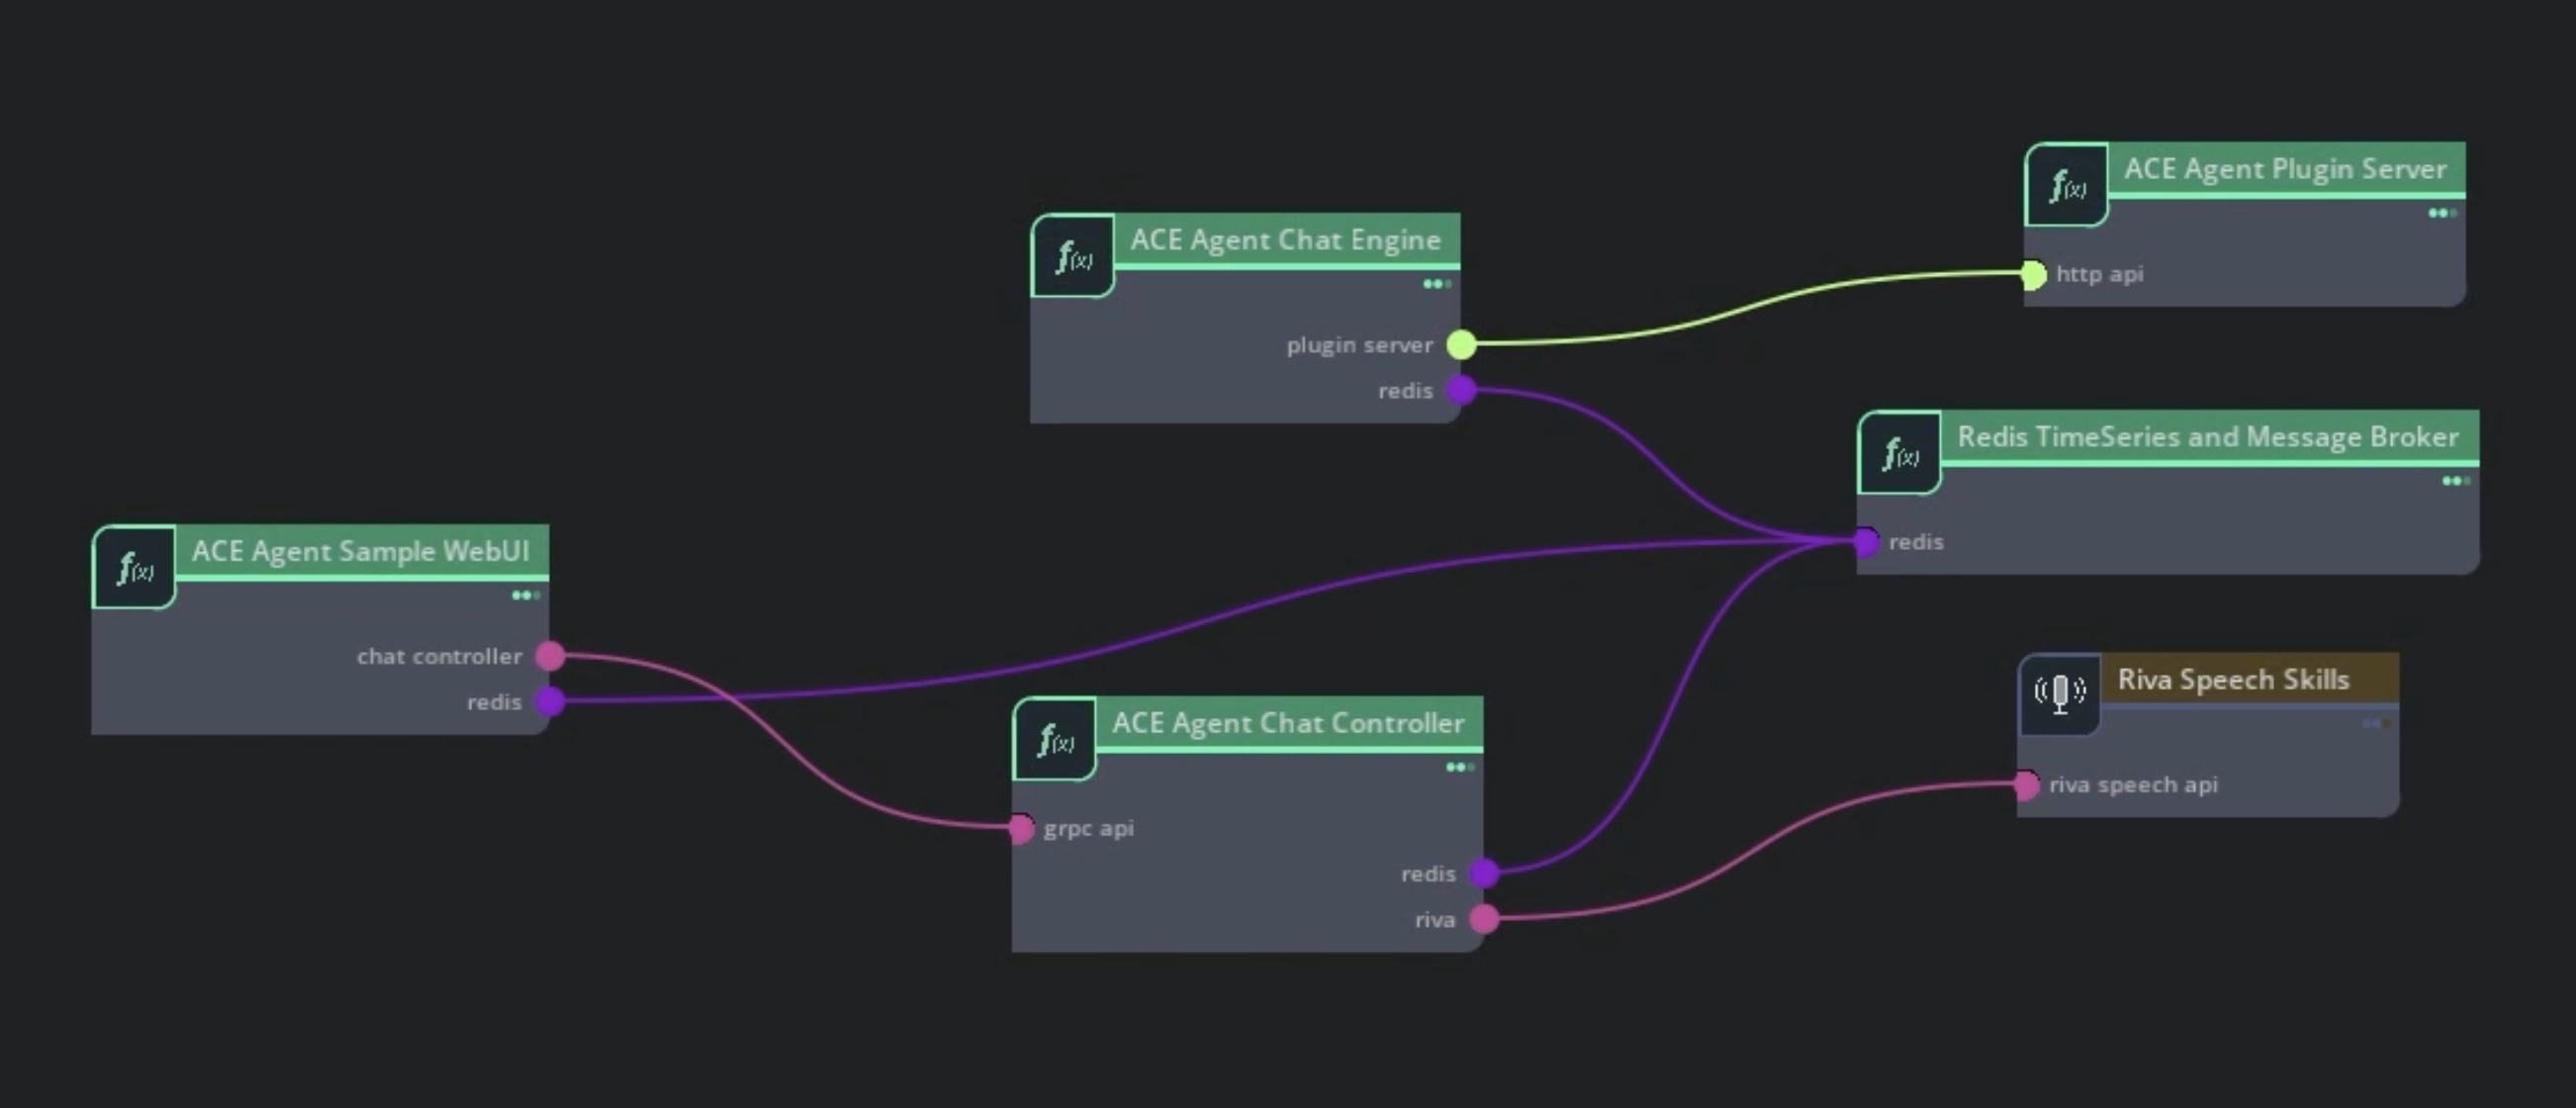
使用聊天控制器微服务添加语音支持。
在
dependencies部分中添加聊天控制器微服务。
dependencies: - ucf.svc.ace-agent.chat-engine:4.1.0 - ucf.svc.ace-agent.web-app:4.1.0 - ucf.svc.ace-agent.plugin-server:4.1.0 - ucf.svc.ace-agent.nlp-server:4.1.0 - ucf.svc.ace-agent.chat-controller:4.1.0 - ucf.svc.core.redis-timeseries:0.0.20
将
chat-controller添加到components部分。
- name: chat-controller type: ucf.svc.ace-agent.chat-controller parameters: imagePullSecrets: - name: ngc-docker-reg-secret secrets: ngc-api-key-secret: k8sSecret/ngc-api-key-secret/NGC_CLI_API_KEY
在
dependencies部分中添加用于部署语音模型的 Riva Speech Skills 微服务。
将
riva-speech添加到components部分。- name: riva-speech type: ucf.svc.riva.speech-skills parameters: imagePullSecrets: - name: ngc-docker-reg-secret secrets: ngc-api-key-secret: k8sSecret/ngc-api-key-secret/NGC_CLI_API_KEY
将聊天控制器连接到 Riva 服务器和聊天引擎。使用聊天控制器更新
webapp连接。connections: chat-engine/plugin-server: plugin-server/http-api chat-engine/redis: redis-timeseries/redis chat-controller/riva: riva-speech/riva-speech-api chat-controller/redis: redis-timeseries/redis webapp/chat-controller: chat-controller/grpc-api webapp/redis: redis-timeseries/redis
使用
test-app/params.yaml中的 ASR 和 TTS 模型更新 Riva 服务器参数。riva-speech: riva: visibleGpus: "0" modelRepoGenerator: ngcModelConfigs: triton0: models: #> description: List of NGC models for deployment - nvidia/ace/rmir_asr_parakeet_1-1b_en_us_str_vad:2.17.0 #english - nvidia/riva/rmir_tts_fastpitch_hifigan_en_us_ipa:2.17.0
更新聊天控制器微服务参数以使用
speech_umim管线。chat-controller: pipeline: speech_umim
在 test-app/params.yaml 中更新 WebUI 微服务参数以启用语音模式。
webapp: chatInterface: "event" speechFlags: "--speech"
生成更新后的 Helm Chart 并部署应用程序。等待所有 Pod 准备就绪,这可能需要大约 40-50 分钟。您应该能够使用
http://<NodeIP>:<NodePort_7006>/处的语音 Web 应用程序与更新后的 Bot 交互。# Rebuild the helm chart ucf_app_builder_cli app build test-app/app.yaml test-app/params.yaml # Uninstall previous deployment helm uninstall test kubectl delete pvc --all # Install updated helm chart helm install test test-app/test-app-0.0.1/
注意
为了访问浏览器上的麦克风,我们需要 HTTPS 端点。您可以添加 SSL 验证并将端点转换为 HTTPS,或者更新您的
chrome://flags/或edge://flags/以允许http://<Node_IP>:<Webapp_NodePort_7006>作为安全端点。
对于生产部署,请使用 NGC 资源为各种 ACE Agent 微服务提供 Bot 配置。这将允许您跟踪版本,而不必依赖主机文件系统。我们将更新
chat-engine微服务,但是,您可以类似地更新 NLP、插件和聊天控制器微服务。从
test-app/app.yaml的chat-engine组件中删除文件。- name: chat-engine type: ucf.svc.ace-agent.chat-engine parameters: imagePullSecrets: - name: ngc-docker-reg-secret secrets: ngc-api-key-secret: k8sSecret/ngc-api-key-secret/NGC_CLI_API_KEY openai-key-secret: k8sSecret/openai-key-secret/OPENAI_API_KEY
在
test-app/params.yaml中添加chat-engine参数。如果文件通过test-app/app.yaml中的组件提供,则不会使用configNgcPath参数。如果您在 NGC 中有多个 Bot 并且想要部署单个 Bot,请使用botConfigName指向所需的bot_config.yaml。chat-engine: configNgcPath: <NGC_RESOURCE_PATH> botConfigName: bot_config.yaml
重建 Helm Chart 并重新部署。
构建 LangChain Bot UCS 应用程序#
在本教程中,我们将展示如何为 ./samples/ddg_langchain_bot 中的示例 LangChain 基于 Bot 创建 UCS 应用程序。本教程可用于为其他示例 Bot(例如 ./samples/rag_bot 或您自己的自定义 Bot)创建 UCS 应用程序。
DuckDuckGo LangChain 示例 Bot 使用 OpenAI 模型,我们将需要 OPENAI_API_KEY。我们已经在 ./deploy/ucs_apps/speech_bot/ddg_langchain_bot/ 中为 DuckDuckGo LangChain Bot 创建了一个 UCS 应用程序,您可以在本教程中使用它作为参考。
创建样板 UCS 应用程序规范。
ucf_app_builder_cli app create langchain-app
按如下所示更新
langchain-app/app.yamlLangChain Agent 将作为插件服务器微服务的一部分进行部署。我们将需要聊天控制器和 Riva Speech Skills 以获得语音支持。我们可以选择性地包含 Web App 微服务,以便 UI 使用文本或语音与 Bot 进行交互。我们需要的依赖项是
dependencies: - ucf.svc.riva.speech-skills:2.17.0 - ucf.svc.ace-agent.plugin-server:4.1.0 - ucf.svc.ace-agent.chat-controller:4.1.0 - ucf.svc.ace-agent.web-app:4.1.0
更新
dependencies部分中微服务的components部分。- name: riva-speech type: ucf.svc.riva.speech-skills parameters: imagePullSecrets: - name: ngc-docker-reg-secret - name: plugin-server type: ucf.svc.ace-agent.plugin-server parameters: imagePullSecrets: - name: ngc-docker-reg-secret - name: chat-controller type: ucf.svc.ace-agent.chat-controller parameters: imagePullSecrets: - name: ngc-docker-reg-secret - name: webapp type: ucf.svc.ace-agent.web-app parameters: imagePullSecrets: - name: ngc-docker-reg-secret
更新微服务之间的
connections。connections: chat-controller/riva: riva-speech/riva-speech-api chat-controller/chat-api: plugin-server/http-api webapp/chat-controller: chat-controller/grpc-api
配置 OpenAI API 密钥。要创建 Kubernetes 密钥,请运行
export OPENAI_API_KEY=... kubectl create secret generic openai-key-secret --from-literal=OPENAI_API_KEY=${OPENAI_API_KEY}
设置用于下载 NGC 资源的 NGC CLI API 密钥。我们在
Prerequisites部分中创建了ngc-api-key-secret。删除vault部分,并使用ngc-api-key-secret和openai-key-secret更新密钥。secrets: k8sSecret/ngc-api-key-secret/NGC_CLI_API_KEY: k8sSecret: secretName: ngc-api-key-secret key: NGC_CLI_API_KEY k8sSecret/openai-key-secret/OPENAI_API_KEY: k8sSecret: secretName: openai-key-secret key: OPENAI_API_KEY
根据需要在
plugin-server、chat-controller和riva-skills部分中配置ngc-api-key-secret和openai-key-secret。- name: riva-speech type: ucf.svc.riva.speech-skills parameters: imagePullSecrets: - name: ngc-docker-reg-secret secrets: ngc-api-key-secret: k8sSecret/ngc-api-key-secret/NGC_CLI_API_KEY - name: plugin-server type: ucf.svc.ace-agent.plugin-server parameters: imagePullSecrets: - name: ngc-docker-reg-secret secrets: ngc-api-key-secret: k8sSecret/ngc-api-key-secret/NGC_CLI_API_KEY openai-key-secret: k8sSecret/openai-key-secret/OPENAI_API_KEY - name: chat-controller type: ucf.svc.ace-agent.chat-controller parameters: imagePullSecrets: - name: ngc-docker-reg-secret secrets: ngc-api-key-secret: k8sSecret/ngc-api-key-secret/NGC_CLI_API_KEY
将 Bot 挂载到插件服务器和聊天控制器微服务。我们可以通过在应用程序规范的
plugin-server和chat-controller组件下提供本地目录来执行相同的操作。- name: plugin-server type: ucf.svc.ace-agent.plugin-server parameters: imagePullSecrets: - name: ngc-docker-reg-secret secrets: ngc-api-key-secret: k8sSecret/ngc-api-key-secret/NGC_CLI_API_KEY openai-key-secret: k8sSecret/openai-key-secret/OPENAI_API_KEY files: config_dir: ../samples/ddg_langchain_bot - name: chat-controller type: ucf.svc.ace-agent.chat-controller parameters: imagePullSecrets: - name: ngc-docker-reg-secret secrets: ngc-api-key-secret: k8sSecret/ngc-api-key-secret/NGC_CLI_API_KEY files: config_dir: ../samples/ddg_langchain_bot
指定微服务的参数。您可以更新组件中的
parameters部分,或创建langchain-app/app-params.yaml。langchain-app/app-params.yaml的更新如下使用
langchain-app/params.yaml中的 ASR 和 TTS 模型更新 Riva Speech 参数。riva-speech: riva: visibleGpus: "0" modelRepoGenerator: ngcModelConfigs: triton0: models: #> description: List of NGC models for deployment - nvidia/ace/rmir_asr_parakeet_1-1b_en_us_str_vad:2.17.0 #english - nvidia/riva/rmir_tts_radtts_hifigan_en_us_ipa:2.17.0
更新
langchain-app/params.yaml中的聊天控制器参数。我们将使用speech_lite管线。插件服务器将公开带有 LangChain 端点前缀的 API。chat-controller: pipeline: speech_lite speechConfigPath: "speech_config.yaml" chatEndpointPrefix: "langchain"
更新插件服务器参数。
plugin-server: pluginConfigPath: "plugin_config.yaml"
更新 WebUI 微服务参数。
webapp: chatInterface: "grpc" speechFlags: "--speech"
LangChain 插件需要在插件服务器容器中安装其他软件包。
通过将
ddg_langchain_bot/plugins/requirements_dev.txt中的需求复制到deploy/docker/dockerfiles/plugin_server.Dockerfile中,构建自定义 Dockerfile。############################## # Install custom dependencies ############################## RUN pip3 install \ langchain==0.1.1 \ langchain-community==0.0.13 \ langchain-core==0.1.12 \ duckduckgo-search==5.3.1b1
注意
如果您在插件服务器中看到崩溃或从 DuckDuckGo 获取响应时遇到问题,请尝试使用更新版本的
duckduckgo-search。构建容器并将其推送到 NGC Docker 注册表。
# Set required environment variables for docker-compose.yaml source deploy/docker/docker_init.sh # Build custom plugin server docker image docker compose -f deploy/docker/docker-compose.yml build plugin-server # Retag docker image and push to NGC docker registry docker tag docker.io/library/plugin-server:4.1.0 <CUSTOM_DOCKER_IMAGE_PATH>:<VERSION> docker push <CUSTOM_DOCKER_IMAGE_PATH>:<VERSION>
如果您想使用其他 Docker 注册表,请更新
langchain-app/app.yaml中的imagePullSecrets。使用
langchain-app/params.yaml覆盖插件服务器镜像。plugin-server: pluginConfigPath: "plugin_config.yaml" applicationSpecs: deployment: containers: container: image: repository: <CUSTOM_DOCKER_IMAGE_PATH> tag: <VERSION>
生成更新后的 Helm Chart 并部署应用程序。您应该能够使用
http://<NodeIP>:<NodePort_7006>/处的语音 Web 应用程序与更新后的 Bot 交互。# Build helm chart using UCS tools ucf_app_builder_cli app build langchain-app/app.yaml langchain-app/params.yaml # Uninstall previous deployment helm uninstall test kubectl delete pvc --all # Deploy generated helm chart helm install test langchain-app/langchain-app-0.0.1/
为了访问浏览器上的麦克风,我们需要 HTTPS 端点。您可以添加 SSL 验证并将端点转换为 HTTPS,或者更新您的
chrome://flags/或edge://flags/以允许http://<Node_IP>:<Webapp_NodePort_7006>作为安全端点。
创建 Kubernetes 密钥#
ACE Agent 微服务利用以下 Kubernetes 密钥来设置各种密钥。
镜像拉取密钥 [强制性]:拉取 Docker 镜像以进行部署。ACE Agent 容器使用 NGC Docker 注册表。要设置镜像拉取密钥,请运行
export NGC_CLI_API_KEY=... kubectl create secret docker-registry ngc-docker-reg-secret --docker-server=nvcr.io --docker-username='$oauthtoken' --docker-password="${NGC_CLI_API_KEY}"
其中
NGC_CLI_API_KEY是 NGC 个人 API 密钥。NGC_CLI_API_KEY 密钥 [必需]:从 NGC 拉取模型和资源。此密钥对于 Chat Engine、Chat Controller、Plugin 和 NLP Server 微服务是必需的。它将在 pod 中的
/secrets/ngc_api_key.txt创建一个包含密钥值的文件。它也可以用于填充NGC_CLI_API_KEY环境变量。export NGC_CLI_API_KEY=... kubectl create secret generic ngc-api-key-secret --from-literal=NGC_CLI_API_KEY="${NGC_CLI_API_KEY}"
其中
NGC_CLI_API_KEY是 NGC 个人 API 密钥。OPENAI_API_KEY 密钥 [可选]:在 Chat Engine、Plugin 和 NLP Server 微服务中设置
OPENAI_API_KEY环境变量。此密钥将在 pod 中的/secrets/openai_api_key.txt创建一个包含密钥值的文件。export OPENAI_API_KEY="sk-XXX" kubectl create secret generic openai-key-secret --from-literal=OPENAI_API_KEY=${OPENAI_API_KEY}
NVIDIA_API_KEY 密钥 [可选]:设置
NVIDIA_API_KEY环境变量,该变量通常用于访问 Plugin 和 Chat Engine 微服务中的 https://build.nvidia.com/ 模型。此密钥将在 pod 中的/secrets/nvidia_api_key.txt创建一个包含密钥值的文件。export NVIDIA_API_KEY="XXX" kubectl create secret generic nvidia-api-key-secret --from-literal=ELEVENLABS_API_KEY=${NVIDIA_API_KEY}
自定义 ENV 密钥 [可选]:此密钥可用于传递任何键值对,这些键值对将导出为环境变量,并由 Chat Engine、Chat Controller、Plugin 和 NLP Server 微服务支持。此密钥将创建一个
/secrets/.env文件,并在运行服务之前加载该文件以设置环境变量。cat <<EOF | tee custom-env.txt KEY1=VALUE1 KEY2=VALUE2 EOF kubectl create secret generic custom-env-secrets --from-file=ENV=custom-env.txt
Bot 和 UCS 应用程序定制#
本节提供关于如何为您的自定义用例修改示例 UCS 应用程序和示例工作流程(如 Tokkio)的指南。ACE Agent 文档使用 Docker 流进行开发和 Bot 定制,并建议使用 Kubernetes 部署用于生产用例。对于某些定制或调试,交替使用 Docker 和 Kubernetes 部署变得很重要。
使用 Kubernetes 环境进行本地开发#
如果您将 ACE Agent 部署为更复杂的 Kubernetes 环境的一部分,例如,创建具有多个 ACE 微服务的交互式虚拟化身体验,您通常会希望在设置环境中直接测试您正在开发的 Bot。在 Kubernetes 部署中测试 Bot 将允许您检查交互的多模态方面,例如虚拟化身的动画、声音、响应时序等等。
为了简化此工作流程并允许快速迭代,可以在本地 Python 环境中运行 Chat Engine 并将其连接到正在运行的 Kubernetes 部署。在这种情况下,您只需在本地重启 Chat Engine 即可测试对 Colang 脚本或 Bot 配置的更改。
在本节中,我们将展示在事件接口中使用本地 Chat Engine 的步骤,但类似的步骤也应适用于 Chat Engine 服务器接口。
通过更新 Chat Controller 出口端点
chat_api的连接,将 UCS 应用程序规范中的 Chat Engine 微服务替换为本地 chat engine 部署。dependencies: [...] - ucf.svc.riva.speech-skills:2.17.0 # Remove chat-engine from the dependency list <Remove>- ucf.svc.ace-agent.chat-engine:4.1.0</Remove> - ucf.svc.ace-agent.chat-controller:4.1.0 [...] components: [...] # Remove the chat-engine from the list of components <Remove>- name: chat-engine type: ucf.svc.ace-agent.chat-engine parameters: imagePullSecrets: - name: ngc-docker-reg-secret secrets: ngc-api-key-secret: k8sSecret/ngc-api-key-secret/NGC_CLI_API_KEY openai-key-secret: k8sSecret/openai-key-secret/OPENAI_API_KEY</Remove> [...] # Add the local chat engine as external endpoint to the component list - name: engine-placeholder type: ucf.svc.external-endpoint parameters: # Update Local Chat Engine deployment IP Port service: 127.0.0.1 port: 8000 [...] connections: [...] # Remove outgoing connections from chat-engine (since we removed it above) <Remove> chat-engine/plugin-server: plugin-server/http-api chat-engine/redis: redis-timeseries/redis</Remove> # Point the chat-api egress connection to the engine-placeholder chat-controller/chat-api: engine-placeholder/endpoint
按照 Kubernetes 环境 部分中的说明重新部署您的 UCS 应用程序。
在单独的终端中,使用端口转发或暴露 nodePort 连接到集群内部的 Redis 时间序列微服务。
kubectl port-forward $(kubectl get pods | grep redis-timeseries | awk '{print $1}') 30379:6379
在本地 Python 环境中启动 ACE Agent(有关更多信息,请参阅 Python 环境)。
aceagent chat event -c bots/your_bot/ --event-provider-port 30379 --log-level=INFO
编辑 Colang 脚本和任何 Bot 配置,将任何更改保存到磁盘,然后只需重启 ACE Agent(CTRL+C 并重复上一步)即可测试您的更改。
将本地 Bot 配置与 UCS 应用程序结合使用#
Tokkio 工作流程利用 Bot 配置作为 NGC 资源。您可以执行以下步骤,使用本地目录自定义您的 Bot 配置,而不是使用 NGC 资源来设置自定义。
在本地下载 NGC Bot 资源。
ngc registry resource download-version <NGC_BOT_RESOURCE_PATH>
更新 UCS
app.yaml文件以使用下载的 NGC 资源本地目录。本地目录将作为 configmap 挂载在 pod 中。使用绝对目录路径或相对于app.yaml的相对路径。
- name: chat-engine type: ucf.svc.ace-agent.chat-engine parameters: imagePullSecrets: - name: ngc-docker-reg-secret secrets: ngc-api-key-secret: k8sSecret/ngc-api-key-secret/NGC_CLI_API_KEY openai-key-secret: k8sSecret/openai-key-secret/OPENAI_API_KEY files: config_dir: <LOCAL_BOT_DIRECTORY>您可以对 Chat Controller、NLP server 和 Plugin server 微服务进行类似的更新。
更新 UCS
app-params.yaml文件,从chat-engine、chat-controller、nlp-server和plugin-server组件中删除对 NGC Bot 配置资源路径的引用。
chat-engine: <REMOVE>configNgcPath: <NGC_RESOURCE_PATH><REMOVE> botConfigName: bot_config.yaml
您可以在本地 Bot 配置目录中进行修改,生成更新的 Helm Chart,并使用 Helm upgrade 部署应用程序。
# Build helm chart using UCS tools ucf_app_builder_cli app build app.yaml params.yaml # Upgrade deployment to utilize latest bot configurations helm upgrade <DEPLOYMENT_NAME> <NEW_HELM_CHART>注意
在 Helm chart 生成期间,您可能会收到关于二进制文件的警告。从 Bot 配置中删除任何二进制文件,因为它将挂载在 Kubernetes 部署中的 configmap 中。
在 Kubernetes 环境中使用第三方文本到语音 (TTS) 解决方案#
ACE Agent 管道支持 Riva TTS 作为默认选项。
对于语音 Bot,您可能希望自定义语音响应的语音。您可以训练自己的 TTS 模型、克隆 TTS 语音或使用任何第三方提供商。我们已经在教程部分中展示了如何使用 Docker 流集成 ElevenLabs 文本到语音 API;在本节中,我们将添加 Kubernetes 部署所需的其他步骤。
构建包含所需 ElevenLabs 依赖项的 NLP server Docker 镜像。
在
deploy/docker/dockerfiles/nlp_server.Dockerfile中的 NLP server Dockerfile 中添加所需的依赖项。############################## # Install custom dependencies ############################## RUN apt-get update & apt-get -y install ffmpeg RUN pip3 install pydub elevenlabs==1.4.1
构建容器并将其推送到 NGC Docker 注册表。
# Set required environment variables for docker-compose.yaml source deploy/docker/docker_init.sh # Build custom nlp server docker image docker compose -f deploy/docker/docker-compose.yml build nlp-server # Retag docker image and push to NGC docker registry docker tag docker.io/library/nlp-server:4.1.0 <CUSTOM_DOCKER_IMAGE_PATH>:<VERSION> docker push <CUSTOM_DOCKER_IMAGE_PATH>:<VERSION>如果您想使用不同的 Docker 注册表,请使用您自己的镜像 Kubernetes 密钥更新
nlp-server组件下app.yaml文件中的imagePullSecrets。
按照教程部分中的步骤,使用 ElevenLabs 特定客户端和配置更新 Bot 配置。如果您正在使用 NGC Bot 资源路径,请切换到本地 Bot 配置以进行更快的迭代。您可以使用 Docker 流验证您的更改。
在 UCS 应用程序规范中添加 NLP server 微服务。
在
app.yaml文件中添加 dependencies 部分。- ucf.svc.ace-agent.nlp-server:4.1.0
在
app.yaml文件中添加 components 部分。- name: nlp-server type: ucf.svc.ace-agent.nlp-server parameters: imagePullSecrets: - name: ngc-docker-reg-secret secrets: ngc-api-key-secret: k8sSecret/ngc-api-key-secret/NGC_CLI_API_KEY files: config_dir: <LOCAL_BOT_CONFIG_DIR>
更新
app-params.yaml文件中的 NLP server 参数,并更新在步骤 1 中创建的 NLP server Docker 镜像。nlp-server: ucfVisibleGpus: [0] modelConfigPath: "model_config.yaml" customModelDir: "elabs.py" # custom elevenlabs client path applicationSpecs: deployment: containers: nlp-api: image: # UPDATE NGC image pushed in step1 repository: <CUSTOM_DOCKER_IMAGE_PATH> tag: <VERSION>
将
ELEVENLABS_API_KEY传递给 NLP server 微服务。
创建一个自定义 Kubernetes 密钥以传递
ELEVENLABS_API_KEY。cat <<EOF | tee custom-env.txt ELEVENLABS_API_KEY=<API_KEY_VALUE> EOF kubectl create secret generic custom-env-secrets --from-file=ENV=custom-env.txt
在
app.yaml文件的 secrets 部分中添加custom-env-secrets。secrets: k8sSecret/ngc-api-key-secret/NGC_CLI_API_KEY: k8sSecret: secretName: ngc-api-key-secret key: NGC_CLI_API_KEY k8sSecret/custom-env-secrets: k8sSecret: secretName: custom-env-secrets key: ENV
在
nlp-server组件中添加custom-env-secrets。- name: nlp-server type: ucf.svc.ace-agent.nlp-server parameters: imagePullSecrets: - name: ngc-docker-reg-secret secrets: ngc-api-key-secret: k8sSecret/ngc-api-key-secret/NGC_CLI_API_KEY custom-env-secrets: k8sSecret/custom-env-secrets files: config_dir: <LOCAL_BOT_CONFIG_DIR>
更新 UCS
app-params.yaml文件中的参数以使用 ElevenLabs TTS 客户端。
在
chat-controller组件中,更新 TTS 部分以使用 ElevenLabs 客户端。riva_tts: RivaTTS: tts_mode: "http" voice_name: "Brian" language: "en-US" server: http://ace-agent-nlp-server-deployment-service:9003/speech/text_to_speech arpabet_dict: "" sample_rate: 16000 model_name: "eleven_turbo_v2_5" chunk_duration_ms: 600 #amount of data to be sent to downstream in realtime audio_start_threshold_ms: 800 #2000 #duration for which audio data will be sent in burst and rest of the data will be sent in realtime send_audio_in_realtime: true #this will send synthesized audio data in realtime to downstream
注释掉
riva-speech组件中的 TTS 模型。nvidia/riva/rmir_tts_fastpitch_hifigan_en_us_ipa:2.17.0
您可以在本地 Bot 配置目录中进行修改,生成更新的 Helm Chart,并使用 Helm upgrade 部署应用程序。
# Build helm chart using UCS tools ucf_app_builder_cli app build app.yaml app-params.yaml # Uninstall previous deployment helm uninstall <DEPLOYMENT_NAME> kubectl delete pvc --all # Deploy generated helm chart helm install <DEPLOYMENT_NAME> <HELM_CHART_PATH>
使用 Kubernetes 部署多语言 Bot#
NVIDIA ACE Agent 支持以不同语言部署 Bot,但有一些限制。
对于 ASR(自动语音识别),仅支持 Riva Speech 兼容的模型和语言。
对于 TTS(文本到语音),除了 Riva TTS 之外,您还可以使用外部服务来选择语言。
单次部署不能支持多种语言。您需要为 ASR 选择一种语言,并且可以为 TTS 选择相同或不同的语言。
在本节中,我们将展示在 UCS 应用程序中部署作为 ACE Agent 版本一部分发布的西班牙语示例 Bot 所需的更改。更改语言时,您可以应用类似的更改。
在
riva-speech组件下app-params.yaml文件中更新目标语言的 ASR 和 TTS 模型。
riva-speech:
  riva:
    visibleGpus: "0"
  modelRepoGenerator:
    ngcModelConfigs:
    triton0:
        models:
        #> description: List of NGC models for deployment

        - nvidia/ace/rmir_asr_parakeet_1-1b_en_us_str_vad:2.17.0 #english
        - nvidia/riva/rmir_tts_fastpitch_hifigan_en_us_ipa:2.17.0
如果您使用 Riva 的神经机器翻译模型在查询级别或响应级别进行翻译,则还需要在 riva-speech 组件中部署翻译模型。
在
app-params.yaml文件中的chat-controller组件中,更新 ASR 的language以及 TTS 的voice_name和language。这些更新可以在speech_config.yaml文件中执行。如果在两个地方都更新,则app-params.yaml文件中的更改将优先。
chat-controller:
 pipelineParams:
   riva_asr:
     RivaASR:
       server: "0.0.0.0:50051"
       language: "en-US"
       word_boost_file_path: "/workspace/config/asr_words_to_boost.txt"
       enable_profanity_filter: false
       endpointing_stop_history: 800
       endpointing_stop_history_eou: 240
   riva_tts:
     RivaTTS:
       server: "0.0.0.0:50051"
       voice_name: "English-US.Female-1"
       language: "en-US"
       sample_rate: 44100
       chunk_duration_ms: 100
       audio_start_threshold_ms: 400
       send_audio_in_realtime: true
       tts_mode: "grpc"
您可以使用以下实现之一开发多语言 Bot
使用多语言 LLM 或特定语言的 LLM - 请参考 Spanish LLM 示例 Bot 作为示例。我们使用 CoLang 语法 (en-US) 和多语言 LLM 为用户查询(也是西班牙语)生成西班牙语响应。
使用 Riva 的神经机器翻译模型 - 在此实现中,我们将用户查询翻译成 en-US,在 en-US 中生成响应,然后将响应翻译成目标语言。请参考 Spanish NMT Bot 作为示例。
使用本地目录或 UCS 应用程序中的 NGC 资源路径更新 Bot 配置,以进行目标用例所需的更改。有关更多信息,请参阅 将本地 Bot 配置与 UCS 应用程序结合使用 部分。
使用 UCS 工具重建 Helm chart。
# Build helm chart using UCS tools
ucf_app_builder_cli app build app.yaml app-params.yaml


