光流#
本笔记本展示了如何使用 Dali 计算给定帧序列的光流。
让我们从一些方便的导入开始
[1]:
import os.path
import numpy as np

from nvidia.dali import pipeline_def
import nvidia.dali.fn as fn

from matplotlib import pyplot as plt
设置元参数。
作为一个例子,我们使用 Sintel 预告片,包含在 DALI_extra 仓库中。欢迎针对您自己的视频数据进行验证。
DALI_EXTRA_PATH 环境变量应指向从 DALI extra 仓库 下载数据的位置。请确保已检出正确的发布标签。
[2]:
batch_size = 1
sequence_length = 10
dali_extra_path = os.environ["DALI_EXTRA_PATH"]
video_filename = (
    dali_extra_path + "/db/optical_flow/sintel_trailer/sintel_trailer_short.mp4"
)
用于光流可视化的函数。
代码来自 Tomrunia 的 GitHub
[3]:
def make_colorwheel():
    """
    Generates a color wheel for optical flow visualization as presented in:
        Baker et al. "A Database and Evaluation Methodology for Optical Flow"
        (ICCV, 2007)
        URL: http://vision.middlebury.edu/flow/flowEval-iccv07.pdf
    According to the C++ source code of Daniel Scharstein
    According to the Matlab source code of Deqing Sun
    """

    RY = 15
    YG = 6
    GC = 4
    CB = 11
    BM = 13
    MR = 6

    ncols = RY + YG + GC + CB + BM + MR
    colorwheel = np.zeros((ncols, 3))
    col = 0

    # RY
    colorwheel[0:RY, 0] = 255
    colorwheel[0:RY, 1] = np.floor(255 * np.arange(0, RY) / RY)
    col = col + RY
    # YG
    colorwheel[col : col + YG, 0] = 255 - np.floor(255 * np.arange(0, YG) / YG)
    colorwheel[col : col + YG, 1] = 255
    col = col + YG
    # GC
    colorwheel[col : col + GC, 1] = 255
    colorwheel[col : col + GC, 2] = np.floor(255 * np.arange(0, GC) / GC)
    col = col + GC
    # CB
    colorwheel[col : col + CB, 1] = 255 - np.floor(255 * np.arange(CB) / CB)
    colorwheel[col : col + CB, 2] = 255
    col = col + CB
    # BM
    colorwheel[col : col + BM, 2] = 255
    colorwheel[col : col + BM, 0] = np.floor(255 * np.arange(0, BM) / BM)
    col = col + BM
    # MR
    colorwheel[col : col + MR, 2] = 255 - np.floor(255 * np.arange(MR) / MR)
    colorwheel[col : col + MR, 0] = 255
    return colorwheel


def flow_compute_color(u, v, convert_to_bgr=False):
    """
    Applies the flow color wheel to (possibly clipped) flow components u and v.
    According to the C++ source code of Daniel Scharstein
    According to the Matlab source code of Deqing Sun
    :param u: np.ndarray, input horizontal flow
    :param v: np.ndarray, input vertical flow
    :param convert_to_bgr: bool, whether to change ordering and output BGR
                                 instead of RGB
    :return:
    """

    flow_image = np.zeros((u.shape[0], u.shape[1], 3), np.uint8)

    colorwheel = make_colorwheel()  # shape [55x3]
    ncols = colorwheel.shape[0]

    rad = np.sqrt(np.square(u) + np.square(v))
    a = np.arctan2(-v, -u) / np.pi

    fk = (a + 1) / 2 * (ncols - 1)
    k0 = np.floor(fk).astype(np.int32)
    k1 = k0 + 1
    k1[k1 == ncols] = 0
    f = fk - k0

    for i in range(colorwheel.shape[1]):
        tmp = colorwheel[:, i]
        col0 = tmp[k0] / 255.0
        col1 = tmp[k1] / 255.0
        col = (1 - f) * col0 + f * col1

        idx = rad <= 1
        col[idx] = 1 - rad[idx] * (1 - col[idx])
        col[~idx] = col[~idx] * 0.75  # out of range?

        # Note the 2-i => BGR instead of RGB
        ch_idx = 2 - i if convert_to_bgr else i
        flow_image[:, :, ch_idx] = np.floor(255 * col)

    return flow_image


def flow_to_color(flow_uv, clip_flow=None, convert_to_bgr=False):
    """
    Expects a two dimensional flow image of shape [H,W,2]
    According to the C++ source code of Daniel Scharstein
    According to the Matlab source code of Deqing Sun
    :param flow_uv: np.ndarray of shape [H,W,2]
    :param clip_flow: float, maximum clipping value for flow
    :return:
    """

    assert flow_uv.ndim == 3, "input flow must have three dimensions"
    assert flow_uv.shape[2] == 2, "input flow must have shape [H,W,2]"

    if clip_flow is not None:
        flow_uv = np.clip(flow_uv, 0, clip_flow)

    u = flow_uv[:, :, 0]
    v = flow_uv[:, :, 1]

    rad = np.sqrt(np.square(u) + np.square(v))
    rad_max = np.max(rad)

    epsilon = 1e-5
    u = u / (rad_max + epsilon)
    v = v / (rad_max + epsilon)

    return flow_compute_color(u, v, convert_to_bgr)
使用 Dali#
定义 Pipeline。#
以下 pipeline 加载视频文件并计算帧序列的光流。有关更多信息,请参阅 readers.video 和 optical_flow 文档。
[4]:
@pipeline_def
def optical_flow_pipe():
    video = fn.readers.video(
        device="gpu", filenames=video_filename, sequence_length=sequence_length
    )
    of = fn.optical_flow(video, output_grid=4)
    return of
构建并运行 DALI Pipeline。#
[5]:
pipe = optical_flow_pipe(batch_size=batch_size, num_threads=1, device_id=0)
pipe.build()
pipe_out = pipe.run()
flow_vector = np.array(pipe_out[0][0].as_cpu())
print(flow_vector.shape)
(9, 180, 320, 2)
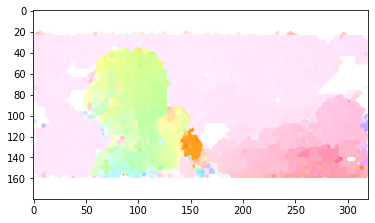
在上面您可以看到计算出的 flow_vector 的形状(NFHWC 格式)。它包含 2 个通道:x 轴的光流向量和 y 轴的光流向量。输出分辨率由传递给 optical_flow 运算符的 output_grid 选项确定:对于 output_grid = 4,4x4 网格用于光流计算,因此每个维度上的分辨率比输入图像的分辨率小 4 倍。
可视化结果#
[6]:
of_result = flow_to_color(flow_vector[sequence_length // 2])
plt.imshow(of_result)
[6]:
<matplotlib.image.AxesImage at 0x7f88f80f7790>
