Numpy 读取器#
概述#
此示例演示了如何使用 DALI 的 readers.numpy 读取器读取 Numpy 数组文件 (*.npy)。此笔记本还演示了如何借助 NVIDIA GPUDirect Storage 使用 DALI 将 numpy 文件直接加载到 GPU 内存,以及如何使用感兴趣区域 (ROI) API 加载数组的区域。
读取器直接从文件中提取形状和数据类型信息。请注意,目前仅支持 Numpy v1(而非 v2)文件。Numpy v1 是最常用的版本。有关更多详细信息,请参阅 numpy 文件格式规范。
操作器返回的数组的形状取自文件。DALI 张量始终以 C 顺序(行优先)存储。如果文件包含 FORTRAN 顺序(列优先)的数据,则操作器将自动将数据转置为 C 顺序。此转置会大大增加加载过程的时间。因此,我们建议尽可能以 C 顺序存储文件。
测试数据#
在此示例中,我们将使用 DALI_extra 存储库中提供的 3D MRI 数据。环境变量 DALI_EXTRA_PATH 应指向 DALI_extra 的位置。确保您检出与已安装的 DALI 版本对应的正确发布标签。
我们将使用两种格式的 3D MRI 扫描
2D 切片,每个切片一个文件
npy_2d_slices
└── STU00001
    ├── SER00001
    │   ├── 0.npy
    │   ├── 1.npy
    │   ├── 2.npy
    │   ├── 3.npy
    │   └── 4.npy
包含整个体积的 3D 数组
npy_3d
└── STU00001
    ├── SER00001.npy
[1]:
import os

batch_size = 4  # to be used in pipelines
dali_extra_dir = os.environ["DALI_EXTRA_PATH"]
data_dir_2d = os.path.join(
    dali_extra_dir, "db", "3D", "MRI", "Knee", "npy_2d_slices", "STU00001"
)
data_dir_3d = os.path.join(
    dali_extra_dir, "db", "3D", "MRI", "Knee", "npy_3d", "STU00001"
)
让我们介绍一个实用函数来绘制样本批次
[2]:
# misc python stuff
import numpy as np
from glob import glob
import shutil
import tempfile

# visualization
from PIL import Image
import matplotlib.pyplot as plt


def plot_batch(np_arrays, nsamples=None):
    if nsamples is None:
        nsamples = len(np_arrays)
    fig, axvec = plt.subplots(
        nrows=1, ncols=nsamples, figsize=(10, 10 * nsamples)
    )
    for i in range(nsamples):
        ax = axvec[i]
        ax.tick_params(
            left=False, bottom=False, labelleft=False, labelbottom=False
        )
        ax.imshow(Image.fromarray(np_arrays[i]))
    plt.tight_layout()
我们可以检查数据在两种表示形式中是否等效
[3]:
ser00001_2d = [
    np.load(os.path.join(data_dir_2d, "SER00001", f"{i}.npy")) for i in range(4)
]
plot_batch(ser00001_2d)

[4]:
ser00001_3d = np.load(os.path.join(data_dir_3d, "SER00001.npy"))
plot_batch([ser00001_3d[0], ser00001_3d[1], ser00001_3d[2], ser00001_3d[3]])
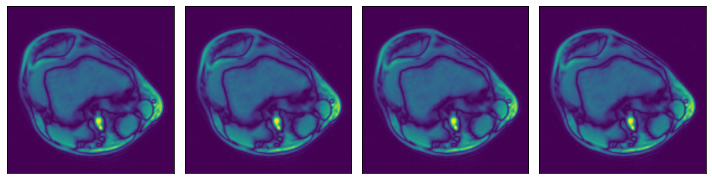
用法#
readers.numpy 读取器可以通过不同的方式进行配置。让我们看一些例子。
Glob 过滤器#
读取由参数 file_root 指定的特定目录下与特定 glob 字符串匹配的所有文件,该 glob 字符串由 file_filter 参数指定。
[5]:
from nvidia.dali import pipeline_def, fn

data_dir = os.path.join(data_dir_2d, "SER00001")


@pipeline_def(batch_size=batch_size, num_threads=3, device_id=0)
def pipe1():
    data = fn.readers.numpy(
        device="cpu", file_root=data_dir, file_filter="*.npy"
    )
    return data


def run(p):
    p.build()  # build the pipeline
    outputs = p.run()  # Run once
    # Getting the batch as a list of numpy arrays, for displaying
    batch = [np.array(outputs[0][s]) for s in range(batch_size)]
    return batch


data1 = run(pipe1())
plot_batch(data1)

包含文件路径列表的文本文件#
读取由文本文件指定的所有文件,其中每行包含相对于 file_root 目录的文件路径。
[6]:
# Used to verify that two batches are identical
def assert_all_equal(batch1, batch2):
    assert len(batch1) == len(batch2)
    batch_size = len(batch1)
    for i in range(batch_size):
        np.testing.assert_array_equal(batch1[i], batch2[i])


# Listing all *.npy files in data_dir
files = sorted([f for f in os.listdir(data_dir) if ".npy" in f])


# Defining a pipeline taking the file list file path as an argument
@pipeline_def(batch_size=batch_size, num_threads=3, device_id=0)
def pipe2(file_list_path):
    data = fn.readers.numpy(
        device="cpu", file_root=data_dir, file_list=filelist_path
    )
    return data


# Creating a temporary directory to contain the "file list" file.
with tempfile.TemporaryDirectory() as tmp_dir:
    # Creating a file_list text file, which contains the names of the data files
    # to be loaded
    filelist_path = os.path.join(tmp_dir, "test_file_list.txt")
    with open(filelist_path, "w") as f:
        f.writelines("\n".join(files))

    # Displaying the contents of the file we just created
    print("File list contents:")
    with open(filelist_path, "r") as f:
        print(f.read())
    print("\n")

    data2 = run(pipe2(file_list_path=filelist_path))
    assert_all_equal(data1, data2)
File list contents:
0.npy
1.npy
2.npy
3.npy
4.npy
文件路径列表#
读取由包含文件路径字符串列表指定的所有文件,这些文件路径相对于 file_root 目录。
[7]:
# Defining a pipeline taking a list of files directly as a keyword argument
@pipeline_def(batch_size=batch_size, num_threads=3, device_id=0)
def pipe3():
    data = fn.readers.numpy(device="cpu", file_root=data_dir, files=files)
    return data


data3 = run(pipe3())
assert_all_equal(data1, data3)
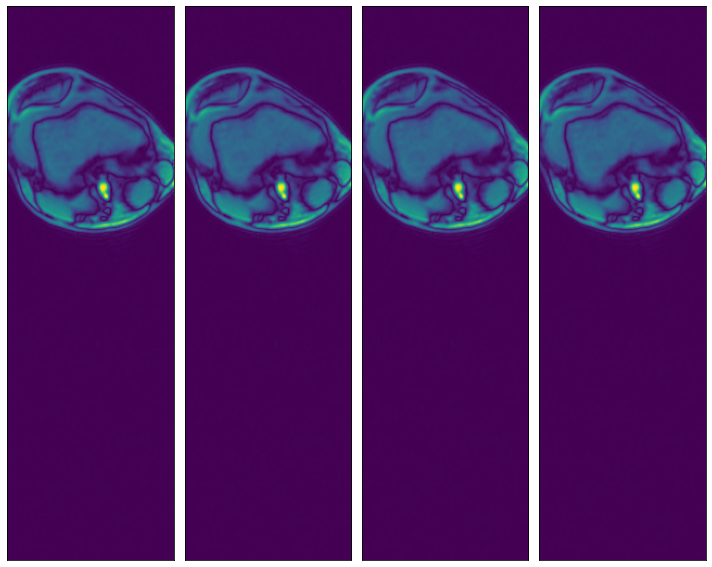
更高维度#
Numpy 读取器还可用于加载更高维度(最多 6 个维度)的数据。让我们用我们的 3D MRI 数组来演示一下
[8]:
@pipeline_def(batch_size=batch_size, num_threads=3, device_id=0)
def pipe_3d():
    data = fn.readers.numpy(
        device="cpu", file_root=data_dir_3d, file_filter="*.npy"
    )
    return data


data_3d = run(pipe_3d())
for s in range(len(data_3d)):
    print(f"Sample {s} shape: {data_3d[s].shape}")

# Displaying first 4 slices of the first sample in the batch
plot_batch(
    [
        data_3d[0][0, :, :],
        data_3d[0][1, :, :],
        data_3d[0][2, :, :],
        data_3d[0][3, :, :],
    ]
)
Sample 0 shape: (5, 512, 512)
Sample 1 shape: (9, 512, 512)
Sample 2 shape: (2, 512, 512)
Sample 3 shape: (38, 320, 320)

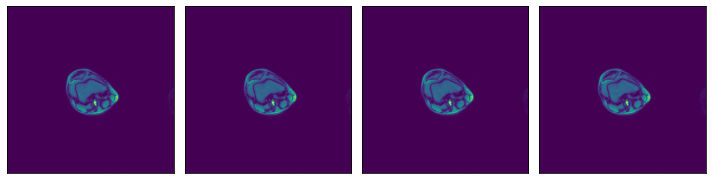
感兴趣区域 (ROI) API#
在上面显示的示例中,我们看到相关数据集中在图像的左上象限,其余部分不包含有用的信息。这并非对数据集中的所有图像都适用,但它将作为演示 ROI 读取的一个很好的示例。
Numpy 读取器允许用户指定感兴趣区域,这等效于为 slice 操作指定的参数。好处是读取器只会读取文件的相关部分,从而节省 I/O 带宽和内存利用率。请注意,将 dont_use_mmap 参数设置为 False 将抵消该性能优势,因为会先读取整个文件,然后再进行切片。
ROI 可以用绝对或相对术语指定,并且可以在数组轴的子集上指定。对于 ROI 中未指定的维度,将使用数组的整个范围。有关 ROI 解码的完整文档,请参阅 readers.numpy 文档(请参阅参数 roi_start、rel_roi_start、roi_end、rel_roi_end、roi_shape、rel_roi_shape、axes)。
让我们看几个实际示例
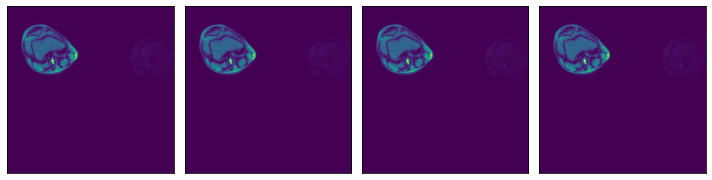
ROI 起始和结束,以绝对坐标表示#
[9]:
# One file is enough for this example
files = ["0.npy"]


@pipeline_def(batch_size=batch_size, num_threads=3, device_id=0)
def pipe_roi1():
    data = fn.readers.numpy(
        device="cpu",
        file_root=data_dir,
        files=files,
        roi_start=[30, 30],
        roi_end=[230, 230],
    )
    return data


data_roi1 = run(pipe_roi1())
plot_batch(data_roi1)
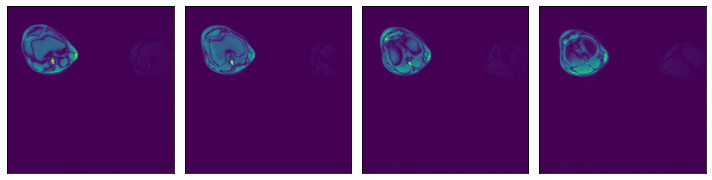
ROI 起始和结束,以相对坐标表示#
[10]:
@pipeline_def(batch_size=batch_size, num_threads=3, device_id=0)
def pipe_roi2():
    data = fn.readers.numpy(
        device="cpu",
        file_root=data_dir,
        files=files,
        rel_roi_start=[0.1, 0.01],
        rel_roi_end=[0.4, 0.5],
    )
    return data


data_roi2 = run(pipe_roi2())
plot_batch(data_roi2)

指定数组轴的子集#
[11]:
@pipeline_def(batch_size=batch_size, num_threads=3, device_id=0)
def pipe_roi3(rel_roi_start, rel_roi_end, roi_axes):
    data = fn.readers.numpy(
        device="cpu",
        file_root=data_dir,
        files=files,
        rel_roi_start=rel_roi_start,
        rel_roi_end=rel_roi_end,
        roi_axes=roi_axes,
    )
    return data


p1 = pipe_roi3(rel_roi_start=[0.1], rel_roi_end=[0.4], roi_axes=(0,))
data_roi3_1 = run(p1)
plot_batch(data_roi3_1)

p2 = pipe_roi3(rel_roi_start=[0.1], rel_roi_end=[0.4], roi_axes=(1,))
data_roi3_2 = run(p2)
plot_batch(data_roi3_2)

越界访问#
此外,用户可以选择当 ROI 落在数组边界之外时会发生什么。默认情况下,越界访问会导致错误,但可以通过 out_of_bounds_policy 参数进行控制。
让我们看一个配置为在 ROI 落在边界之外时用零填充的 pipeline 示例
[12]:
@pipeline_def(batch_size=batch_size, num_threads=3, device_id=0)
def pipe_roi_oob():
    data = fn.readers.numpy(
        device="cpu",
        file_root=data_dir,
        files=files,
        roi_start=(-150, -150),
        roi_end=(400, 400),
        out_of_bounds_policy="pad",
        fill_value=0,
        shard_id=0,
        num_shards=1,
    )
    return data


data_oob = run(pipe_roi_oob())
plot_batch(data_oob)
GPUDirect Storage 支持#
DALI Numpy 读取器通过 libcufile 支持 GPUDirect Storage (GDS)。GDS 实现了存储和 GPU 内存之间的直接数据路径,并避免了通过 CPU 内存中的反弹缓冲区的额外副本。
为了在 DALI 中启用 GDS 支持,请确保已安装 GDS。在具有 CUDA 11.4 或更高版本的系统上,GDS 已作为 CUDA 11.4 SDK 的一部分安装。对于较旧的 CUDA 版本,请单独安装 GDS(请按照上面的链接获取说明)。
安装 GDS 后,只需将读取器的设备切换到 "gpu" 即可使用它。请注意,如果 GDS 不可用,则在尝试执行 pipeline 时,您可能会看到 CUDA Driver API 错误。
[13]:
@pipeline_def(batch_size=batch_size, num_threads=3, device_id=0)
def pipe_gds():
    data = fn.readers.numpy(device="gpu", file_root=data_dir, files=files)
    return data


p = pipe_gds()
p.build()
pipe_out = p.run()

# as_cpu() to copy the data back to CPU memory
data_gds = pipe_out[0].as_cpu().as_array()
print(data_gds.shape)
plot_batch(data_gds)
(4, 512, 512)