参考图表#
本节详细介绍了 DeepStream 扩展的示例图表。 大多数这些示例图表等同于作为 DeepStreamSDK 一部分发布的示例应用程序,并演示了如何将“C/C++”的 DeepStream 应用程序的各个部分移植/转换为图表和自定义组件/扩展。
安装参考图表#
下载参考图表
https://catalog.ngc.nvidia.com/orgs/nvidia/resources/gxf_and_gc
安装参考图表
sudo dpkg -i deepstream-reference-graphs-7.1.deb
图表安装到
/opt/nvidia/deepstream/deepstream/reference_graphs
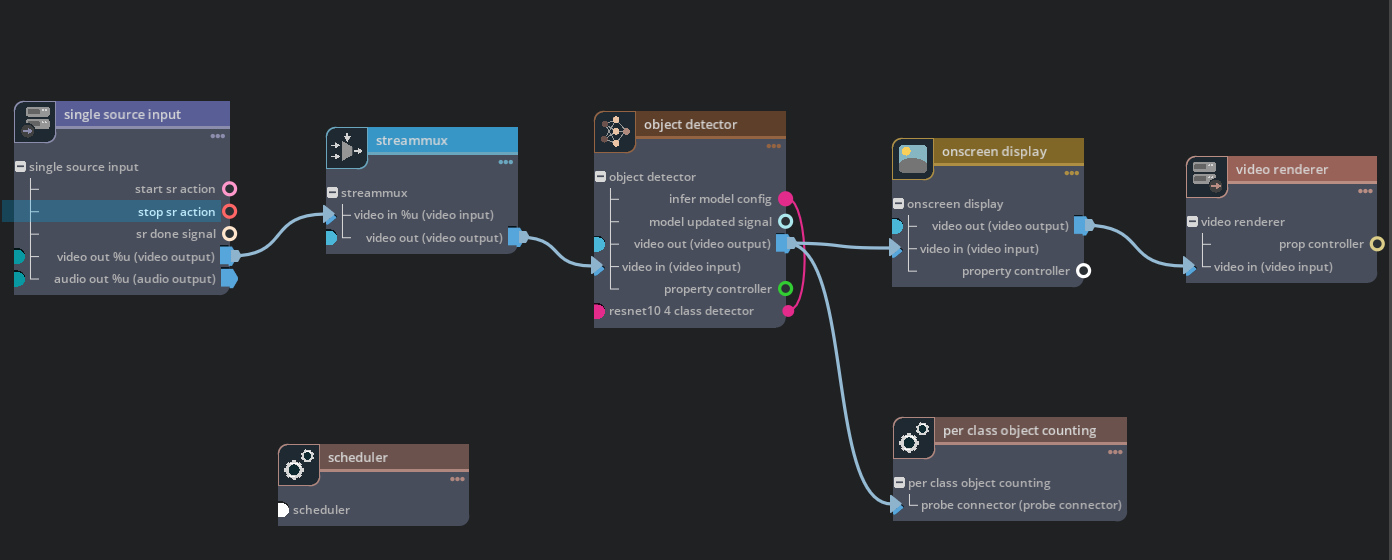
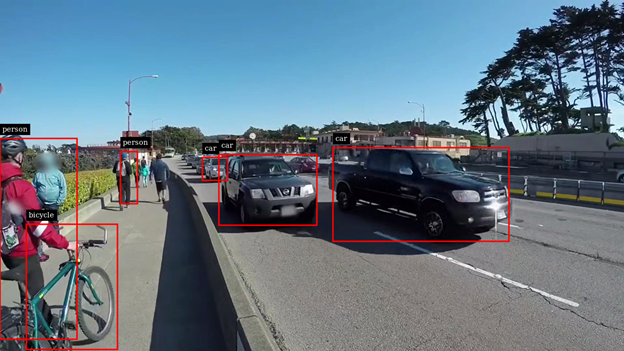
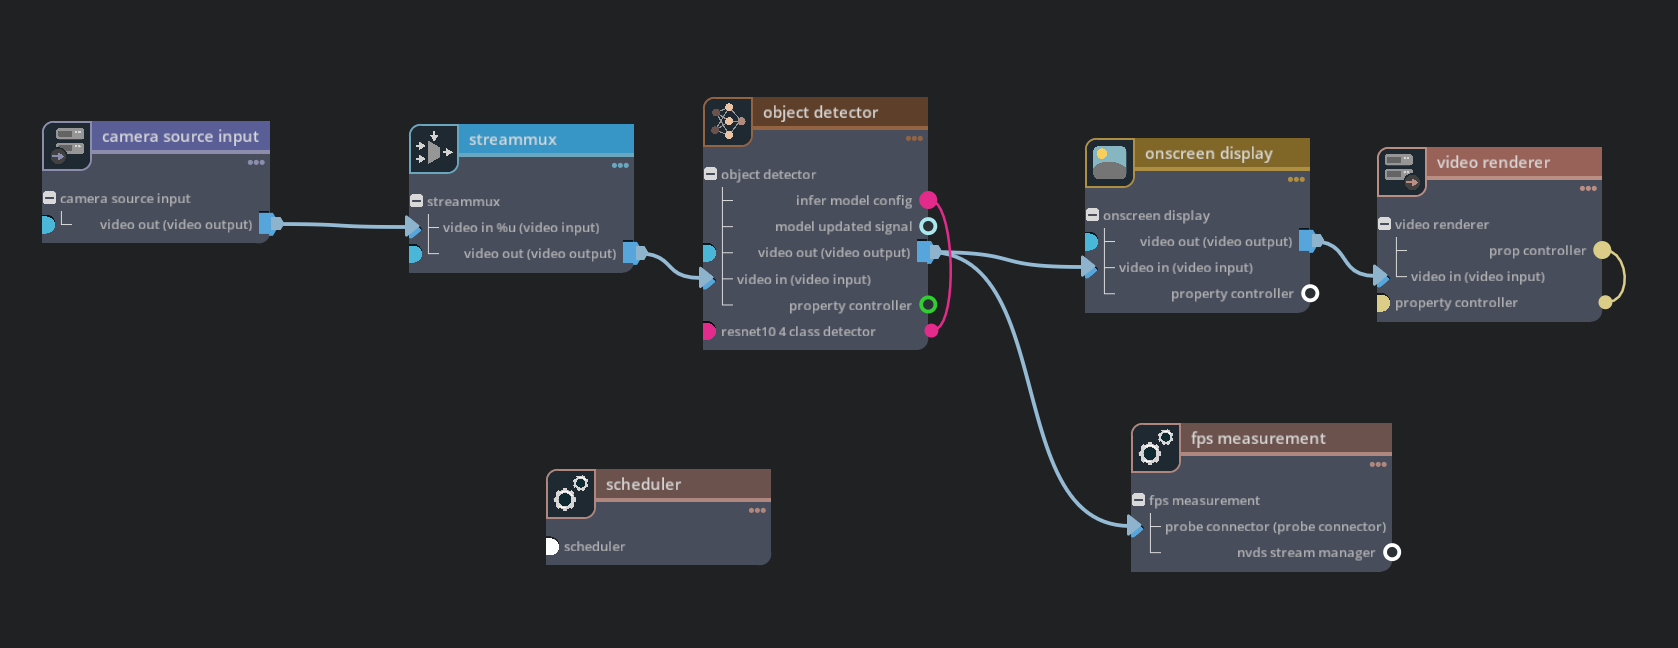
deepstream-test1#
使用 DeepStream 进行对象检测的最简单示例。 演示了从文件解码视频、执行对象检测以及在帧上叠加边界框。
图表文件#
deepstream-test1.yaml – 主图表文件
parameters.yaml – 包含图中各种组件参数的文件
README - 包含详细的图表描述和执行说明
ds_test1_container_builder_dgpu.yaml - 用于构建 dGPU 平台特定应用程序容器的配置文件
ds_test1_container_builder_jetson.yaml - 用于构建 Jetson 平台特定应用程序容器的配置文件
路径 - /opt/nvidia/deepstream/deepstream/reference_graphs/deepstream-test1
示例命令
On x86:
$ /opt/nvidia/graph-composer/execute_graph.sh deepstream-test1.yaml \
      parameters.yaml -d ../common/target_x86_64.yaml

On Jetson:
$ /opt/nvidia/graph-composer/execute_graph.sh deepstream-test1.yaml \
      parameters.yaml -d ../common/target_aarch64.yaml
图表#
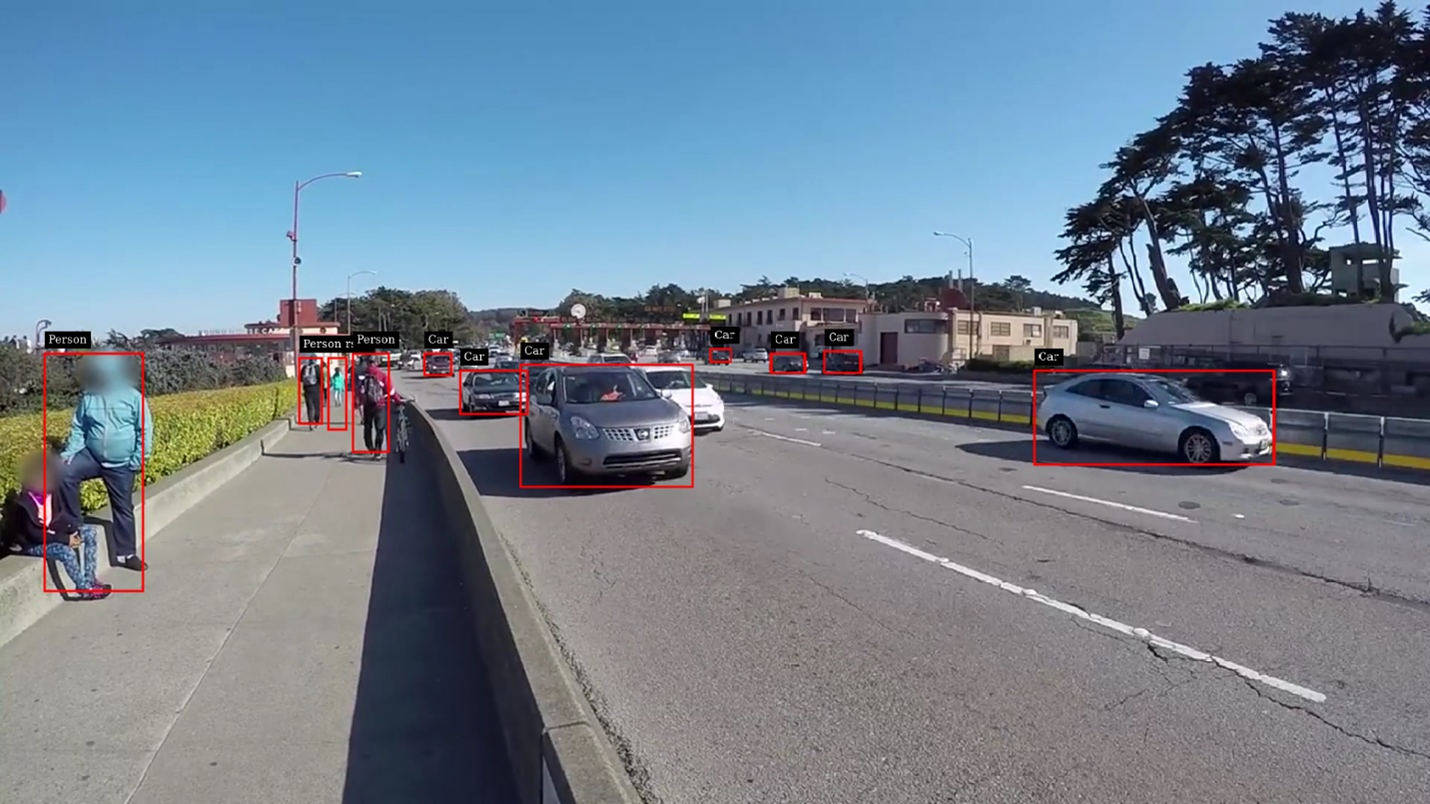
示例输出#
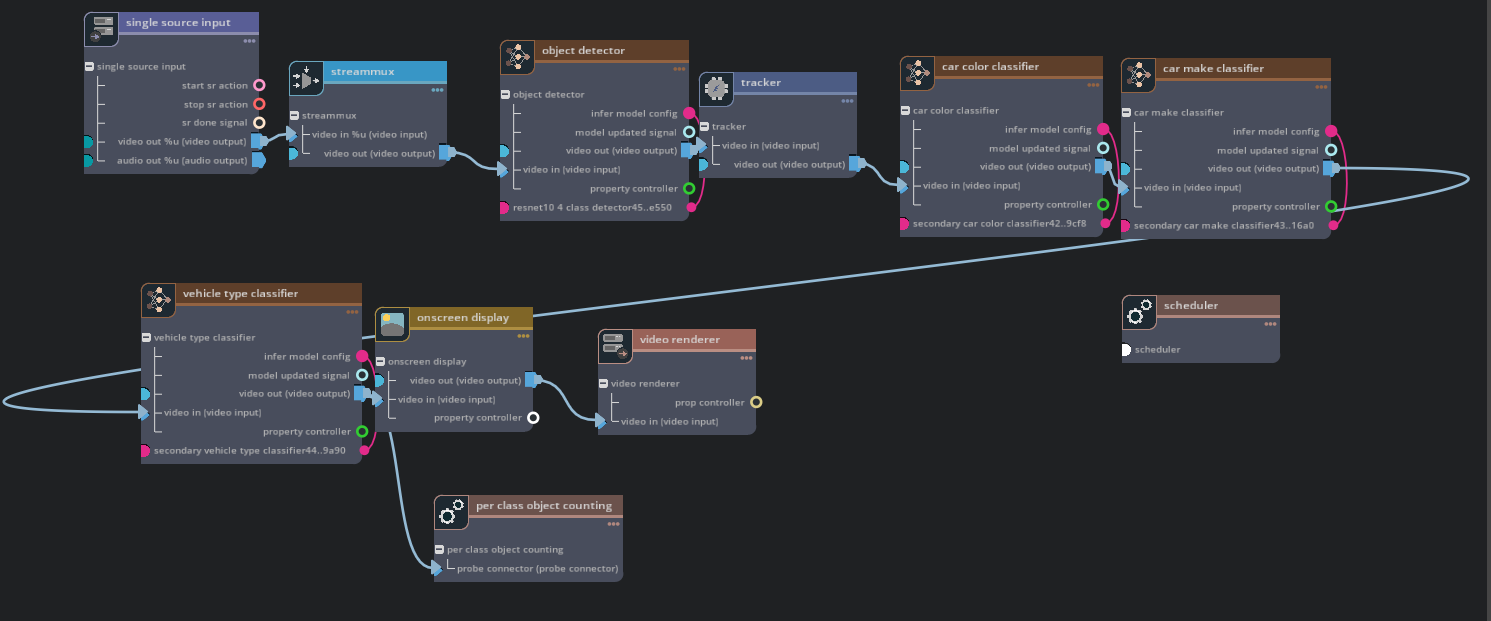
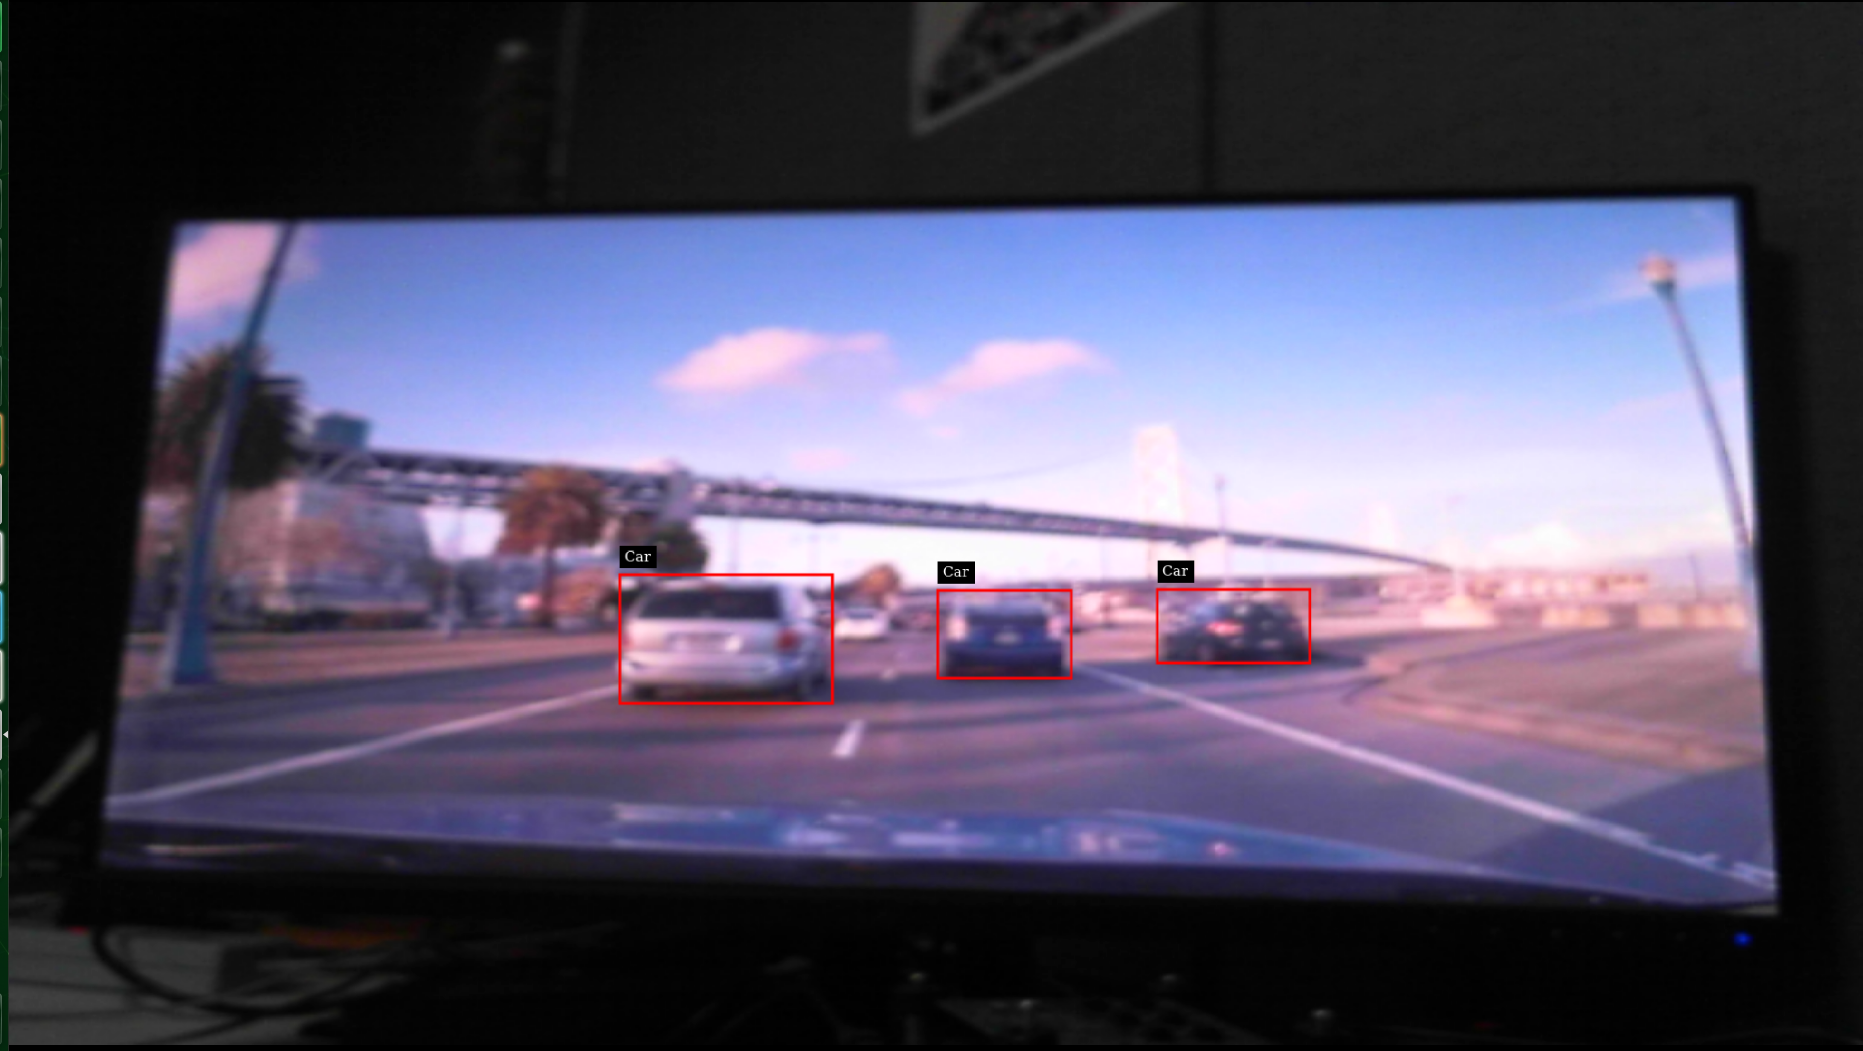
deepstream-test2#
基于 deepstream-test1 构建,并演示了对象跟踪和级联推理。
图表文件#
deepstream-test2.yaml – 主图表文件
parameters.yaml – 包含图中各种组件参数的文件
README - 包含详细的图表描述和执行说明
ds_test2_container_builder_dgpu.yaml - 用于构建 dGPU 平台特定应用程序容器的配置文件
ds_test2_container_builder_jetson.yaml - 用于构建 Jetson 平台特定应用程序容器的配置文件
路径 - /opt/nvidia/deepstream/deepstream/reference_graphs/deepstream-test2
示例命令
On x86:
$ /opt/nvidia/graph-composer/execute_graph.sh deepstream-test2.yaml \
      parameters.yaml -d ../common/target_x86_64.yaml

On Jetson:
$ /opt/nvidia/graph-composer/execute_graph.sh deepstream-test2.yaml \
      parameters.yaml -d ../common/target_aarch64.yaml
图表#
示例输出#

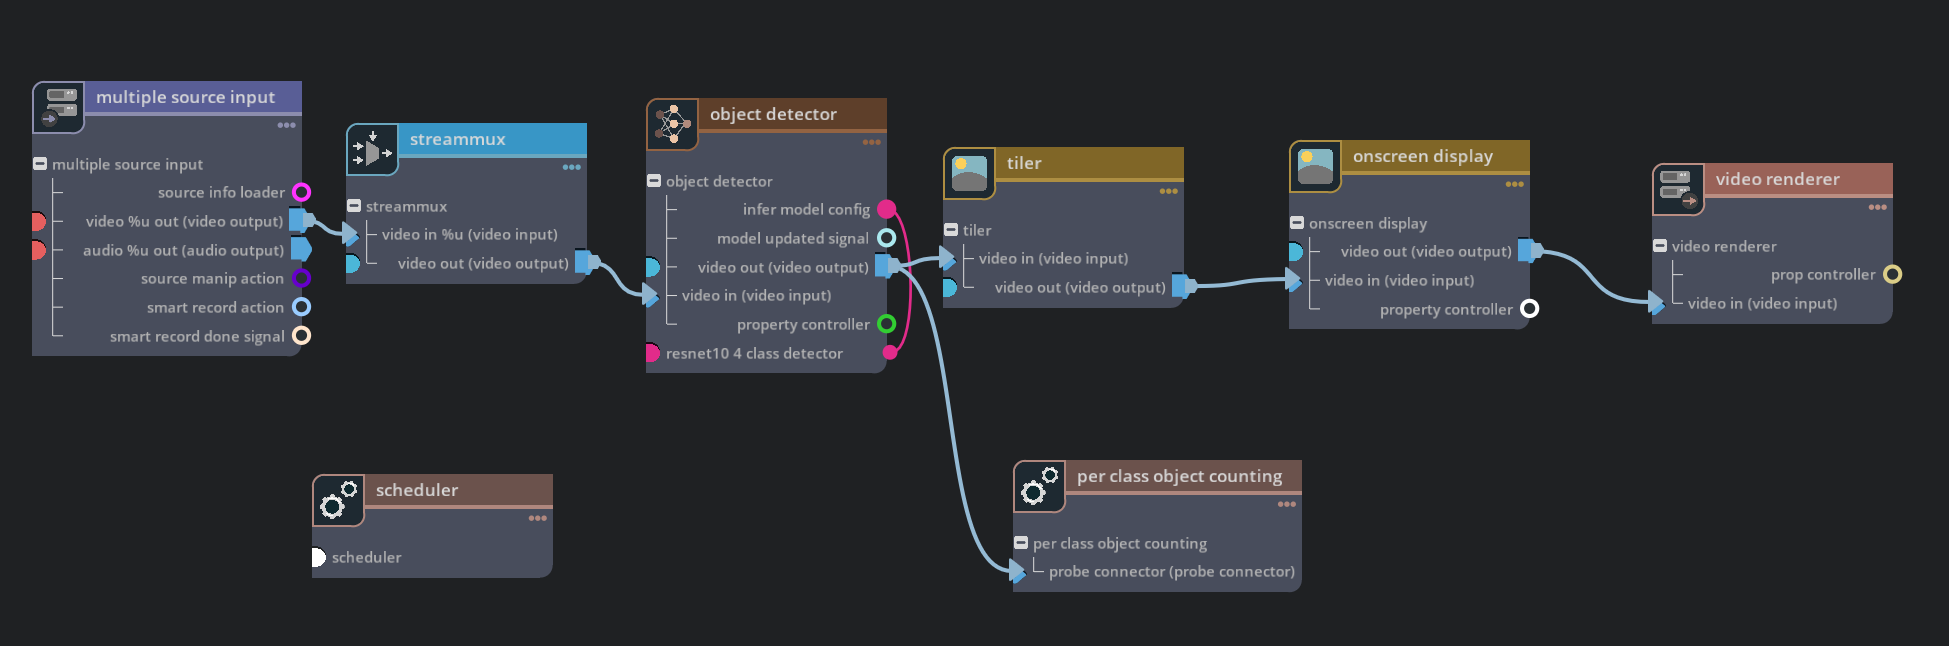
deepstream-test3#
基于 deepstream-test1 构建,以演示在管道中使用多个源。
图表文件#
deepstream-test3.yaml – 主图表文件
parameters.yaml – 包含图中各种组件参数的文件
README - 包含详细的图表描述和执行说明
ds_test3_container_builder_dgpu.yaml - 用于构建 dGPU 平台特定应用程序容器的配置文件
ds_test3_container_builder_jetson.yaml - 用于构建 Jetson 平台特定应用程序容器的配置文件
路径 - /opt/nvidia/deepstream/deepstream/reference_graphs/deepstream-test3
示例命令
On x86:
$ /opt/nvidia/graph-composer/execute_graph.sh deepstream-test3.yaml \
      parameters.yaml -d ../common/target_x86_64.yaml

On Jetson:
$ /opt/nvidia/graph-composer/execute_graph.sh deepstream-test3.yaml \
      parameters.yaml -d ../common/target_aarch64.yaml
图表#
示例输出#
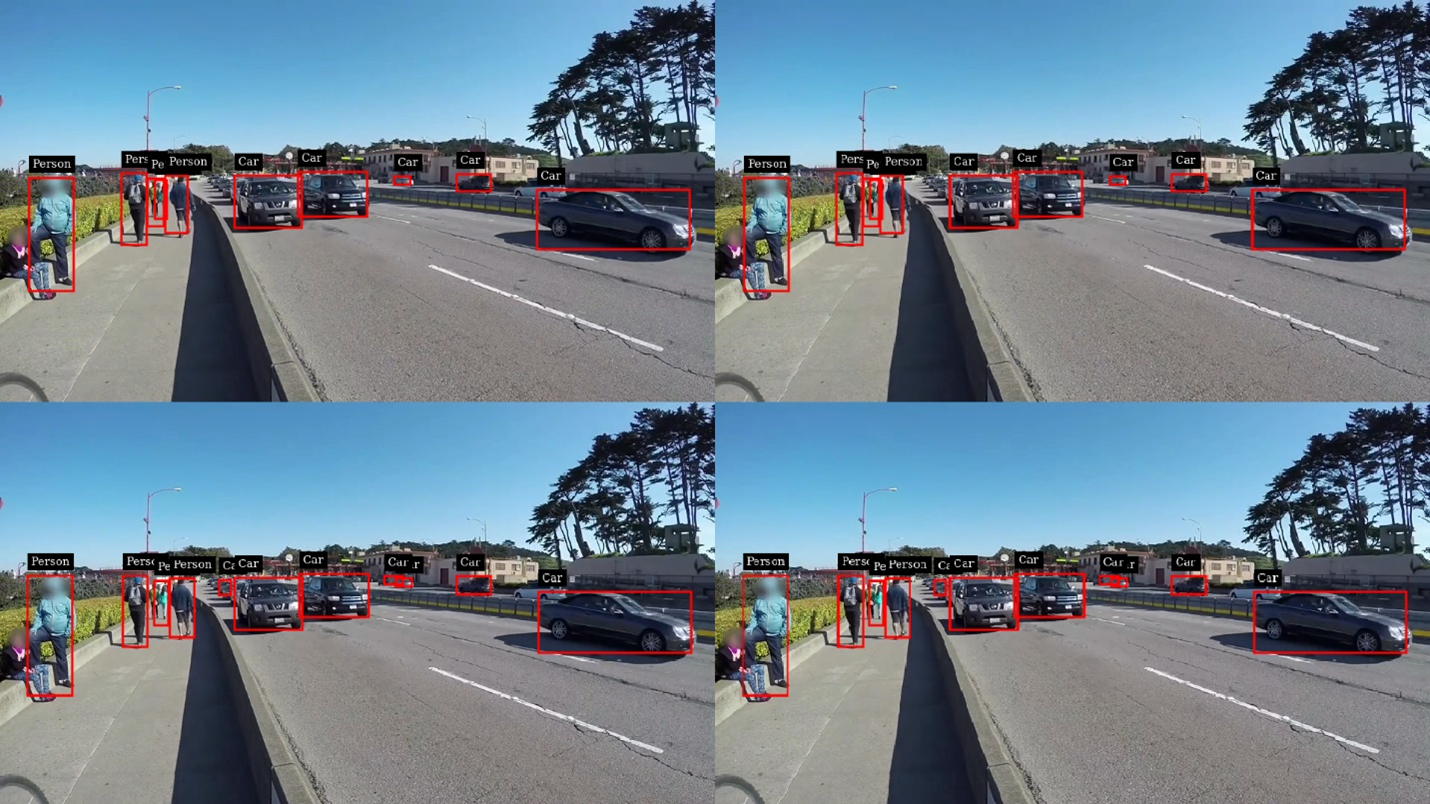
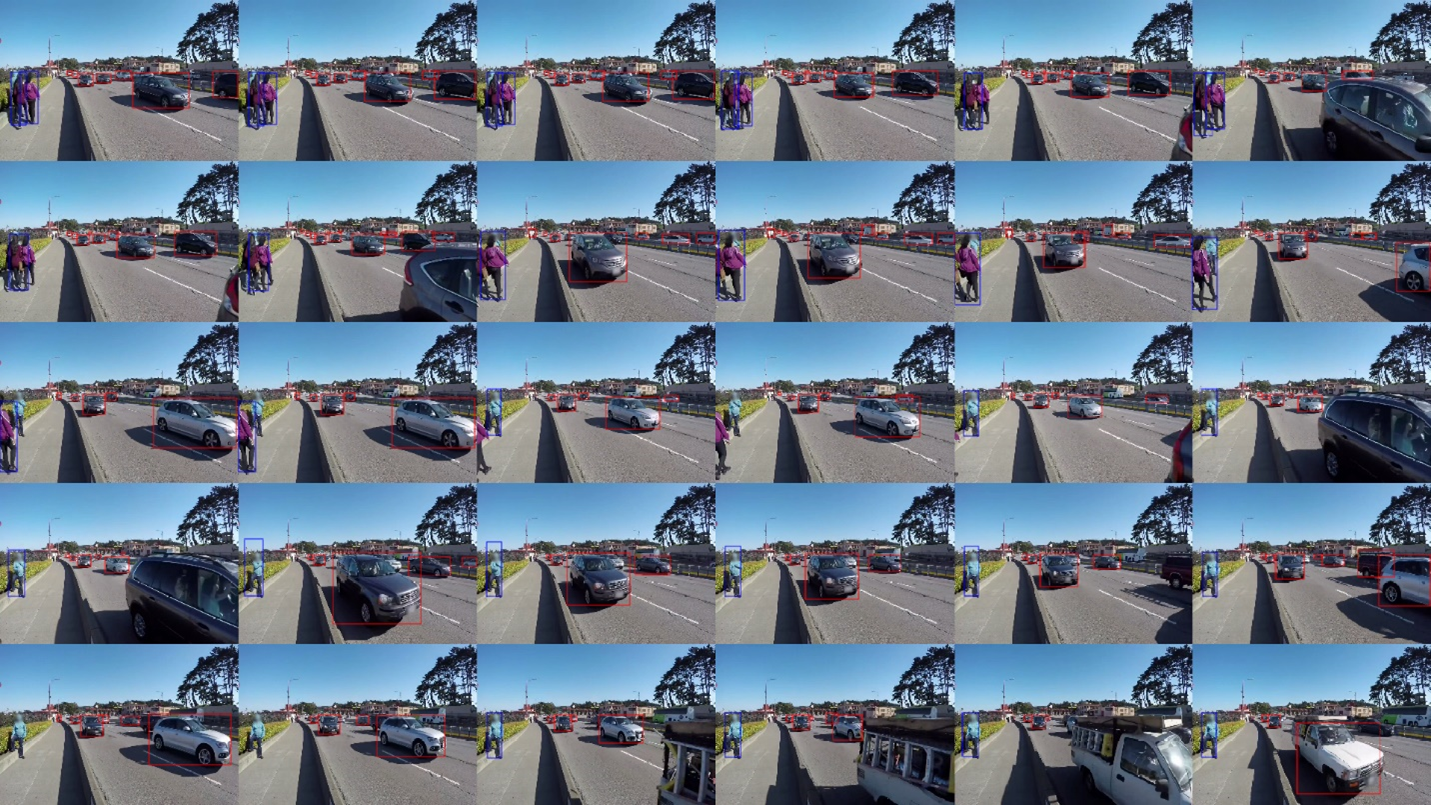
deepstream-test4#
基于 deepstream-test1 构建,以演示如何使用消息传递组件将 DeepStream 组件生成的元数据发送到云端。
图表文件#
deepstream-test4.yaml – 主图表文件
parameters.yaml – 包含图中各种组件参数的文件
README - 包含详细的图表描述和执行说明
ds_test4_container_builder_dgpu.yaml - 用于构建 dGPU 平台特定应用程序容器的配置文件
ds_test4_container_builder_jetson.yaml - 用于构建 Jetson 平台特定应用程序容器的配置文件
路径 - /opt/nvidia/deepstream/deepstream/reference_graphs/deepstream-test4
示例命令
On x86:
$ /opt/nvidia/graph-composer/execute_graph.sh deepstream-test4.yaml \
      parameters.yaml -d ../common/target_x86_64.yaml

On Jetson:
$ /opt/nvidia/graph-composer/execute_graph.sh deepstream-test4.yaml \
      parameters.yaml -d ../common/target_aarch64.yaml
注意
关于在任何系统上运行图表所需的最小参数更改的小提示
注意
默认情况下,示例配置为通过 Kafka 发送消息,因此需要运行 Kafka 代理。 图表文件假定服务器在“localhost:9092”上运行。 可以通过修改 parameters.yaml 文件中的 msg-broker-conn-str 和 topic 参数来更改要向其发送消息的服务器以及主题。
图表#
示例输出#
以下是输出视频的快照。 但是,该应用程序还会通过 Kafka 发送消息,可以使用 Kafka 包中的控制台消费者实用程序或类似的替代方案查看这些消息。
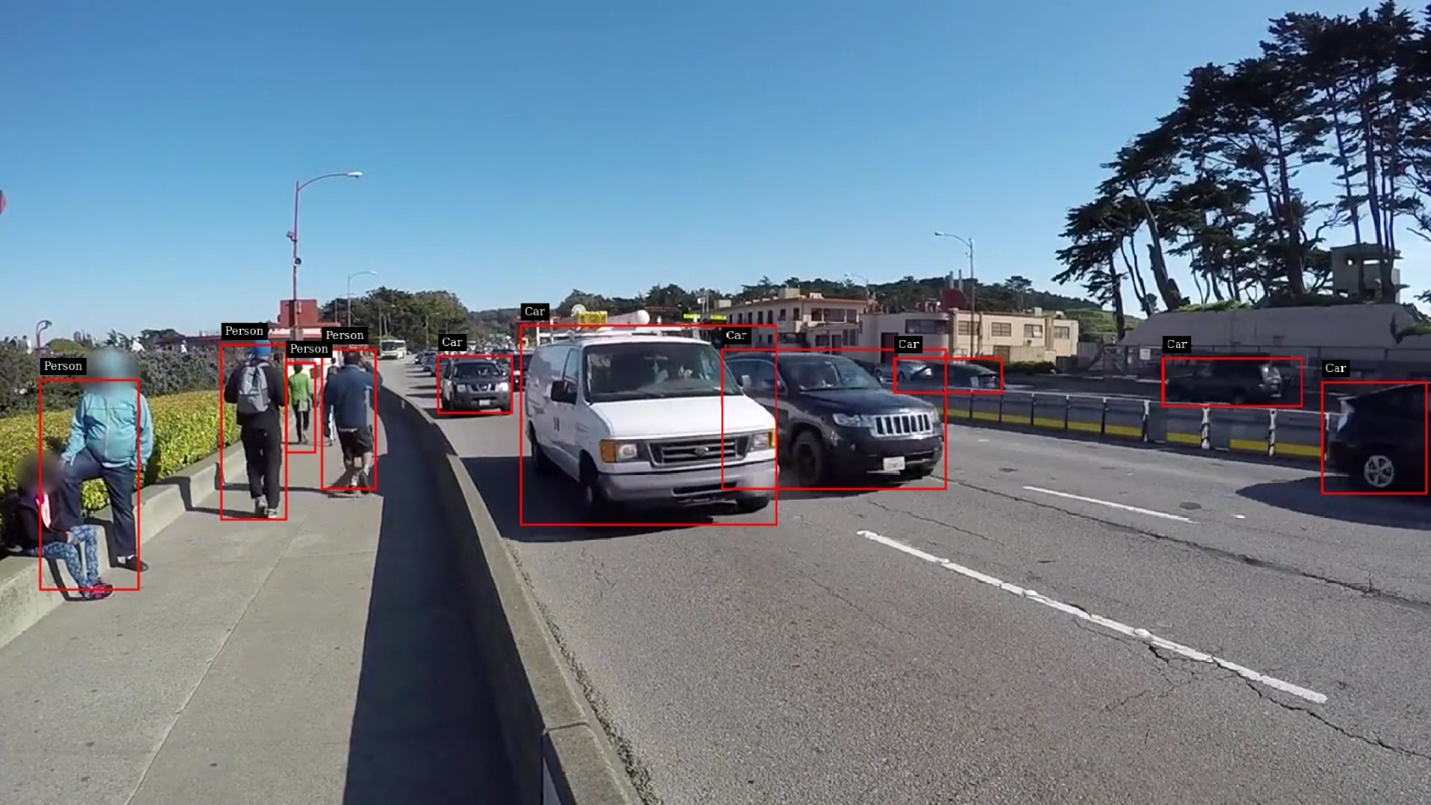
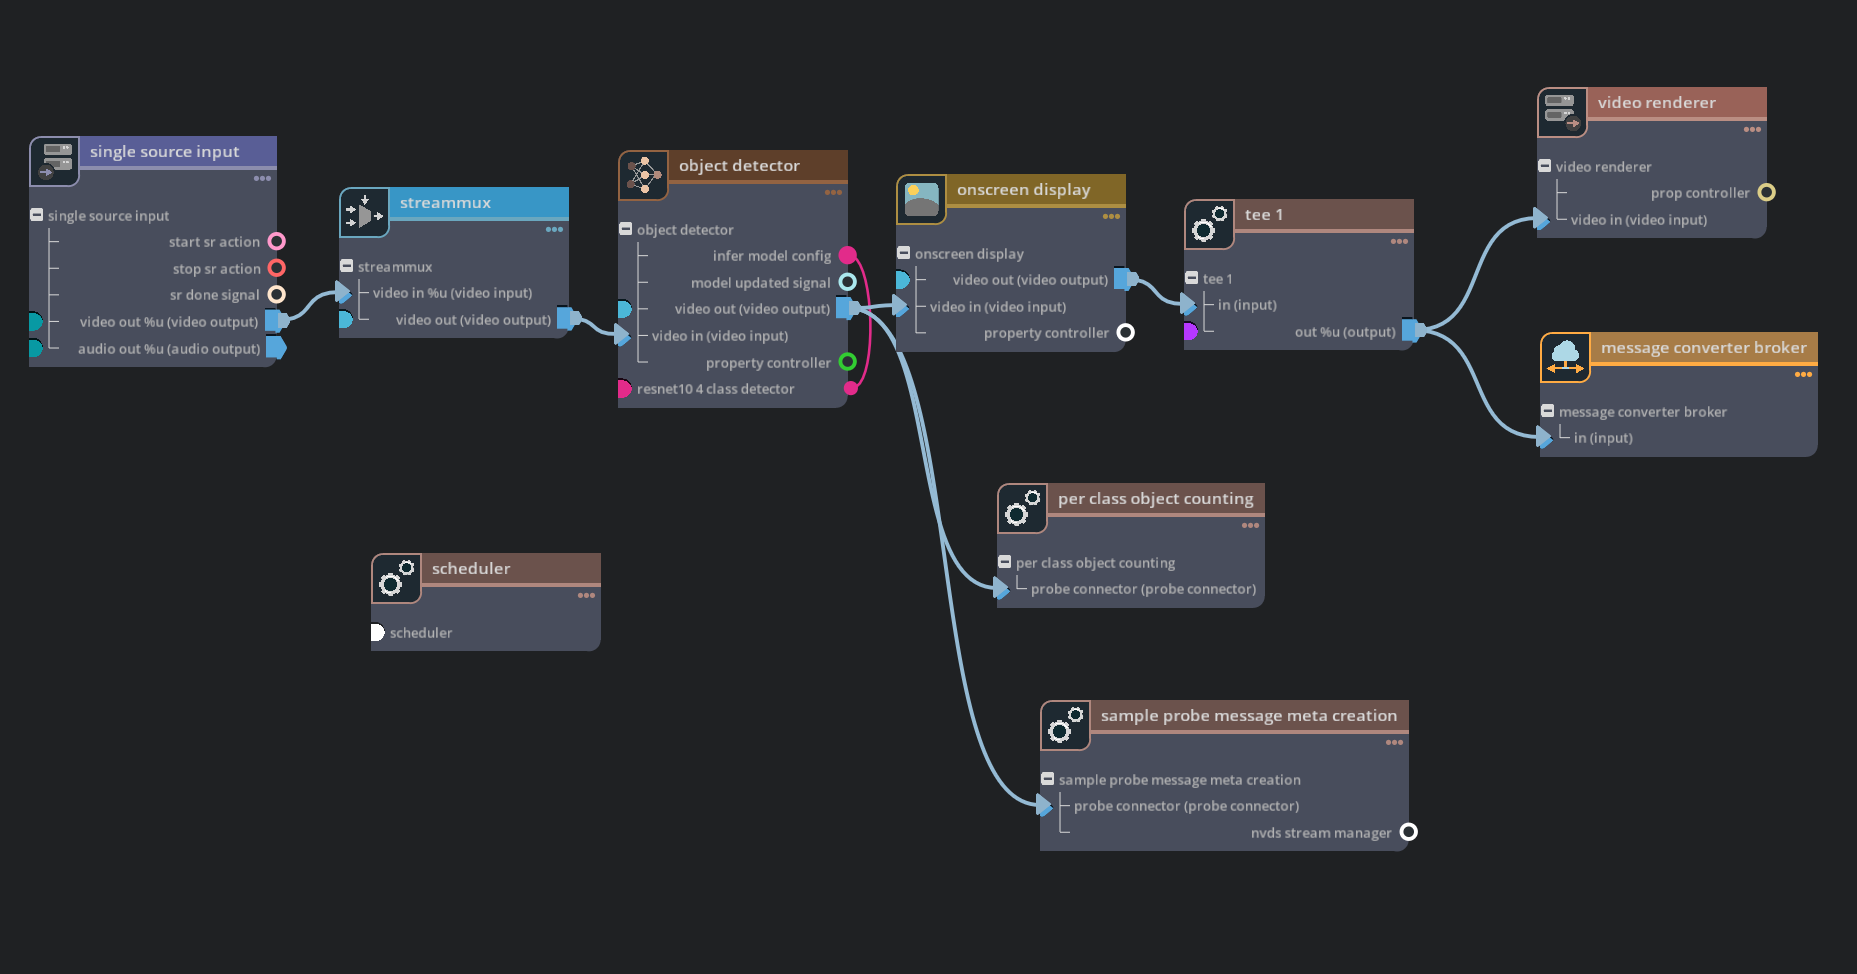
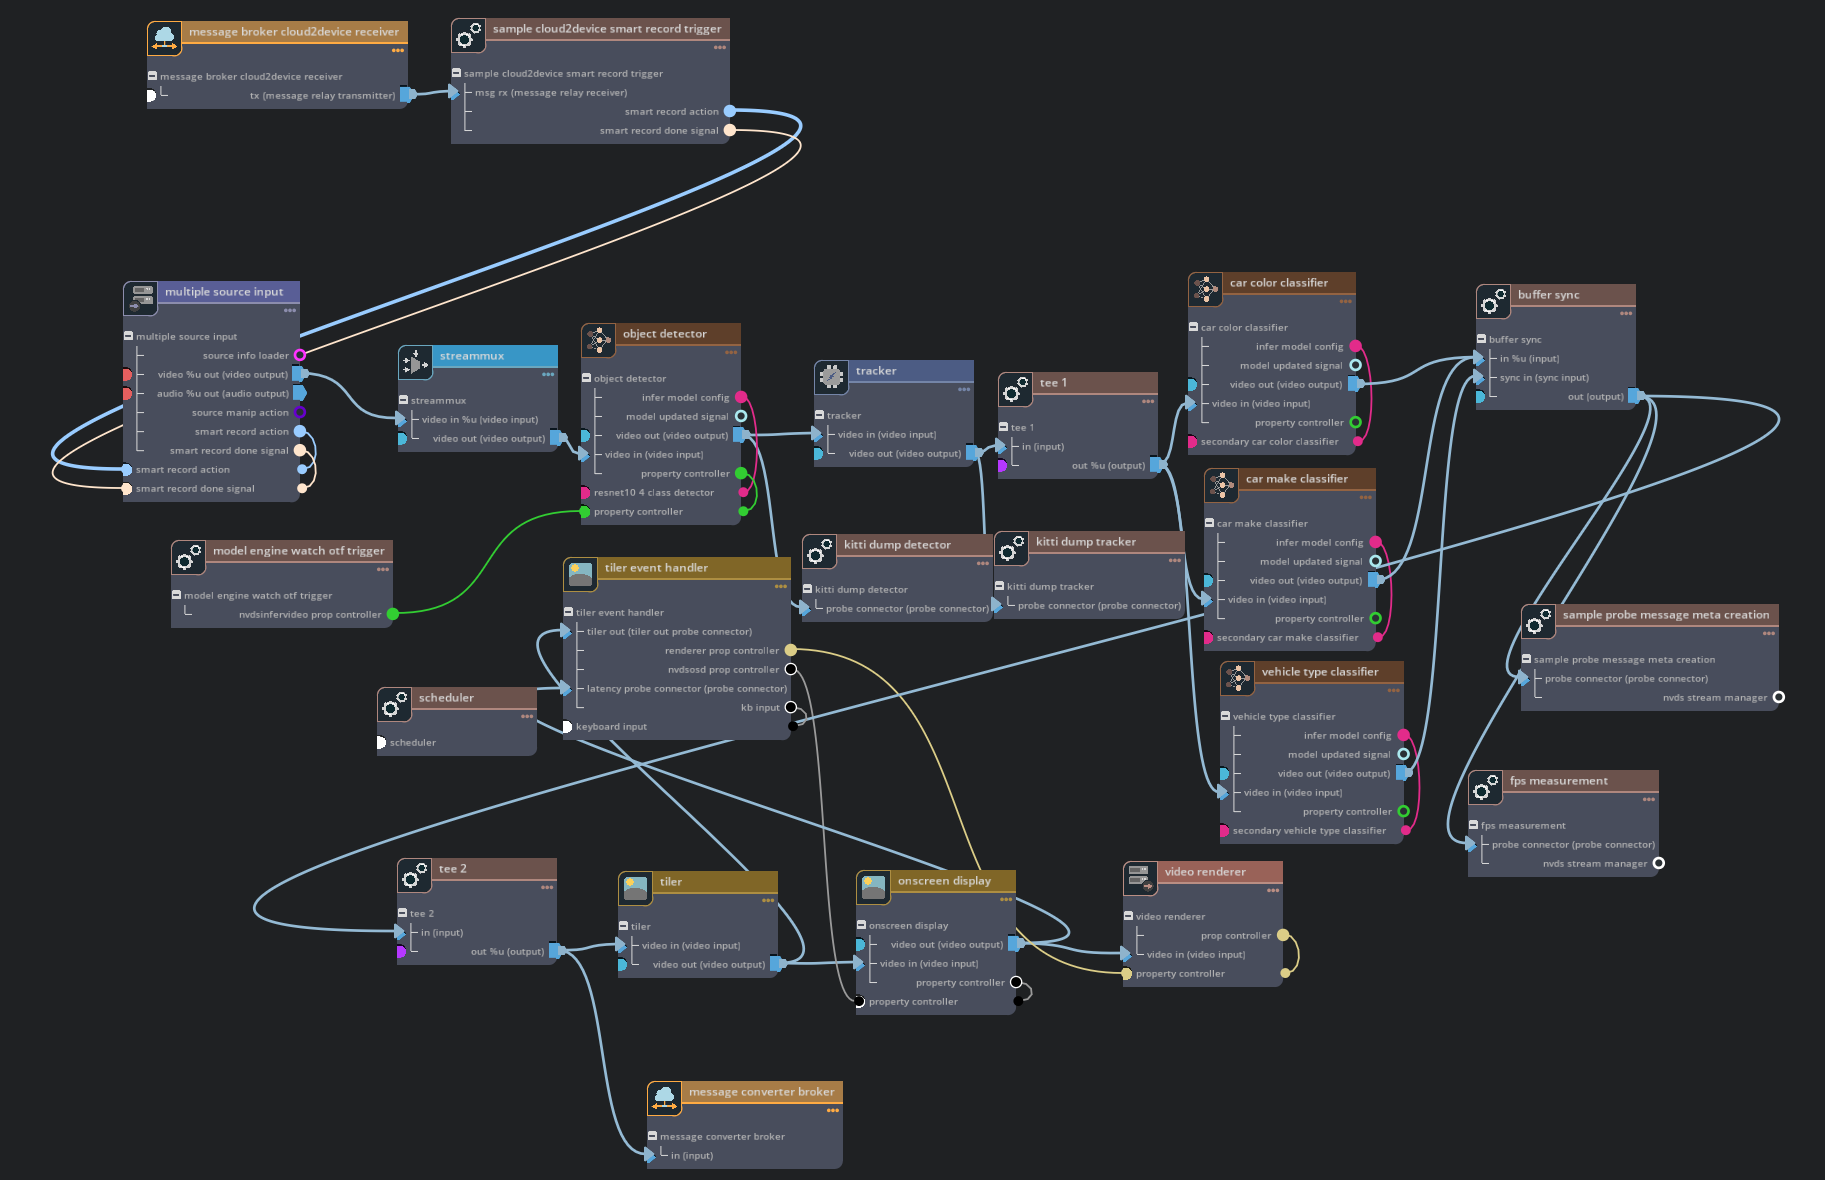
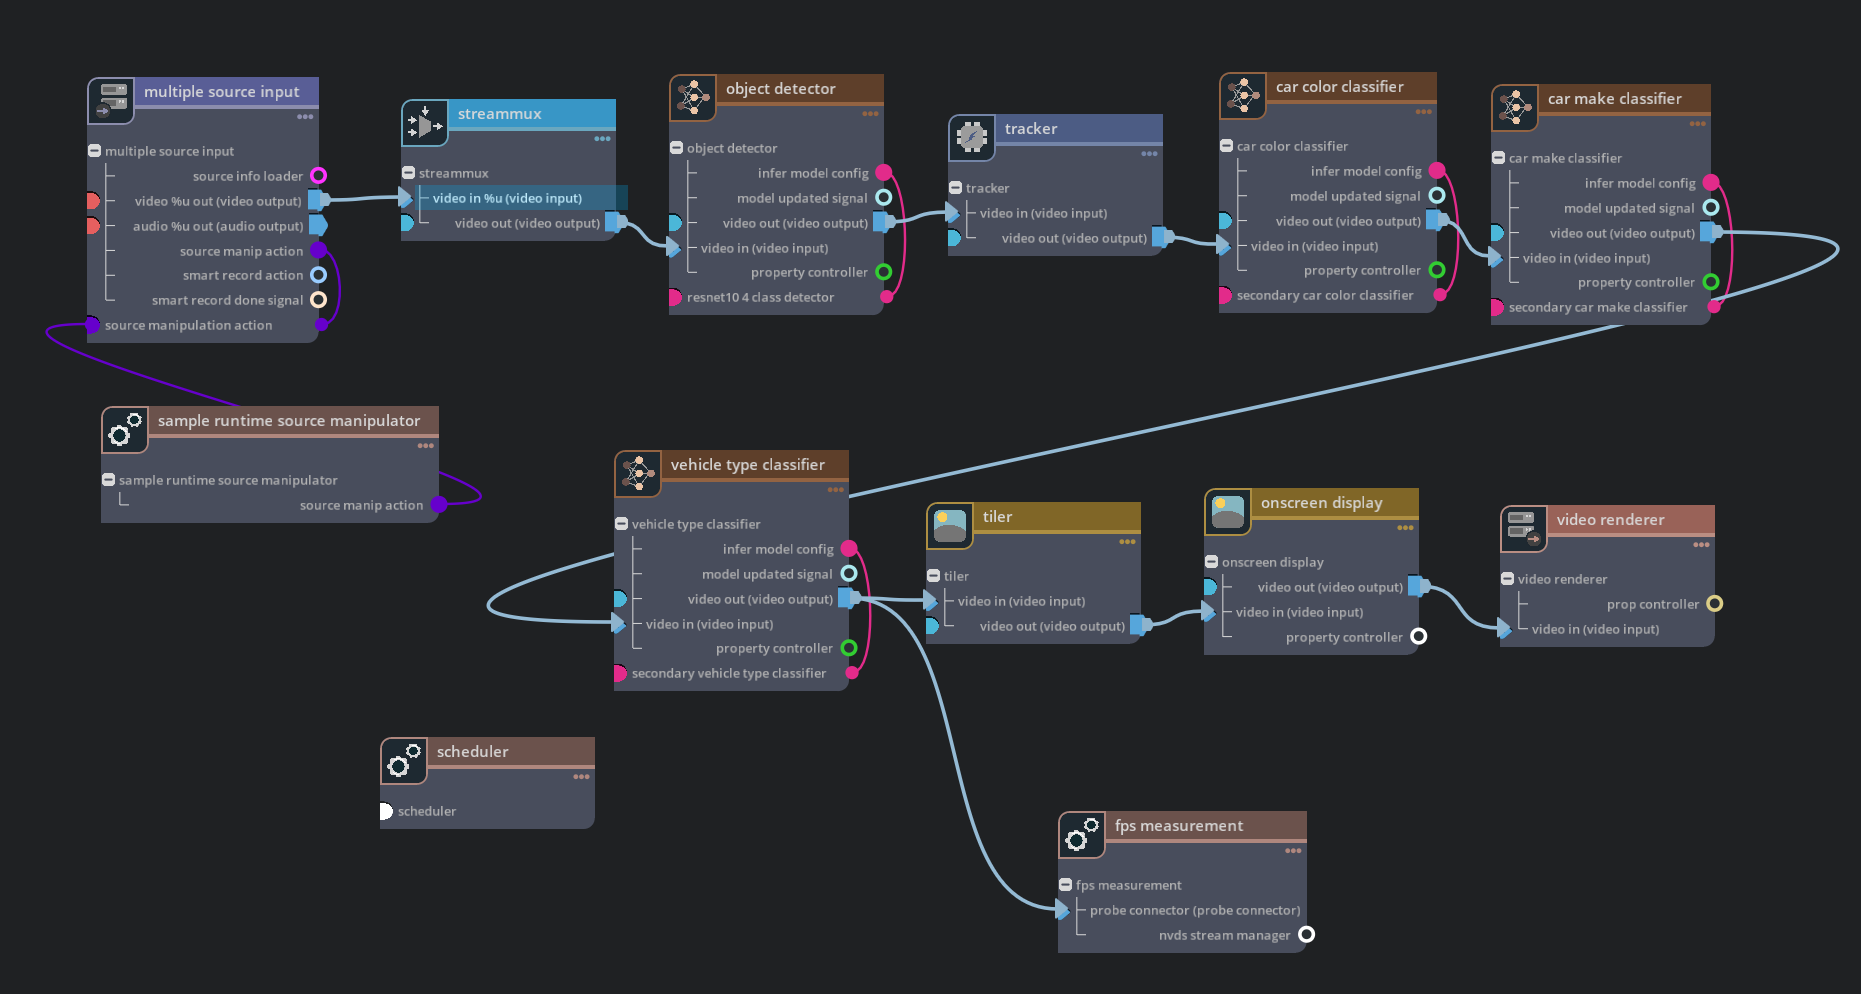
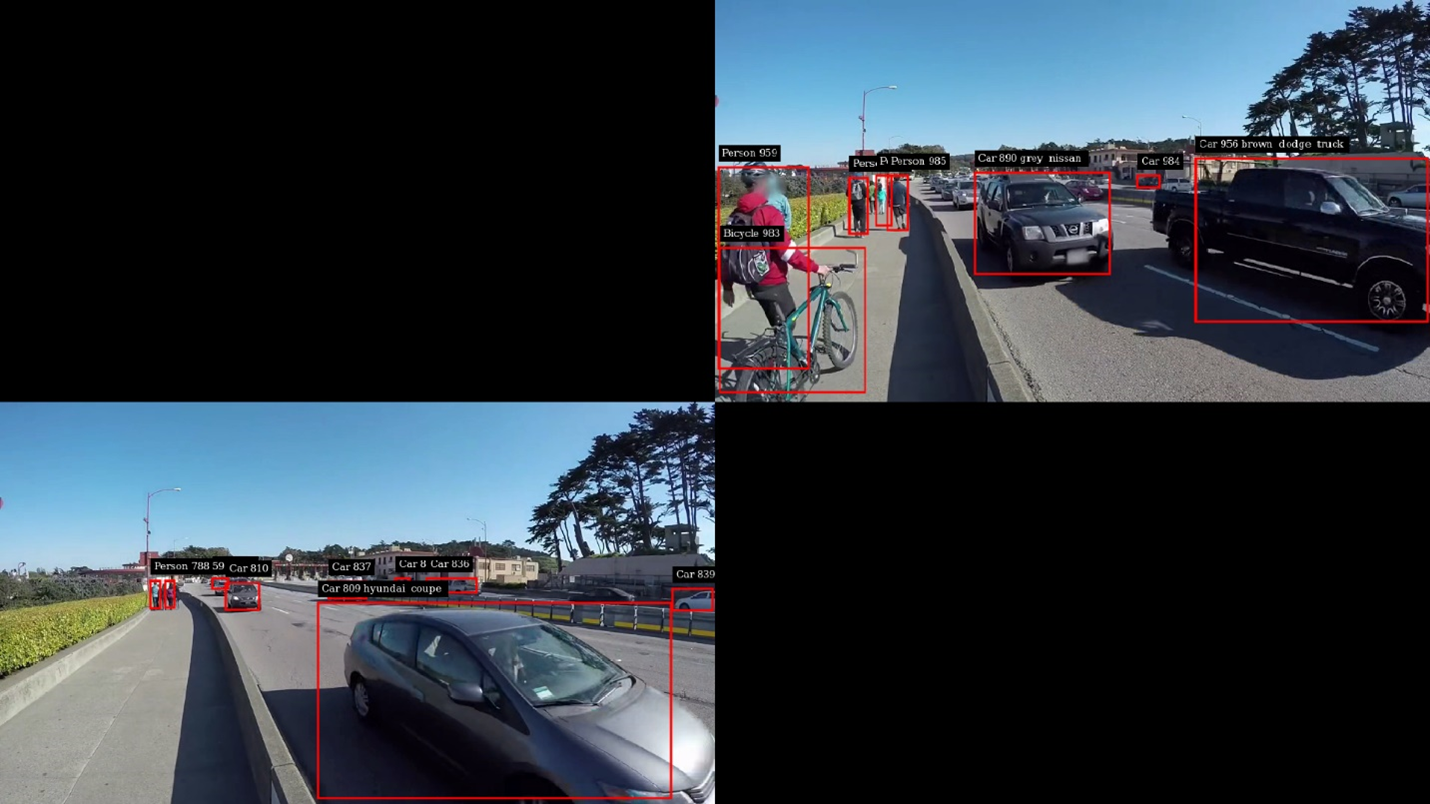
deepstream-test5#
DeepStream 参考应用程序,演示了设备到云和云到设备的消息传递、智能记录和在线模型更新。
图表#
示例输出#

deepstream-runtime-src-add-del#
演示了如何在运行时动态添加/删除源。 此外,还演示了操作/信号组件的使用。 “NvDsMultiSrcInput”组件的“NvDsSourceManipulationAction”用于添加/删除源。 此操作由另一个示例组件“NvDsSampleSourceManipulator”以可配置的固定间隔触发。 或者,此操作也可以由 Http 服务“NvDsStreamManager”在添加源或删除源 Http 请求时触发。
图表文件#
deepstream-runtime-src-add-del.yaml – 主图表文件
deepstream-runtime-src-add-del-as-a-service.yaml – 带有流管理器服务的主图表文件
parameters.yaml – 包含图中各种组件参数的文件
README - 包含详细的图表描述和执行说明
ds_runtime_src_add_del_container_builder_dgpu.yaml - 用于构建 dGPU 平台特定应用程序容器的配置文件
ds_runtime_src_add_del_container_builder_jetson.yaml - 用于构建 Jetson 平台特定应用程序容器的配置文件
路径 - /opt/nvidia/deepstream/deepstream/reference_graphs/deepstream-runtime-src-add-del
示例命令
On x86:
$ /opt/nvidia/graph-composer/execute_graph.sh deepstream-runtime-src-add-del.yaml \
      parameters.yaml -d ../common/target_x86_64.yaml
$ /opt/nvidia/graph-composer/execute_graph.sh deepstream-runtime-src-add-del-as-a-service.yaml \
      -d ../common/target_x86_64.yaml
* To add / remove a stream using a client on the same host
   Add stream with id 1:
   $ curl -X POST "https://:8082/AddStream/stream" -d "{\"sensor\":{\"id\": \"1\", \"uri\": \"file:///opt/nvidia/deepstream/deepstream/samples/streams/sample_1080p_h265.mp4\"}}"
   Add stream with id 2:
   $ curl -X POST "https://:8082/AddStream/stream" -d "{\"sensor\":{\"id\": \"2\", \"uri\": \"file:///opt/nvidia/deepstream/deepstream/samples/streams/sample_1080p_h265.mp4\"}}"
   ......
   Until the max number of streams configured in NvDsStreamManager is reached

   Remove stream with id 2:
   $ curl -X POST "https://:8082/RemoveStream/stream" -d "{\"sensor\":{\"id\": \"2\"}}"
   Remove stream with id 1:
   $ curl -X POST "https://:8082/RemoveStream/stream" -d "{\"sensor\":{\"id\": \"1\"}}"
   ......
   Until all streams are removed

On Jetson:
$ /opt/nvidia/graph-composer/execute_graph.sh deepstream-runtime-src-add-del.yaml \
      parameters.yaml -d ../common/target_aarch64.yaml
图表#
示例输出#
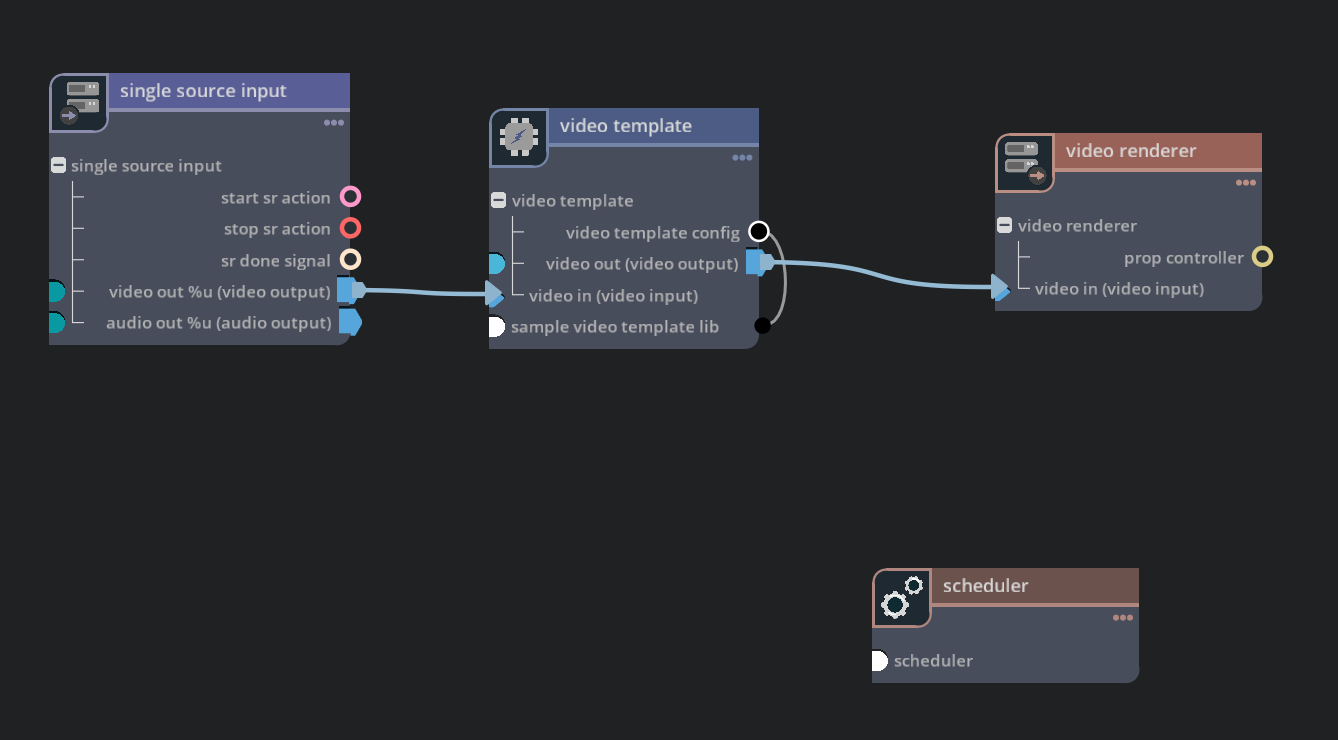
deepstream-template-plugin#
演示了用作其他组件配置提供程序的配置组件的用法。 这些图表仅适用于 DGPU 平台,因为 DeepStream 模板插件仅在 DGPU 平台上可用。
图表文件#
deepstream-videotemplate.yaml – 演示 DS 视频模板插件和插件配置提供程序用法的图表
README - 包含详细的图表描述和执行说明
路径 - /opt/nvidia/deepstream/deepstream/reference_graphs/deepstream-template-plugin
示例命令
On x86:
$ /opt/nvidia/graph-composer/execute_graph.sh deepstream-videotemplate.yaml \
      -d ../common/target_x86_64.yaml

On Jetson:
$ /opt/nvidia/graph-composer/execute_graph.sh deepstream-videotemplate.yaml \
      -d ../common/target_aarch64.yaml
图表#
示例输出#
示例输出由图中 NvDsSampleVideoTemplateLib 组件的参数中提到的“scale-factor”缩放的输入视频组成。
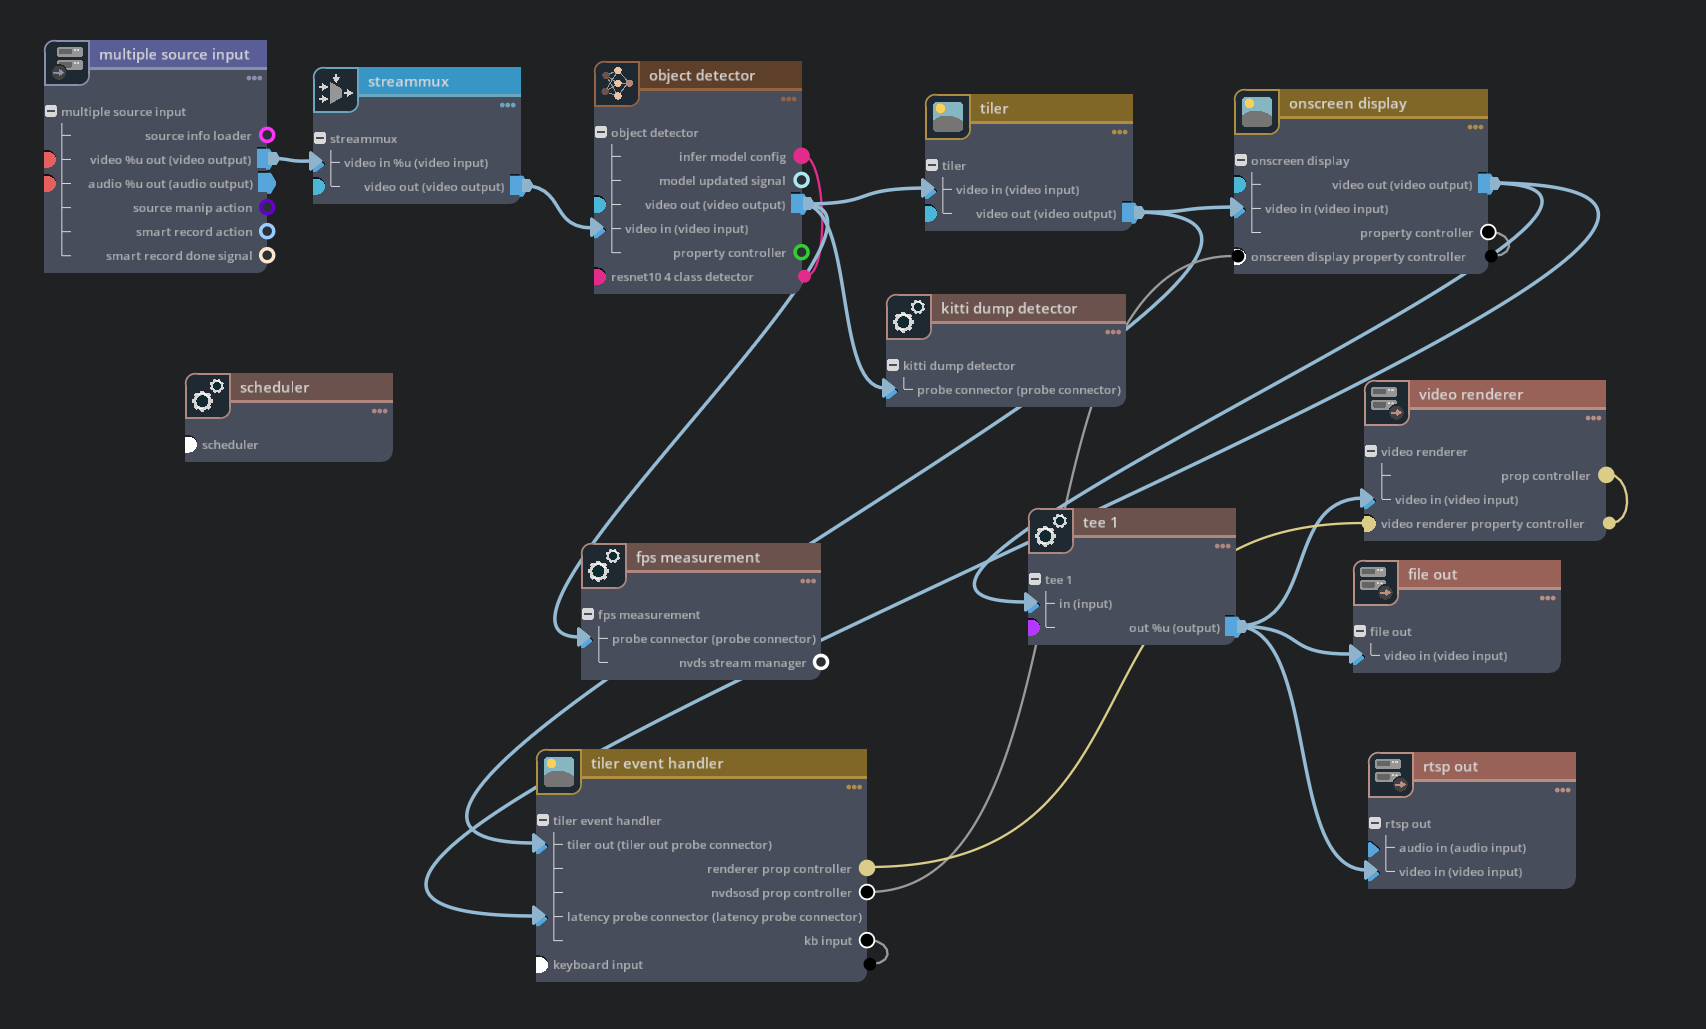
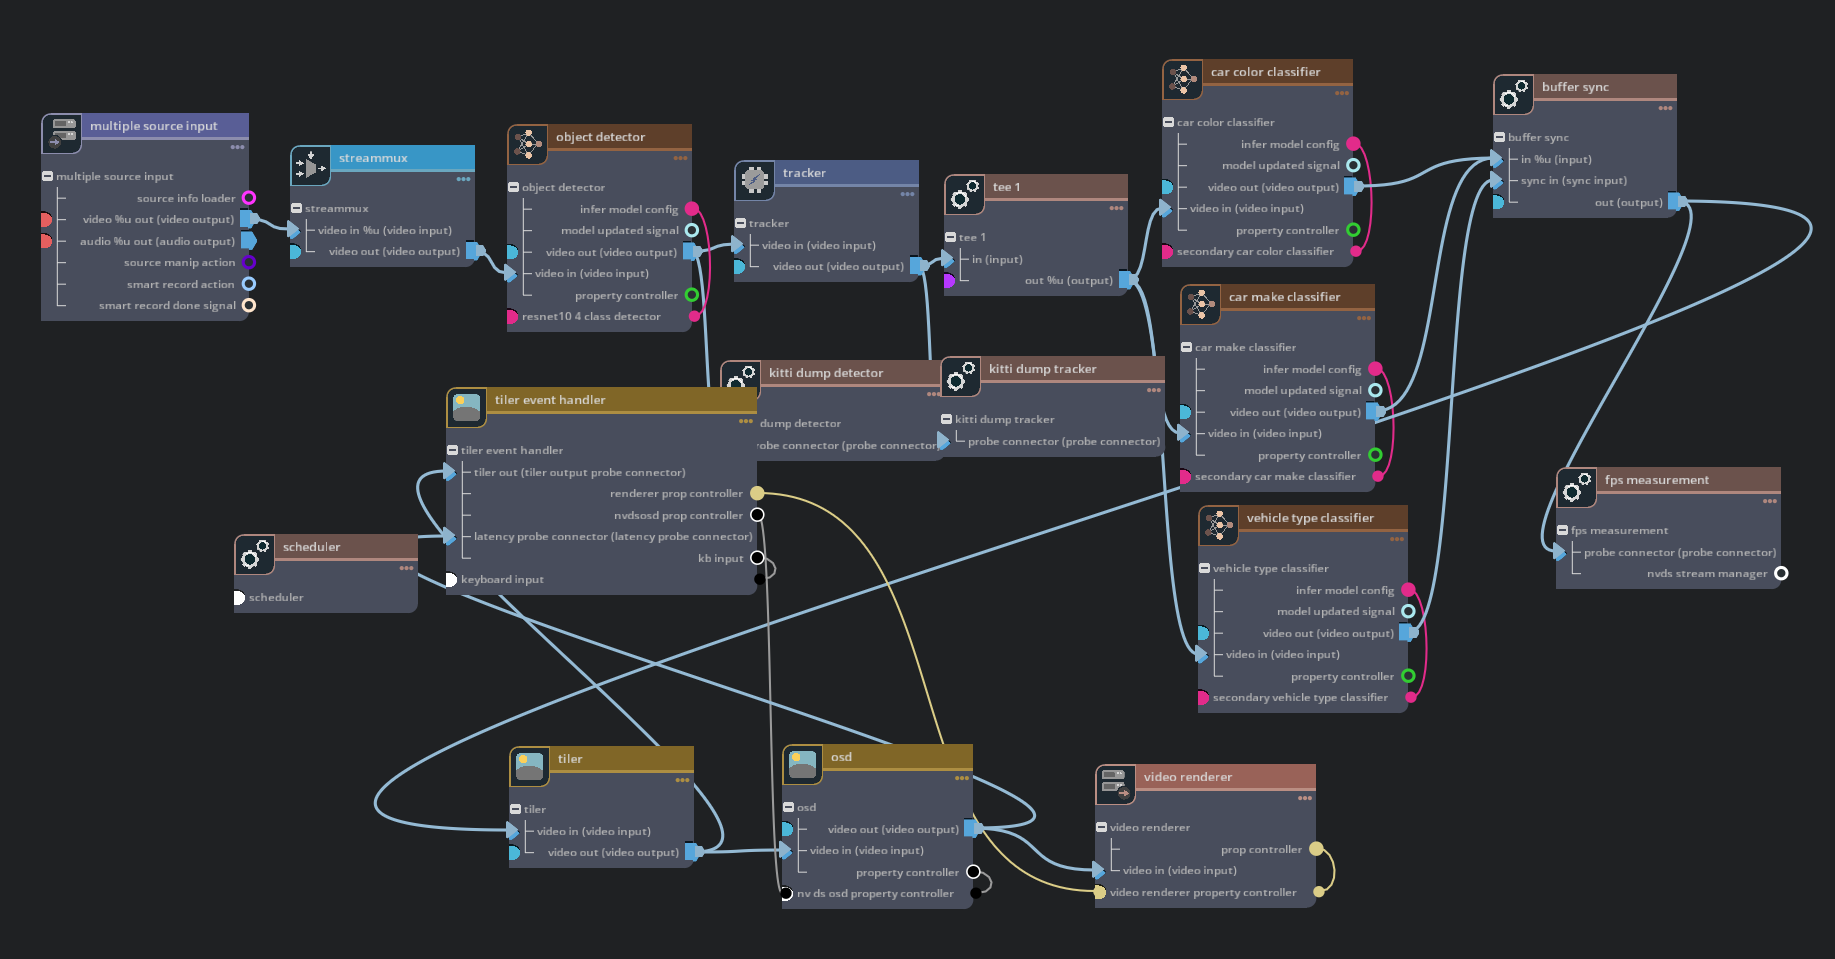
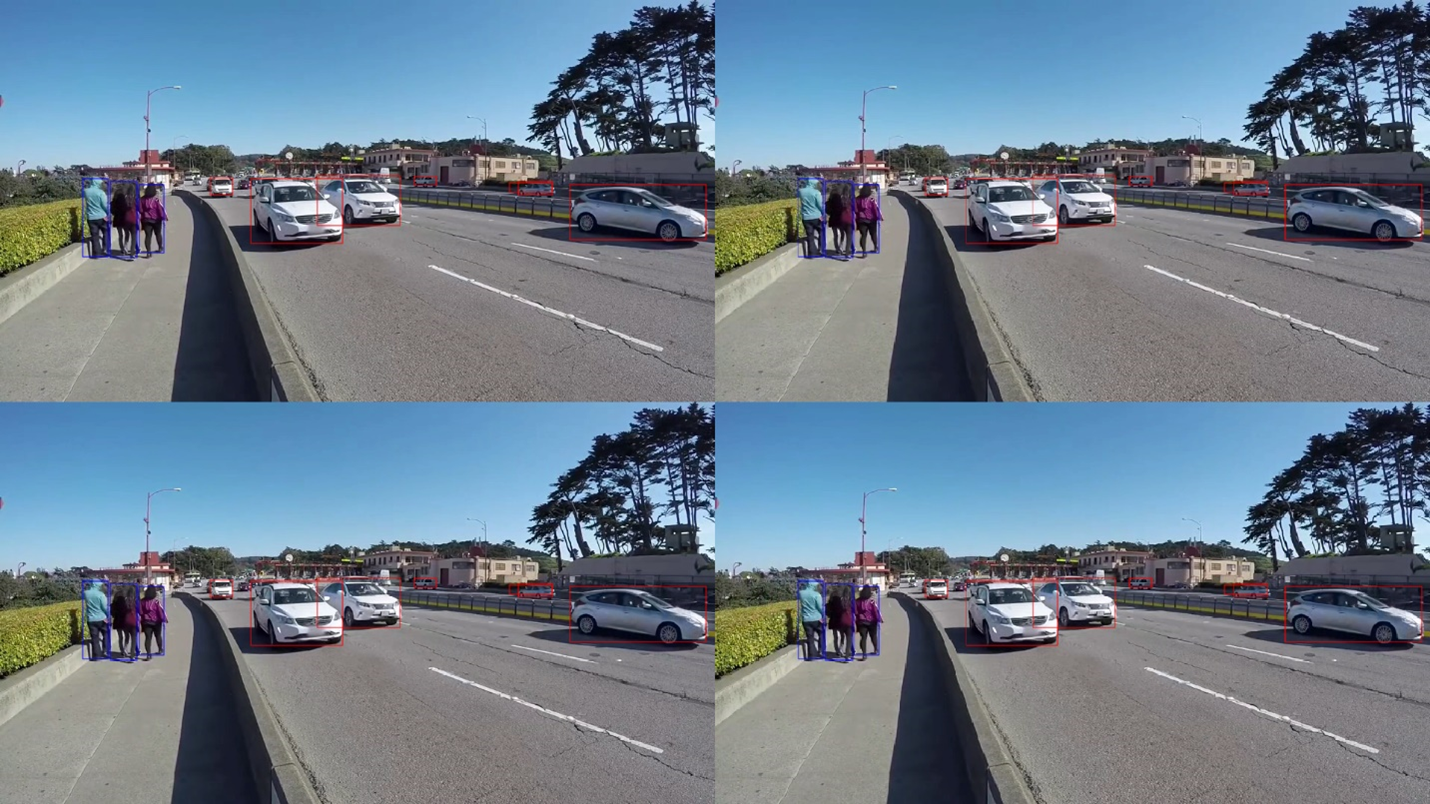
deepstream-app#
DeepStream 参考应用程序,展示了各种各样的功能,例如 kitti 转储、性能测量、处理平铺器事件。 提供了与 DeepStreamSDK 中的两个示例配置相对应的两个图表。
图表文件#
source30_1080p_dec_infer-resnet_tiled_display_int8.yaml – 30 个文件输入 + 主检测器 + 平铺输出的图表文件
source30_1080p_dec_infer-resnet_tiled_display_int8.parameters.yaml – 包含上述图表中各种组件参数的文件
source4_1080p_dec_infer-resnet_tracker_sgie_tiled_display_int8.yaml – 4 个文件输入 + 主检测器 + 跟踪器 + 3 个辅助分类器 + 平铺输出的图表文件
source4_1080p_dec_infer-resnet_tracker_sgie_tiled_display_int8.parameters.yaml – 包含上述图表中各种组件参数的文件
README - 包含详细的图表描述和执行说明
ds_app_container_builder_dgpu.yaml - 用于构建 dGPU 平台特定应用程序容器的配置文件
ds_app_container_builder_jetson.yaml - 用于构建 Jetson 平台特定应用程序容器的配置文件
路径 - /opt/nvidia/deepstream/deepstream/reference_graphs/deepstream-app
示例命令
On x86:
$ /opt/nvidia/graph-composer/execute_graph.sh \
      source30_1080p_dec_infer-resnet_tiled_display_int8.yaml \
      source30_1080p_dec_infer-resnet_tiled_display_int8.parameters.yaml \
      -d ../common/target_x86_64.yaml

$ /opt/nvidia/graph-composer/execute_graph.sh \
      source4_1080p_dec_infer-resnet_tracker_sgie_tiled_display_int8.yaml \
      source4_1080p_dec_infer-resnet_tracker_sgie_tiled_display_int8.parameters.yaml \
      -d ../common/target_x86_64.yaml

On Jetson:
$ /opt/nvidia/graph-composer/execute_graph.sh \
      source30_1080p_dec_infer-resnet_tiled_display_int8.yaml \
      source30_1080p_dec_infer-resnet_tiled_display_int8.parameters.yaml \
      -d ../common/target_aarch64.yaml

$ /opt/nvidia/graph-composer/execute_graph.sh \
      source4_1080p_dec_infer-resnet_tracker_sgie_tiled_display_int8.yaml \
      source4_1080p_dec_infer-resnet_tracker_sgie_tiled_display_int8.parameters.yaml \
      -d ../common/target_aarch64.yaml
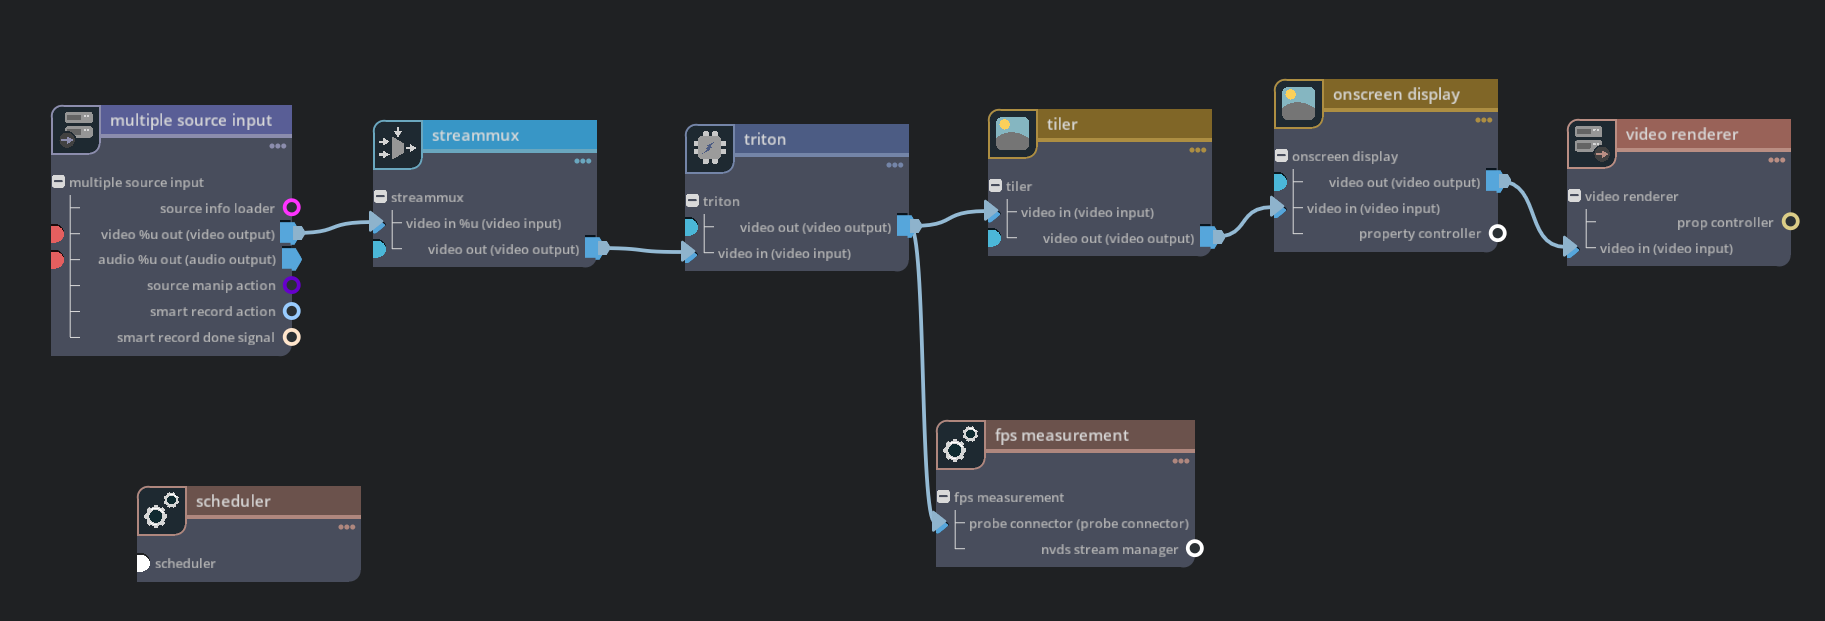
deepstream-triton#
演示了在简单的 DeepStream 管道中使用 triton 服务器以及使用 NVIDIA Graph Container Builder 创建基于用例的容器。 该图表显示了通过 Triton 服务器使用 SSD Inception V2 Tensorflow 模型进行对象检测。 对于 DGPU,该图表必须在使用容器构建器构建的容器内执行,因为 Triton 仅以 docker 格式提供。 对于 Jetson,该图表可以直接在设备上运行。
图表和相关文件#
deepstream-triton.yaml – 主图表文件
deepstream-triton.parameters.dgpu_container.yaml – 包含在 DGPU 上执行图表的参数的文件
deepstream-triton.parameters.jetson.yaml – 包含在 Jetson 上执行图表的参数的文件
ds_triton_container_builder_cfg_dgpu.yaml – 用于构建图表容器的 Container Builder 配置文件
README - 包含详细的图表描述和执行说明
ds_triton_container_builder_cfg_dgpu.yaml - 用于构建 dGPU 平台特定应用程序容器的配置文件
ds_triton_container_builder_cfg_jetson.yaml - 用于构建 Jetson 平台特定应用程序容器的配置文件
路径 - /opt/nvidia/deepstream/deepstream/reference_graphs/deepstream-triton
示例命令
On x86:
Triton samples for DGPU need to be run in containers based on Triton. This
sample uses the NVIDIA Container Builder to build a container for the sample.

Steps:
* Build the container
$ container_builder build -c ds_triton_container_builder_cfg_dgpu.yaml \
      -d target_triton_x86_64.yaml -wd $(pwd)

* Start the container
$ docker run -it --rm  -e DISPLAY=:0 -v /tmp/.X11-unix/:/tmp/.X11-unix \
      --gpus all deepstream_triton_dgpu

On Jetson:
Triton samples for Jetson can be run natively or in a container.

Steps for running natively:
* Setup the Triton Server.
- $ cd /opt/nvidia/deepstream/deepstream/samples
- $ sudo ./triton_backend_setup.sh

* Prepare the triton model repo. Downloads the model files.
- $ cd /opt/nvidia/deepstream/deepstream/samples/
- $ ./prepare_ds_triton_model_repo.sh # prepare the triton model repo

* Launch the graph
- $ /opt/nvidia/graph-composer/execute_graph.sh deepstream-triton.yaml \
      deepstream-triton.parameters.jetson.yaml -d target_triton_aarch64.yaml
注意
有时在运行图表时可能会出现以下错误。
"unable to load backend library: /usr/lib/aarch64-linux-gnu/libgomp.so.1: cannot allocate memory in static TLS block"
要解决此问题,需要预加载 libgomp.so.1,可以在运行示例之前按如下方式完成
$ export LD_PRELOAD=/usr/lib/aarch64-linux-gnu/libgomp.so.1:$LD_PRELOAD
图表#
示例输出#
deepstream-camera#
演示了在简单的 DeepStream 管道中使用相机源
图表和相关文件#
deepstream-camera.yaml – 主图表文件
v4l2-usb-camera.parameters.yaml - 用于使用 V4L2 USB 相机的参数文件。 在 x86 和 jetson 上均可使用
argus-csi-camera.parameters.yaml - 用于使用 NVIDIA Argus API 使用 CSI 相机的参数文件。 仅适用于 jetson
README - 包含详细的图表描述和执行说明
ds_camera_container_builder_dgpu.yaml - 用于构建 dGPU 平台特定应用程序容器的配置文件
ds_camera_container_builder_jetson.yaml - 用于构建 Jetson 平台特定应用程序容器的配置文件
路径 - /opt/nvidia/deepstream/deepstream/reference_graphs/deepstream-camera
示例命令
On x86:
$ /opt/nvidia/graph-composer/execute_graph.sh deepstream-camera.yaml \
      v4l2-usb-camera.parameters.yaml -d ../common/target_x86_64.yaml

On Jetson:
$ /opt/nvidia/graph-composer/execute_graph.sh deepstream-camera.yaml \
      v4l2-usb-camera.parameters.yaml -d ../common/target_aarch64.yaml
OR
$ /opt/nvidia/graph-composer/execute_graph.sh deepstream-camera.yaml \
      argus-csi-camera.parameters.yaml -d ../common/target_aarch64.yaml
图表#
示例输出#
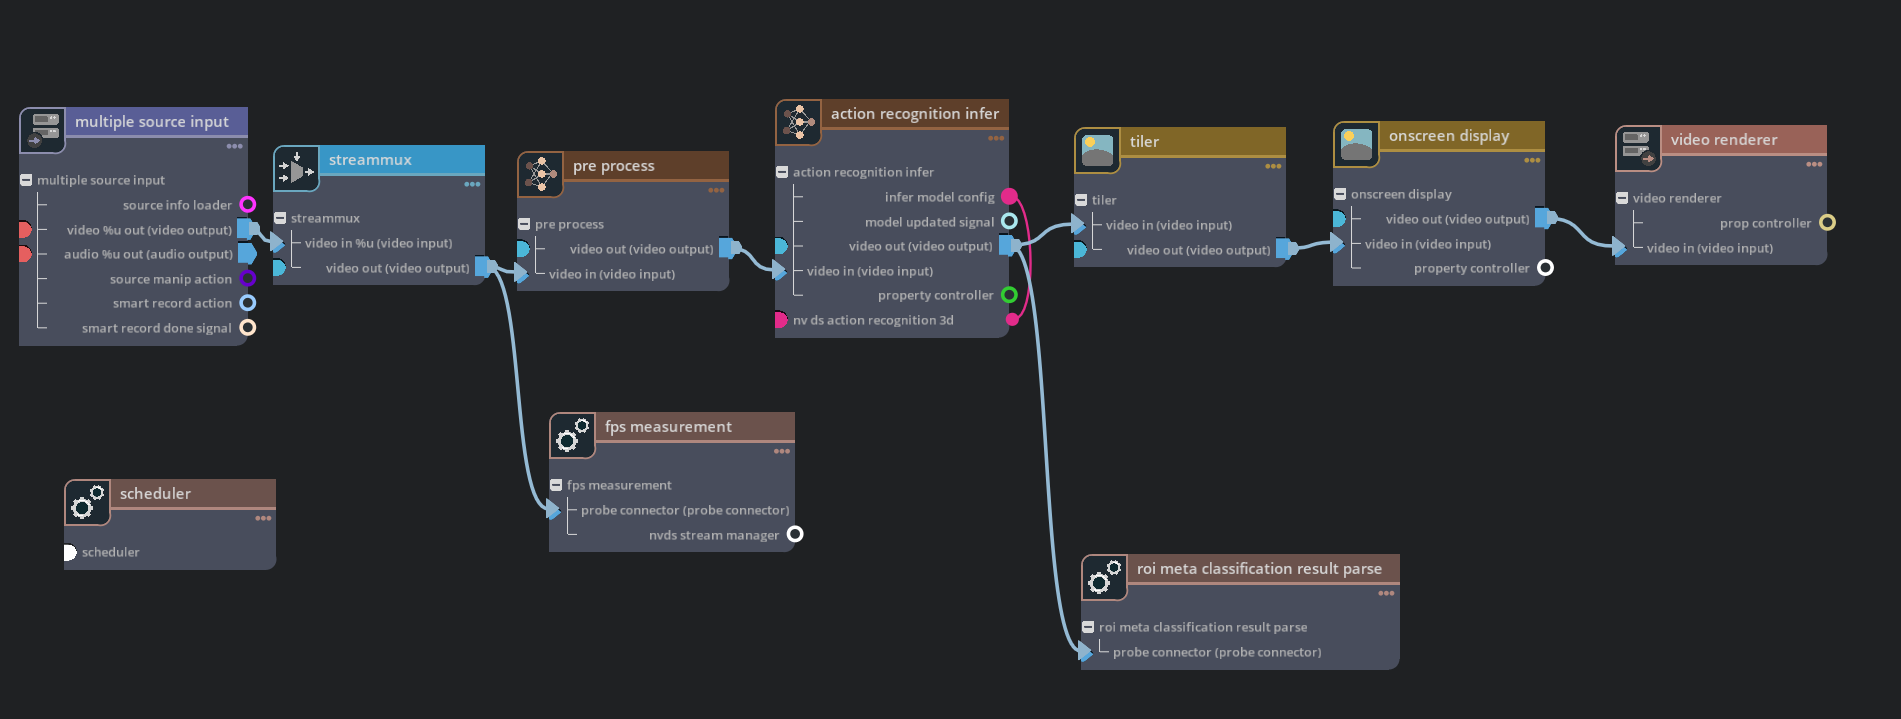
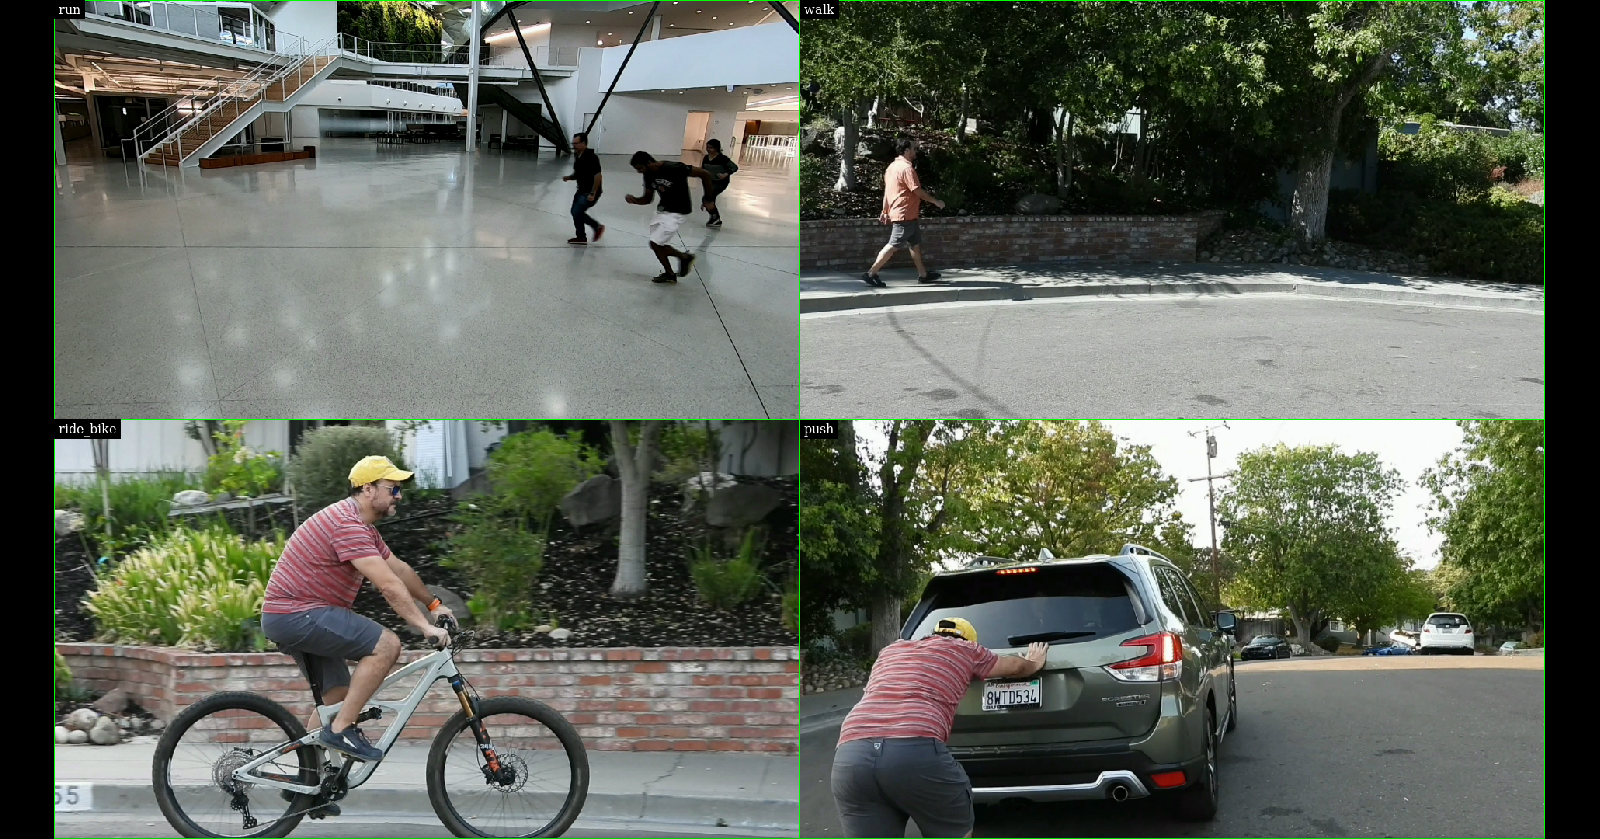
deepstream-action-recognition#
演示了 NvDsPreProcess 组件的用法,以在 NvDsInferVideo 组件外部进行预处理。 在此示例中,它用于演示 NVIDIA TAO 动作识别模型所需的时间批处理和预处理。
图表和相关文件#
deepstream-action-recognition.yaml – 主图表文件
parameters.yaml - 包含图中各种组件参数的文件
resources.yaml - 执行图表所需的资源列表。 使用远程图表执行时需要此文件
README - 包含详细的图表描述和执行说明
ds_action_recognition_container_builder_dgpu.yaml - 用于构建 dGPU 平台特定应用程序容器的配置文件
ds_action_recognition_container_builder_jetson.yaml - 用于构建 Jetson 平台特定应用程序容器的配置文件
config_preprocess_3d_custom.txt - 3D 动作识别模型的 NvDsPreProcess 组件配置文件
config_preprocess_2d_custom.txt - 2D 动作识别模型的 NvDsPreProcess 组件配置文件
路径 - /opt/nvidia/deepstream/deepstream/reference_graphs/deepstream-action-recognition
示例命令
On x86:
$ /opt/nvidia/graph-composer/execute_graph.sh deepstream-action-recognition.yaml \
      parameters.yaml -d ../common/target_x86_64.yaml

On Jetson:
$ /opt/nvidia/graph-composer/execute_graph.sh deepstream-action-recognition.yaml \
      parameters.yaml -d ../common/target_aarch64.yaml
注意
在远程目标上执行时,必须提供额外的参数“–resources resources.yaml”才能执行 execute_graph.sh 脚本。
图表#
示例输出#
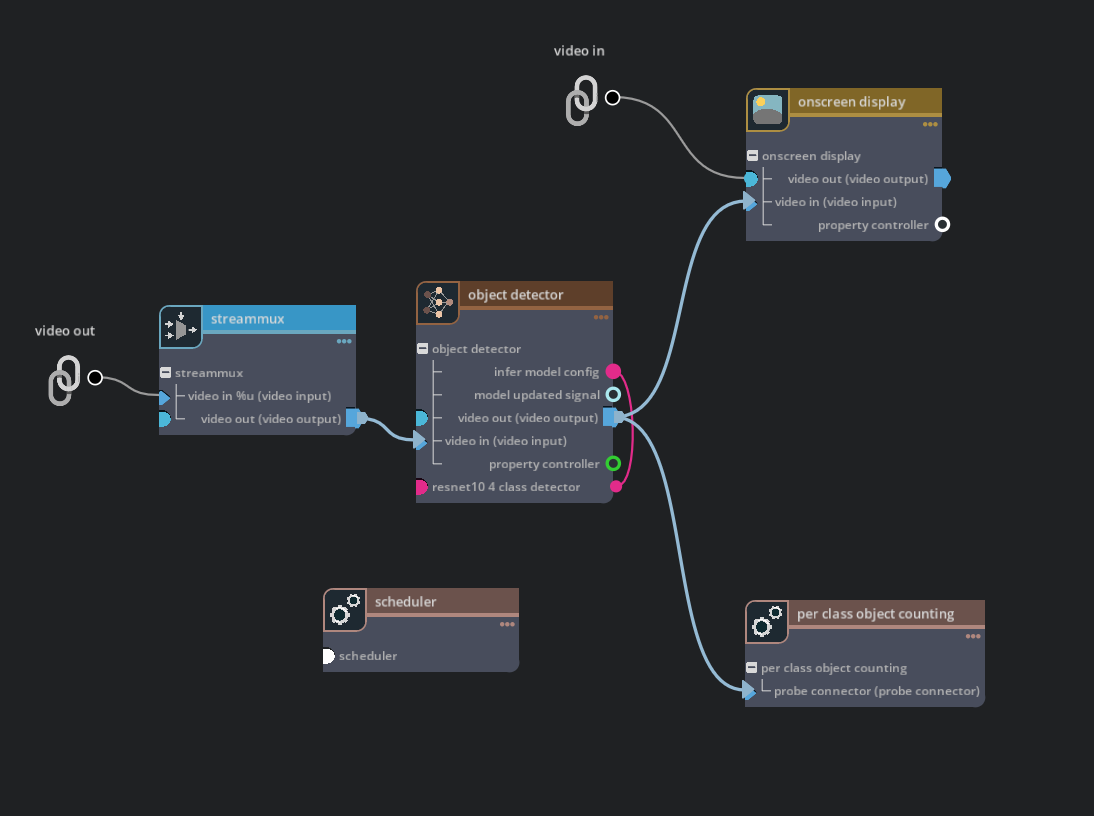
deepstream-subgraph#
演示了子图与 DS 组件的用法。
图表和相关文件#
main_graph.yaml – 主图表文件
inference_subgraph.yaml - thr 主图表使用的推理子图
resources.yaml - 执行图表所需的资源列表。 使用远程图表执行时需要此文件
README - 包含详细的图表描述和执行说明
ds_subgraph_container_builder_dgpu.yaml - 用于构建 dGPU 平台特定应用程序容器的配置文件
ds_subgraph_container_builder_jetson.yaml - 用于构建 Jetson 平台特定应用程序容器的配置文件
路径 - /opt/nvidia/deepstream/deepstream/reference_graphs/deepstream-subgraph
示例命令
On x86:
$ /opt/nvidia/graph-composer/execute_graph.sh main_graph.yaml \
      -s inference_subgraph.yaml -d ../common/target_x86_64.yaml

On Jetson:
$ /opt/nvidia/graph-composer/execute_graph.sh main_graph.yaml \
      -s inference_subgraph.yaml -d ../common/target_aarch64.yaml
注意
在远程目标上执行时,必须提供额外的参数“–resources resources.yaml”才能执行 execute_graph.sh 脚本。
图表#
主图表
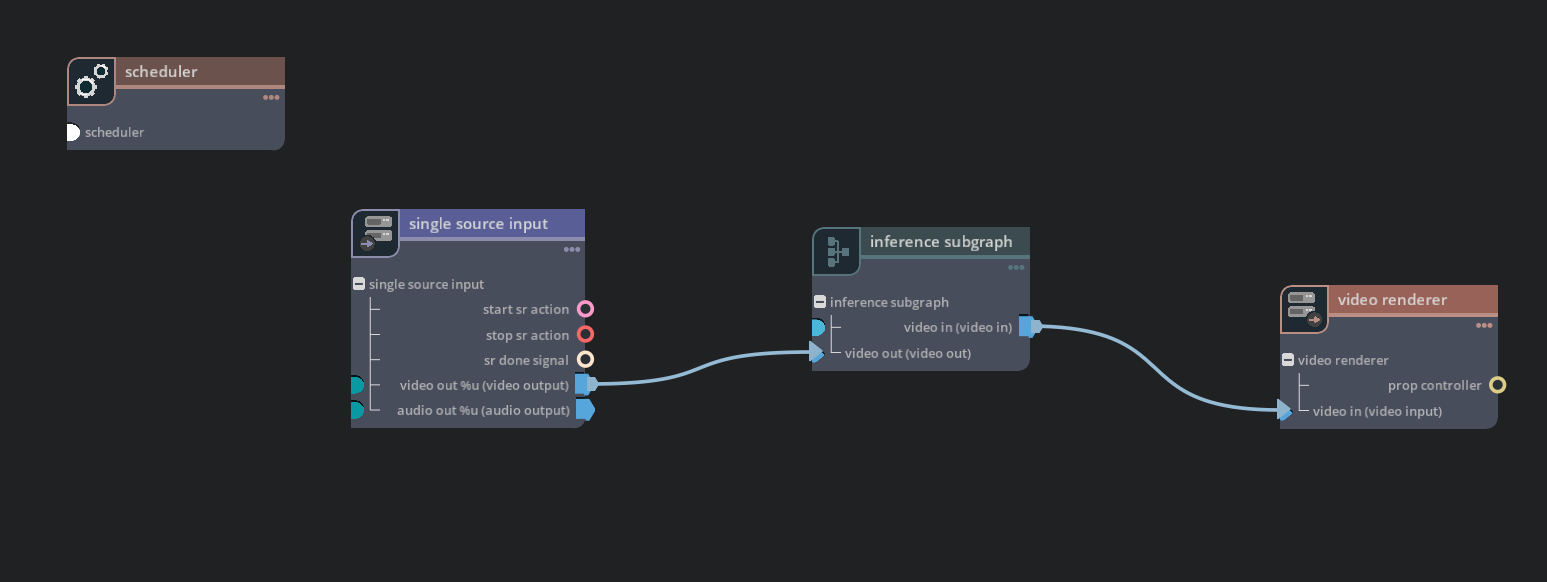
推理子图
示例输出#

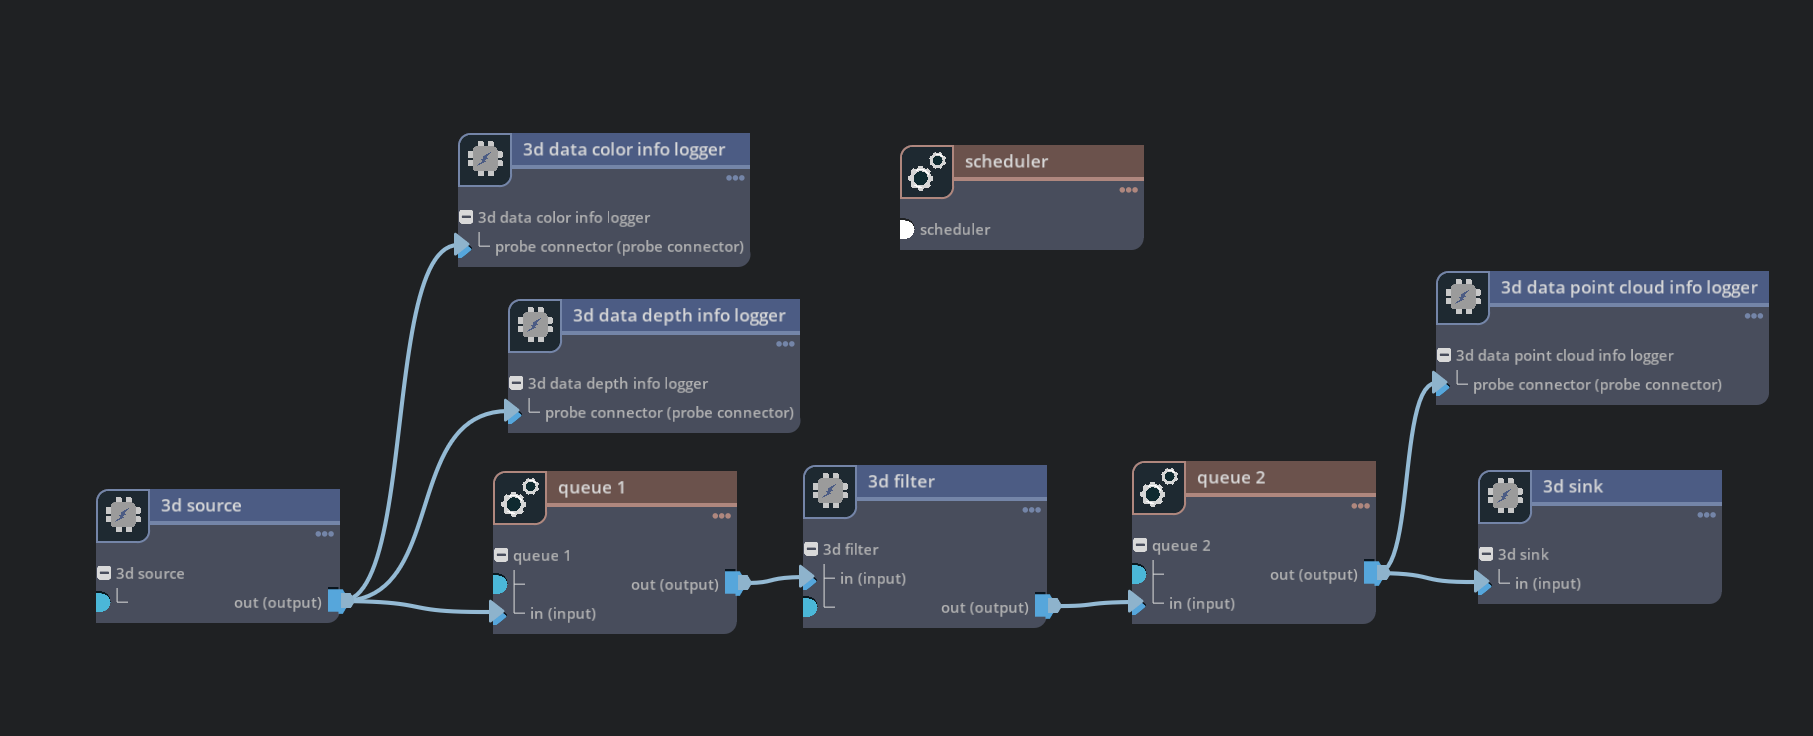
deepstream-3d-camera#
演示了从 3D 相机捕获、处理和渲染 3D 数据。
图表和相关文件#
deepstream-3d-camera.yaml – 主图表文件
parameters-2drender.yaml - 渲染为 2D 而不是 3D 的参数
ds_3d_loader_realsense.yaml - 数据加载器组件(源)的配置文件
ds_3d_filter_depth2cloud.yaml - 数据过滤组件 (nvds3dfilter) 的配置文件
ds_3d_render_depth2d.yaml - 数据渲染组件(接收器)的配置文件 - 2D 渲染
ds_3d_render_pointcloud3d.yaml - 数据渲染组件(接收器)的配置文件 - 3D 渲染
resources.yaml - 执行图表所需的资源列表。 使用远程图表执行时需要此文件
README - 包含详细的图表描述和执行说明
ds_3d_depth_camera_container_builder_dgpu.yaml - 用于构建 dGPU 平台特定应用程序容器的配置文件
路径 - /opt/nvidia/deepstream/deepstream/reference_graphs/deepstream-3d-camera
示例命令
On x86:
$ /opt/nvidia/graph-composer/execute_graph.sh deepstream-3d-camera.yaml \
      -d ../common/target_x86_64.yaml

On Jetson:
$ /opt/nvidia/graph-composer/execute_graph.sh deepstream-3d-camera.yaml \
      -d ../common/target_aarch64.yaml

NOTE:
注意
可以将“parameters-2drender.yaml”添加到命令行以渲染 2D 深度/彩色图像,而不是默认的 3D 点云渲染。
默认的 3D 点渲染支持鼠标交互。
图表#
示例输出#
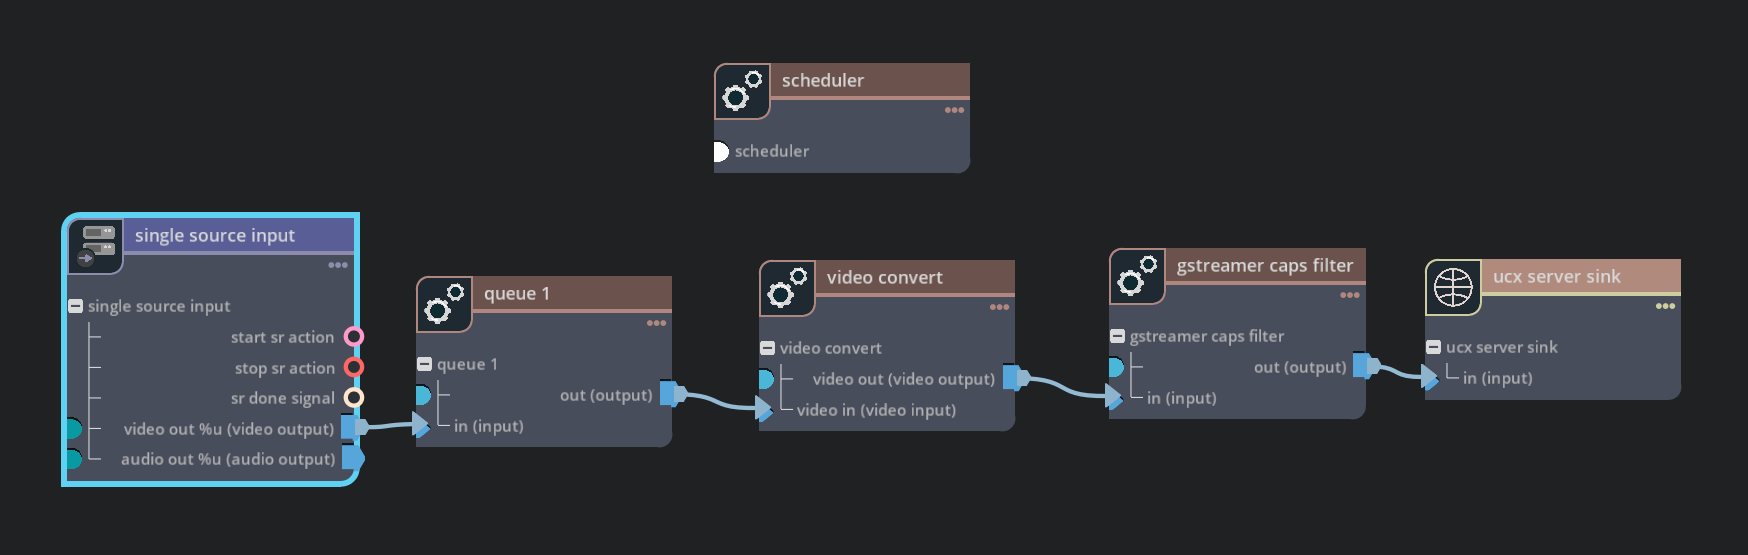
deepstream-ucx-test1#
演示了如何使用 DeepStream UCX 通信组件进行数据传输
图表和相关文件#
deepstream-ucx-test1-server.yaml – 服务器应用程序图表文件(发送器)
deepstream-ucx-test1-client.yaml – 客户端应用程序图表文件(接收器)
server-parameters.yaml - 服务器应用程序中各种组件的可配置参数。
client-parameters.yaml - 客户端应用程序中各种组件的可配置参数。
README - 包含详细的图表描述和执行说明
路径 - /opt/nvidia/deepstream/deepstream/reference_graphs/deepstream-ucx-test1
示例命令
Run the server first:

Update `addr` parameter in `server-parameters.yaml` to mellanox NIC address on
which the server listens.

On x86:
$ /opt/nvidia/graph-composer/execute_graph.sh deepstream-ucx-test1-server.yaml \
      server-parameters.yaml -d ../common/target_x86_64.yaml

Run the client next:

Update addr` parameters in `client-parameters.yaml` to address on which the
server is listening. This may be executed on the same device in another terminal
or on another device with a mellanox NIC connected to the server side mellanox
NIC.

On x86:
$ /opt/nvidia/graph-composer/execute_graph.sh deepstream-ucx-test1-client.yaml \
      client-parameters.yaml -d ../common/target_x86_64.yaml
注意
此示例仅支持 x86。
图表#
服务器图表
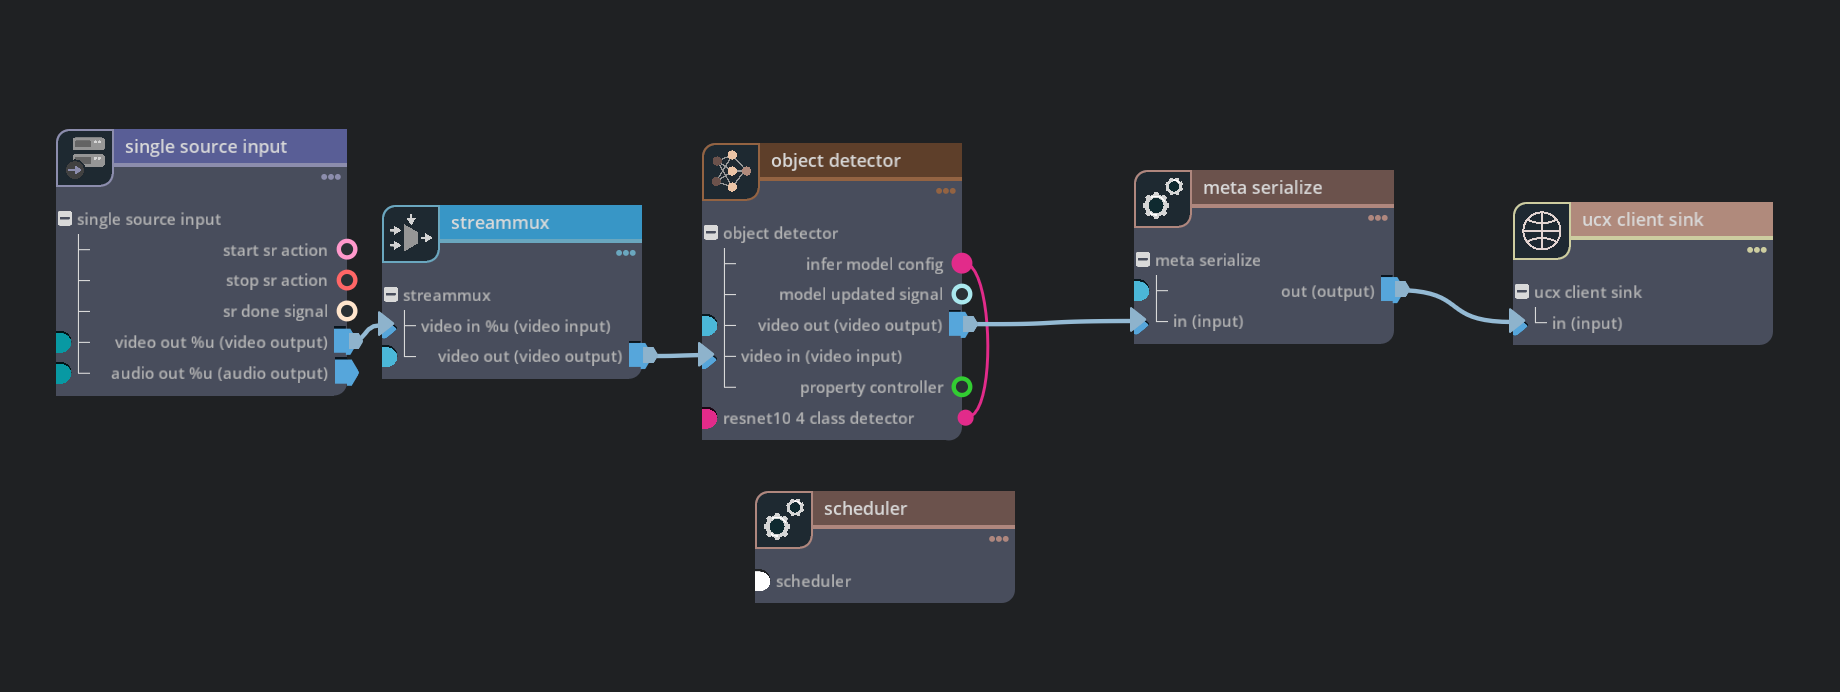
客户端图表

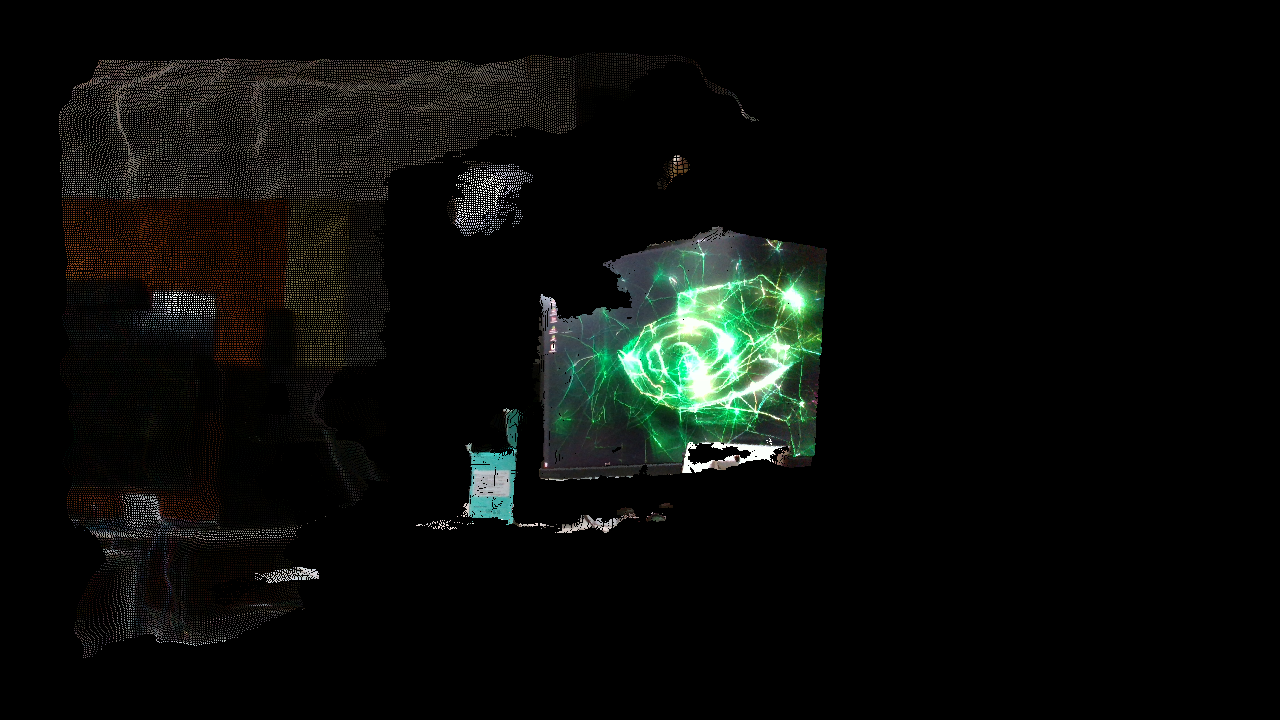
示例输出#
deepstream-ucx-test2#
演示了如何使用 DeepStream UCX 通信组件进行数据传输,包括 DS 元数据。
图表和相关文件#
deepstream-ucx-test2-server.yaml – 服务器应用程序图表文件(发送器)
deepstream-ucx-test2-client.yaml – 客户端应用程序图表文件(接收器)
server-parameters.yaml - 服务器应用程序中各种组件的可配置参数。
client-parameters.yaml - 客户端应用程序中各种组件的可配置参数。
README - 包含详细的图表描述和执行说明
路径 - /opt/nvidia/deepstream/deepstream/reference_graphs/deepstream-ucx-test2
示例命令
Run the server first:

Update `addr` parameter in `server-parameters.yaml` to mellanox NIC address on
which the server listens.

On x86:
$ /opt/nvidia/graph-composer/execute_graph.sh deepstream-ucx-test2-server.yaml \
      server-parameters.yaml -d ../common/target_x86_64.yaml

Run the client next:

Update addr` parameters in `client-parameters.yaml` to address on which the
server is listening. This may be executed on the same device in another terminal
or on another device with a Mellanox NIC connected to the server side Mellanox
NIC.

On x86:
$ /opt/nvidia/graph-composer/execute_graph.sh deepstream-ucx-test2-client.yaml \
      client-parameters.yaml -d ../common/target_x86_64.yaml
注意
此示例仅支持 x86。
图表#
服务器图表

客户端图表
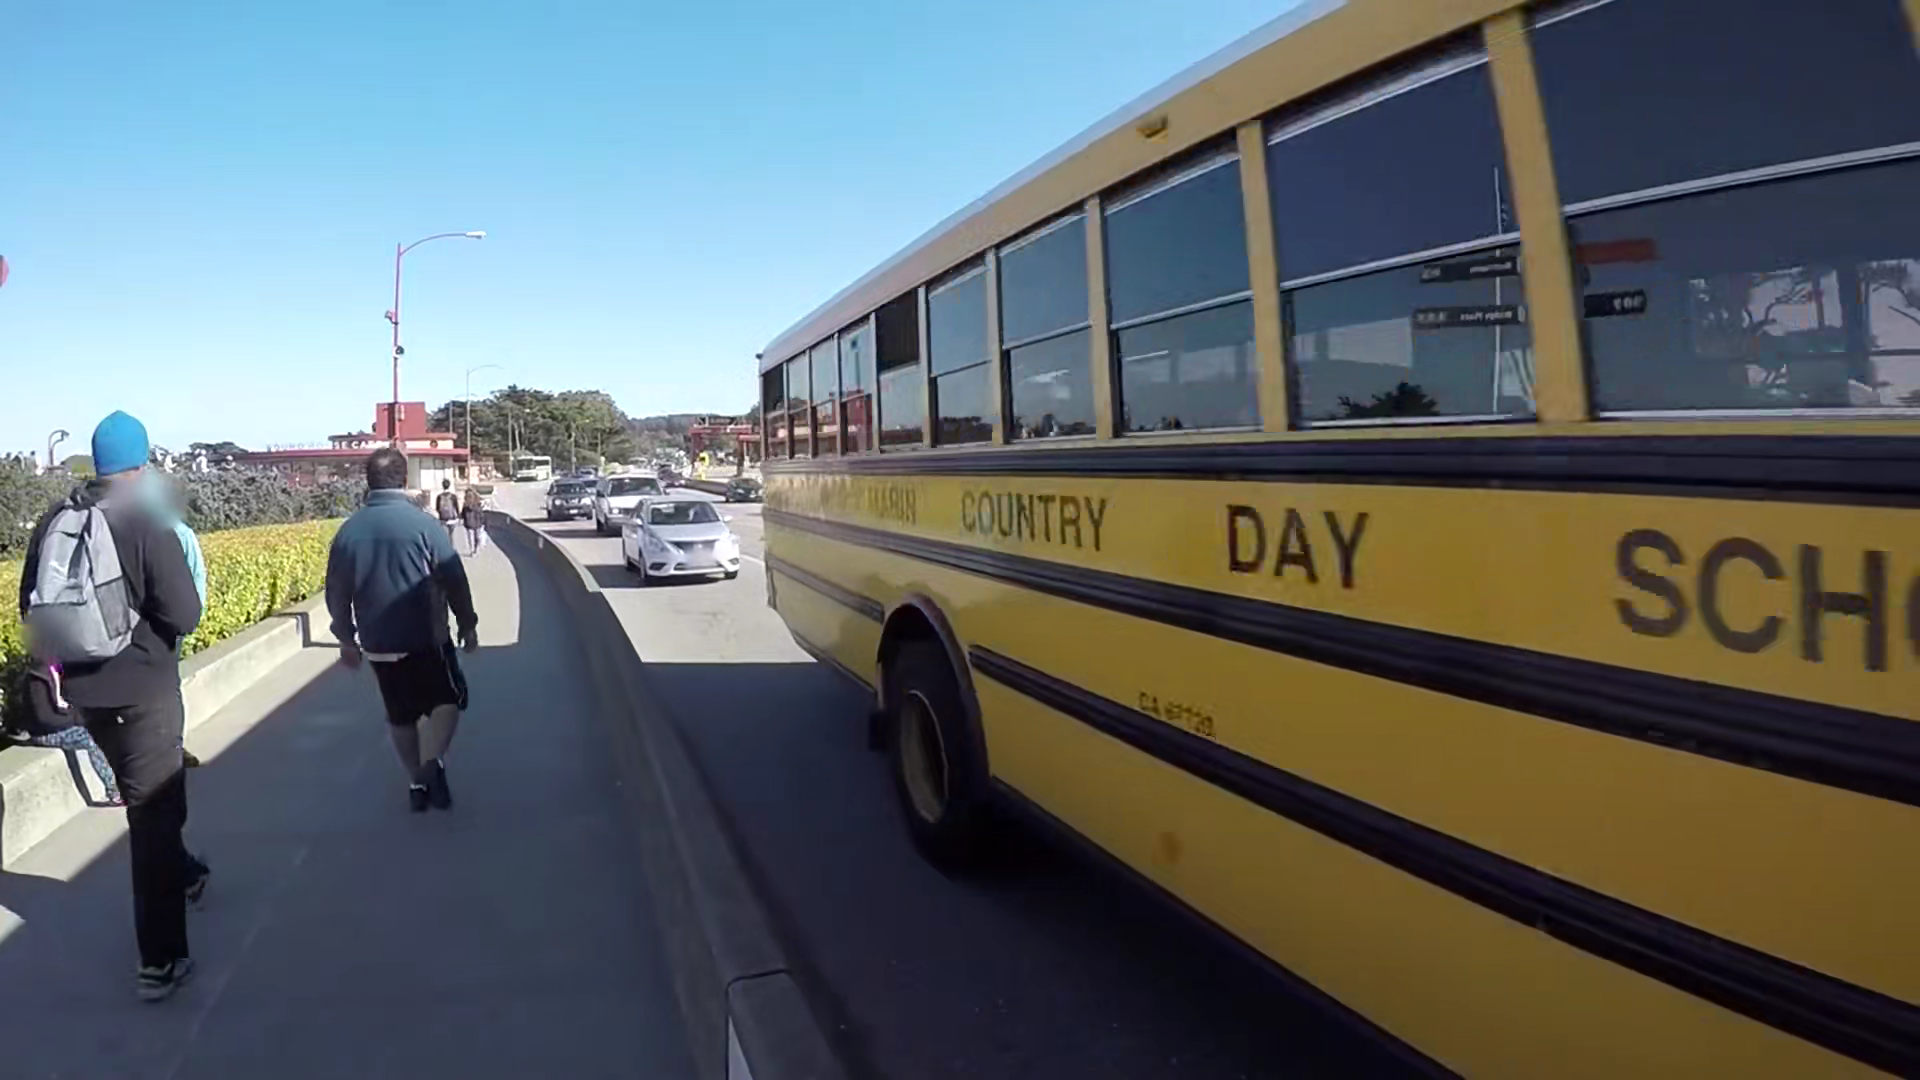
示例输出#
