DeepStream 与 REST API 服务器#
DeepStream 应用程序借助 REST API 支持某些组件的运行时参数配置。DeepStream 应用程序应作为服务器运行以实现此功能。
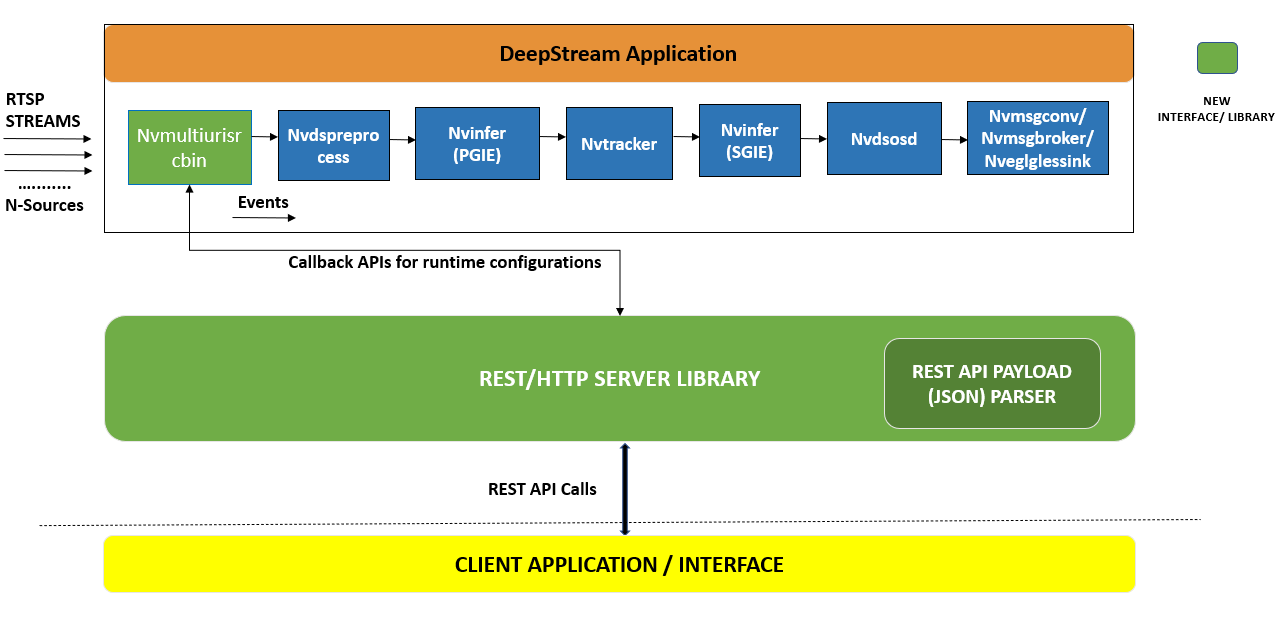
x86(DeepStream-6.2 及更高版本)和 Jetson(DeepStream-6.3 及更高版本)均支持 Rest 服务器。REST 服务器库使用“Civetweb”OSS 库集成 HTTP 服务器以处理 REST API 端点。REST 服务器库实现了各种组件特定的端点处理。此外,REST API 有效负载解析器使用“jsoncpp”OSS 库集成,以解析 JSON 格式的有效负载。新的 nvmultiurisrcbin 实现了回调 API,用于在原生 DeepStream gstreamer 管道中运行时参数配置受支持的组件。接收到 REST API 的 HTTP POST 请求后,nvmultiurisrcbin 实现的相关回调会创建新的自定义 gstreamer 事件,这些事件将被注入到原生 gstreamer 管道中。适用的 gstreamer 组件拦截自定义事件以在原生 gstreamer 管道中运行时配置相关组件。示例应用程序 deepstream-server-app 也位于 /opt/nvidia/deepstream/deepstream/sources/apps/sample_apps/deepstream-server 供参考。这些接口源在 DeepStream SDK 包中提供。这应为用户提供随时可用的基础设施,以定义和实现他们自己的自定义 REST API 支持各种 DeepStream 组件(请参阅下面的“如何添加自定义 REST API 支持”部分)。REST 服务器默认在 nvmultiurisrcbin 插件内部实例化。
有关“nvmultiurisrcbin”的详细信息,请参阅 Gst-nvmultiurisrcbin。
功能#
示例 deepstream-server 应用程序可用于演示如何使用 REST API 在运行时配置 DeepStream 组件参数。目前支持的 REST API 可用于配置 DeepStream 管道,如下所述
注意
DS-6.4 及更高版本引入了 REST API 支持。当前 DS-7.1 支持的版本为 /api/v1。
DS-7.0 及更高版本支持 REST API 错误处理,符合 OpenAPI 规范 (https://spec.openapis.org.cn/oas/v3.0.3)。
下表总结了支持的 REST API
Rest API 支持# 组/组件名称
参数更新
流特定
流添加和删除
nvdspreprocess
更新预处理的 ROI
nvv4l2decoder
“drop-frame-interval”和“skip-frame”属性更新
nvdsinfer
“interval”属性更新
nvdsinferserver
“interval”属性更新
nvv4l2encoder
“force-idr”、“force-intra”、“iframeinterval”和“bitrate”属性更新
nvstreammux
“batched-push-timeout”属性更新
nvvideoconvert
“src-crop”、“dest-crop”、“flip-method”和“interpolation-method”属性更新
nvdsosd
“process-mode”属性更新
应用程序特定
应用程序退出
GET 请求
获取流信息
nvds_rest_server#
nvds_rest_server 是一个自定义 DeepStream 库,与 DeepStreamSDK 包一起开源,位于 /opt/nvidia/deepstream/deepstream/sources/libs/nvds_rest_server/。鼓励用户按原样使用此库或进行修改以支持自定义用例。此库可以集成到 Gstreamer 插件、GStreamer bin 或 DeepStream 应用程序中。从 DS 6.2 版本开始,nvds_rest_server 库与 Gst-nvmultiurisrcbin 集成,以支持通过 REST API 运行时添加和删除传感器。
deepstream-server-app#
deepstream-server-app 示例应用程序位于 /opt/nvidia/deepstream/deepstream/sources/apps/sample_apps/deepstream-server。参考应用程序演示了如何使用 REST API 在运行时配置 DeepStream 插件参数,方法是使用 nvmultiurisrcbin 或直接使用低级 nvds_rest_server 库 API。有关应用程序用法、有效负载架构和 REST API 端点详细信息,请参阅 /opt/nvidia/deepstream/deepstream/sources/apps/sample_apps/deepstream-server/README 中的 README。
deepstream-server-app 在两种模式下运行
nvmultiurisrcbin 内的 REST 服务器(默认)
要使用 nvmultiurisrcbin,请在 dsserver_config.yml 文件中定义的
rest-server组中设置within_multiurisrcbin: 1。如果使用 nvmultiurisrcbin 进行模拟,应用程序将使用 dsserver_config.yml 的multiurisrcbin组中定义的参数。所有 REST API 回调均通过 nvmultiurisrcbin 实现。
与应用程序一起使用的 REST 服务器
要将 REST 服务器与应用程序一起使用,请在
dsserver_config.yml配置文件中设置within_multiurisrcbin: 0。将使用 dsserver_config.yml 的server-app-ctx组内定义的参数。所有 REST API 回调均通过应用程序实现。
注意
此应用程序包包含 dsserver_pgie_config.yml 和 dsserver_config.yml 文件。dsserver_config.yml 在启动应用程序时使用。dsserver_pgie_config.yml 用于在示例应用程序中配置 pgie。
预期行为:即使从管道收到 EOS,示例服务器应用程序也将持续运行,因为在配置文件 dsserver_config.yml 中,drop-pipeline-eos 设置为 TRUE(默认)。但是,如果用户需要更改此行为,请将 dsserver_config.yml 文件中定义的“multiurisrcbin”组的“drop-pipeline-eos: 0”或“server-app-ctx”组的“drop_pipeline_eos: 0”设置为在 EOS 时退出应用程序。
使用 deepstream-test5-app 进行传感器配置#
DeepStream 配置文件解析参考应用程序(如 deepstream-test5-app)支持传感器配置(运行时流添加/删除)。有关更多详细信息和要参考的示例配置文件,请参阅文档 此处。
如何添加自定义 REST API 支持#
用户应遵循以下部分。每个部分都详细介绍了实现新的自定义 REST API 支持的步骤。
REST API 端点实现
自定义事件生成
REST API 端点的回调实现
REST API 端点实现#
定义任何组件/组特定的自定义 REST API 端点。
注册自定义 REST API 端点。
对于 1 和 2,请参阅 /opt/nvidia/deepstream/deepstream/sources/libs/nvds_rest_server/nvds_rest_server.cpp 中的以下源代码片段
if (uri.find ("/roi/update") != std::string::npos) {
  /* Pre-Process Specific */
  m_func[uri] =
      [roi_cb, uri] (const Json::Value & req_info, const Json::Value & in,
      Json::Value & out, struct mg_connection * conn) {
    return handleUpdateROI (req_info, in, out, conn, roi_cb, uri);
  };
}
定义并实现与新的自定义 REST API 对应的 Handler 函数。
请参阅 /opt/nvidia/deepstream/deepstream/sources/libs/nvds_rest_server/nvds_rest_server.cpp 中的以下源代码片段
NvDsServerStatusCode
handleUpdateROI (const Json::Value & req_info, const Json::Value & in,
  Json::Value & response, struct mg_connection *conn,
  std::function < void (NvDsServerRoiInfo * roi_ctx, void *ctx) > roi_cb,
  std::string uri);
有关更多详细信息,请参阅 Handler 函数实现详细信息 部分。
使用 Civerweb 的“httpServerHandler->addHandler”接口注册新的自定义 REST API 的 Handler 函数。
请参阅 /opt/nvidia/deepstream/deepstream/sources/libs/nvds_rest_server/nvds_rest_server.cpp 中的以下源代码片段
httpServerHandler->addHandler (it.first, new RequestHandler (it.first,
        it.second));
定义回调函数,供 REST 服务器用于相应的新自定义 REST API。用户需要将回调函数指针添加为结构 NvDsServerCallbacks 的成员。
请参阅 /opt/nvidia/deepstream/deepstream/sources/libs/nvds_rest_server/nvds_rest_server.h 中的以下源代码片段
typedef struct NvDsServerCallbacks
{
  std::function < void (NvDsServerRoiInfo * roi_info, void *ctx) > roi_cb;
  std::function < void (NvDsServerDecInfo * dec_info, void *ctx) > dec_cb;
  std::function < void (NvDsServerEncInfo * enc_info, void *ctx) > enc_cb;
  std::function < void (NvDsServerStreamInfo * stream_info,
    void *ctx) > stream_cb;
  std::function < void (NvDsServerInferInfo * infer_info,
    void *ctx) > infer_cb;
  std::function < void (NvDsServerConvInfo * conv_info, void *ctx) > conv_cb;
  std::function < void (NvDsServerMuxInfo * mux_info, void *ctx) > mux_cb;
  std::function < void (NvDsServerInferServerInfo * inferserver_info,
    void *ctx) > inferserver_cb;
  std::function < void (NvDsServerOsdInfo * osd_info, void *ctx) > osd_cb;
  std::function < void (NvDsServerAppInstanceInfo * appinstance_info,
    void *ctx) > appinstance_cb;
  std::unordered_map <std::string, cb_func> custom_cb_endpt;
} NvDsServerCallbacks;
Handler 函数实现详细信息#
定义并实现解析器函数,以解析使用新的自定义 REST API 的 HTTP 请求接收的有效负载数据。用户可以定义新的自定义数据结构(使用 nvds_rest_server.h)来保存解析后的有效负载数据。
请参阅 /opt/nvidia/deepstream/deepstream/sources/libs/nvds_rest_server/nvds_roi_parse.cpp 中的源代码片段
bool
nvds_rest_roi_parse (const Json::Value & in, NvDsServerRoiInfo * roi_info)
调用定义的回调,提供有效负载解析数据和自定义上下文指针(如果有)。
根据收到的回调函数返回状态,创建要为收到的 HTTP 请求发送的 JSON 响应。
请参阅 /opt/nvidia/deepstream/deepstream/sources/libs/nvds_rest_server/nvds_rest_server.cpp 中的以下源代码片段
if (nvds_rest_roi_parse (in, &roi_info) && (roi_cb)) {
  roi_cb (&roi_info, &custom_ctx);
  switch (roi_info.roi_flag) {
    case ROI_UPDATE:
      http_err_code = NvDsServerStatusCodeToHttpStatusCode(roi_info.err_info.code);
      break;
    default:
      break;
  }
} else {
  http_err_code = NvDsServerStatusCodeToHttpStatusCode(roi_info.err_info.code);
}
res_info.status = std::string ("HTTP/1.1 ") + std::to_string (http_err_code.first) +
      " " + http_err_code.second;

res_info.reason = roi_info.roi_log;

response["status"] = res_info.status;
response["reason"] = res_info.reason;
自定义事件生成#
定义并实现适用于特定“元素或元素组”的新自定义 gst-event,以处理新的自定义 REST API。
请参阅 /opt/nvidia/deepstream/deepstream/sources/libs/gstnvdscustomhelper/gst-nvdscustomevent.c 中的以下源代码片段
GstEvent *
gst_nvevent_new_roi_update (gchar* stream_id, guint roi_count, RoiDimension *roi_dim)
此自定义 gst-event 将由 gstnvdsmulturisrcbin 注入到原生 gstreamer 管道中。
REST API 端点的回调实现#
实现为新的自定义 REST API 定义的回调函数(如在结构 NvDsServerCallbacks 中注册)。
如果 REST 服务器与 nvmultiurisrcbin 一起使用,请参阅 /opt/nvidia/deepstream/deepstream/sources/gst-plugins/gst-nvmultiurisrcbin/gstdsnvmultiurisrcbin.cpp 的以下源代码片段
static void s_roi_api_impl (NvDsServerRoiInfo * roi_info, void *ctx)
如果 REST 服务器与应用程序一起使用,请参阅 /opt/nvidia/deepstream/deepstream/sources/apps/sample_apps/deepstream-server/rest_server_callbacks.cpp 的以下源代码片段
void s_roi_callback_impl (NvDsServerRoiInfo * roi_info, void *ctx)
此回调函数将新的自定义 gst-event 注入到管道中,以供相应的 gstreamer 元素或元素组处理。适用的 gstreamer 元素或元素组需要在 sink pad 事件处理程序处拦截此新的自定义 gst-event,并将收到的配置应用于运行时适用的元素。
请参阅 /opt/nvidia/deepstream/deepstream/sources/gst-plugins/gst-nvmultiurisrcbin/gstdsnvmultiurisrcbin.cpp 的以下源代码片段
GstEvent *nvevent = gst_nvevent_new_roi_update((char*)roi_info->stream_id.c_str(), roi_info->roi_count, roi_dim);
if (!nvevent) {
    roi_info->roi_log = "ROI_UPDATE_FAIL, nv-roi-update event creation failed";
    roi_info->status = ROI_UPDATE_FAIL;
    roi_info->err_info.code = StatusInternalServerError;
}

if (!gst_pad_push_event ((GstPad *) (nvmultiurisrcbin->bin_src_pad),
          nvevent)) {
  switch (roi_info->roi_flag) {
    case ROI_UPDATE:
      g_print ("[WARN] nv-roi-update event not pushed downstream.. !! \n");
      roi_info->roi_log = "ROI_UPDATE_FAIL, nv-roi-update event not pushed";
      roi_info->status = ROI_UPDATE_FAIL;
      roi_info->err_info.code = StatusInternalServerError;
      break;
    default:
      break;
  }
} else {
  switch (roi_info->roi_flag) {
    case ROI_UPDATE:
      roi_info->status = ROI_UPDATE_SUCCESS;
      roi_info->roi_log = "ROI_UPDATE_SUCCESS";
      roi_info->err_info.code = StatusOk;
      break;
    default:
      break;
  }
}
如果适用的元素已经是 gstdsnvmultiurisrcbin 的一部分(例如解码器),则无需将此类自定义 gst-event 注入到管道中,因为适用于 gst-element 的所有运行时配置都可以从 gstdsnvmultiurisrcbin 内部处理。
请参阅 /opt/nvidia/deepstream/deepstream/sources/gst-plugins/gst-nvmultiurisrcbin/gstdsnvmultiurisrcbin.cpp 的以下源代码片段
if (!set_nvuribin_dec_prop (nvmultiurisrcbin->nvmultiurisrcbinCreator,
        sourceId, dec_info)) {
  switch (dec_info->dec_flag) {
    case DROP_FRAME_INTERVAL:
      g_print ("[WARN] drop-frame-interval not set on decoder .. !! \n");
      dec_info->status = DROP_FRAME_INTERVAL_UPDATE_FAIL;
      dec_info->dec_log = "DROP_FRAME_INTERVAL_UPDATE_FAIL, drop-frame-interval not set on decoder";
      dec_info->err_info.code = StatusInternalServerError;
      break;
    case SKIP_FRAMES:
      g_print ("[WARN] skip-frame not set on decoder .. !! \n");
      dec_info->status = SKIP_FRAMES_UPDATE_FAIL;
      dec_info->dec_log = "SKIP_FRAMES_UPDATE_FAIL, skip-frame not set on decoder";
      dec_info->err_info.code = StatusInternalServerError;
      break;
    case LOW_LATENCY_MODE:
      g_print ("[WARN] low-latency-mode not set on decoder .. !! \n");
      dec_info->status = LOW_LATENCY_MODE_UPDATE_FAIL;
      dec_info->dec_log = "LOW_LATENCY_MODE_UPDATE_FAIL, low-latency-mode not set on decoder";
      dec_info->err_info.code = StatusInternalServerError;
      break;
    default:
      break;
  }
} else {
  switch (dec_info->dec_flag) {
    case DROP_FRAME_INTERVAL:
      dec_info->status =
          dec_info->status !=
          DROP_FRAME_INTERVAL_UPDATE_FAIL ? DROP_FRAME_INTERVAL_UPDATE_SUCCESS
          : DROP_FRAME_INTERVAL_UPDATE_FAIL;
      if ( dec_info->status == DROP_FRAME_INTERVAL_UPDATE_SUCCESS ){
        dec_info->err_info.code = StatusOk;
        dec_info->dec_log = "DROP_FRAME_INTERVAL_UPDATE_SUCCESS";
      } else{
        dec_info->err_info.code = StatusInternalServerError;
        dec_info->dec_log = "DROP_FRAME_INTERVAL_UPDATE_FAIL, Error while setting drop-frame-interval property";
      }
      break;
    case SKIP_FRAMES:
      dec_info->status =
          dec_info->status !=
          SKIP_FRAMES_UPDATE_FAIL ? SKIP_FRAMES_UPDATE_SUCCESS :
          SKIP_FRAMES_UPDATE_FAIL;
      if ( dec_info->status == SKIP_FRAMES_UPDATE_SUCCESS ){
        dec_info->err_info.code = StatusOk;
        dec_info->dec_log = "SKIP_FRAMES_UPDATE_SUCCESS";
      } else{
        dec_info->err_info.code = StatusInternalServerError;
        dec_info->dec_log = "SKIP_FRAMES_UPDATE_FAIL, Error while setting skip-frame property";
      }
      break;
    case LOW_LATENCY_MODE:
      dec_info->status =
          dec_info->status !=
          LOW_LATENCY_MODE_UPDATE_FAIL ? LOW_LATENCY_MODE_UPDATE_SUCCESS :
          LOW_LATENCY_MODE_UPDATE_FAIL;
      if ( dec_info->status == LOW_LATENCY_MODE_UPDATE_SUCCESS ){
        dec_info->err_info.code = StatusOk;
        dec_info->dec_log = "LOW_LATENCY_MODE_UPDATE_SUCCESS";
      } else{
        dec_info->err_info.code = StatusInternalServerError;
        dec_info->dec_log = "LOW_LATENCY_MODE_UPDATE_FAIL, Error while setting skip-frame property";
      }
      break;
    default:
      break;
  }
}
架构和端点#
注意
DS-7.1 支持 REST API 版本 /api/v1。请参阅以下架构详细信息。
流添加/删除#
添加流
端点:/stream/add
用于添加流的 Curl 命令
1.curl -XPOST 'https://:9000/api/v1/stream/add' -d '{
  "key": "sensor",
  "value": {
      "camera_id": "uniqueSensorID1",
      "camera_name": "front_door",
      "camera_url": "file:///opt/nvidia/deepstream/deepstream/samples/streams/sample_1080p_h264.mp4",
      "change": "camera_add",
      "metadata": {
          "resolution": "1920 x1080",
          "codec": "h264",
          "framerate": 30
      }
  },
  "headers": {
      "source": "vst",
      "created_at": "2021-06-01T14:34:13.417Z"
  }
}'

2.curl -XPOST 'https://:9000/api/v1/stream/add' -d '{
  "key": "sensor",
  "event": {
      "camera_id": "uniqueSensorID1",
      "camera_name": "front_door",
      "camera_url": "rtsp://xyz.mp4",
      "change": "camera_streaming",
      "metadata": {
          "resolution": "1920 x1080",
          "codec": "h264",
          "framerate": 30
      }
  },
  "headers": {
      "source": "vst",
      "created_at": "2021-06-01T14:34:13.417Z"
  }
}'
预期输出:指定的 uri 应添加到显示中。对于每个新添加的流,camera_id 应是唯一的。只有当示例应用程序使用 nvmultiurisrcbin 时,才支持上面 (2) 中提到的 curl 命令。
删除流
端点:/stream/remove
用于删除流的 Curl 命令
curl -XPOST 'https://:9000/api/v1/stream/remove' -d '{
  "key": "sensor",
  "value": {
      "camera_id": "uniqueSensorID1",
      "camera_name": "front_door",
      "camera_url": "file:///opt/nvidia/deepstream/deepstream/samples/streams/sample_1080p_h264.mp4",
      "change": "camera_remove",
      "metadata": {
          "resolution": "1920 x1080",
          "codec": "h264",
          "framerate": 30
      }
  },
  "headers": {
      "source": "vst",
      "created_at": "2021-06-01T14:34:13.417Z"
  }
}'
预期输出:指定的 uri 应从显示中删除。用于删除流的 camera_id 应与使用 REST API 添加流时使用的 camera_id 相同。
ROI#
端点:/roi/update
用于更新 ROI 的 Curl 命令
curl -XPOST 'https://:9000/api/v1/roi/update' -d '{
  "stream": {
      "stream_id": "0",
      "roi_count": 2,
      "roi": [{
              "roi_id": "0",
              "left": 100,
              "top": 300,
              "width": 400,
              "height": 400
          },
          {
              "roi_id": "1",
              "left": 550,
              "top": 300,
              "width": 500,
              "height": 500
          }
      ]
  }
}'
预期输出:应在显示中观察到更新的 roi 尺寸。
解码器#
丢帧间隔
端点:/dec/drop-frame-interval
架构中“drop_frame_interval”字段的配置值:范围 [0 - 30] 用于配置解码器丢帧间隔属性的 Curl 命令
curl -XPOST 'https://:9000/api/v1/dec/drop-frame-interval' -d '{
"stream":
  {
      "stream_id":"0",
      "drop_frame_interval":2
  }
}'
预期输出:丢帧间隔值将设置在解码器上。解码器丢帧间隔应反映每隔 <value> 帧(由解码器给出),其余所有帧都将为选定的流丢弃。
跳帧
端点:/dec/skip-frames
- 架构中“skip_frames”字段的配置值
(0):- 解码所有帧 (1):- 解码非参考帧 (2):- 解码关键帧
用于配置解码器跳帧属性的 Curl 命令
curl -XPOST 'https://:9000/api/v1/dec/skip-frames' -d '{
"stream":
  {
      "stream_id":"0",
      "skip_frames":2
  }
}'
预期输出:跳帧属性值将设置在解码器上。
(0):- 解码器将解码编码比特流的所有帧 (1):- 解码器将仅解码编码比特流的非参考帧 (2):- 解码器将仅解码编码比特流的关键帧
Nvinfer#
端点:/infer/set-interval
用于配置 nvinfer interval 属性的 Curl 命令
curl -XPOST 'https://:9000/api/v1/infer/set-interval' -d '{
"stream":
  {
      "stream_id":"0",
      "interval":2
  }
}'
预期输出:interval 值将设置在 nvinfer 上。Interval 值指定将跳过视频流的连续批次以进行推理。
禁用/注释 dsserver_pgie_config.yml 中的“input-tensor-meta”属性,以查看 nvinfer/nvinferserver 的“interval”属性功能。当前 stream_id(在架构中指定)对指定的 stream_id 没有影响,而是配置应用于所有活动流。
Nvinferserver#
端点:/inferserver/set-interval
用于配置 nvinferserver interval 属性的 Curl 命令
curl -XPOST 'https://:9000/api/v1/inferserver/set-interval' -d '{
"stream":
  {
      "stream_id":"0",
      "interval":2
  }
}'
预期输出:interval 值将设置在 nvinferserver 上。Interval 值指定将跳过视频流的连续批次以进行推理。
当前 stream_id(在架构中指定)对指定的 stream_id 没有影响,而是配置应用于所有活动流。
编码器#
注意
默认情况下,编码器已禁用。要启用,请在 dsserver_config.yml 的“encoder”组中设置 enable: 1。当前 stream_id(在架构中指定)对指定的 stream_id 没有影响,而是配置应用于混合编码比特流。
Force-idr
端点:/enc/force-idr
- 架构中“force_idr”字段的配置值
(1):- 强制 IDR 帧
用于配置编码器强制 idr 帧属性的 Curl 命令
curl -XPOST 'https://:9000/api/v1/enc/force-idr' -d '{
"stream":
  {
      "stream_id":"0",
      "force_idr":1
  }
}'
预期输出:force-idr 属性值将设置在编码器上。编码器 force-idr 属性应反映 IDR 帧与编码器编码比特流的插入。
Force-intra
端点:/enc/force-intra
- 架构中“force_intra”字段的配置值
(1):- 强制 Intra 帧
用于配置编码器强制帧内帧属性的 Curl 命令
curl -XPOST 'https://:9000/api/v1/enc/force-intra' -d '{
"stream":
  {
      "stream_id":"0",
      "force_intra":1
  }
}'
预期输出:force-intra 属性值将设置在编码器上。编码器 force-intra 属性应反映帧内帧与编码器编码比特流的插入。
比特率
端点:/enc/bitrate
用于配置编码器比特率属性的 Curl 命令
curl -XPOST 'https://:9000/api/v1/enc/bitrate' -d '{
"stream":
  {
      "stream_id":"0",
      "bitrate":2000000
  }
}'
使用以下命令将生成的 .h264 原始比特流转换为 mp4 文件
$ ffmpeg -i out.h264 -vcodec copy out.mp4
$ mediainfo out.mp4
预期输出:应重新配置编码器以使用更新的比特率 <value> 并提供相应的编码比特流。Mediainfo 应显示与更新值对应的编码器比特率。
iframeinterval
端点:/api/v1/enc/iframe-interval
用于配置编码器 iframeinterval 属性的 Curl 命令
curl -XPOST 'https://:9000/api/v1/enc/iframe-interval' -d '{
 "stream":
   {
       "stream_id":"0",
       "iframeinterval":50
   }
 }'
预期输出:iframeinterval 属性值将设置在编码器上。编码器 iframeinterval 属性应反映 I 帧在指定间隔与编码器编码比特流的插入。
Streammux#
端点:/mux/batched-push-timeout
- 架构中“batched_push_timeout”字段的配置值
(微秒):- 超时值
用于配置 streammux 批量推送超时属性的 Curl 命令
curl -XPOST 'https://:9000/api/v1/mux/batched-push-timeout' -d '{
"stream":
  {
      "batched_push_timeout":100000
  }
}'
适用于旧的 nvstreammux。预期输出:batched push timeout 属性值将设置在 nvstreammux 上。nvstreammux 属性应反映在第一个缓冲区可用后等待的超时时间(以微秒为单位),即使未形成完整批次也要推送批次。
Nvvideoconvert#
注意
要模拟视频转换特定的 REST API 功能,deepstream-server 应用程序显式禁用 passthrough 模式,方法是使用 nvmultiurisrcbin 中 nvvideoconvert 的“disbale-passthrough”属性。在 dsserver_config.yml 文件中设置 disable-passthrough: 1。
src-crop
端点:/conv/srccrop 架构中“src_crop”字段的配置值:(字符串)像素位置 left:top:width:height
用于配置 nvvideoconvert src-crop 属性的 Curl 命令
curl -XPOST 'https://:9000/api/v1/conv/srccrop' -d '{
"stream":
  {
      "stream_id":"0",
      "src_crop":"200:200:400:500"
  }
}'
预期输出:输入图像的 left:top:width:height 将被裁剪并转换为输出缓冲区。如果裁剪位置超出范围,则值将被钳制到输入图像的图像边界。
dest-crop
端点:/conv/destcrop
架构中“dest_crop”字段的配置值:(字符串)像素位置 left:top:width:height
用于配置 nvvideoconvert dest-crop 属性的 Curl 命令
  curl -XPOST 'https://:9000/api/v1/conv/destcrop' -d '{
  "stream":
    {
        "stream_id":"0",
        "dest_crop":"100:200:400:500"
    }
  }'

Expected output: left:top:width:height is the location in the output image
where the input image will be transformed.  If the crop location is out of
bound the values will be clamped to image boundaries of the output image.
The region apart from the cropped location in the destination frame will
retain the last pixel values.
flip-method
端点:/conv/flip-method
架构中“flip_method”字段的配置值
(0): none             - Identity (no rotation)
(1): counterclockwise - Rotate counter-clockwise 90 degrees
(2): rotate-180       - Rotate 180 degrees
(3): clockwise        - Rotate clockwise 90 degrees
(4): horizontal-flip  - Flip horizontally
(5): upper-right-diagonal - Flip across upper right/lower left diagonal
(6): vertical-flip    - Flip vertically
(7): upper-left-diagonal - Flip across upper left/lower right diagonal
用于配置 nvvideoconvert flip-method 属性的 Curl 命令
curl -XPOST 'https://:9000/api/v1/conv/flip-method' -d '{
"stream":
  {
      "stream_id":"0",
      "flip_method":2
  }
}'
预期输出:根据 flip-method 属性类型值,应翻转输出图像。例如 - 对于值 2,图像将旋转 180 度。
interpolation-method
端点:/conv/interpolation-method
架构中“interpolation_method”字段的配置值
(0): Nearest          - Nearest
(1): Bilinear         - Bilinear
(2): Algo-1           - GPU - Cubic, VIC - 5 Tap
(3): Algo-2           - GPU - Super, VIC - 10 Tap
(4): Algo-3           - GPU - LanzoS, VIC - Smart
(5): Algo-4           - GPU - Ignored, VIC - Nicest
(6): Default          - GPU - Nearest, VIC - Nearest
用于配置 nvvideoconvert interpolation-method 属性的 Curl 命令
curl -XPOST 'https://:9000/api/v1/conv/interpolation-method' -d '{
"stream":
  {
      "stream_id":"0",
      "interpolation_method":2
  }
}'
预期输出:不会有任何视觉变化,但应用的 interpolation-method 应用于转换。
Nvdsosd#
端点:/osd/process-mode
- 架构中“process_mode”字段的配置值
0 和 1,0=CPU 模式,1=GPU 模式
用于配置 nvdsosd process_mode 属性的 Curl 命令
curl -XPOST 'https://:9000/api/v1/osd/process-mode' -d '{
"stream":
  {
      "stream_id":"0",
      "process_mode":0
  }
}'
预期输出:不会有任何视觉变化,但应用的 process-mode 应用于绘制边界框。
应用程序实例#
应用程序退出
端点:/app/quit
架构中“app_quit”字段的配置值:(1):- 应用程序退出(布尔值)
用于退出示例应用程序的 Curl 命令
curl -XPOST 'https://:9000/api/v1/app/quit' -d '{
"stream":
  {
      "app_quit":1
  }
}'
预期输出:应用程序应退出。
GET 请求#
GET 流信息
端点:/api/v1/stream/get-stream-info 用于获取流信息的 Curl 命令
curl -XGET 'https://:9000/api/v1/stream/get-stream-info'
OR
curl -XGET 'https://:9000/api/v1/stream/get-stream-info' -d '{}'
预期输出:返回给客户端的示例流信息响应
{
     "reason" : "GET_LIVE_STREAM_INFO_SUCCESS",
     "status" : "HTTP/1.1 200 OK",
     "stream-info" :
     {
             "stream-count" : 1,
             "stream-info" :
             [
                     {
                             "camera_id" : "UniqueSensorId1",
                             "camera_name" : "UniqueSensorName1"
                     }
             ]
     }
}
限制#
REST API 功能已通过 HTTP 验证。HTTPS 支持尚未启用,但用户可以通过增强 DeepStream SDK 中的相应源来添加 HTTPS 支持。
目前不支持将新的 nvstreammux 用于视频和音频用例,并且可能无法正常工作。
目前仅在管道中使用 nvmultiurisrcbin 的模式下支持 nvvidconvert 和 nvstreammux 的 REST API 支持。请参阅 deepstream-server-app 源代码目录中存在的 dsserver_config.yml 文件。
不支持 MJPEG 输入流源。
Jetson 上不支持用于 skip-frame 的解码器 REST API。目前在 x86 上,不支持值“(1): decode_non_ref”的 skip-frame。