运行 cuBB 端到端#
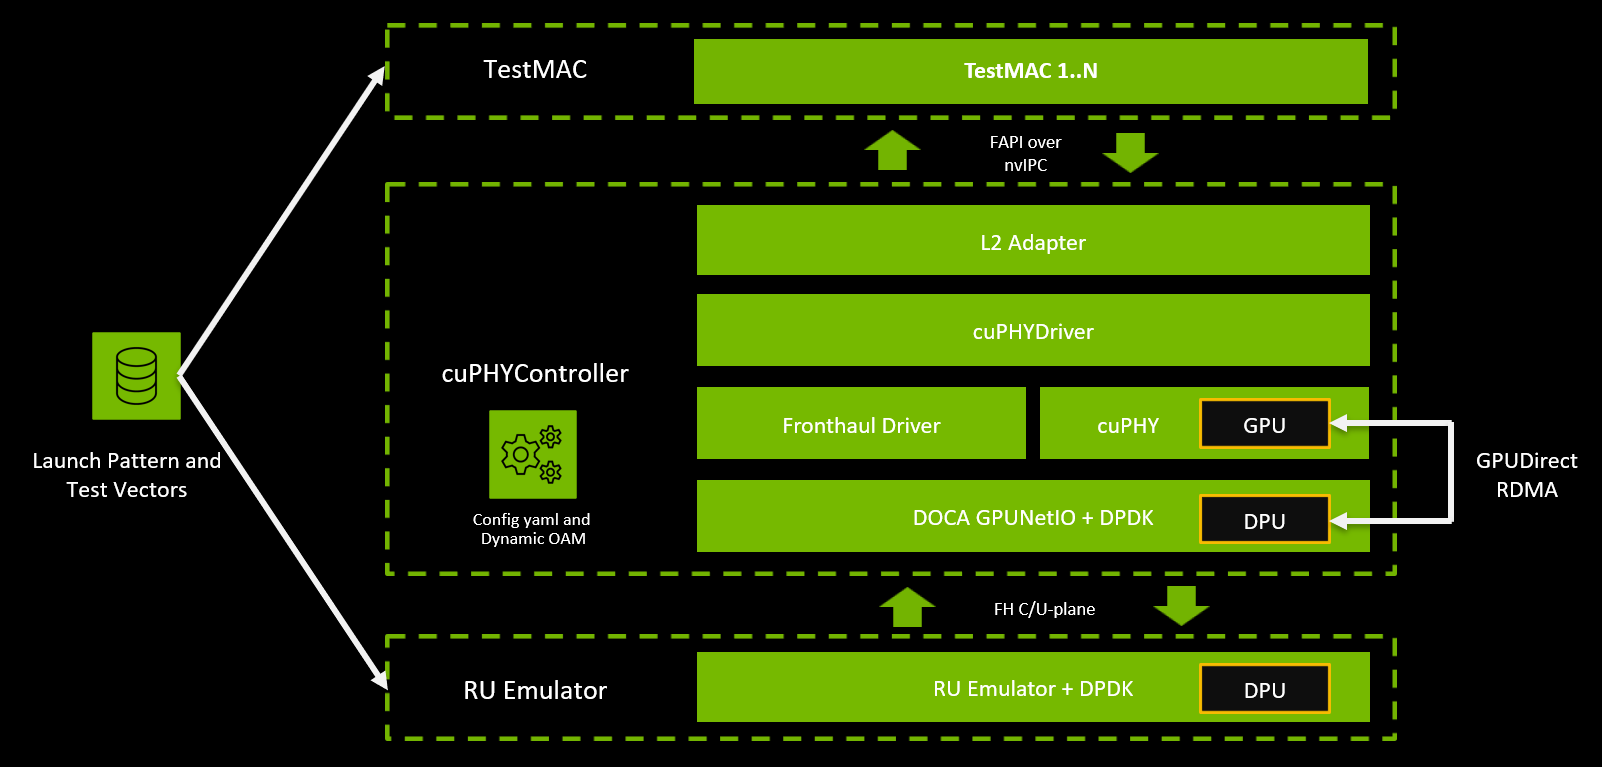
除了 cuPHY 物理层 1 PHY 软件及其独立示例之外,本节还介绍如何构建和运行下图所示的 cuBB 软件组件。
cuPHYController 模块在 L2 和 RU 前传接口之间运行。它通过 cuPHY 和 DOCA GPUNetIO + DPDK 进行接口连接,以操作 GPU 和 NIC。
L2 适配器:此模块通过 FAPI 消息在 nvIPC 上与 L2 或 TestMAC 通信。它接收来自 L2 的下行链路和上行链路调度命令,并将其转换为内部 cuPHYDriver API 调用。
cuPHYDriver:此模块在可用的工作线程之间分配 UL 和 DL 任务。它与 GPU 交互以执行以下任务
准备并通过 cuPHY API 触发新的 UL/DL cuPHY 处理。
使用 CUDA 内核启动 UL 数据包排序。
它通过前传驱动程序与 DPU/NIC 交互,以发送和接收 ORAN 前传数据包(C/U 平面)。
RU 仿真器模拟单个或多个 RU 的网络流量。它验证以下内容
基于可配置的 ORAN 数据包窗口的所有 DL 方向数据包(即 DL-C、UL-C、DL-U)的数据包定时。
它检查所有数据包,以确保 eCPRI 数据包结构与 ORAN 规范对齐。
它验证 DL U 平面有效负载中的 IQ 样本,以及不同压缩方法的预期分段大小。
它验证 DL/UL C 平面中的 BFW IQ 样本,以及 CSI-RS/PDSCH 的 DL-C 中的 RE 掩码。
它验证 PUCCH/PUSCH/PRACH/SRS 的 UL-C 分段信息,并使用相应的 UL U 平面进行响应。
TestMAC 模拟 L2 并通过 nvIPC 提供 FAPI 接口。它验证以下内容
它根据启动模式和 TV 计算预期吞吐量数据,并打印到控制台。然后可以使用 python 脚本来验证 TestMAC 和 RU 的吞吐量。吞吐量数据包括:Prmb/HARQ/SR/CSI/SRS 数量、信道数量、DL/UL 数据速率。单位是每秒数量。
它通过与 TV 中的预加载数据进行比较来验证 UL FAPI 消息数据结构和 TB 缓冲区。
它验证 UL FAPI 定时(UL FAPI 消息预期接收的时隙数)。
cuPHYController 在 RU 仿真器和 TestMAC 之间的环境中进行练习。
L1/L2 接口基于小型蜂窝论坛 (SCF) 定义的 5G FAPI 222.10.02 和部分 222.10.04。有关支持的消息和 PDU 类型以及例外情况,请参阅cuBB 发行说明。
构建 cuBB 端到端#
以下过程描述了在 Aerial cuBB 中构建端到端组件的步骤。
在 cuBB 容器内,转到 SDK 文件夹
$ cd /opt/nvidia/cuBB
使用构建选项创建构建目录
-DSCF_FAPI_10_04=ON启用支持的 FAPI 10.04 字段(例如,SRS)。-DENABLE_CONFORMANCE_TM_PDSCH_PDCCH=ON运行测试模式 (TM) 测试。-DENABLE_20C=ON在 Grace Hopper MGX 系统上运行超过 16 个小区-DENABLE_STATIC_BFW=ON运行具有动态 + 静态波束赋形测试的 64T64R注意
编译时标志 DYNAMIC_SFN_SLOT 已被 l2_adapter yaml 启动时选项 enableTickDynamicSfnSlot 取代。如果 l2_adapter yaml 中不存在此字段,则默认值为 1(启用动态 SFN 时隙)。不再需要使用 -DDYNAMIC_SFN_SLOT=ON/OFF 标志运行 cmake。相同的二进制文件可以用于 RU 仿真器配置和 eLSU/O-RU 配置。自 Aerial 23-4 版本起,DYNAMIC_SFN_SLOT 选项已从 CMakeLists.txt 中完全删除。
例如,要运行 F08 性能基准测试,请使用以下 CMake 命令
$ cmake -Bbuild -GNinja -DCMAKE_TOOLCHAIN_FILE=cuPHY/cmake/toolchains/native -DSCF_FAPI_10_04=ON -DENABLE_CONFORMANCE_TM_PDSCH_PDCCH=ON
要在 Grace Hopper MGX 系统上运行 20C 测试,请使用以下 CMake 命令
$ cmake -Bbuild -GNinja -DCMAKE_TOOLCHAIN_FILE=cuPHY/cmake/toolchains/native -DSCF_FAPI_10_04=ON -DENABLE_CONFORMANCE_TM_PDSCH_PDCCH=ON -DENABLE_20C=ON
要使用默认选项构建,请使用以下 CMake 命令
$ cmake -Bbuild -GNinja -DCMAKE_TOOLCHAIN_FILE=cuPHY/cmake/toolchains/native
以下是支持的构建变体
FAPI 10.02
RU 类型 \ 构建选项
默认(无构建标志)
RU 仿真器:无构建标志;相反,在 l2_adapter YAML 文件中设置
enableTickDynamicSfnSlot: 0cmake -Bbuild -GNinja -DCMAKE_TOOLCHAIN_FILE=cuPHY/cmake/toolchains/native
Keysight eLSU:默认(无构建标志)
cmake -Bbuild -GNinja -DCMAKE_TOOLCHAIN_FILE=cuPHY/cmake/toolchains/native
启用 FAPI 10.04
RU 类型 \ 构建选项
DSCF_FAPI_10_04=ON
RU 仿真器:无构建标志;相反,在 l2_adapter YAML 文件中设置
enableTickDynamicSfnSlot: 0cmake -Bbuild -GNinja -DCMAKE_TOOLCHAIN_FILE=cuPHY/cmake/toolchains/native -DSCF_FAPI_10_04=ON
Keysight eLSU:默认(无构建标志)
不适用
启用测试模式
RU 类型 \ 构建选项
DENABLE_CONFORMANCE_TM_PDSCH_PDCCH=ON
RU 仿真器:无构建标志;相反,在 l2_adapter YAML 文件中设置
enableTickDynamicSfnSlot: 0cmake -Bbuild -GNinja -DCMAKE_TOOLCHAIN_FILE=cuPHY/cmake/toolchains/native -DENABLE_CONFORMANCE_TM_PDSCH_PDCCH=ON
Keysight eLSU:默认(无构建标志)
不适用
在 Grace Hopper MGX 上启用 20C
RU 类型 \ 构建选项
DENABLE_20C=ON
RU 仿真器:无构建标志;相反,在 l2_adapter YAML 文件中设置
enableTickDynamicSfnSlot: 0cmake -Bbuild -GNinja -DCMAKE_TOOLCHAIN_FILE=cuPHY/cmake/toolchains/native -DSCF_FAPI_10_04=ON`` -DENABLE_CONFORMANCE_TM_PDSCH_PDCCH=ON -DENABLE_20C=ON
Keysight eLSU:默认(无构建标志)
不适用
注意
为 E2E 测试构建时,cmake 构建选项中默认启用“-DENABLE_L2_SLT_RSP=ON”。它要求 L2 支持供应商特定的消息“SLOT.response”。如果 L2 不支持它,则必须在 cmake 构建选项中包含“-DENABLE_L2_SLT_RSP=OFF”以关闭 L1 中的此功能。
建议使用 ENABLE_L2_SLT_RSP=ON。
选项 ENABLE_L2_SLT_RSP 必须在 L1、L2 和 libnvipc.so 独立构建中配置相同的值以用于 L2:(1) L1: cuBB_SDK。(2) 用于 L2 的 libnvipc.so 独立构建。请参阅 ${cuBB_SDK}/cuPHY-CP/gt_common_libs/README.md。(3) L2:包含 nv_ipc.h 的 gNB DU 代码。要确认是否已启用,请对 (1) 和 (2) 运行“grep ENABLE_L2_SLT_RSP build/CMakeCache.txt”,在 (3) 的 L2 代码中打印 sizeof(nv_ipc_t)。
按如下方式构建 Aerial cuBB 组件。
要构建所有 Aerial cuBB 组件,请使用以下命令
$ cd ${cuBB_SDK}
$ cmake --build build
要仅构建 cuPHY,请使用以下命令
$ cd ${cuBB_SDK}/cuPHY
$ cmake -Bbuild -GNinja -DCMAKE_TOOLCHAIN_FILE=cmake/toolchains/native
$ cmake --build build
要仅构建 Test MAC,请使用以下命令
$ cd ${cuBB_SDK}
$ cmake --build build -t test_mac
要仅构建 cuPHY 控制器,请使用以下命令
$ cd ${cuBB_SDK}
$ cmake --build build -t cuphycontroller_scf
要仅构建 cuPHY 驱动程序,请使用以下命令
$ cd ${cuBB_SDK}
$ cmake --build build -t cuphydriver
要仅构建 RU 仿真器,请使用以下命令
$ cd ${cuBB_SDK}
$ cmake --build build -t ru_emulator
要在具有 isolcpus 限制内核的开发套件或 Dell R750 机器上的容器中编译 Aerial 代码,您可以使用以下命令覆盖 isolcpus:示例命令使用内核 10-20。
$ sudo chrt -r 1 sudo -u aerial taskset -c 10-20 cmake --build build
nvlog 配置#
Aerial-SDK 使用 nvlog 作为记录器。它基于开源 FMT 记录器。配置文件位于 ./cuPHY/nvlog/config/nvlog_config.yaml。
日志文件默认存储在 /tmp 目录中,路径可以通过环境变量 AERIAL_LOG_PATH 覆盖。
最大日志文件大小可以通过 max_file_size_bytes 配置,以避免耗尽系统磁盘存储。
要配置全局日志级别,请设置“shm_log_level: <level>”。要配置特定标签的日志级别,请在标签名称行下添加“shm_level: <level>”行。例如,以下配置将全局日志级别设置为 3 - CONSOLE 级别,并将“FH.LATE_PACKETS”标签设置为 5 - INFO 级别。
# log files stored at /tmp directory (default)
# log file path can be customized using environment variable $AERIAL_LOG_PATH
# Log levels: 0 - NONE, 1 - FATAL, 2 - ERROR, 3 - CONSOLE, 4 - WARNING, 5 - INFO, 6 - DEBUG, 7 - VERBOSE

nvlog:
  shm_log_level: 3 # Global log level
  max_file_size_bytes: 50000000000 # Size in bytes The rotating log files in /tmp (default)
  nvlog_tags:
    - 0: ""             # Reserve number 0 for no tag print
      shm_level: 5      # Example: overlay shm_log_level for a tag

    - 621: "FH.LATE_PACKETS"
      shm_level: 5
更新端到端配置文件#
本节介绍您可以修改以运行端到端的配置参数。
服务器 #1(运行 TestMAC 和 cuPHYController)#
有几个常用配置。检查并编辑 .yaml 文件中的以下参数
根据您使用的设置,在以下配置文件中配置 NIC 地址,这些是提供的默认文件
cuphycontroller_F08_CG1.yamlcuphycontroller_F08_R750.yamlcuphycontroller_nrSim_SCF.yaml
编辑 NIC PCIe 地址以匹配 NIC 硬件 PCIe 地址。例如,R750 gNB 上的 FH NIC 使用 PCIe 地址
0000:cc:00.0$ sed -i "s/ nic:.*/ nic: 0000:cc:00.0/" ${cuBB_SDK}/cuPHY-CP/cuphycontroller/config/cuphycontroller_F08_R750.yaml
检查与 NIC 共享 PCIe 交换机的 GPU 的 GPU ID。下面显示的 gpus 参数的默认值为 0,GPU ID 为 0。如果 GPU 0 不是您要使用的 GPU,请替换 sed 命令行中的 0 并运行它
$ sed -i "/gpus:/{n;s/.*/ - 0/}" ${cuBB_SDK}/cuPHY-CP/cuphycontroller/config/cuphycontroller_F08_*.yaml
如果系统只有一个 GPU 卡,您可以保留默认设置 0。
要确定哪个 GPU 与 NIC 共享 PCIe 交换机,请使用以下命令
$ nvidia-smi topo -m
在输出中,查找连接到 NIC 的 GPU,连接类型为 PIX(它们在表中相交的位置)。在下面的示例中,列中的 GPU 0 是 PIX 与 Mellanox mlx5_0 和 mlx5_1 相交的那个。对
.yaml gpus参数使用 GPU ID 值 0。GPU0 mlx5_0 mlx5_1 CPU Affinity GPU0 X PIX PIX 0-23 mlx5_0 PIX X PIX mlx5_1 PIX PIX X
PIX 的含义是
X    = Self
SYS  = Connection traversing PCIe and the SMP interconnect between NUMA nodes (e.g., QPI/UPI)
NODE = Connection traversing PCIe and the interconnect between PCIe Host Bridges within a NUMA node
PHB  = Connection traversing PCIe and a PCIe Host Bridge (typically the CPU)
PXB  = Connection traversing multiple PCIe bridges (without traversing the PCIe Host Bridge)
PIX  = Connection traversing at most a single PCIe bridge
NV#  = Connection traversing a bonded set of # NVLinks
注意
Aerial-SDK 期望 DL 和 UL 信道之间的 eAxCid 端口集相同(不包括 PRACH)。确保在 YAML 配置文件中为 DL 和 UL 信道配置相同的端口索引集。例如,如果端口索引集 [0,8,1,2] 配置用于 PDSCH,则相同的设置应用于 PDCCH、SSB/PBCH 和 CSI-RS。同样,如果端口索引集 [0,8] 配置用于 PUSCH,则相同的索引集应使用于 PUCCH。DL 和 UL 信道之间的 eAxCid 端口数不需要相同。
要启用早期 HARQ,请在 cuphycontroller 配置中将 pusch_subSlotProcEn 设置为 1
sed -i "s/ pusch_subSlotProcEn:.*/ pusch_subSlotProcEn: 1/" ${cuBB_SDK}/cuPHY-CP/cuphycontroller/config/cuphycontroller_F08_*.yaml
要激活早期 HARQ,请在 test_mac_config.yaml 中将 uciIndPerSlot 设置为 2
sed -i "s/ uciIndPerSlot :.*/ uciIndPerSlot : 2/" ${cuBB_SDK}/cuPHY-CP/testMAC/testMAC/test_mac_config.yaml
注意
此拆分 UCI.indication 与早期 HARQ 功能仅在 FAPI 10.04 中启用。要启用此功能,请使用编译标志 -DSCF_FAPI_10_04=ON 进行构建。如果在 cuphycontroller 配置中将 pusch_subSlotProcEn 设置为 1,则此功能在 cuPHY 中启用。但是,在 L2 发送带有 TLV 0x102B indicationInstancesPerSlot.UCI.indication = 2 的 config.request 之前,cuPHY 不会报告 PUSCH 上 UCI 的早期 HARQ。要指示 testMac 在 config.request 中发送此 TLV,请在 test_mac_config.yaml 中将 uciIndPerSlot 设置为 2。
sed -i "s/ pusch_subSlotProcEn:.*/ pusch_subSlotProcEn: 1/" ${cuBB_SDK}/cuPHY-CP/cuphycontroller/config/cuphycontroller_F08_*.yaml
sed -i "s/ uciIndPerSlot :.*/ uciIndPerSlot : 2/" ${cuBB_SDK}/cuPHY-CP/testMAC/testMAC/test_mac_config.yaml

sed -i "s/ mCh_segment_proc_enable:.*/ mCh_segment_proc_enable: 1/" ${cuBB_SDK}/cuPHY-CP/cuphycontroller/config/cuphycontroller_F08_*.yaml
sed -i "s/ channel_segment_timelines:.*/ channel_segment_timelines: 1/"${cuBB_SDK}/cuPHY-CP/testMAC/testMAC/test_mac_config.yaml
注意
要启用增强的 L1-L2 接口,必须如上所述启用早期 HARQ 功能,并使用 FAPI 10.04 进行编译。要启用此功能,请使用编译标志 -DSCF_FAPI_10_04=ON 进行构建。要指示 testMac 发送 TLV CONFIG_TLV_VENDOR_CHAN_SEGMENT (0xA018),请在 test_mac_config.yaml 中将 channel_segment_timelines 设置为 1。预期当时间线不满足 cuPHYDriver 的处理时,会发送 Error.Indication。
服务器 #2(运行 RU 仿真器)#
RU 仿真器读取位于以下位置的配置文件:$cuBB_SDK/cuPHY-CP/ru-emulator/config/config.yaml。
在运行 ru-emulator 之前,修改 config.yaml 以匹配您的服务器系统硬件设置。
config.yaml 文件中有两个参数需要修改
# PCI Address of NIC interface used
nic_interface: b5:00.0
# MAC address of cuPHYController port in use on server#1
peerethaddr: 1c:34:da:ff:ff:fe
根据所使用的系统更新 nic_interface 和 peerethaddr。查找这些 NIC 接口的地址。
nic_interface是运行 RU 仿真器的系统上的 NIC 端口 PCIe 总线地址。将 0000:b5:00.0 替换为要使用的 NIC 的 PCIe 地址。peerethaddr是运行 cuPHYController 的系统上的 NIC 端口 MAC 地址。将 MAC 地址替换为服务器 #1 中使用的 NIC 的 MAC 地址。
将 0000:b5:00.0 替换为要使用的 NIC 端口的 PCIe 地址
$ sed -i "s/nic_interface.*/nic_interface: 0000:b5:00.0/" ${cuBB_SDK}/cuPHY-CP/ru-emulator/config/config.yaml
将 MAC 地址替换为服务器 #1 中使用的 NIC 端口的 MAC 地址
$ sed -i "s/peerethaddr.*/peerethaddr: 1c:34:da:ff:ff:fe/" ${cuBB_SDK}/cuPHY-CP/ru-emulator/config/config.yaml
在主机上运行以下命令以识别正确的 PCIe 地址和 MAC 地址。
$ sudo lshw -c network -businfo

Bus info          Device       Class          Description
=========================================================
pci@0000:05:00.0  eno1         network        I210 Gigabit Network Connection
pci@0000:06:00.0  enp6s0       network        I210 Gigabit Network Connection
pci@0000:b5:00.0  ens6f0       network        MT2892 Family [ConnectX-6 Dx]
pci@0000:b5:00.1  ens6f1       network        MT2892 Family [ConnectX-6 Dx]
                  vethdf87878  network        Ethernet interface
要查找 NIC 端口的 MAC 地址,请运行以下命令
$ ifconfig -a
…
68: ens6f0: <BROADCAST,MULTICAST,UP,LOWER_UP> mtu 1514 qdisc mq state UP group default qlen 1000
    link/ether 1c:34:da:ff:ff:fe brd ff:ff:ff:ff:ff:ff
    inet6 fe80::bace:f6ff:fe33:fe16/64 scope link
       valid_lft forever preferred_lft forever
69: ens6f1: <BROADCAST,MULTICAST,UP,LOWER_UP> mtu 1500 qdisc mq state UP group default qlen 1000
    link/ether 1c:34:da:ff:ff:ff brd ff:ff:ff:ff:ff:ff
    inet6 fe80::bace:f6ff:fe33:fe17/64 scope link
       valid_lft forever preferred_lft forever
NIC 端口的 MAC 地址位于 link/ether 标签下。
端到端运行环境初始化#
本节介绍如何将各种 cuBB 软件组件一起运行。在此,cuBB 使用 GPU 和 NIC 进行 cuPHY L1 计算和网络数据流量加速。
两个服务器之间使用网络连接来物理连接 RU 仿真器和 cuBB gNB 软件堆栈。

要验证 PTP4L 和 PHC2SYS 服务是否正在运行,请在主机上运行以下命令
$ sudo systemctl status ptp4l.service
…
# check that the service is active and has low rms value (<30):
$ sudo systemctl status phc2sys.service
验证系统时钟是否同步,以及 NTP 是否关闭
$ timedatectl
               Local time: Thu 2022-02-03 22:30:58 UTC
           Universal time: Thu 2022-02-03 22:30:58 UTC
                 RTC time: Thu 2022-02-03 22:30:58
                Time zone: Etc/UTC (UTC, +0000)
System clock synchronized: yes
              NTP service: inactive
          RTC in local TZ: no
端到端运行示例 (SCF FAPI)#
本节介绍如何使用 SCF FAPI 运行 cuBB 端到端。
有三个用例示例
用例 1:testMAC + SCF L2 适配器独立
用例 2:testMAC + cuPHYController_SCF + RU 仿真器
用例 3:testMAC + cuPHYController_SCF + RU 仿真器 P5G PRACH
运行 testMAC + SCF L2 适配器独立#
按照构建 cuBB 端到端中所述构建所有模块。
以独立模式运行 l2adapter
sudo $cuBB_SDK/build/cuPHY-CP/scfl2adapter/scf_app/cuphycontroller\
/l2_adapter_cuphycontroller_scf
在 l2adapter 启动后运行 testMAC。
您可以运行不同的案例
sudo $cuBB_SDK/build/cuPHY-CP/testMAC/testMAC/test_mac <Fxx> <xC> [-- channels <CHANNELS>] --no-validation
示例
sudo $cuBB_SDK/build/cuPHY-CP/testMAC/testMAC/test_mac F08 1C --no-validation
sudo $cuBB_SDK/build/cuPHY-CP/testMAC/testMAC/test_mac F08 2C --no-validation
sudo $cuBB_SDK/build/cuPHY-CP/testMAC/testMAC/test_mac F08 3C --no-validation
sudo $cuBB_SDK/build/cuPHY-CP/testMAC/testMAC/test_mac F08 4C --no-validation
测试结果和测试日志:在下面的 testMAC 终端输出中,您可以看到 TTI 滴答计数器和吞吐量
08:32:15.793986 Cell 0 | DL 1586.28 Mbps 1600 Slots | UL  249.10 Mbps  400 Slots | Prmb    0 | HARQ    0 | SR    0 | CSI1    0 | CSI2    0 | ERR  150 | INV 0
08:32:15.793996 Cell 1 | DL 1586.28 Mbps 1600 Slots | UL  249.10 Mbps  400 Slots | Prmb    0 | HARQ    0 | SR    0 | CSI1    0 | CSI2    0 | ERR  150 | INV 0
08:32:15.794000 Cell 2 | DL 1586.28 Mbps 1600 Slots | UL  249.10 Mbps  400 Slots | Prmb    0 | HARQ    0 | SR    0 | CSI1    0 | CSI2    0 | ERR  150 | INV 0
08:32:15.794003 Cell 3 | DL 1586.28 Mbps 1600 Slots | UL  249.10 Mbps  400 Slots | Prmb    0 | HARQ    0 | SR    0 | CSI1    0 | CSI2    0 | ERR  150 | INV 0
运行 testMAC + cuPHYController_SCF + RU 仿真器#
注意
在运行 cuBB 测试用例之前,在每次运行时重新启动 MPS。运行以下命令以导出环境变量并在 cuphycontroller 终端中重新启动 MPS(不要为 test_mac 和 ru-emulator 运行此命令)。
# Export variables
export CUDA_DEVICE_MAX_CONNECTIONS=8
export CUDA_MPS_PIPE_DIRECTORY=/var
export CUDA_MPS_LOG_DIRECTORY=/var

# Stop existing MPS
sudo -E echo quit | sudo -E nvidia-cuda-mps-control

# Start MPS
sudo -E nvidia-cuda-mps-control -d
sudo -E echo start_server -uid 0 | sudo -E nvidia-cuda-mps-control
如果需要,可以在 $cuBB_SDK/cuPHY/nvlog/config/nvlog_config.yaml 中更改 nvlog 级别。例如,要更改为仅控制台日志级别
  name: phy
- shm_log_level:5  # SHM log level
+ shm_log_level: 3 # SHM log level
执行以下命令以禁用 ru_emulator 的 GPU(如果存在)。
export CUDA_VISIBLE_DEVICES=""
导出可能在某些系统环境中不起作用。在这种情况下,请在命令前添加值,如下例所示
sudo -E CUDA_VISIBLE_DEVICES="" ./ru_emulator xxx
如果没有 CUDA_VISIBLE_DEVICES=””,则在主机上使用 GPU 启动 ru_emulator 时会看到以下日志。它不影响功能。
15:15:56.251444 [FH.FLOW] [/opt/nvidia/cuBB/cuPHY-CP/aerial-fh-driver/lib/flow.cpp:201] cuda failed with invalid argument
在 ${cuBB_SDK}/cuPHY-CP/cuphycontroller/config/cuphycontroller_F08_CG1.yaml 中配置工作线程,以用于 L1 cuPHYDriver 中的 CPU
workers_ul:
    - 5
    - 6
workers_dl:
    - 11
    - 12
    - 13
运行 F08 测试用例#
在 ${cuBB_SDK}/cuPHY-CP/cuphycontroller/config/cuphycontroller_F08_CG1.yaml 中配置 cell_group:将 cell_group 设置为 1,并将 cell_group_num 设置为要运行的小区数。
例如,要运行 1C
cell_group: 1
cell_group_num: 1
要运行 2C
cell_group: 1
cell_group_num: 2
要运行 3C
cell_group: 1
cell_group_num: 3
要运行 4C
cell_group: 1
cell_group_num: 4
F08 流量模式
对于模式 59C 和 60C,您必须在 cuphycontroller_F08_CG1.yaml 中启用 OTA 一致性功能
pusch_tdi: 1
pusch_cfo: 1
pusch_to: 1
pusch_dftsofdm: 0
pusch_select_eqcoeffalgo: 1
puxch_polarDcdrListSz: 8
对于模式 60C,您必须在 cuphycontroller_F08_CG1.yaml 中为每个小区设置 pusch_nMaxPrb
pusch_nMaxPrb: 136
对于模式 61,您必须在 cuphycontroller_F08_CG1.yaml 中为每个小区设置 pusch_nMaxPrb,这允许我们在 Grace Hopper 系统上测试 20C
pusch_nMaxPrb: 36
23-4 及更高版本支持早期 HARQ 处理。对于 59C 和 60C 模式,使用以下配置启用早期 HARQ 处理
# For early HARQ
sed -i 's/uciIndPerSlot :.*/uciIndPerSlot : 2/' ${cuBB_SDK}/cuPHY-CP/testMAC/testMAC/test_mac_config.yaml
sed -i "s/pusch_subSlotProcEn:.*/pusch_subSlotProcEn: 1/" ${cuBB_SDK}/cuPHY-CP/cuphycontroller/config/cuphycontroller_F08_CG1.yaml

# For early non HARQ
sed -i 's/uciIndPerSlot :.*/uciIndPerSlot : 0/' ${cuBB_SDK}/cuPHY-CP/testMAC/testMAC/test_mac_config.yaml
sed -i "s/pusch_subSlotProcEn:.*/pusch_subSlotProcEn: 0/" ${cuBB_SDK}/cuPHY-CP/cuphycontroller/config/cuphycontroller_F08_CG1.yaml
# For Enhanced L1 - L2 Interface
sed -i 's/uciIndPerSlot :.*/uciIndPerSlot : 2/' ${cuBB_SDK}/cuPHY-CP/testMAC/testMAC/test_mac_config.yaml
sed -i "s/pusch_subSlotProcEn:.*/pusch_subSlotProcEn: 1/" ${cuBB_SDK}/cuPHY-CP/cuphycontroller/config/cuphycontroller_F08_CG1.yaml

sed -i "s/ mCh_segment_proc_enable:.*/ mCh_segment_proc_enable: 1/" ${cuBB_SDK}/cuPHY-CP/cuphycontroller/config/cuphycontroller_F08_CG1.yaml
sed -i "s/ channel_segment_timelines:.*/ channel_segment_timelines: 1/"${cuBB_SDK}/cuPHY-CP/testMAC/testMAC/test_mac_config.yaml

# Run F08 1C only as Enhanced L1 - L2 Interface is intended for 1 Cell.
对于 24-3 及更高版本,模式 59C 峰值和 60C 平均值是用于性能测试的最新模式。
对于性能测试,请使用以下 testMAC 设置来调整 FAPI 命令的调度时间,这需要一个构建器线程
# testMAC configs for scheduling FAPI messages with appropriate L2 delay, also configure testMAC to stop after 600k slots:
sed -i 's/schedule_total_time:.*/schedule_total_time: 455000/' ${cuBB_SDK}/cuPHY-CP/testMAC/testMAC/test_mac_config.yaml
sed -i 's/builder_thread_enable:.*/builder_thread_enable: 1/' ${cuBB_SDK}/cuPHY-CP/testMAC/testMAC/test_mac_config.yaml
sed -i 's/fapi_delay_bit_mask:.*/fapi_delay_bit_mask: 0xF/' ${cuBB_SDK}/cuPHY-CP/testMAC/testMAC/test_mac_config.yaml

# optionally configure the test duration with the number of test_slots. Keep test_slots: 0 to run indefinitely.
sed -i 's/test_slots: 0/test_slots: 600000/' ${cuBB_SDK}/cuPHY-CP/testMAC/testMAC/test_mac_config.yaml

# testMAC core configs, use free cores on the same NUMA, for example, the following settings can be applied to an R750 using NUMA 1:
sed -i -z 's/  cpu_affinity:\s*[0-9]\+/  cpu_affinity: 35/2' ${cuBB_SDK}/cuPHY-CP/testMAC/testMAC/test_mac_config.yaml
sed -i -z 's/  cpu_affinity:\s*[0-9]\+/  cpu_affinity: 33/1' ${cuBB_SDK}/cuPHY-CP/testMAC/testMAC/test_mac_config.yaml
您必须启用 PUSCH 一致性标志和 RU 仿真器验证,以考虑波束赋形
# cuphycontroller configs for PUSCH conformance flags:
sed -i "s/pusch_tdi:.*/pusch_tdi: 1/" ${cuBB_SDK}/cuPHY-CP/cuphycontroller/config/cuphycontroller_F08_CG1.yaml
sed -i "s/pusch_cfo:.*/pusch_cfo: 1/" ${cuBB_SDK}/cuPHY-CP/cuphycontroller/config/cuphycontroller_F08_CG1.yaml
sed -i "s/pusch_to:.*/pusch_to: 1/" ${cuBB_SDK}/cuPHY-CP/cuphycontroller/config/cuphycontroller_F08_CG1.yaml
sed -i "s/puxch_polarDcdrListSz:.*/puxch_polarDcdrListSz: 8/" ${cuBB_SDK}/cuPHY-CP/cuphycontroller/config/cuphycontroller_F08_CG1.yaml

# RU emulator beamforming validation config
sed -i "s/enable_beam_forming:.*/enable_beam_forming: 1/" ${cuBB_SDK}/cuPHY-CP/ru-emulator/config/config.yaml

# RU emulator 20C performance configurations on running a R750 system:
sed -i "s/ul_core_list.*/ul_core_list: [5,7,9,11,13,15,17,19,21,23,25,27,29,31,33,35,37,39,41,43]/" ${cuBB_SDK}/cuPHY-CP/ru-emulator/config/config.yaml
sed -i "s/dl_core_list.*/dl_core_list: [4,6,8,10,12,14,16,18,20,22,24,26,28,30,32,34,36,38,40,42]/" ${cuBB_SDK}/cuPHY-CP/ru-emulator/config/config.yaml
sed -i "s/aerial_fh_split_rx_tx_mempool.*/aerial_fh_split_rx_tx_mempool: 1/" ${cuBB_SDK}/cuPHY-CP/ru-emulator/config/config.yaml
sed -i "s/low_priority_core.*/low_priority_core: 45/" ${cuBB_SDK}/cuPHY-CP/ru-emulator/config/config.yaml
为了测试 4T 4R TDD 7 波束系列 59 和 60,已生成 80 个时隙模式
- 系列 59c:20C 峰值小区,7 个波束,全带宽 CSI-RS,OTA,4 个 UL 流,18 个 PUCCH UCI + 6 个 PUSCH UCI 频分复用
PDSCH:6 个 UEG / 时隙,MCS 27,45 个 PRB / UEG,(具有 SSB 时为 42 个 PRB / UEG)
PUSCH:6 个 UEG / 时隙,MCS 27,42 个 PRB / UEG,(具有 4 个 PRACH 时为 34 个 PRB / UEG,具有 3 个 PRACH 时为 36 个 PRB / UEG)
UCI@PUSCH:4 个 HARQ,37 个 CSI-1,5 个 CSI-2
PDCCH:12 个 DCI / 时隙(6 个 DL + 6 个 UL)
PUCCH:18 个 UE 频分复用 (PF1)
- 帧 0
时隙 0、1、2:ssb(2 个块),
时隙 3,ssb(1 个块)
时隙 6,8,10,16, TRS + CSIRS
时隙 7,9,11,17, TRS
时隙 5,15, PRACH
- 帧 1
时隙 6,8,10, TRS + CSIRS
时隙 7,9,11, TRS
时隙 5,15, PRACH
- 帧 2
时隙 0、1、2:ssb *2,
时隙 3,ssb
时隙 6,7,8,9,10,11, 16,17 TRS
时隙 5,15, PRACH
- 帧 3
时隙 6,7,8,9,10,11 TRS
时隙 5,15, PRACH
TRS/CSI-RS 在符号 6+10 / 12 中(对于偶数情况)
TRS/CSI-RS 在符号 5+9 / 13 中(对于奇数情况)
- 系列 59d:20C 峰值小区,7 个波束,全带宽 CSI-RS,OTA,4 个 UL 流,24 个 PUCCH UCI 频分复用
PDSCH:6 个 UEG / 时隙,MCS 27,45 个 PRB / UEG,(具有 SSB 时为 42 个 PRB / UEG)
PUSCH:6 个 UEG / 时隙,MCS 27,41 个 PRB / UEG,(具有 4 个 PRACH 时为 33 个 PRB / UEG,具有 3 个 PRACH 时为 35 个 PRB / UEG)
UCI@PUSCH:0 个 HARQ,37 个 CSI-1,5 个 CSI-2
PDCCH:12 个 DCI / 时隙(6 个 DL + 6 个 UL)
PUCCH:24 个 UE 频分复用 (PF1)
- 帧 0
时隙 0、1、2:ssb(2 个块),
时隙 3,ssb(1 个块)
时隙 6,8,10,16, TRS + CSIRS
时隙 7,9,11,17, TRS
时隙 5,15, PRACH
- 帧 1
时隙 6,8,10, TRS + CSIRS
时隙 7,9,11, TRS
时隙 5,15, PRACH
- 帧 2
时隙 0、1、2:ssb *2,
时隙 3,ssb
时隙 6,7,8,9,10,11, 16,17 TRS
时隙 5,15, PRACH
- 帧 3
时隙 6,7,8,9,10,11 TRS
时隙 5,15, PRACH
TRS/CSI-RS 在符号 6+10 / 12 中(对于偶数情况)
TRS/CSI-RS 在符号 5+9 / 13 中(对于奇数情况)
- 系列 59e:30C 峰值小区,7 个波束,全带宽 CSI-RS,1 dmrs,4 个 UL 流,18 个 PUCCH UCI + 6 个 PUSCH UCI 频分复用
与 59c 相同的设置,但只有 1 个 dmrs。
PDSCH:6 个 UEG / 时隙,MCS 27,45 个 PRB / UEG,(具有 SSB 时为 42 个 PRB / UEG)
PUSCH:6 个 UEG / 时隙,MCS 27,42 个 PRB / UEG,(具有 4 个 PRACH 时为 34 个 PRB / UEG,具有 3 个 PRACH 时为 36 个 PRB / UEG)
UCI@PUSCH:4 个 HARQ,37 个 CSI-1,5 个 CSI-2
PDCCH:12 个 DCI / 时隙(6 个 DL + 6 个 UL)
PUCCH:18 个 UE 频分复用 (PF1)
TRS/CSI-RS 在符号 6+10 / 12 中(对于偶数情况)
TRS/CSI-RS 在符号 5+9 / 13 中(对于奇数情况)
- 系列 60c:7 个波束,100 MHz (273 PRB),20C,平均小区,OTA,不相交 PDSCH 和 CSIRS,4 个 UL 流,18 个 PUCCH UCI 频分复用
PDSCH:6 个 UEG / 时隙,MCS 27,22 个 PRB / UEG,(具有 ssb 时为 18 个 PRB / UEG)
PUSCH:6 个 UEG / 时隙,MCS 27,19 个 PRB / UEG,(具有 4 个 PRACH 时为 11 个 PRB / UEG,具有 3 个 PRACH 时为 13 个 PRB / UEG)
UCI@PUSCH:4 个 HARQ,37 个 CSI-1,5 个 CSI-2(启用早期 HARQ)
PDCCH:12 个 DCI / 时隙(6 个 DL + 6 个 UL)
PUCCH:18 个 UE 频分复用 (PF1)
- 帧 0
时隙 0、1、2:ssb(2 个块),
时隙 3,ssb(1 个块)
时隙 6,8,10,16, TRS + CSIRS
时隙 7,9,11,17, TRS
时隙 5,15, PRACH
- 帧 1
时隙 6,8,10, TRS + CSIRS
时隙 7,9,11, TRS
时隙 5,15, PRACH
- 帧 2
时隙 0、1、2:ssb *2,
时隙 3,ssb
时隙 6,7,8,9,10,11, 16,17 TRS
时隙 5,15, PRACH
- 帧 3
时隙 6,7,8,9,10,11 TRS
时隙 5,15, PRACH
TRS/CSI-RS 在符号 6+10 / 12 中(对于偶数情况)
TRS/CSI-RS 在符号 5+9 / 13 中(对于奇数情况)
- 系列 60d:7 个波束,100 MHz (273 PRB),20C,平均小区,OTA,不相交 PDSCH 和 CSIRS,4 个 UL 流,24 个 PUCCH UCI 频分复用
PDSCH:6 个 UEG / 时隙,MCS 27,22 个 PRB / UEG,(具有 ssb 时为 18 个 PRB / UEG)
PUSCH:6 个 UEG / 时隙,MCS 27,18 个 PRB / UEG,(具有 4 个 PRACH 时为 10 个 PRB / UEG,具有 3 个 PRACH 时为 12 个 PRB / UEG)
UCI@PUSCH:0 个 HARQ,37 个 CSI-1,5 个 CSI-2(启用早期 HARQ)
PDCCH:12 个 DCI / 时隙(6 个 DL + 6 个 UL)
PUCCH:24 个 UE 频分复用 (PF1)
- 帧 0
时隙 0、1、2:ssb(2 个块),
时隙 3,ssb(1 个块)
时隙 6,8,10,16, TRS + CSIRS
时隙 7,9,11,17, TRS
时隙 5,15, PRACH
- 帧 1
时隙 6,8,10, TRS + CSIRS
时隙 7,9,11, TRS
时隙 5,15, PRACH
- 帧 2
时隙 0、1、2:ssb *2,
时隙 3,ssb
时隙 6,7,8,9,10,11, 16,17 TRS
时隙 5,15, PRACH
- 帧 3
时隙 6,7,8,9,10,11 TRS
时隙 5,15, PRACH
TRS/CSI-RS 在符号 6+10 / 12 中(对于偶数情况)
TRS/CSI-RS 在符号 5+9 / 13 中(对于奇数情况)
- 系列 62c:30C 峰值小区,7 个波束,全带宽 CSI-RS,OTA,4 个 UL 流,18 个 PUCCH UCI + 6 个 PUSCH UCI 频分复用,S 时隙中的 PUSCH
59c + S 时隙中 4 个符号的 pusch
PDSCH:6 个 UEG / 时隙,MCS 27,45 个 PRB / UEG,(具有 SSB 时为 42 个 PRB / UEG)
PUSCH:6 个 UEG / 时隙,MCS 27,42 个 PRB / UEG,(具有 4 个 PRACH 时为 34 个 PRB / UEG,具有 3 个 PRACH 时为 36 个 PRB / UEG)
UCI@PUSCH:4 个 HARQ,37 个 CSI-1,5 个 CSI-2
PDCCH:12 个 DCI / 时隙(6 个 DL + 6 个 UL)
PUCCH:18 个 UE 频分复用 (PF1)
- 帧 0
时隙 0、1、2:ssb(2 个块),
时隙 3,ssb(1 个块)
时隙 6,8,10,16, TRS + CSIRS
时隙 7,9,11,17, TRS
时隙 5,15, PRACH
- 帧 1
时隙 6,8,10, TRS + CSIRS
时隙 7,9,11, TRS
时隙 5,15, PRACH
- 帧 2
时隙 0、1、2:ssb *2,
时隙 3,ssb
时隙 6,7,8,9,10,11, 16,17 TRS
时隙 5,15, PRACH
- 帧 3
时隙 6,7,8,9,10,11 TRS
时隙 5,15, PRACH
TRS/CSI-RS 在符号 6+10 / 12 中(对于偶数情况)
TRS/CSI-RS 在符号 5+9 / 13 中(对于奇数情况)
- 系列 63c:7 个波束,100 MHz (273 PRB),20C,平均小区,OTA,不相交 PDSCH 和 CSIRS,4 个 UL 流,18 个 PUCCH UCI 频分复用,S 时隙中的 PUSCH
59c + S 时隙中 4 个符号的 pusch
PDSCH:6 个 UEG / 时隙,MCS 27,22 个 PRB / UEG,(具有 ssb 时为 18 个 PRB / UEG)
PUSCH:6 个 UEG / 时隙,MCS 27,19 个 PRB / UEG,(具有 4 个 PRACH 时为 11 个 PRB / UEG,具有 3 个 PRACH 时为 13 个 PRB / UEG)
UCI@PUSCH:4 个 HARQ,37 个 CSI-1,5 个 CSI-2(启用早期 HARQ)
PDCCH:12 个 DCI / 时隙(6 个 DL + 6 个 UL)
PUCCH:18 个 UE 频分复用 (PF1)
- 帧 0
时隙 0、1、2:ssb(2 个块),
时隙 3,ssb(1 个块)
时隙 6,8,10,16, TRS + CSIRS
时隙 7,9,11,17, TRS
时隙 5,15, PRACH
- 帧 1
时隙 6,8,10, TRS + CSIRS
时隙 7,9,11, TRS
时隙 5,15, PRACH
- 帧 2
时隙 0、1、2:ssb *2,
时隙 3,ssb
时隙 6,7,8,9,10,11, 16,17 TRS
时隙 5,15, PRACH
- 帧 3
时隙 6,7,8,9,10,11 TRS
时隙 5,15, PRACH
TRS/CSI-RS 在符号 6+10 / 12 中(对于偶数情况)
TRS/CSI-RS 在符号 5+9 / 13 中(对于奇数情况)
sudo -E ./cuphycontroller_scf F08_CG1
sudo ./test_mac F08 4C 59C
sudo ./ru_emulator F08 4C 59C
21:40:26.213585 WRN 2231 0 [RU] Cell  0 DL 1469.14 Mbps 1400 Slots | UL  213.84 Mbps  400 Slots | PBCH   200 | PDCCH_UL  1600 | PDCCH_DL  1600 | CSI_RS   700 | PRACH  200 Slots | PUCCH  400 Slots | DL_C_ON 100.00% DL_U_ON  99.91% UL_C_ON 100.00% |Seconds    459
21:40:26.213591 WRN 2231 0 [RU] Cell  1 DL 1469.14 Mbps 1400 Slots | UL  213.84 Mbps  400 Slots | PBCH   200 | PDCCH_UL  1600 | PDCCH_DL  1600 | CSI_RS   700 | PRACH  200 Slots | PUCCH  400 Slots | DL_C_ON 100.00% DL_U_ON  99.94% UL_C_ON 100.00% |Seconds    459
21:40:26.213595 WRN 2231 0 [RU] Cell  2 DL 1469.14 Mbps 1400 Slots | UL  213.84 Mbps  400 Slots | PBCH   200 | PDCCH_UL  1600 | PDCCH_DL  1600 | CSI_RS   700 | PRACH  200 Slots | PUCCH  400 Slots | DL_C_ON 100.00% DL_U_ON  99.92% UL_C_ON 100.00% |Seconds    459
21:40:26.213599 WRN 2231 0 [RU] Cell  3 DL 1469.14 Mbps 1400 Slots | UL  213.84 Mbps  400 Slots | PBCH   200 | PDCCH_UL  1600 | PDCCH_DL  1600 | CSI_RS   700 | PRACH  200 Slots | PUCCH  400 Slots | DL_C_ON 100.00% DL_U_ON  99.95% UL_C_ON 100.00% |Seconds    459
在 R750 A100X DU 系统上,F08 4C 模式 60(平均模式)
sudo -E ./cuphycontroller_scf F08_CG1
sudo ./test_mac F08 4C 60C
sudo ./ru_emulator F08 4C 60C
22:01:12.039024 WRN 2375 0 [RU] Cell  0 DL  523.10 Mbps 1400 Slots | UL   94.65 Mbps  400 Slots | PBCH   200 | PDCCH_UL  1600 | PDCCH_DL  1600 | CSI_RS   700 | PRACH  200 Slots | PUCCH  400 Slots | DL_C_ON 100.00% DL_U_ON  99.99% UL_C_ON 100.00% |Seconds    471
22:01:12.039030 WRN 2375 0 [RU] Cell  1 DL  523.10 Mbps 1400 Slots | UL   94.65 Mbps  400 Slots | PBCH   200 | PDCCH_UL  1600 | PDCCH_DL  1600 | CSI_RS   700 | PRACH  200 Slots | PUCCH  400 Slots | DL_C_ON 100.00% DL_U_ON  99.99% UL_C_ON 100.00% |Seconds    471
22:01:12.039034 WRN 2375 0 [RU] Cell  2 DL  523.10 Mbps 1400 Slots | UL   94.65 Mbps  400 Slots | PBCH   200 | PDCCH_UL  1600 | PDCCH_DL  1600 | CSI_RS   700 | PRACH  200 Slots | PUCCH  400 Slots | DL_C_ON 100.00% DL_U_ON  99.99% UL_C_ON 100.00% |Seconds    471
22:01:12.039037 WRN 2375 0 [RU] Cell  3 DL  523.10 Mbps 1400 Slots | UL   94.65 Mbps  400 Slots | PBCH   200 | PDCCH_UL  1600 | PDCCH_DL  1600 | CSI_RS   700 | PRACH  200 Slots | PUCCH  400 Slots | DL_C_ON 100.00% DL_U_ON  99.99% UL_C_ON 100.00% |Seconds    471
使用 RU 仿真器进行同步 FH 端口测试配置#
以下 TC 可以使用两个 FH 端口进行测试
BFP9 2C 59c
要设置双端口测试,您必须适当地设置配置。
您可以选择以下经过验证的双端口测试拓扑
- 1 个 GH 和 1 个 RU 服务器
GH P0 <-> RU P0
GH P1 <-> RU P1
- 1 个 GH 和 2 个 RU 服务器
GH P0 <-> RU 1 P0
GH P1 <-> RU 2 P0
注意:对于 1 个 GH 和 2 个 RU 服务器的场景,我们需要三个设置同步,即使用 FH 交换机作为三个系统之间的 PTP 主时钟。
cuPHYController 配置
nics:
  - nic: 0000:01:00.0
    mtu: 1514
    cpu_mbufs: 196608
    uplane_tx_handles: 64
    txq_count: 48
    rxq_count: 16
    txq_size: 8192
    rxq_size: 16384
    gpu: 0
  - nic: 0000:01:00.1
    mtu: 1514
    cpu_mbufs: 196608
    uplane_tx_handles: 64
    txq_count: 48
    rxq_count: 16
    txq_size: 8192
    rxq_size: 16384
    gpu: 0
在 cuPHYController 小区配置中,您可以设置小区将在其上运行流量的端口
cells:
- name: O-RU 0
[...]
  nic: 0000:01:00.0
- name: O-RU 1
[...]
  nic: 0000:01:00.1
对于具有单个 RU 仿真器系统的第一个拓扑,您可以指定 NIC 接口和对等以太网地址,并使用 DU 端口的地址,例如
nics:
  - nic_interface: 0000:cc:00.0
  - nic_interface: 0000:cc:00.1
peers:
  - peerethaddr: 48:b0:2d:a6:28:02 # MAC address of DU port 0
  - peerethaddr: 48:b0:2d:a6:28:03 # MAC address of DU port 1
类似地,对于 RU 仿真器配置,根据上面列表中定义的索引,适当地分配 NIC 和对等地址
cell_configs:
  -
    name: "Cell1"
    peer: 0
    nic: 0
  -
    name: "Cell2"
    peer: 1
    nic: 1
在 GH 服务器上运行 RU#
为了在 GH 服务器上运行 RU,请更新 RU 的核心绑定以用于 GH CPU 编号。
为了支持 20C 峰值小区性能测试用例,NUMA 不是问题,例如,我们可以使用以下核心分配
请注意,由于 PTP4L/PHC2SYS 核心绑定,跳过了 41。
ul_core_list: [4, 5, 6, 7, 8, 9, 10, 11, 12, 13, 14, 15, 16, 17, 18, 19, 20, 21, 22, 23]
dl_core_list: [24, 25, 26, 27, 28, 29, 30, 31, 32, 33, 34, 35, 36, 37, 38, 39, 40, 42, 43, 44]
low_priority_core: 45
aerial_fh_dpdk_thread: 46
注意:请务必在 PCIe nic_interface 中包含“0000”
nics:
    - nic_interface: 0000:01:00.0
请在 arm 服务器上构建 RU 仿真器二进制文件,执行命令与上述示例相同。
运行 nrSim 测试用例#
PBCH#
# Restart MPS
sudo -E ./cuphycontroller_scf nrSim_SCF
sudo ./test_mac nrSim 1901 --channels PBCH
sudo ./ru_emulator nrSim 1901 --channels PBCH
# Expect RU Emulator to report 100 PBCH per second
PDCCH_DL#
# Restart MPS
sudo -E ./cuphycontroller_scf nrSim_SCF
sudo ./test_mac nrSim 2901 --channels PDCCH_DL
sudo ./ru_emulator nrSim 2901 --channels PDCCH_DL
# Expect RU Emulator to report 100 PDCCH_DL per second
PDSCH#
# Restart MPS
sudo -E ./cuphycontroller_scf nrSim_SCF
sudo ./test_mac nrSim 3901 --channels PDSCH
sudo ./ru_emulator nrSim 3901 --channels PDSCH
# Expect RU Emulator to report 100 PDSCH per second
PUSCH#
# Restart MPS
sudo -E ./cuphycontroller_scf nrSim_SCF
sudo ./test_mac nrSim 7901 --channels PUSCH
sudo ./ru_emulator nrSim 7901 --channels PUSCH
# Expect testMAC to report 100 PUSCH per second

# PUSCH Mapping Type B
# Restart MPS
sudo -E ./cuphycontroller_scf nrSim_SCF
sudo ./test_mac nrSim 7258 --channels PUSCH
sudo ./ru_emulator nrSim 7258 --channels PUSCH
# Expect testMAC to report 100 PUSCH per second

# Restart MPS
sudo -E ./cuphycontroller_scf nrSim_SCF
sudo ./test_mac nrSim 7259 --channels PUSCH
sudo ./ru_emulator nrSim 7259 --channels PUSCH
# Expect testMAC to report 100 PUSCH per second

#CSI P2
sed -i "s/enable_csip2_v3.*/enable_csip2_v3: 1/" ${cuBB_SDK}/cuPHY-CP/cuphycontroller/config/cuphycontroller_nrSim_SCF.yaml
sed -i "s/enable_csip2_v3.*/enable_csip2_v3: 1/" $cuBB_SDK/cuPHY-CP/testMAC/testMAC/test_mac_config.yaml

# Restart MPS
sed -i "s/ uciIndPerSlot :.*/ uciIndPerSlot : 2/" ${cuBB_SDK}/cuPHY-CP/testMAC/testMAC/test_mac_config.yaml
sudo -E ./cuphycontroller_scf nrSim_SCF
sudo ./test_mac nrSim 7599 --channels PUSCH
sudo ./ru_emulator nrSim 7599 --channels PUSCH
# Expect testMAC to report 100 PUSCH and 100 CSIP2 per second

# Restart MPS
sed -i "s/ uciIndPerSlot :.*/ uciIndPerSlot : 2/" ${cuBB_SDK}/cuPHY-CP/testMAC/testMAC/test_mac_config.yaml
sudo -E ./cuphycontroller_scf nrSim_SCF
sudo ./test_mac nrSim 7600 --channels PUSCH
sudo ./ru_emulator nrSim 7600 --channels PUSCH
# Expect testMAC to report 100 PUSCH and 100 CSIP2 per second
PRACH#
# Restart MPS
sudo -E ./cuphycontroller_scf nrSim_SCF
sudo ./test_mac nrSim 5901 --channels PRACH
sudo ./ru_emulator nrSim 5901 --channels PRACH
# Expect testMAC to report 100 Preambles per second

# PRACH 16 PID/Slot and PRACH B4 4FDM
# Restart MPS
sudo -E ./cuphycontroller_scf nrSim_SCF
sudo ./test_mac nrSim 5013 --channels PRACH
sudo ./ru_emulator nrSim 5013 --channels PRACH
Expect testMAC to receive 1600 Preambles per second

- Change tv_prach field as below in cuphycontroller_nrSim_SCF.yaml
  tv_prach: TVnr_5013_PRACH_gNB_CUPHY_s1p0.h5

Expect 4 RO occasions in each slot in phy.log in sequence mentioned in below.
RO 0 - PrmbIndex (2,5,8,11)
RO 1 - PrmbIndex (14,17,20,23)
RO 2 - PrmbIndex (32,35,26,29)
RO 3 - PrmbIndex (38,41,44,47)

# grep -i "RO\|prmbIndex" phy.log
15:57:41.161874 I [DRV.PRACH] RO 0 SFN 599.01 Preambles num detected 4
15:57:41.161878 I [DRV.PRACH] SFN 599.01         #0 prmbIndex 2 prmbDelay 0.000000 prmbPower -2.878487
15:57:41.161880 I [DRV.PRACH] SFN 599.01         #1 prmbIndex 5 prmbDelay 0.000000 prmbPower -2.801307
15:57:41.161883 I [DRV.PRACH] SFN 599.01         #2 prmbIndex 8 prmbDelay 0.000000 prmbPower -3.207683
15:57:41.161886 I [DRV.PRACH] SFN 599.01         #3 prmbIndex 11 prmbDelay 0.000000 prmbPower -3.423241
15:57:41.161901 I [DRV.PRACH] RO 1 SFN 599.01 Preambles num detected 4
15:57:41.161904 I [DRV.PRACH] SFN 599.01         #0 prmbIndex 14 prmbDelay 0.000000 prmbPower -4.193221
15:57:41.161906 I [DRV.PRACH] SFN 599.01         #1 prmbIndex 17 prmbDelay 0.000000 prmbPower -4.011869
15:57:41.161909 I [DRV.PRACH] SFN 599.01         #2 prmbIndex 20 prmbDelay 0.000000 prmbPower -3.471422
15:57:41.161912 I [DRV.PRACH] SFN 599.01         #3 prmbIndex 23 prmbDelay 0.000000 prmbPower -3.552692
15:57:41.161924 I [DRV.PRACH] RO 2 SFN 599.01 Preambles num detected 4
15:57:41.161927 I [DRV.PRACH] SFN 599.01         #0 prmbIndex 32 prmbDelay 0.000000 prmbPower -4.954414
15:57:41.161930 I [DRV.PRACH] SFN 599.01         #1 prmbIndex 35 prmbDelay 0.000000 prmbPower -3.706564
15:57:41.161933 I [DRV.PRACH] SFN 599.01         #2 prmbIndex 26 prmbDelay 0.000000 prmbPower -4.333083
15:57:41.161935 I [DRV.PRACH] SFN 599.01         #3 prmbIndex 29 prmbDelay 0.000000 prmbPower -3.994442
15:57:41.161945 I [DRV.PRACH] RO 3 SFN 599.01 Preambles num detected 4
15:57:41.161947 I [DRV.PRACH] SFN 599.01         #0 prmbIndex 38 prmbDelay 0.000000 prmbPower -3.341729
15:57:41.161950 I [DRV.PRACH] SFN 599.01         #1 prmbIndex 41 prmbDelay 0.000000 prmbPower -4.641103
15:57:41.161952 I [DRV.PRACH] SFN 599.01         #2 prmbIndex 44 prmbDelay 0.000000 prmbPower -4.189767
15:57:41.161955 I [DRV.PRACH] SFN 599.01         #3 prmbIndex 47 prmbDelay 0.000000 prmbPower -4.946166
NZP CSI_RS#
# Restart MPS
sudo -E ./cuphycontroller_scf nrSim_SCF
sudo ./test_mac nrSim 4001 --channels CSI_RS
sudo ./ru_emulator nrSim 4001 --channels CSI_RS
# Expect RU Emulator to report 100 CSI_RS per second
PDSCH + ZP CSI_RS#
要运行 TC 3323、3338 和 3339,请在 test_mac 和 ru_emulator 命令中添加 --channels CSI_RS+PDSCH。
# Restart MPS
sudo -E ./cuphycontroller_scf nrSim_SCF
sudo ./test_mac nrSim 3323 --channels CSI_RS+PDSCH
sudo ./ru_emulator nrSim 3323 --channels CSI_RS+PDSCH
# Expect RU Emulator to count 100 CSI_RS and 100 PDSCH per second
预编码#
# Below steps are applicable to precoding test for PDSCH, PDCCH, PBCH, and CSI_RS
# In l2_adapter_config_nrSim_SCF.yaml, set enable_precoding to 1
sed -i -z "s/enable_precoding: 0/enable_precoding: 1/" $cuBB_SDK/cuPHY-CP/cuphycontroller/config/l2_adapter_config_nrSim_SCF.yaml
# Restart MPS
sudo -E ./cuphycontroller_scf nrSim_SCF
sudo ./test_mac nrSim 3248 --channels PDSCH
# Reset enable_precoding to 0
sed -i -z "s/enable_precoding: 1/enable_precoding: 0/" $cuBB_SDK/cuPHY-CP/cuphycontroller/config/l2_adapter_config_nrSim_SCF.yaml

# In ru-emulator/config/config.yaml, set dl_approx_validation to 1
sed -i -z "s/dl_approx_validation: 0/dl_approx_validation: 1/1" $cuBB_SDK/cuPHY-CP/ru-emulator/config/config.yaml

sudo ./ru_emulator nrSim 3248 --channels PDSCH
# Expect testMAC and RU Emulator both see 1.36 Mbps  100 Slots per second
# Reset dl_approx_validation to 0
sed -i -z "s/dl_approx_validation: 1/dl_approx_validation: 0/1" $cuBB_SDK/cuPHY-CP/ru-emulator/config/config.yaml
关于 24-3,我们还需要在 RU 仿真器端启用 oam_cell_ctrl_cmd,以用于启用预编码的 nrSim 测试用例。
sed -i "s/oam_cell_ctrl_cmd:.*/oam_cell_ctrl_cmd: 1/" $cuBB_SDK/cuPHY-CP/ru-emulator/config/config.yaml
PUCCH HARQ#
# Restart MPS
sudo -E ./cuphycontroller_scf nrSim_SCF
sudo ./test_mac nrSim 6001 --channels PUCCH
sudo ./ru_emulator nrSim 6001 --channels PUCCH
# Expect testMAC to report 100 HARQ indications and ru-emulator to report 100 PUCCH per second
PUCCH 格式 2#
# Restart MPS
sudo -E ./cuphycontroller_scf nrSim_SCF
sudo ./test_mac nrSim 6201 --channels PUCCH
sudo ./ru_emulator nrSim 6201 --channels PUCCH
# Expect testMAC to report 100 HARQ indications and ru-emulator to report 100 PUCCH per second
PUCCH HARQ/SR#
# Restart MPS
sudo -E ./cuphycontroller_scf nrSim_SCF
sudo ./test_mac nrSim 6049 --channels PUCCH
sudo ./ru_emulator nrSim 6049 --channels PUCCH
# Expect testMAC to report 300 HARQ + 300 SR and ru-emulator to report 100 PUCCH per second
PUCCH 格式 3#
# Restart MPS
sudo -E ./cuphycontroller_scf nrSim_SCF
sudo ./test_mac nrSim 6301 --channels PUCCH
sudo ./ru_emulator nrSim 6301 --channels PUCCH
# Expect testMAC to report 100 HARQ indications and ru-emulator to report 100 PUCCH per second
PUSCH 上的 UCI#
# Restart MPS
sudo -E ./cuphycontroller_scf nrSim_SCF
sudo ./test_mac nrSim 7501
sudo ./ru_emulator nrSim 7501
# Expect testMAC to report 100 HARQ/s and UL slots/s

# Restart MPS
sudo -E ./cuphycontroller_scf nrSim_SCF
sudo ./test_mac nrSim 7502
sudo ./ru_emulator nrSim 7502
# Expect testMAC to report 100 HARQ/s and UL slots/s

# Restart MPS
#UCI on PUSCH CSI part 2
sudo -E ./cuphycontroller_scf nrSim_SCF
sudo ./test_mac nrSim 7517
sudo ./ru_emulator nrSim 7517 --channel PUSCH

For 7517-7519, 7524-26, 7528-29
# Expect testMAC to report 100 CSI part2/s and 100 UL slots/s
# Expect cuphycontroller to report 0 CRC for 100 slots/s and 1.61 Mbps UL throughput

For 7520-7523, 7527, 7530
# Expect testMAC to report 100 CSI part2/s
# Expect cuphycontroller to report 0 CRC for 100 slots/s
SRS#
要为 SRS 测试启用 FAPI 10.04 字段,请在 cmake 选项中添加 -DSCF_FAPI_10_04=ON,并执行清除构建。用于 SRS 验证的测试用例为 8301 和 8302。
In cuphycontroller_nrSim_SCF.yaml - enable_srs: 1
# Restart MPS
# Running 8301
sudo ./ru_emulator nrSim 8301 --channels SRS or ./ru_emulator nrSim 8301 (default support all channels)
sudo ./test_mac nrSim 8301 --channels SRS or ./test_mac nrSim 8301 (default support all channels)
sudo -E ./cuphycontroller_scf nrSim_SCF
# Expect the testMac to report the number of received SRS is between 97 and 103 and INV values per second to be 0.
# If the INV Values are greater than 0, there is either a SRS report mismatch or SRS report parameter mismatch.

# Restart MPS
# Running 8302
sudo ./ru_emulator nrSim 8302 --channels SRS or ./ru_emulator nrSim 8302 (default support all channels)
sudo ./test_mac nrSim 8302 --channels SRS or ./test_mac nrSim 8302 (default support all channels)
sudo -E ./cuphycontroller_scf nrSim_SCF
# Expect the testMac to report the number of received SRS is between 97 and 103 and INV values per second to be 0.
# If the INV Values are greater than 0, there is either a SRS report mismatch or SRS report parameter mismatch.
S-slot#
# Restart MPS
sudo ./ru_emulator nrSim 90013 --channels 0x1ff
sudo -E ./cuphycontroller_scf nrSim_SCF
sudo ./test_mac nrSim 90013 --channels 0x1ff
# Expect RU Emulator to report 50 DL and PDCCH_DL per second, testMAC to report 50 HARQ per second

# Restart MPS
sudo ./ru_emulator nrSim 90015 --channels 0x1ff
sudo -E ./cuphycontroller_scf nrSim_SCF
sudo ./test_mac nrSim 90015 --channels 0x1ff
# Expect RU Emulator to report 50 DL and PDCCH_DL per second, testMAC to report 50 HARQ per second
多个 SSB#
# Restart MPS
sudo -E ./cuphycontroller_scf nrSim_SCF
sudo ./test_mac nrSim 1104 --channels PBCH
sudo ./ru_emulator nrSim 1104 --channels PBCH
# Expect RU Emulator to report 100 PBCH per second
PUSCH TDI#
# Restart MPS
sudo -E ./cuphycontroller_scf nrSim_SCF_tdi
sudo ./test_mac nrSim 7411 --channels PUSCH
sudo ./ru_emulator nrSim 7411 --channels PUSCH
# Expect testMAC and RU Emulator both see 1.79 Mbps 100 Slots per second
PUSCH SINR 和噪声#
# For TCs 7265,7266,7268,7269,7271,7272
# Change cuphycontroller_nrSim_SCF.yaml file to have 8 eAxIds for PUSCH
eAxC_id_pusch:       [8,0,1,2,3,4,5,6]
sed -i s/"eAxC_id_pusch:       \\[8,0,1,2\\]/eAxC_id_pusch:       \\[8,0,1,2,3,4,5,6\\]/1" $cuBB_SDK/cuPHY-CP/cuphycontroller/config/cuphycontroller_nrSim_SCF.yaml

#  For TCs 7264,7267,7270  no change to cuphycontroller_nrSim_SCF.yaml
# Restart MPS
sudo ./test_mac nrSim 7265 --channels PUSCH
sudo ./ru_emulator nrSim 7265 --channels PUSCH
# Revert if changed earlier
sed -i s/"eAxC_id_pusch:       \\[8,0,1,2,3,4,5,6\\]/eAxC_id_pusch:       \\[8,0,1,2\\]/1" $cuBB_SDK/cuPHY-CP/cuphycontroller/config/cuphycontroller_nrSim_SCF.yaml
mSlot_mCell 测试用例#
TC 90001-90006,90011-90015, 90061-90063, 90700-90705 - TDD 模式 DSUUU TC:90061,90062, 90063 - 多时隙 SRS TC:90700, 90701, 90702, 90703, 90705
# nrSim config generation
cd ${cuBB_SDK}/cubb_scripts/autoconfig
python3 auto_controllerConfig.py -i ../../testVectors/ -t ../../cuPHY-CP/cuphycontroller/config/cuphycontroller_nrSim_SCF.yaml -o ../../cuPHY-CP/cuphycontroller/config
python3 auto_RuEmulatorConfig.py -i ../../cuPHY-CP/cuphycontroller/config -t ../../cuPHY-CP/ru-emulator/config/config.yaml -o ../../cuPHY-CP/ru-emulator/config

# backup default nrSim config
cp ${cuBB_SDK}/cuPHY-CP/cuphycontroller/config/cuphycontroller_nrSim_SCF.yaml ${cuBB_SDK}/cuPHY-CP/cuphycontroller/config/cuphycontroller_nrSim_SCF.yaml.orig
cp ${cuBB_SDK}/cuPHY-CP/ru-emulator/config/config.yaml ${cuBB_SDK}/cuPHY-CP/ru-emulator/config/config.yaml.orig
cp ${cuBB_SDK}/cuPHY-CP/testMAC/testMAC/test_mac_config.yaml ${cuBB_SDK}/cuPHY-CP/testMAC/testMAC/test_mac_config.yaml.orig

# Use nrSim_SCF_900xx config
cp ${cuBB_SDK}/cuPHY-CP/cuphycontroller/config/cuphycontroller_nrSim_SCF_900xx.yaml ${cuBB_SDK}/cuPHY-CP/cuphycontroller/config/cuphycontroller_nrSim_SCF.yaml
cp ${cuBB_SDK}/cuPHY-CP/ru-emulator/config/ru_emulator_config_900xx.yaml ${cuBB_SDK}/cuPHY-CP/ru-emulator/config/config.yaml
python3 auto_TestMacConfig.py -t ../../cuPHY-CP/testMAC/testMAC/test_mac_config.yaml.orig -c 900xx -p CG1 -o ../../cuPHY-CP/testMAC/testMAC/test_mac_config.yaml

#For TCs 90061-90063, set pusch_aggr_per_ctx to 9, prach_aggr_per_ctx to 4 and ul_input_buffer_per_cell to 15 in cuphycontroller_nrSim_SCF.yaml
sed -i "s/ pusch_aggr_per_ctx:.*/ pusch_aggr_per_ctx: 9/" ${cuBB_SDK}/cuPHY-CP/cuphycontroller/config/cuphycontroller_nrSim_SCF.yaml
sed -i "s/ prach_aggr_per_ctx:.*/ prach_aggr_per_ctx: 4/" ${cuBB_SDK}/cuPHY-CP/cuphycontroller/config/cuphycontroller_nrSim_SCF.yaml
sed -i "s/ ul_input_buffer_per_cell:.*/ ul_input_buffer_per_cell: 15/" ${cuBB_SDK}/cuPHY-CP/cuphycontroller/config/cuphycontroller_nrSim_SCF.yaml

# For TCs, 90703 and 90704, set prach_aggr_per_ctx to 4 and ul_input_buffer_per_cell to 12 in cuphycontroller_nrSim_SCF.yaml
sed -i "s/ prach_aggr_per_ctx:.*/ prach_aggr_per_ctx: 4/" ${cuBB_SDK}/cuPHY-CP/cuphycontroller/config/cuphycontroller_nrSim_SCF.yaml
sed -i "s/ ul_input_buffer_per_cell:.*/ ul_input_buffer_per_cell: 12/" ${cuBB_SDK}/cuPHY-CP/cuphycontroller/config/cuphycontroller_nrSim_SCF.yaml

# Restart MPS
sudo -E ./cuphycontroller_scf nrSim_SCF
sudo ./ru_emulator nrSim 900xx --channels 0x1ff
sudo ./test_mac nrSim 900xx --channels 0x1ff

# Restore nrSim config file
cp ${cuBB_SDK}/cuPHY-CP/cuphycontroller/config/cuphycontroller_nrSim_SCF.yaml.orig ${cuBB_SDK}/cuPHY-CP/cuphycontroller/config/cuphycontroller_nrSim_SCF.yaml
cp ${cuBB_SDK}/cuPHY-CP/ru-emulator/config/config.yaml.orig ${cuBB_SDK}/cuPHY-CP/ru-emulator/config/config.yaml
cp ${cuBB_SDK}/cuPHY-CP/testMAC/testMAC/test_mac_config.yaml.orig ${cuBB_SDK}/cuPHY-CP/testMAC/testMAC/test_mac_config.yaml
64T64R SRS + 动态波束赋形权重 + 静态波束赋形权重测试用例#
以下是构建和运行 64T6R SRS 和动态波束赋形权重相关测试的步骤。
构建选项
cmake -Bbuild -GNinja -DCMAKE_TOOLCHAIN_FILE=cmake/toolchains/native -DSCF_FAPI_10_04=ON -DENABLE_STATIC_BFW=ON
cmake --build build
验证动态 DL-BFW+PDSCH、动态 UL-BFW+PUSCH、所有信道静态+动态波束赋形权重的以下所有启动模式
基本全部分配
100 MHz DL 16 层 (1+1+1+1+1+1+1+1+1+1+1+1+1+1+1+1) - 90090
100 MHz UL 8 层 1+1+1+1+1+1+1+1 层 - 90091
100 MHz DL 8 PDU SRS - 8514
100 MHz DL 1 层 - 90092
100 MHz UL 1 层 - 90093
100 MHz DL 2 层 - 90094
100 MHz UL 2 层 - 90095
100 MHz DL 1+1 层 - 90096
100 MHz UL 1+1 层 - 90097
100 MHz DL 2+2 层 - 90098
100 MHz UL 2+2 层 - 90099
100 MHz DL 1+1+1+1 层 - 90100
100 MHz UL 1+1+1+1 层 - 90101
100 MHz DL 2+2+2+2 层 - 90102
100 MHz UL 1+1+1+1+1+1+1+1 层 - 90110
100 MHz DL 2+2+2+2+2+2+2+2 层 - 90111
100 MHz UL 2+2+2+2 层 - 90112
100 MHz DL 4+4+4+4 层 - 90113
100 MHz DL 16 层 (1+1+1+1+1+1+1+1+1+1+1+1+1+1+1+1) + UL 8 层 (1+1+1+1+1+1+1+1) + SRS - 90103
100 MHz DL 1 层 + UL 1 层 + SRS - 90104
100 MHz DL 2 层 + UL 2 层 + SRS - 90105
100 MHz DL 1+1 层 + UL 1+1 层 + SRS - 90106
100 MHz DL 2+2 层 + UL 2+2 层 + SRS - 90107
100 MHz DL 1+1+1+1 层 + UL 1+1+1+1 层 + SRS - 90108
100 MHz DL 2+2+2+2 层 + UL 1+1+1+1 层 + SRS - 90109
100 MHz UL 1+1+1+1+1+1+1+1 层 + DL 2+2+2+2+2+2+2+2 层 + SRS - 90114
100 MHz UL 2+2+2+2 层 + DL 4+4+4+4 层 + SRS - 90115
具有一个 BWP 的多个 UE 组
100 MHz UL 2 个 UE 组,相同层,prb 大小,起始 prb - 90116
100 MHz DL 2 个 UE 组,相同层,prb 大小,起始 prb - 90117
100 MHz UL 2 个 UE 组。不同的 prb 大小。- 90118
100 MHz DL 2 个 UE 组。不同的 prb 大小。- 90119
100 MHz UL 2 个 UE 组。不同的起始 prb。- 90120
100 MHz DL 2 个 UE 组。不同的起始 prb。- 90121
100 MHz UL 2 个 UE 组。不同的层。- 90122
100 MHz DL 2 个 UE 组。不同的层。- 90123
100 MHz UL 2 个 UE 组。所有 prms 都不同。- 90124
100 MHz DL 2 个 UE 组。所有 prms 都不同。- 90125
100 MHz UL 4 个 UE 组。所有不同的层。- 90126
100 MHz DL 4 个 UE 组。所有不同的层。- 90127
100 MHz UL 8 个 UE 组 - 90128
100 MHz DL 8 个 UE 组 - 90129
100 MHz UL + DL 2 个 UE 组,相同层,prb 大小,起始 prb + SRS - 90130
100 MHz UL + DL 2 个 UE 组。不同的 prb 大小 + SRS - 90131
100 MHz UL + DL 2 个 UE 组。不同的起始 prb。+ SRS - 90132
100 MHz UL + DL 2 个 UE 组。不同的层。+ SRS - 90133
100 MHz UL + DL 2 个 UE 组。所有 prms 都不同。+ SRS - 90134
100 MHz UL + DL 4 个 UE 组。所有不同的层。+ SRS - 90135
100 MHz UL + DL 8 个 UE 组 + SRS - 90136
灵活的 PRG 大小/PRB 数量
100 MHz DL 8 层部分 PRB 分配 - 90137
100 MHz UL 4 层部分 PRB 分配 - 90138
100 MHz DL 部分 PRB 分配 - 90139
100 MHz UL 部分 PRB 分配 - 90140
100 MHz DL 8 层 + UL 4 层部分 PRB 分配 + SRS - 90143
100 MHz DL + UL 部分 PRB 分配 + SRS - 90144
多个 PRG 大小
100MHz 64 PRB,prgSize=4 UL - 90141
100MHz 64 PRB,prgSize=4 DL - 90142
prgSize_SRS != prgSize_BFW DL - 90146
prgSize_SRS != prgSize_BFW UL - 90147
100MHz 64 PRB,prgSize=4 UL + DL + SRS - 90145
prgSize_SRS != prgSize_BFW DL + UL + SRS - 90148
动态 + 静态波束赋形
所有信道 UEG0(静态,1 个 UE)- 90606
所有信道 UEG0(静态,1 个 UE)+ UEG1(静态,1 个 UE)- 90607
所有信道 UEG0(动态,4 个 UE)+ UEG1(动态,1 个 UE)+ UEG2(静态,1 个 UE)- 90608
所有信道 UEG0(动态,1 个 UE)+ UEG1(静态,1 个 UE)- 90609
所有信道 UEG0(动态,2 个 UE)+ UEG1(静态,1 个 UE)- 90610
所有信道 DL(动态,1x8 个 UE)+ UL(动态 2x1 个 UE)- 90611
所有信道静态+动态配置 - 90612
PDSCH + CSIRS (nPrb =< 255, sym 0) - 90613
PDSCH + CSIRS (nPrb > 255, sym 0) - 90614
PDSCH + CSIRS (nPrb > 255, sym 6) - 90615
PDSCH + CSIRS (prgSize = 273, nPrg = 1) - 90616
所有信道 - UL 时隙 3 和 4 上的 SRS - 90620
所有信道 - UL 时隙 3 和 5 上的 SRS - 90621
所有信道 - UL 时隙 3、4 和 5 上的 SRS - 90622
2 个多用户 MIMO 小区 - 所有信道 UEG0(动态,4 个 UE)+ UEG1(动态,1 个 UE)+ UEG2(静态,1 个 UE)- 90630
3 个多用户 MIMO 小区 - 所有信道 UEG0(动态,4 个 UE)+ UEG1(动态,1 个 UE)+ UEG2(静态,1 个 UE)- 90631
2 个多用户 MIMO 小区 - 所有信道 小区 1(无 BFW)+ 小区 2(BFW)- 90632
2 个多用户 MIMO 小区 - 所有信道 小区 1(无 BFW)+ 小区 2(无 BFW)+ 小区 3(BFW)- 90633
3 个多用户 MIMO 小区 - 100 MHz DL 16 层 (1+1+1+1+1+1+1+1+1+1+1+1+1+1+1+1) + UL 8 层 (1+1+1+1+1+1+1+1) + SRS - 90634
对于 64T64R SRS 85xx,需要执行 TV。您可以使用自动配置脚本为上述启动模式生成配置,但以下参数需要明确在生成的配置文件中修改
In cuphycontroller_nrSim_SCF.yaml - enable_srs: 1, mMIMO_enable: 1, mtu: 8192, cpu_mbufs: 196608
In cuphycontroller_nrSim_SCF_CG1.yaml - enable_srs: 1, mMIMO_enable: 1, mtu: 8192, cpu_mbufs: 196608
In ru-emulator: config.yaml - aerial_fh_mtu: 8192, enable_mmimo: 1
# nrSim config generation
cd ${cuBB_SDK}/cubb_scripts/autoconfig
python3 auto_controllerConfig.py -i ../../testVectors/ -t ../../cuPHY-CP/cuphycontroller/config/cuphycontroller_nrSim_SCF.yaml -o ../../cuPHY-CP/cuphycontroller/config
python3 auto_RuEmulatorConfig.py -i ../../cuPHY-CP/cuphycontroller/config -t ../../cuPHY-CP/ru-emulator/config/config.yaml -o ../../cuPHY-CP/ru-emulator/config

# backup default nrSim config
cp ${cuBB_SDK}/cuPHY-CP/cuphycontroller/config/cuphycontroller_nrSim_SCF.yaml ${cuBB_SDK}/cuPHY-CP/cuphycontroller/config/cuphycontroller_nrSim_SCF.yaml.orig
cp ${cuBB_SDK}/cuPHY-CP/ru-emulator/config/config.yaml ${cuBB_SDK}/cuPHY-CP/ru-emulator/config/config.yaml.orig
cp ${cuBB_SDK}/cuPHY-CP/testMAC/testMAC/test_mac_config.yaml ${cuBB_SDK}/cuPHY-CP/testMAC/testMAC/test_mac_config.yaml.orig

# Use nrSim_SCF_900xx config
cp ${cuBB_SDK}/cuPHY-CP/cuphycontroller/config/cuphycontroller_nrSim_SCF_900xx.yaml ${cuBB_SDK}/cuPHY-CP/cuphycontroller/config/cuphycontroller_nrSim_SCF.yaml
cp ${cuBB_SDK}/cuPHY-CP/ru-emulator/config/ru_emulator_config_900xx.yaml ${cuBB_SDK}/cuPHY-CP/ru-emulator/config/config.yaml
python3 auto_TestMacConfig.py -t ../../cuPHY-CP/testMAC/testMAC/test_mac_config.yaml.orig -c 90xxx -p CG1 -o ../../cuPHY-CP/testMAC/testMAC/test_mac_config.yaml

# Restart MPS
sudo -E ./cuphycontroller_scf nrSim_SCF
sudo ./ru_emulator nrSim 90xxx --channels 0x7ff
sudo ./test_mac nrSim 90xxx --channels 0x7ff

# Restore nrSim config file
cp ${cuBB_SDK}/cuPHY-CP/cuphycontroller/config/cuphycontroller_nrSim_SCF.yaml.orig ${cuBB_SDK}/cuPHY-CP/cuphycontroller/config/cuphycontroller_nrSim_SCF.yaml
cp ${cuBB_SDK}/cuPHY-CP/ru-emulator/config/config.yaml.orig ${cuBB_SDK}/cuPHY-CP/ru-emulator/config/config.yaml
cp ${cuBB_SDK}/cuPHY-CP/testMAC/testMAC/test_mac_config.yaml.orig ${cuBB_SDK}/cuPHY-CP/testMAC/testMAC/test_mac_config.yaml
FAPI 消息参考检查#
cuBB 软件支持 FAPI 消息参考检查。RX_DATA.ind、CRC.ind、UCI.ind 和 RACH.ind 的值和有效负载与 TV 的相关 INDx PDU 进行比较。如果验证失败,testMAC 会在 testmac.log 中打印“mismatch”WARN 级别的日志。
注意
某些验证失败尚未修复。默认情况下,当前已知的验证失败不会报告“INV > 0”。
以下配置已实现,用于配置 test_mac 报告。FAPI 验证的默认配置如下
# FAPI indication validating
# validate_enable: 0 - disabled; 1 - report error level; 2 - report error and warning levels
validate_enable: 1
# validate_log_opt: 0 - no print; 1 - print per MSG; 2 - print per PDU; 3 - force print all
validate_log_opt: 1
以下是具有默认配置的验证失败日志示例
09:35:02.205513 W [MAC.FAPI] SFN 0.5 Cell 6 CRC.ind mismatch: 0 err 6 warn [crc->num_cb=192 tv.NumCb=4] [meas->ul_cqi=255 tv.UL_CQI=206] [meas->rssi=65535 tv.RSSI=880]
一个 FAPI 消息可以包含多个 PDU,一个 PDU 可以包含多个验证失败。
设置“validate_enable: 1”以仅在 test_mac 控制台中报告一些带有“INV > 0”的验证失败。已知验证失败不会报告“INV > 0”(但仍可以在“mismatch”WARN 日志中看到)。
设置“validate_enable: 2”以在 test_mac 控制台中报告所有带有“INV > 0”的验证失败。
设置 “validate_log_opt: 1” 以打印一行 “mismatch” 日志,其中每个 FAPI 消息最多包含三个不匹配的值,并打印每个 FAPI 消息的总不匹配 PDU 计数(例如 “0 err, 6 warn”)(避免性能下降)。
设置 “validate_log_opt: 2” 以在 “mismatch” WARN 日志中打印所有验证失败,每 PDU 一行。
使用 “validate_log_opt: 2” 的日志示例
07:32:09.407972 W [MAC.FAPI] SFN 0.14 Cell 0 CRC.ind PDU0 mismatch: [crc->num_cb=0 tv.NumCb=5] [meas->ul_cqi=255 tv.UL_CQI=206] [meas->rssi=65535 tv.RSSI=1280]
07:32:09.407976 W [MAC.FAPI] SFN 0.14 Cell 0 CRC.ind PDU1 mismatch: [crc->num_cb=0 tv.NumCb=5] [meas->ul_cqi=255 tv.UL_CQI=206] [meas->rssi=65535 tv.RSSI=1280]
07:32:09.407979 W [MAC.FAPI] SFN 0.14 Cell 0 CRC.ind PDU2 mismatch: [crc->num_cb=0 tv.NumCb=5] [meas->ul_cqi=255 tv.UL_CQI=206] [meas->rssi=65535 tv.RSSI=1280]
当前推荐的测试说明
使用默认配置进行测试,然后在
phy.log中grep“mismatch” 以检查是否存在验证失败。如果需要,配置 “validate_log_opt: 2” 以打印所有验证失败。
运行 testMAC + cuPHYController_SCF + RU Emulator P5G PRACH#
此用例在 RU Emulator 和 testMAC 之间运行 Private 5G SIB1 和 PRACH demo msg1-4。
您需要对默认的 cuPHYController_P5G_GH.yaml 进行额外修改以针对 RU 模拟器进行测试。确保它与此处的配置匹配。您还必须设置当前正在使用的 PCIe NIC 地址
服务器 #1#
sed -i "s/dl_iq_data_fmt.*/dl_iq_data_fmt: {comp_meth: 1, bit_width: 16}/" ${cuBB_SDK}/cuPHY-CP/cuphycontroller/config/cuphycontroller_P5G_GH.yaml
sed -i "s/ul_iq_data_fmt.*/ul_iq_data_fmt: {comp_meth: 1, bit_width: 16}/" ${cuBB_SDK}/cuPHY-CP/cuphycontroller/config/cuphycontroller_P5G_GH.yaml
sed -i "s/pcp.*/pcp: 7/" ${cuBB_SDK}/cuPHY-CP/cuphycontroller/config/cuphycontroller_P5G_GH.yaml
sed -i "0,/dst_mac_addr.*/{s/dst_mac_addr.*/dst_mac_addr: 20:04:9B:9E:27:A3/}" ${cuBB_SDK}/cuPHY-CP/cuphycontroller/config/cuphycontroller_P5G_GH.yaml
sed -i "s/enableTickDynamicSfnSlot.*/enableTickDynamicSfnSlot: 0/" ${cuBB_SDK}/cuPHY-CP/cuphycontroller/config/l2_adapter_config_P5G_GH.yaml
服务器 #2#
将 0000:b5:00.0 替换为要使用的 NIC 的 PCIe 地址。此外,将 MAC 地址替换为 服务器 #1(运行 cuPHYController 和 testMAC 的服务器)中使用的 NIC 的 MAC 地址
sed -i "s/nic_interface.*/nic_interface: 0000:b5:00.0/" ${cuBB_SDK}/cuPHY-CP/ru-emulator/config/config.yaml
将 dl_iq_data_fmt/ul_iq_data_fmt 更改为 BFP 16。确保将其改回 BFP 14 以进行其他测试。
sed -i "s/dl_iq_data_fmt.*/dl_iq_data_fmt: {comp_meth: 1, bit_width: 16}/"  ${cuBB_SDK}/cuPHY-CP/ru-emulator/config/config.yaml
sed -i "s/ul_iq_data_fmt.*/ul_iq_data_fmt: {comp_meth: 1, bit_width: 16}/"  ${cuBB_SDK}/cuPHY-CP/ru-emulator/config/config.yaml
sed -i "s/eAxC_DL: \[8,0,1,2\]/eAxC_DL: \[0,8,1,9\]/1" ${cuBB_SDK}/cuPHY-CP/ru-emulator/config/config.yaml
sed -i "s/eAxC_UL: \[8,0,1,2\]/eAxC_UL: \[0,8,1,9\]/1" ${cuBB_SDK}/cuPHY-CP/ru-emulator/config/config.yaml
sed -i "s/eAxC_prach_list: \[15,7,0,1\]/eAxC_prach_list: \[7,15,6,14\]/1" ${cuBB_SDK}/cuPHY-CP/ru-emulator/config/config.yaml
运行模拟器
sudo ./ru_emulator P5G PRACH --channels 0x1FF
运行 cuPHY 控制器和 testMAC
sudo -E ./cuphycontroller_scf P5G_GH
sudo ./test_mac P5G PRACH --channels 0x1FF
预期 RU 模拟器控制台
00:44:12.169849 Cell 0 DL    0.17 Mbps  100 Slots | UL    0.03 Mbps   50 Slots | PBCH    50 | PDCCH_UL     0 | PDCCH_DL   150 | PRACH   50 Slots | Seconds     25
00:44:13.169848 Cell 0 DL    0.17 Mbps  100 Slots | UL    0.03 Mbps   50 Slots | PBCH    50 | PDCCH_UL     0 | PDCCH_DL   150 | PRACH   50 Slots | Seconds     26
00:44:14.169849 Cell 0 DL    0.17 Mbps  100 Slots | UL    0.03 Mbps   50 Slots | PBCH    50 | PDCCH_UL     0 | PDCCH_DL   150 | PRACH   50 Slots | Seconds     27
预期 testMAC 控制台
00:44:11.565232 Cell 0 | DL    0.26 Mbps  150 Slots | UL    0.03 Mbps   50 Slots | Prmb   50 | HARQ    0 | SR    0 | CSI1    0 | CSI2    0 | ERR    0 | INV 0
00:44:12.565230 Cell 0 | DL    0.26 Mbps  150 Slots | UL    0.03 Mbps   50 Slots | Prmb   50 | HARQ    0 | SR    0 | CSI1    0 | CSI2    0 | ERR    0 | INV 0
00:44:13.565230 Cell 0 | DL    0.26 Mbps  150 Slots | UL    0.03 Mbps   50 Slots | Prmb   50 | HARQ    0 | SR    0 | CSI1    0 | CSI2    0 | ERR    0 | INV 0
预期 cuPHYController 日志将被前导码检测淹没
00:44:11.565224 C [SCF.PHY] Cell 0 | DL    0.26 Mbps  150 Slots | UL    0.03 Mbps   50 Slots CRC   0 (     0) | Tick 2000
00:44:12.565224 C [SCF.PHY] Cell 0 | DL    0.26 Mbps  150 Slots | UL    0.03 Mbps   50 Slots CRC   0 (     0) | Tick 4000
00:44:13.565224 C [SCF.PHY] Cell 0 | DL    0.26 Mbps  150 Slots | UL    0.03 Mbps   50 Slots CRC   0 (     0) | Tick 6000
使用完整堆栈运行端到端测试#
本节提供有关参考 cuPHYController YAML 的指南,该指南在使用带有完整堆栈应用程序的 Aerial CUDA 加速 RAN 时使用。
在 Grace Hopper 上运行完整堆栈 Aerial CUDA 加速 RAN 时,请使用以下文件作为起点,并根据您的实验室配置进行修改。
当使用 Keysight RU-SIM 作为无线电单元时,请使用
cuphycontroller_P5G_GH.yaml作为参考。当使用 Foxconn O-RU 作为无线电单元时,请使用
cuphycontroller_P5G_FXN_GH.yaml作为参考。
注意
您需要根据您的端到端设置修改上述参考文件。
捕获日志#
测试后收集文本日志。
默认情况下,日志存储在
/tmp位置。您可以使用AERIAL_LOG_PATH环境变量来设置日志文件路径。当日志大小超过 50GB 时,将创建一个新文件(例如
phy.log,phy.log.1,phy.log.2…phy.log.7)。test MAC 日志命名为
testmac.log,testmac.log.1等。RU 日志命名为
ru.log,ru.log.1等。
这些文件段以循环方式重用,通过覆盖最旧的文件。
对于 SHM IPC,如果您在测试期间看到 IPC 缓冲区池已满,请运行以下命令以在测试后转储 IPC 状态
# For SHM IPC, dump nvipc message queues after test
sudo ./build/cuPHY-CP/gt_common_libs/nvIPC/tests/dump/ipc_dump

# If not using default nvipc configurations, need input the nvipc "prefix" and yaml config file like below.
# For Multi-L2 case, the "prefix" names are different for each L2 instance, see related nvipc config yaml files.
sudo ./build/cuPHY-CP/gt_common_libs/nvIPC/tests/dump/ipc_dump nvipc ./cuPHY-CP/cuphycontroller/config/l2_adapter_config_F08_CG1.yaml
要捕获 PCAP 日志,请在 cuphycontroller 的命令行中运行 “export NVIPC_DEBUG_EN=1” 或配置 pcap_enable=1。PCAP 日志的最大大小限制可以在 yaml 文件中配置。
# Transport settings for nvIPC
transport:
  type: shm
  app_config:
    pcap_enable: 1
    pcap_cpu_core: -1 # CPU core of background pcap log save thread
    pcap_cache_size_bits: 29 # 2^29 = 512MB, size of /dev/shm/${prefix}_pcap
    pcap_file_size_bits: 31 # 2^31 = 2GB, max size of /dev/shm/${prefix}_pcap
    pcap_max_data_size: 8000 # Max DL/UL FAPI data size to capture reduce pcap size.
在 cuphycontroller 退出后,使用 nvipc “prefix” 运行以下命令以收集 PCAP 日志。“prefix” 来自 l2adapter 配置 yaml。默认情况下为 “nvipc”。在多 L2 情况下,不同的 L2 实例具有不同的 “prefix” 名称。
# Usage: sudo ./pcap_collect <prefix> [destination path]
sudo $cuBB_SDK/build/cuPHY-CP/gt_common_libs/nvIPC/tests/pcap/pcap_collect nvipc

# The nvipc.pcap can be seen at current directory (by default) or the inputed "destination path".
在测试模式 (TM) 下运行#
要运行任何至少有一个小区处于测试模式 (TM) 的测试,您需要确保使用 -DENABLE_CONFORMANCE_TM_PDSCH_PDCCH=ON 运行 cmake。
nrSIM TC 2036 (PDCCH) 和 3296 (PDSCH) 以及 DLMIX TC 120-128(PDSCH 和 PDCCH 都存在)需要此选项。此要求扩展到任何多小区启动模式,其中至少存在一个这些 TM 测试向量。
对于没有 TM 小区的测试用例,cmake 选项值与 cuBB 测试的功能正确性无关。
混合 O-RAN IOT 配置文件 (CAT-A-NoBF + CAT-A-DBF)#
要运行混合的 CAT-A-NoBF 小区和一个 CAT-A-DBF 小区,请使用 nrSIM TC 90019 并运行以下命令
# nrSim config generation
cd ${cuBB_SDK}/cubb_scripts/autoconfig
python3 auto_controllerConfig.py -i ../../testVectors/ -t ../../cuPHY-CP/cuphycontroller/config/cuphycontroller_nrSim_SCF.yaml -o ../../cuPHY-CP/cuphycontroller/config
python3 auto_RuEmulatorConfig.py -i ../../cuPHY-CP/cuphycontroller/config -t ../../cuPHY-CP/ru-emulator/config/config.yaml -o ../../cuPHY-CP/ru-emulator/config

# backup default nrSim config
cp ${cuBB_SDK}/cuPHY-CP/cuphycontroller/config/cuphycontroller_nrSim_SCF.yaml ${cuBB_SDK}/cuPHY-CP/cuphycontroller/config/cuphycontroller_nrSim_SCF.yaml.orig
cp ${cuBB_SDK}/cuPHY-CP/ru-emulator/config/config.yaml ${cuBB_SDK}/cuPHY-CP/ru-emulator/config/config.yaml.orig
cp ${cuBB_SDK}/cuPHY-CP/testMAC/testMAC/test_mac_config.yaml ${cuBB_SDK}/cuPHY-CP/testMAC/testMAC/test_mac_config.yaml.orig

# Use nrSim_SCF_90019 config
cp ${cuBB_SDK}/cuPHY-CP/cuphycontroller/config/cuphycontroller_nrSim_SCF_90019.yaml ${cuBB_SDK}/cuPHY-CP/cuphycontroller/config/cuphycontroller_nrSim_SCF.yaml
cp ${cuBB_SDK}/cuPHY-CP/ru-emulator/config/ru_emulator_config_90019.yaml ${cuBB_SDK}/cuPHY-CP/ru-emulator/config/config.yaml
python3 auto_TestMacConfig.py -t ../../cuPHY-CP/testMAC/testMAC/test_mac_config.yaml.orig -c 90019 -p CG1 -o ../../cuPHY-CP/testMAC/testMAC/test_mac_config.yaml

# Restart MPS
sudo -E ./cuphycontroller_scf nrSim_SCF
sudo ./ru_emulator nrSim 90019 --channels 0x1ff
sudo ./test_mac nrSim 90019 --channels 0x1ff

# Restore nrSim config file
cp ${cuBB_SDK}/cuPHY-CP/cuphycontroller/config/cuphycontroller_nrSim_SCF.yaml.orig ${cuBB_SDK}/cuPHY-CP/cuphycontroller/config/cuphycontroller_nrSim_SCF.yaml
cp ${cuBB_SDK}/cuPHY-CP/ru-emulator/config/config.yaml.orig ${cuBB_SDK}/cuPHY-CP/ru-emulator/config/config.yaml
cp ${cuBB_SDK}/cuPHY-CP/testMAC/testMAC/test_mac_config.yaml.orig ${cuBB_SDK}/cuPHY-CP/testMAC/testMAC/test_mac_config.yaml
预期结果
# Expected Tput and passing criteria
Expected thrput: Cell 0: [DL=1.36/100]
Expected thrput: Cell 1: [DL=2.72/100]
Pass criterion low:  Cell 0: [DL=1.31/97]
Pass criterion high: Cell 0: [DL=1.40/103]
Pass criterion low:  Cell 1: [DL=2.63/97]
Pass criterion high: Cell 1: [DL=2.80/103]

# Example ru-emulator output
16:24:15.218189 Cell 0 DL    1.36 Mbps  100 Slots | UL    0.00 Mbps    0 Slots | DL_C_ON 100.00% DL_U_ON 100.00% UL_C_ON 0.00% |Seconds     45
16:24:15.218201 Cell 1 DL    2.72 Mbps  100 Slots | UL    0.00 Mbps    0 Slots | DL_C_ON 100.00% DL_U_ON 100.00% UL_C_ON 0.00% |Seconds     45
16:24:16.218191 Cell 0 DL    1.36 Mbps  100 Slots | UL    0.00 Mbps    0 Slots | DL_C_ON 100.00% DL_U_ON 100.00% UL_C_ON 0.00% |Seconds     46
16:24:16.218204 Cell 1 DL    2.72 Mbps  100 Slots | UL    0.00 Mbps    0 Slots | DL_C_ON 100.00% DL_U_ON 100.00% UL_C_ON 0.00% |Seconds     46
混合 BFP9/BFP14#
 # nrSim config generation
cd ${cuBB_SDK}/cubb_scripts/autoconfig
python3 auto_controllerConfig.py -i ../../testVectors/ -t ../../cuPHY-CP/cuphycontroller/config/cuphycontroller_nrSim_SCF.yaml -o ../../cuPHY-CP/cuphycontroller/config
python3 auto_RuEmulatorConfig.py -i ../../cuPHY-CP/cuphycontroller/config -t ../../cuPHY-CP/ru-emulator/config/config.yaml -o ../../cuPHY-CP/ru-emulator/config

# backup default nrSim config
cp ${cuBB_SDK}/cuPHY-CP/cuphycontroller/config/cuphycontroller_nrSim_SCF.yaml ${cuBB_SDK}/cuPHY-CP/cuphycontroller/config/cuphycontroller_nrSim_SCF.yaml.orig
cp ${cuBB_SDK}/cuPHY-CP/ru-emulator/config/config.yaml ${cuBB_SDK}/cuPHY-CP/ru-emulator/config/config.yaml.orig
cp ${cuBB_SDK}/cuPHY-CP/testMAC/testMAC/test_mac_config.yaml ${cuBB_SDK}/cuPHY-CP/testMAC/testMAC/test_mac_config.yaml.orig

# Use nrSim_SCF_90020 config
cp ${cuBB_SDK}/cuPHY-CP/cuphycontroller/config/cuphycontroller_nrSim_SCF_90020.yaml ${cuBB_SDK}/cuPHY-CP/cuphycontroller/config/cuphycontroller_nrSim_SCF.yaml
cp ${cuBB_SDK}/cuPHY-CP/ru-emulator/config/ru_emulator_config_90020.yaml ${cuBB_SDK}/cuPHY-CP/ru-emulator/config/config.yaml
python3 auto_TestMacConfig.py -t ../../cuPHY-CP/testMAC/testMAC/test_mac_config.yaml.orig -c 90020 -p CG1 -o ../../cuPHY-CP/testMAC/testMAC/test_mac_config.yaml

# Restart MPS
sudo -E ./cuphycontroller_scf nrSim_SCF
sudo ./ru_emulator nrSim 90020 --channels 0x1ff
sudo ./test_mac nrSim 90020 --channels 0x1ff

# Restore nrSim config file
cp ${cuBB_SDK}/cuPHY-CP/cuphycontroller/config/cuphycontroller_nrSim_SCF.yaml.orig ${cuBB_SDK}/cuPHY-CP/cuphycontroller/config/cuphycontroller_nrSim_SCF.yaml
cp ${cuBB_SDK}/cuPHY-CP/ru-emulator/config/config.yaml.orig ${cuBB_SDK}/cuPHY-CP/ru-emulator/config/config.yaml
cp ${cuBB_SDK}/cuPHY-CP/testMAC/testMAC/test_mac_config.yaml.orig ${cuBB_SDK}/cuPHY-CP/testMAC/testMAC/test_mac_config.yaml
预期结果
# Expected throughput and passing criteria
ExpectedSlots: Cell=0 PUSCH=100 PDSCH=0 PDCCH_UL=0 PDCCH_DL=0 PBCH=0 PUCCH=0 PRACH=0 CSI_RS=0 SRS=0
ExpectedData: Cell=0 DL=0.000000 UL=41.797600 Prmb=0 HARQ=0 SR=0 CSI1=0 CSI2=0 ERR=0 INV=0
ExpectedSlots: Cell=1 PUSCH=100 PDSCH=0 PDCCH_UL=0 PDCCH_DL=0 PBCH=0 PUCCH=0 PRACH=0 CSI_RS=0 SRS=0
ExpectedData: Cell=1 DL=0.000000 UL=41.797600 Prmb=0 HARQ=0 SR=0 CSI1=0 CSI2=0 ERR=0 INV=0

# Example testMAC output
07:09:34.600006 Cell 0 | DL    0.00 Mbps    0 Slots | UL   41.80 Mbps  100 Slots | Prmb    0 | HARQ    0 | SR    0 | CSI1    0 | CSI2    0 | ERR    0 | INV 0
07:09:34.600015 Cell 1 | DL    0.00 Mbps    0 Slots | UL   41.80 Mbps  100 Slots | Prmb    0 | HARQ    0 | SR    0 | CSI1    0 | CSI2    0 | ERR    0 | INV 0
07:09:35.600006 Cell 0 | DL    0.00 Mbps    0 Slots | UL   41.80 Mbps  100 Slots | Prmb    0 | HARQ    0 | SR    0 | CSI1    0 | CSI2    0 | ERR    0 | INV 0
07:09:35.600014 Cell 1 | DL    0.00 Mbps    0 Slots | UL   41.80 Mbps  100 Slots | Prmb    0 | HARQ    0 | SR    0 | CSI1    0 | CSI2    0 | ERR    0 | INV 0
07:09:36.600006 Cell 0 | DL    0.00 Mbps    0 Slots | UL   41.80 Mbps  100 Slots | Prmb    0 | HARQ    0 | SR    0 | CSI1    0 | CSI2    0 | ERR    0 | INV 0
07:09:36.600013 Cell 1 | DL    0.00 Mbps    0 Slots | UL   41.80 Mbps  100 Slots | Prmb    0 | HARQ    0 | SR    0 | CSI1    0 | CSI2    0 | ERR    0 | INV 0
07:09:37.600008 Cell 0 | DL    0.00 Mbps    0 Slots | UL   41.80 Mbps  100 Slots | Prmb    0 | HARQ    0 | SR    0 | CSI1    0 | CSI2    0 | ERR    0 | INV 0
07:09:37.600017 Cell 1 | DL    0.00 Mbps    0 Slots | UL   41.80 Mbps  100 Slots | Prmb    0 | HARQ    0 | SR    0 | CSI1    0 | CSI2    0 | ERR    0 | INV 0
07:09:38.600006 Cell 0 | DL    0.00 Mbps    0 Slots | UL   41.80 Mbps  100 Slots | Prmb    0 | HARQ    0 | SR    0 | CSI1    0 | CSI2    0 | ERR    0 | INV 0
07:09:38.600014 Cell 1 | DL    0.00 Mbps    0 Slots | UL   41.80 Mbps  100 Slots | Prmb    0 | HARQ    0 | SR    0 | CSI1    0 | CSI2    0 | ERR    0 | INV 0
07:09:39.600008 Cell 0 | DL    0.00 Mbps    0 Slots | UL   41.80 Mbps  100 Slots | Prmb    0 | HARQ    0 | SR    0 | CSI1    0 | CSI2    0 | ERR    0 | INV 0
F08 测试用例的混合 IQ 数据格式#
这是一个示例,演示如何为 1 个 16 位定点 + 1 个 BFP9 + N 个 BFP 14 小区(其中 N = 1,2,3)运行混合压缩的 F08 测试用例。在 cuPHYController_F08_*.yaml 文件和 RU 模拟器 config.yaml 文件中,将第一个小区的 dl_iq_data_fmt 和 ul_iq_data_fmt 值设置为 16 位定点,将第二个小区的值设置为 BFP 9。将所有其他小区的 dl_iq_data_fmt 和 ul_iq_data_fmt 值设置为 BFP 14。
# First cell
dl_iq_data_fmt: {comp_meth: 0, bit_width: 16}
ul_iq_data_fmt: {comp_meth: 0, bit_width: 16}

# Second cell
dl_iq_data_fmt: {comp_meth: 1, bit_width: 9}
ul_iq_data_fmt: {comp_meth: 1, bit_width: 9}

# All other cells
dl_iq_data_fmt: {comp_meth: 1, bit_width: 14}
ul_iq_data_fmt: {comp_meth: 1, bit_width: 14}
吞吐量级别必须与仅使用 BFP 14 的非混合情况相同。
16:17:05.609792 C [SCF.PHY] Cell 0 | DL 1586.28 Mbps 1600 Slots | UL  249.10 Mbps  400 Slots CRC   0 (     0) | Tick 16000
16:17:05.609808 C [SCF.PHY] Cell 1 | DL 1586.28 Mbps 1600 Slots | UL  249.10 Mbps  400 Slots CRC   0 (     0) | Tick 16000
16:17:05.609814 C [SCF.PHY] Cell 2 | DL 1586.28 Mbps 1600 Slots | UL  249.10 Mbps  400 Slots CRC   0 (     0) | Tick 16000
16:17:05.609822 C [SCF.PHY] Cell 3 | DL 1586.28 Mbps 1600 Slots | UL  249.10 Mbps  400 Slots CRC   0 (     0) | Tick 16000
UL 测量#
要在 PHY 中启用 UL 测量,请在 cuphycontroller_nrSim_SCF.yaml 中将以下内容设置为 1,所有测量单位均为 dBm。
pusch_sinr: 1 # 0 - Disabled; 1 - PostEq value; 2 - PreEq value
pusch_rssi: 1
pusch_tdi: 1
pusch_cfo: 1
注意
从 22-2.3 版本开始,SINR 报告可以配置为从上面的 cuphycontroller_nrSim_SCF.yaml 文件报告均衡器前或均衡器后的值。
要启用 FAPI 10.04 字段,请在 cmake 选项中添加 -DSCF_FAPI_10_04=ON 并进行干净构建。
要启用 RSSI 和 RSRP 测量,L2 必须在 config.request 中发送 Measurement Config TLV,其中 dBm 的值为 1,如 FAPI 10.02 的表 3-27 和 FAPI 10.04 的表 3-48 中所述。要在 testMac 中启用相同功能
默认情况下启用 RSSI。
对于 RSRP,请在
$cuBB_SDK/testMAC/testMAC/test_mac_config.yaml文件中将以下内容设置为 1rsrpMeasurement: 1
L2 供应商已请求针对 PUSCH、PUSCH 上的 UCI 和 PUCCH(仅支持 PF2,3)的额外干扰级别报告。为此,已定义供应商特定的消息来指示报告这些测量的 Aerial 实例。要启用此报告,L2 必须在 config.request 中发送 2 个额外的 TLV,如 CONFIG.request 中所述。
标签 |
字段 |
类型 |
描述 |
|---|---|---|---|
0xA012 |
PNMeasurement |
uint8_t |
均衡后噪声方差测量值:0:不报告 1:dBm |
0xA014 |
PF_234_Interference |
uint8_t |
每个 UE 的干扰功率。值:0:不报告 1:dBm |
启用后,对于每个 CRC.indication,Aerial 发送一个额外的 RX_PE_Noise_Variance.indication。对于每个携带 PF2,3 的 UCI.indication,Aerial 发送一个 PF_234_Interference.indication。
要在 testMac 中启用干扰报告,请在 $cuBB_SDK/testMAC/testMAC/test_mac_config.yaml 文件中将以下内容设置为 1
pf_234_interference: 1
pnMeasurement: 1
在 cuPHY/nvlog/config/nvlog_config.yaml 文件中为标签 SCF.PHY 启用 DEBUG 级别日志
- 333: "SCF.PHY"
  shm_level: 6      # Example: overlay shm_log_level for a tag
以下示例显示了 phy.log 日志中的结果
05:22:56.350648 D [SCF.PHY] >>> SCF_FAPI_UCI_INDICATION: PUCCH interference Raw=1520 dbm 733 numMeasurements 1
05:22:56.350664 I [MAC.SCF] SFN 375.0 <<< SCF_FAPI_RX_PF_234_INTEFERNCE_INDICATION: num=0 meas=733
对于 PUSCH 上 UCI 的 DTX 检测,请查找 “detection status”。示例如下。
03:30:11.983670 D [SCF.PHY] >>> SCF_FAPI_UCI_INDICATION: HARQ detection status 4
03:30:11.983671 D [SCF.PHY] >>> SCF_FAPI_UCI_INDICATION: UCI on PUSCH HARQ bitlen 2
03:30:11.983671 D [SCF.PHY] >>> SCF_FAPI_UCI_INDICATION: PUCCH F234 CSI Part1 detection status 4 CSI P1 bit len 10
PUSCH 测量报告的 BFP-9/14/16 验证#
更改 matlab 文件 5GModel/nr_matlab/config 中 BFP 的值。生成 cuPHY 和 FAPI TV 并运行测试。
% BFP setting for cuPHY UL TV generation and UL performance simulation
SimCtrl.BFPforCuphy = 16; % 16, 14 or 9 for FP16, BFP14 or BFP9
将日志级别设置为 6,并获取 FAPI TV 中 IND1 的 h5dump。
h5dump -d IND1 TVnr_7427_gNB_FAPI_s0.h5_BFP9

HDF5 "TVnr_7427_gNB_FAPI_s0.h5_BFP9" {
DATASET "IND1" {
DATATYPE H5T_COMPOUND

{ H5T_STD_U32LE "idxPdu"; H5T_STD_U32LE "type"; H5T_STD_U32LE "TbCrcStatus"; H5T_STD_U32LE "NumCb"; H5T_STD_U32LE "UL_CQI"; H5T_STD_U32LE "TimingAdvance"; H5T_STD_U32LE "RSSI"; H5T_STD_U32LE "RSRP"; H5T_STD_I16LE "sinrdB"; H5T_STD_I16LE "postEqSinrdB"; H5T_STD_I16LE "noiseVardB"; H5T_STD_I16LE "postEqNoiseVardB"; }
Compare RSSI, RSRP, sinrdB and noiseVar values against the FAPI values in logs -

>>> SCF_FAPI_CRC_INDICATION 10.04 ul-sinr=20000 ta=63 ta-ns=16803 rssi=853 rsrp=912

[SCF.PHY] >>> RX_PE_NOISE_VARIANCE_INDICATION: PHY sfn=0x153 slot=0x0 num_meas=1 meas[0]=633
为了将 UL 测量的原始值与 TV 进行比较,请从 cuPHY TV 获取以下值的 h5dump。然后将 reference_sinrdB、reference_rssi、reference_rsrpdB 和 reference_noiseVardB 值与日志中的原始值进行比较。
23:18:48.950917 D [SCF.PHY] Raw RSSI=6.020887 db ul_configured_gain=48.680000
23:18:48.950919 D [SCF.PHY] Raw SINR=40.000000
23:18:48.950920 D [SCF.PHY] Raw RSRP =-0.045194 db ul_configured_gain =48.680000

23:18:48.950938 D [SCF.PHY] Raw PE Noise variance=-40.000000 ul_configured_gain=48.680000
PUCCH 测量报告的 BFP-9/14/16 验证#
更改 5GModel/nr_matlab/config matlab 文件中 BFP 的值。生成 cuPHY 和 FAPI TV 并运行测试。
% BFP setting for cuPHY UL TV generation and UL performance simulation
SimCtrl.BFPforCuphy = 16; % 16, 14 or 9 for FP16, BFP14 or BFP9
将日志级别设置为 6。
将日志中的值与 cuPHY TV 中的这些字段进行匹配。
格式 0 - F0UcisOutRef。将 RSSI 和 RSRP 值与日志中的对应值进行比较。
SCF_FAPI_UCI_INDICATION 10.04: PUCCH : Raw SINR=0.000000 RSSI=16.824944 RSRP=10.804343
格式 1 - F1UcisOutRef。将 “SinrDB”、“RSSI” 和 “RSRP” 值与日志中的对应值进行比较。
SCF_FAPI_UCI_INDICATION 10.04: PUCCH : Raw SINR=25.059706 RSSI=-3.927727 RSRP=-9.948327
格式 2/3 - pucchF234_refSnrBuffer、pucchF234_refRsrpBuffer、pucchF234_refRssiBuffer 和 pucchF234_refInterfBuffer。将它们与日志中的相关值进行比较。
[SCF.PHY] Raw SINR=28.154160 RSRP=-0.132790 ul_configured_gain=48.680000

[SCF.PHY] Raw RSSI=5.887811 ul_configured_gain=48.680000

>>> SCF_FAPI_UCI_INDICATION: PUCCH interference Raw=-28.286949 dbm 750 numMeasurements 1
PRACH 干扰级别报告的 BFP-9/14/16 验证#
在 test_mac_config.yaml 中启用配置。
prach_interference: 1
运行 nrSim 5013 测试。
nrSim 5013 --channels PRACH
从 phy.log 获取 “nOcc=x Raw PRACH interference”(x=0~3),并从 TV 获取 “PDUx_noise”(x=1~4)
# phy.log
grep -o "PHY nOcc=[0-9] Raw PRACH interference=.*" phy.log
PHY nOcc=0 Raw PRACH interference=-16.046867 ul_configured_gain=48.680000 FAPI value=872
PHY nOcc=1 Raw PRACH interference=-16.921370 ul_configured_gain=48.680000 FAPI value=863
PHY nOcc=2 Raw PRACH interference=-17.524746 ul_configured_gain=48.680000 FAPI value=857
PHY nOcc=3 Raw PRACH interference=-18.472067 ul_configured_gain=48.680000 FAPI value=848

# TV
h5ls -ld TVnr_5013_gNB_FAPI_s1.h5/PDU1_noise TVnr_5013_gNB_FAPI_s1.h5/PDU2_noise TVnr_5013_gNB_FAPI_s1.h5/PDU3_noise TVnr_5013_gNB_FAPI_s1.h5/PDU4_noise
PDU1_noise               Dataset {1, 1}
    Data:
        (0,0) -16.0463
PDU2_noise               Dataset {1, 1}
    Data:
        (0,0) -16.0842
PDU3_noise               Dataset {1, 1}
    Data:
        (0,0) -16.0449
PDU4_noise               Dataset {1, 1}
    Data:
        (0,0) -16.294
预期结果
abs(Raw PRACH interference - PDUx_noise) < 3
# Example, in above log the 4th occasion: abs(-18.472067 + 16.294) = 2.178067 < 3
小区生命周期测试#
要在多个小区运行时重启所有小区
在 test_mac_config.yaml 文件中,设置以下内容
# testMAC/test_mac_config.yaml

# Total slot number in test
test_slots: 8000  # When 1 slot = 0.5 ms, 8000 slots = 4 seconds.
# Restart interval after test_slots finished. Unit is second
restart_interval: 5
这指示 testMAC 调度 8000 个时隙,然后向所有小区发送小区停止请求。等待 5 秒后,TestMAC 向所有小区发送配置请求和小区启动请求。
使用以下命令使用 F08 4C 模式 A 用例进行验证。预期结果是满吞吐量运行约 4 秒,test_mac 吞吐量停止,ru-emulator 吞吐量减少到 0 约 5 秒,然后该过程重复。
sudo ./cuPHY-CP/ru-emulator/ru_emulator/ru_emulator F08 4C 60
sudo -E ./cuPHY-CP/cuphycontroller/examples/cuphycontroller_scf F08
sudo ./cuPHY-CP/testMAC/testMAC/test_mac F08 4C 60
使用 gRPC 消息终止 cuphycontroller#
像往常一样运行 F08 E2E 测试用例
sudo -E ${cuBB_SDK}/build/cuPHY-CP/cuphycontroller/examples/cuphycontroller_scf F08
sudo ${cuBB_SDK}/build/cuPHY-CP/ru-emulator/ru_emulator/ru_emulator F08 1C 60
sudo ${cuBB_SDK}/build/cuPHY-CP/testMAC/testMAC/test_mac F08 1C 60
在 E2E 测试运行时终止 cuphycontroller
cd ${cuBB_SDK}/build/cuPHY-CP/cuphyoam
python3 ../../../cuPHY-CP/cuphyoam/examples/aerial_terminate_cuphycontroller.py
验证 cuphycontroller 停止运行,并且 aerial_terminate_cuphycontroller.py 打印以下输出
12:23:32 Terminating cuphycontroller...
12:23:36 cuphycontroller terminated successfully!
使用 gRPC 消息更新 M-plane 参数#
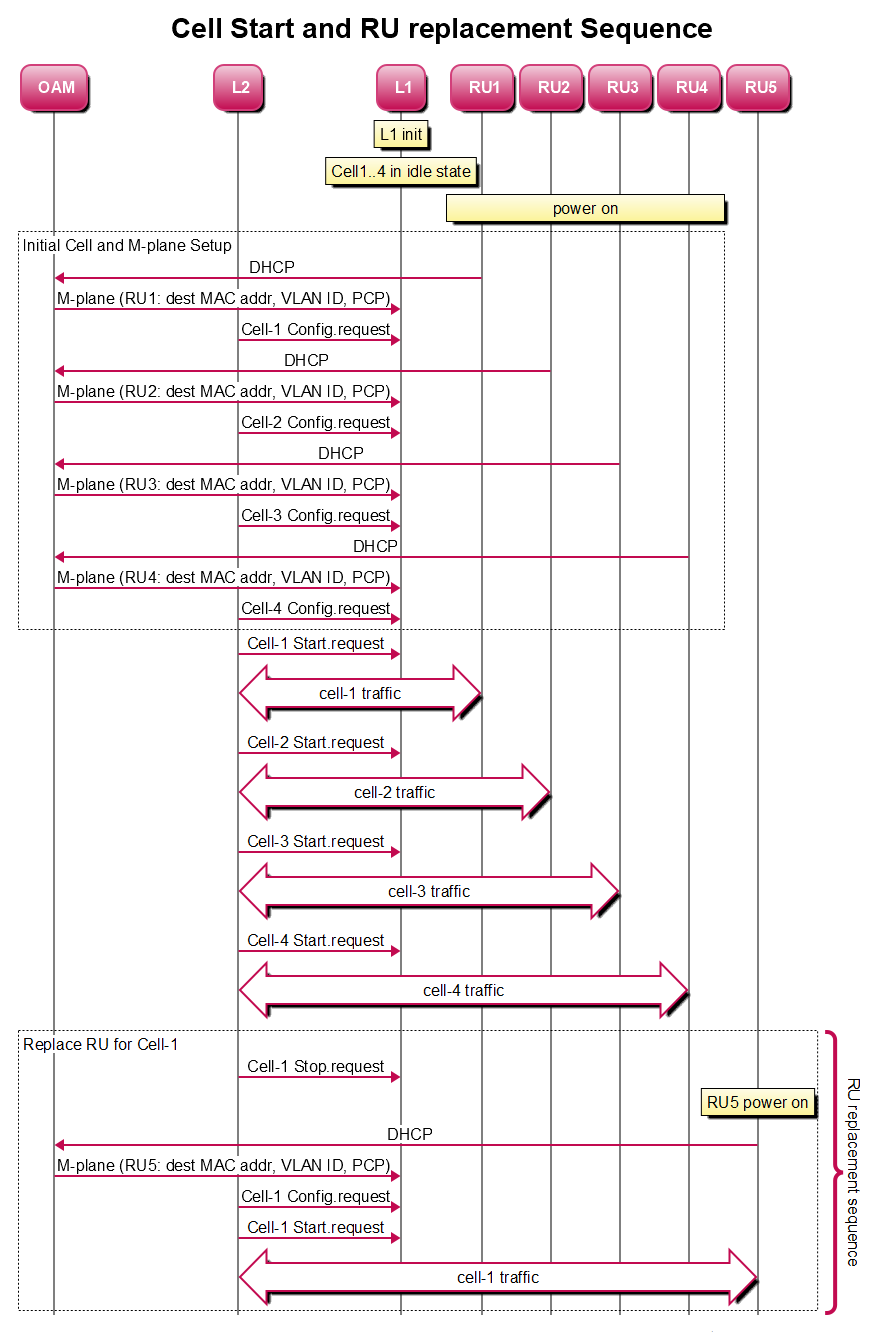
通过 gPRC 消息动态更改 M-plane 参数通常用于小区生命周期,在初始小区设置 RU 期间以及在小区运行时更换 RU 时。请参阅 动态 OAM 通过 gRPC 和 CONFIG.request(M-plane)支持的参数列表。
以下时序图显示了两种场景的示例
初始小区和 M-plane 设置:启动 cuphycontroller 后,L1 初始化,所有小区都处于空闲状态以进行配置。最大小区数由 cuphycontroller YAML 配置中的
cell_group_num参数定义。在示例时序图中,OAM 发送 gRPC 消息以更新 M-plane 参数,以便 L1 获取详细信息以连接到每个小区的正确 RU。然后 L2 发送CONFIG.request以配置小区。注意
在当前实现中,必须在任何小区
Start.request之前配置所有小区。在其他小区运行时更换 RU:示例时序图显示了将 cell-1 流量从 RU1 移动到 RU5 的顺序。首先,L2 必须停止在 cell-1 上调度流量,并向 cell-1 发送小区停止请求 Stop.request。之后,OAM 通过 gRPC 消息发送新的 M-plane 参数,以便 L1 连接到 RU5。然后 L2 发送 Config.request 和 Start.request 以使 cell-1 再次进入运行状态。
注意
在当前实现中,第一个小区
Start.request之后的 小区Config.request无效。
X2 启动模式文件生成#
在后续章节中,相关测试需要 X2 启动模式文件。 $cuBB_SDK/cuPHY-CP/cuphyoam/examples/launch_pattern_x2_update.py 脚本用于生成它们。
以下是用法
usage: launch_pattern_x2_update.py [-h] -f LAUNCH_PATTERN_FILE -o OUTPUT_DIR
launch_pattern_x2_update.py: error: the following arguments are required: -f/--launch_pattern_file, -o/--output_dir
例如,要为 TC “F08 2C 59” 生成 X2 启动模式文件,请在容器中运行以下命令。这将生成相应的 ‘$cuBB_SDK/testVectors/multi-cell/launch_pattern_F08_2C_59_X2.yaml’ 文件。
python3 $cuBB_SDK/cuPHY-CP/cuphyoam/examples/launch_pattern_x2_update.py -f $cuBB_SDK/testVectors/multi-cell/launch_pattern_F08_2C_59.yaml -o $cuBB_SDK/testVectors/multi-cell/'
初始 OAM 更新#
这是一个 4 小区测试的示例。使用错误的初始配置运行 cuphycontroller,然后使用 gRPC 消息将其更新为正确的值。
DST MAC 地址 OAM 初始更新测试 - 单小区#
Update configs:

# Update 'cell_group_num' to 1 in cuphycontroller yaml config
sed -i "s/cell_group_num.*/cell_group_num: 1/" ${cuBB_SDK}/cuPHY-CP/cuphycontroller/config/cuphycontroller_F08_*.yaml

# Use below settings for "Cell1" in ${cuBB_SDK}/cuPHY-CP/ru-emulator/config/config.yaml, note that only the eth mac address is changed cell_configs:
-
    name: "Cell1"
    eth: "20:04:9B:9E:27:B3"
    eAxC_UL: [8,0,1,2]
    eAxC_DL: [8,0,1,2]
    eAxC_prach_list: [15,7,0,1]
    dl_iq_data_fmt: {comp_meth: 1, bit_width: 14}
    ul_iq_data_fmt: {comp_meth: 1, bit_width: 14}
    peer: 0
    nic: 0
    vlan: 2
    pcp: 7
如果您不执行 OAM 更新以更改小区 1 目标 MAC 地址,则以下测试将失败。预期的测试结果是 ru-emulator 侧没有吞吐量。
sudo -E ./cuphycontroller_scf F08_CG1
sudo ./ru_emulator F08 1C 59
sudo ./test_mac F08 1C 59
如果您执行 OAM 更新以更改小区 1 目标 MAC 地址,则以下测试将通过。预期的测试结果是 ru-emulator 侧有吞吐量。
sudo -E ./cuphycontroller_scf F08_CG1
# Below OAM update command should be executed on the same server as cuphycontroller
cd $cuBB_SDK/build/cuPHY-CP/cuphyoam && python3 $cuBB_SDK/cuPHY-CP/cuphyoam/examples/aerial_cell_param_net_update.py 1 20:04:9B:9E:27:B3 E002
sudo ./ru_emulator F08 1C 59
sudo ./test_mac F08 1C 59
VLAN ID OAM 初始更新测试 - 单小区#
Update configs:

# Update 'cell_group_num' to 1 in cuphycontroller yaml config
sed -i "s/cell_group_num.*/cell_group_num: 1/" ${cuBB_SDK}/cuPHY-CP/cuphycontroller/config/cuphycontroller_F08_*.yaml
# Use below settings for "Cell1" in ${cuBB_SDK}/cuPHY-CP/ru-emulator/config/config.yaml, note that only the VLAN ID is changedcell_configs:
-
    name: "Cell1"
    eth: "20:04:9B:9E:27:A3"
    eAxC_UL: [8,0,1,2]
    eAxC_DL: [8,0,1,2]
    eAxC_prach_list: [15,7,0,1]
    dl_iq_data_fmt: {comp_meth: 1, bit_width: 14}
    ul_iq_data_fmt: {comp_meth: 1, bit_width: 14}
    peer: 0
    nic: 0
    vlan: 3
    pcp: 7
如果您不执行 OAM 更新以更改小区 1 VLAN ID,则以下测试将失败。预期的测试结果是 ru-emulator 侧没有吞吐量。
sudo -E ./cuphycontroller_scf F08_CG1
sudo ./ru_emulator F08 1C 59
sudo ./test_mac F08 1C 59
如果您执行 OAM 更新以更改小区 1 VLAN ID,则以下测试将通过。预期的测试结果是 ru-emulator 侧有吞吐量。
sudo -E ./cuphycontroller_scf F08_CG1
# Below OAM update command should be executed on the same server as cuphycontroller
cd $cuBB_SDK/build/cuPHY-CP/cuphyoam && python3 $cuBB_SDK/cuPHY-CP/cuphyoam/examples/aerial_cell_param_net_update.py 1 20:04:9B:9E:27:A3 E003
sudo ./ru_emulator F08 1C 59
sudo ./test_mac F08 1C 59
VLAN PCP OAM 初始更新测试 - 单小区#
更新配置
# Update 'cell_group_num' to 1 in cuphycontroller yaml config
sed -i "s/cell_group_num.*/cell_group_num: 1/" ${cuBB_SDK}/cuPHY-CP/cuphycontroller/config/cuphycontroller_F08_*.yaml
# Use below settings for "Cell1" in ${cuBB_SDK}/cuPHY-CP/ru-emulator/config/config.yaml, note that only the PCP is changed cell_configs:
-
    name: "Cell1"
    eth: "20:04:9B:9E:27:A3"
    eAxC_UL: [8,0,1,2]
    eAxC_DL: [8,0,1,2]
    eAxC_prach_list: [15,7,0,1]
    dl_iq_data_fmt: {comp_meth: 1, bit_width: 14}
    ul_iq_data_fmt: {comp_meth: 1, bit_width: 14}
    peer: 0
    nic: 0
    vlan: 2
    pcp: 4
如果您不执行 OAM 更新以更改小区 1 PCP,则以下测试将失败。预期的测试结果是 ru-emulator 侧没有吞吐量。
sudo -E ./cuphycontroller_scf F08_CG1
sudo ./ru_emulator F08 1C 59
sudo ./test_mac F08 1C 59
如果您执行 OAM 更新以更改小区 1 PCP,则以下测试将通过。预期的测试结果是 ru-emulator 侧有吞吐量。
sudo -E ./cuphycontroller_scf F08_CG1
# Below OAM update command should be executed on the same server as cuphycontroller
cd $cuBB_SDK/build/cuPHY-CP/cuphyoam && python3 $cuBB_SDK/cuPHY-CP/cuphyoam/examples/aerial_cell_param_net_update.py 1 20:04:9B:9E:27:A3 8002
sudo ./ru_emulator F08 1C 59
sudo ./test_mac F08 1C 59
DST MAC + VLAN ID + PCP OAM 初始更新测试 - 多小区#
# Update 'cell_group_num' to 4 in cuphycontroller yaml config
sed -i "s/cell_group_num.*/cell_group_num: 4/" ${cuBB_SDK}/cuPHY-CP/cuphycontroller/config/cuphycontroller_F08_*.yaml

# Change eth, vlan, pcp of Cell 1~4 to any wrong values (here only show the values which require change) in ${cuBB_SDK}/cuPHY-CP/cuphycontroller/config/cuphycontroller_F08_*.yaml
-
    cell_id: 1
    dst_mac_addr: 20:20:20:20:20:A1
    vlan: 3
    pcp: 2
-
    cell_id: 2
    dst_mac_addr: 20:20:20:20:20:A2
    vlan: 4
    pcp: 3
-
    cell_id: 3
    dst_mac_addr: 20:20:20:20:20:A3
    vlan: 5
    pcp: 4
-
    cell_id: 4
    dst_mac_addr: 20:20:20:20:20:A4
    vlan: 6
    pcp: 5
如果您不执行 OAM 更新,则 E2E 测试将失败。预期的测试结果是 ru-emulator 侧没有吞吐量。
sudo -E ./cuphycontroller_scf F08_CG1
sudo ./ru_emulator F08 4C 59
sudo ./test_mac F08 4C 59
如果您为 4 个小区的 MAC + VLAN + PCP 执行 OAM 更新为正确的值,则 E2E 测试将通过。预期的测试结果是所有小区的正常吞吐量。
sudo -E ./cuphycontroller_scf F08_CG1
# OAM update MAC + VLAN + PCP of the 4 cells after cuphycontroller_scf started
cd $cuBB_SDK/build/cuPHY-CP/cuphyoam && python3 $cuBB_SDK/cuPHY-CP/cuphyoam/examples/aerial_cell_param_net_update.py 1 20:04:9B:9E:27:A3 E002
cd $cuBB_SDK/build/cuPHY-CP/cuphyoam && python3 $cuBB_SDK/cuPHY-CP/cuphyoam/examples/aerial_cell_param_net_update.py 2 26:04:9D:9E:29:B3 E002
cd $cuBB_SDK/build/cuPHY-CP/cuphyoam && python3 $cuBB_SDK/cuPHY-CP/cuphyoam/examples/aerial_cell_param_net_update.py 3 20:34:9A:9E:29:B3 E002
cd $cuBB_SDK/build/cuPHY-CP/cuphyoam && python3 $cuBB_SDK/cuPHY-CP/cuphyoam/examples/aerial_cell_param_net_update.py 4 22:34:9C:9E:29:A3 E002

sudo ./ru_emulator F08 4C 59
sudo ./test_mac F08 4C 59
动态 OAM 更新#
DST MAC 地址 OAM 运行时更新测试 - 单小区#
使用 testMac 配置文件($cuBB_SDK/cuPHY-CP/testMAC/testMAC/test_mac_config.yaml)中的以下值更新 ‘restart_interval’ 和 ‘test_cell_update’ 部分。
testMAC 配置:将 cell_id 0 添加到 “test_cells” 列表中以启用测试。请注意, ‘vlan’ 和 ‘pcp’ 相同,但 ‘dst_mac’ 在这里不同。如果需要测试更多用例,请更改 ‘test_sequence’。
restart_interval: 3

# For cell net parameters update test
# Configs of slot_point=0 only runs at init, other configs will run repeatably.
test_cell_update:
test_cells: [0]
test_sequence:
- slot_point: 20000
    configs:
    - {cell_id: 0, dst_mac: 20:04:9B:9E:27:A3, vlan: 2, pcp: 7}
- slot_point: 40000
    configs:
    - {cell_id: 0, dst_mac: 26:04:9D:9E:29:B3, vlan: 2, pcp: 7}
testMAC 在 testMAC 初始化期间和小区重启之前自动调用以下脚本来更改网络参数(注意:m-plane cell_id = testMAC cell_id + 1)。
cd $cuBB_SDK/build/cuPHY-CP/cuphyoam && python3 $cuBB_SDK/cuPHY-CP/cuphyoam/examples/aerial_cell_param_net_update.py <m-plane cell_id> <dst_mac> <pcp_vlan>
在 ru-emulator 配置文件($cuBB_SDK/cuPHY-CP/ru-emulator/config/config.yaml)中,将 “Cell2” 参数更改为与 “Cell1” 相同,除了 “eth”(唯一的区别是 eth MAC 地址)。
-
    name: "Cell1"
    eth: "20:04:9B:9E:27:A3"
    eAxC_UL: [8,0,1,2]
    eAxC_DL: [8,0,1,2]
    eAxC_prach_list: [15,7,0,1]
    dl_iq_data_fmt: {comp_meth: 1, bit_width: 14}
    ul_iq_data_fmt: {comp_meth: 1, bit_width: 14}
    peer: 0
    nic: 0
    vlan: 2
    pcp: 7
-
    name: "Cell2"
    eth: "26:04:9D:9E:29:B3"
    eAxC_UL: [8,0,1,2]
    eAxC_DL: [8,0,1,2]
    eAxC_prach_list: [15,7,0,1]
    dl_iq_data_fmt: {comp_meth: 1, bit_width: 14}
    ul_iq_data_fmt: {comp_meth: 1, bit_width: 14}
    peer: 0
    nic: 0
    vlan: 2
    pcp: 7
运行正常的 F08 模式 0 1C E2E 测试命令,除了将 ru-emulator 参数 “1C” 更改为 “1C_X2”。以下仅显示测试用例参数;有关完整说明,请参阅 F08 用例
sudo ./ru_emulator F08 1C_59_X2
sudo -E ./cuphycontroller_scf F08_CG1
sudo ./test_mac F08 1C 59
测试结果
ru-emulator 吞吐量首先在小区 1 上开始。
ru-emulator 吞吐量在小区 0 和小区 1 之间切换,并重复。
切换时间点由上述 testMAC 配置中的 “slot_point” 决定。当前 20000 个时隙 = 10 秒。
VLAN ID OAM 运行时更新测试 - 单小区#
使用 testMac 配置文件 $cuBB_SDK/cuPHY-CP/testMAC/testMAC/test_mac_config.yaml 中的以下内容更新 ‘restart_interval’ 和 ‘test_cell_update’ 部分。
testMAC 配置:将 cell_id 0 添加到 “test_cells” 列表中以启用测试。请注意, ‘dst_mac’ 和 ‘pcp’ 相同, ‘vlan’ 在这里不同。如果需要测试更多用例,请更改 test_sequence。
restart_interval: 3

# For cell net parameters update test
test_cell_update:
test_cells: [0]
test_sequence:
- slot_point: 20000
    configs:
    - {cell_id: 0, dst_mac: 20:04:9B:9E:27:A3, vlan: 3, pcp: 7}
- slot_point: 40000
    configs:
    - {cell_id: 0, dst_mac: 20:04:9B:9E:27:A3, vlan: 2, pcp: 7}
testMAC 自动调用以下脚本来更改网络参数,并停止然后重启小区。(注意:m-plane cell_id = testMAC cell_id + 1)
cd $cuBB_SDK/build/cuPHY-CP/cuphyoam && python3 $cuBB_SDK/cuPHY-CP/cuphyoam/examples/aerial_cell_param_net_update.py <m-plane cell_id> <dst_mac> <pcp_vlan>
在 ru-emulator 配置文件 $cuBB_SDK/cuPHY-CP/ru-emulator/config/config.yaml 中,使用以下内容更新 “Cell1” 和 “Cell2” 的 ‘cell_configs’ 部分。注意:唯一的区别是 vlan id。
-
    name: "Cell1"
    eth: "20:04:9B:9E:27:A3"
    eAxC_UL: [8,0,1,2]
    eAxC_DL: [8,0,1,2]
    eAxC_prach_list: [15,7,0,1]
    dl_iq_data_fmt: {comp_meth: 1, bit_width: 14}
    ul_iq_data_fmt: {comp_meth: 1, bit_width: 14}
    peer: 0
    nic: 0
    vlan: 2
    pcp: 7
-
    name: "Cell2"
    eth: "20:04:9B:9E:27:A3"
    eAxC_UL: [8,0,1,2]
    eAxC_DL: [8,0,1,2]
    eAxC_prach_list: [15,7,0,1]
    dl_iq_data_fmt: {comp_meth: 1, bit_width: 14}
    ul_iq_data_fmt: {comp_meth: 1, bit_width: 14}
    peer: 0
    nic: 0
    vlan: 3
    pcp: 7
运行正常的 F08 模式 0 1C E2E 测试命令,除了将 ru-emulator 参数 “1C” 更改为 “1C_X2”。此示例仅显示测试用例参数,有关完整说明,请参阅 F08 用例
sudo ./ru_emulator F08 1C_59_X2
sudo -E ./cuphycontroller_scf F08_CG1
sudo ./test_mac F08 1C 59
预期测试结果:ru-emulator 的吞吐量在小区 0 和小区 1 之间更改,并重复。更改时间点由上述 testMAC 配置中的 “slot_point” 决定。当前 20000 个时隙 = 10 秒。
VLAN PCP OAM 运行时更新测试 - 单小区#
使用 testMac 配置文件 $cuBB_SDK/cuPHY-CP/testMAC/testMAC/test_mac_config.yaml 中的以下内容更新 ‘restart_interval’ 和 ‘test_cell_update’ 部分。
testMAC 配置:将 cell_id 0 添加到 “test_cells” 列表中以启用测试。请注意, ‘dst_mac’ 和 ‘vlan’ 相同, ‘pcp’ 在这里不同。如果需要测试更多用例,请更改 test_sequence。
restart_interval: 3

# For cell net parameters update test
test_cell_update:
test_cells: [0]
test_sequence:
- slot_point: 20000
    configs:
    - {cell_id: 0, dst_mac: 20:04:9B:9E:27:A3, vlan: 2, pcp: 4}
- slot_point: 40000
    configs:
    - {cell_id: 0, dst_mac: 20:04:9B:9E:27:A3, vlan: 2, pcp: 7}
testMAC 自动调用以下脚本来更改网络参数,并停止然后重启小区。(注意:m-plane cell_id = testMAC cell_id + 1)
cd $cuBB_SDK/build/cuPHY-CP/cuphyoam && python3 $cuBB_SDK/cuPHY-CP/cuphyoam/examples/aerial_cell_param_net_update.py <m-plane cell_id> <dst_mac> <pcp_vlan>
在 ru-emulator 配置文件 $cuBB_SDK/cuPHY-CP/ru-emulator/config/config.yaml 中,使用以下内容更新 “Cell1” 和 “Cell2” 的 ‘cell_configs’ 部分。注意:唯一的区别是 PCP 值。
-
    name: "Cell1"
    eth: "20:04:9B:9E:27:A3"
    eAxC_UL: [8,0,1,2]
    eAxC_DL: [8,0,1,2]
    eAxC_prach_list: [15,7,0,1]
    dl_iq_data_fmt: {comp_meth: 1, bit_width: 14}
    ul_iq_data_fmt: {comp_meth: 1, bit_width: 14}
    peer: 0
    nic: 0
    vlan: 2
    pcp: 7
-
    name: "Cell2"
    eth: "20:04:9B:9E:27:A3"
    eAxC_UL: [8,0,1,2]
    eAxC_DL: [8,0,1,2]
    eAxC_prach_list: [15,7,0,1]
    dl_iq_data_fmt: {comp_meth: 1, bit_width: 14}
    ul_iq_data_fmt: {comp_meth: 1, bit_width: 14}
    peer: 0
    nic: 0
    vlan: 2
    pcp: 4
运行正常的 F08 模式 0 1C E2E 测试命令,除了将 ru-emulator 参数 “1C” 更改为 “1C_X2”。以下示例仅显示测试用例参数,有关完整说明,请参阅 F08 用例
sudo ./ru_emulator F08 1C_59_X2
sudo -E ./cuphycontroller_scf F08_CG1
sudo ./test_mac F08 1C 59
预期测试结果:ru-emulator 的吞吐量在小区 0 和小区 1 之间更改,并重复。更改时间点由上述 testMAC 配置中的 “slot_point” 决定。当前 20000 个时隙 = 10 秒。
DST MAC OAM 运行时更新测试(带有 OAM Cell Ctrl 命令) - 多小区#
以下时序图显示了在多小区运行时动态更新 Dst_MAC/VLAN/PCP 的功能。

配置更新
# Save original configuration before the test
cp $cuBB_SDK/cuPHY-CP/testMAC/testMAC/test_mac_config.yaml $cuBB_SDK/cuPHY-CP/testMAC/testMAC/test_mac_config.yaml.orig
cp ${cuBB_SDK}/cuPHY-CP/ru-emulator/config/config.yaml ${cuBB_SDK}/cuPHY-CP/ru-emulator/config/config.yaml.orig
cp ${cuBB_SDK}/cuPHY-CP/cuphycontroller/config/cuphycontroller_F08_CG1.yaml ${cuBB_SDK}/cuPHY-CP/cuphycontroller/config/cuphycontroller_F08_CG1.yaml.orig

# Update config
sed -i "s/oam_cell_ctrl_cmd:.*/oam_cell_ctrl_cmd: 1/" $cuBB_SDK/cuPHY-CP/testMAC/testMAC/test_mac_config.yaml

sed -i "s/eAxC_UL:.*/eAxC_UL: \\[0,1,2,3\\]/" ${cuBB_SDK}/cuPHY-CP/ru-emulator/config/config.yaml
sed -i "s/eAxC_DL:.*/eAxC_DL: \\[0,1,2,3\\]/" ${cuBB_SDK}/cuPHY-CP/ru-emulator/config/config.yaml
sed -i "s/eAxC_prach_list:.*/eAxC_prach_list: \\[5,6,7,10\\]/" ${cuBB_SDK}/cuPHY-CP/ru-emulator/config/config.yaml

sed -i "s/cell_group_num:.*/cell_group_num: 4/" ${cuBB_SDK}/cuPHY-CP/cuphycontroller/config/cuphycontroller_F08_CG1.yaml
sed -i "s/\\[.*//g" ${cuBB_SDK}/cuPHY-CP/cuphycontroller/config/cuphycontroller_F08_CG1.yaml
sed -i "s/eAxC_id_.*/&\\[0, 1, 2, 3\\]/" ${cuBB_SDK}/cuPHY-CP/cuphycontroller/config/cuphycontroller_F08_CG1.yaml
sed -i "s/eAxC_id_prach.*/eAxC_id_prach: \\[5, 6, 7, 10\\]/" ${cuBB_SDK}/cuPHY-CP/cuphycontroller/config/cuphycontroller_F08_CG1.yaml

# Restore the configuration after the test
cp  $cuBB_SDK/cuPHY-CP/testMAC/testMAC/test_mac_config.yaml.orig $cuBB_SDK/cuPHY-CP/testMAC/testMAC/test_mac_config.yaml
cp ${cuBB_SDK}/cuPHY-CP/ru-emulator/config/config.yaml.orig ${cuBB_SDK}/cuPHY-CP/ru-emulator/config/config.yaml
cp ${cuBB_SDK}/cuPHY-CP/cuphycontroller/config/cuphycontroller_F08_CG1.yaml.orig ${cuBB_SDK}/cuPHY-CP/cuphycontroller/config/cuphycontroller_F08_CG1.yaml
RU-Emulator 将使用启动模式文件 “xC_59_X2” 进行测试
launch_pattern_F08_4C_59_X2.yaml
launch_pattern_F08_8C_59_X2.yaml
注意
运行 launch_pattern_F08_8C_59_X2.yaml 存在已知问题。
运行正常的 F08 4C 59 E2E 测试命令,除了将 ru-emulator 参数 “4C” 更改为 “4C_59_X2”。以下示例仅显示测试用例参数,有关完整说明,请参阅 F08 用例
sudo ./ru_emulator F08 4C_59_X2
sudo -E ./cuphycontroller_scf F08_CG1
sudo ./test_mac F08 4C 59
Init CONF.req 发送到所有小区(在 DU 服务器上执行)
cd $cuBB_SDK/build/cuPHY-CP/cuphyoam/
for i in {0..3}; do python3 $cuBB_SDK/cuPHY-CP/cuphyoam/examples/aerial_cell_ctrl_cmd.py --server_ip localhost --cell_id $i --cmd 3 && sleep 1; done;
START.req 发送到所有小区(在 DU 服务器上执行)
cd $cuBB_SDK/build/cuPHY-CP/cuphyoam/
for i in {0..3}; do python3 $cuBB_SDK/cuPHY-CP/cuphyoam/examples/aerial_cell_ctrl_cmd.py --server_ip localhost --cell_id $i --cmd 1 && sleep 1; done;
此时,验证 RU 模拟器是否看到小区 0~3 具有吞吐量
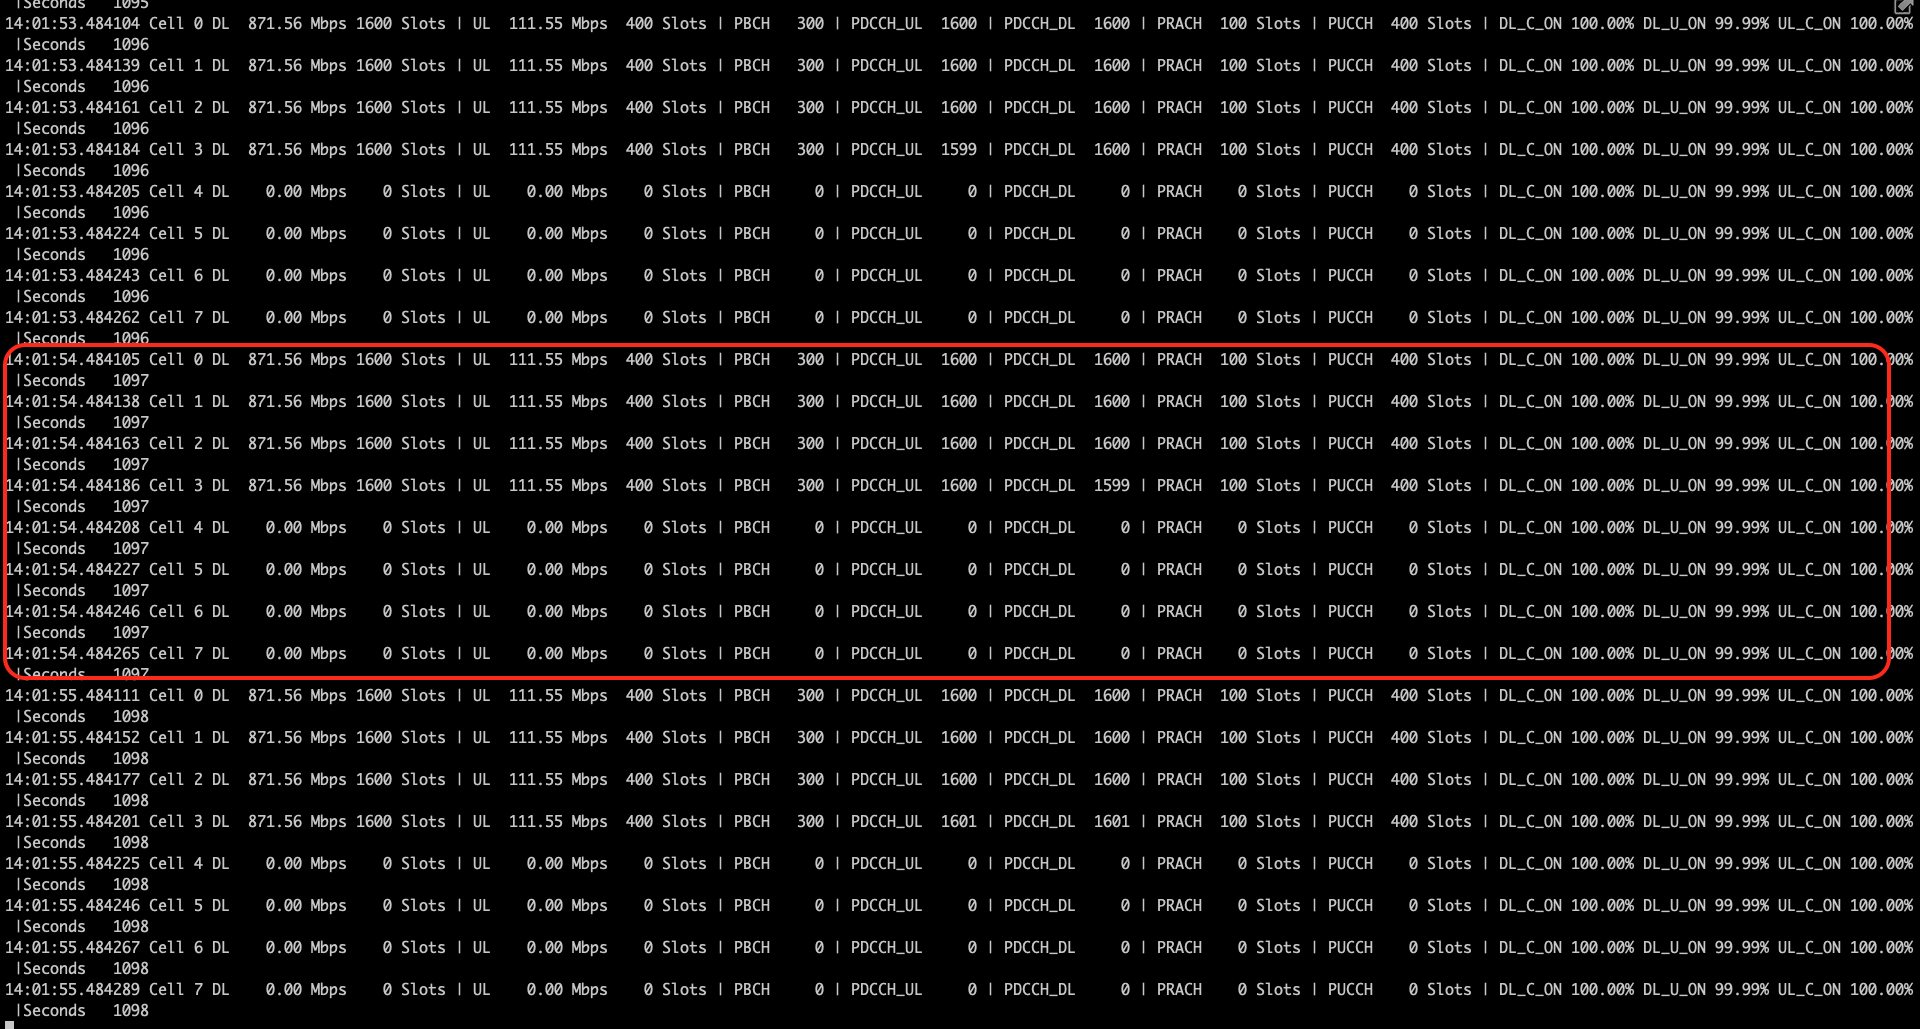
STOP.req 发送到所有小区(在 DU 服务器上执行)
cd $cuBB_SDK/build/cuPHY-CP/cuphyoam/
for i in {0..3}; do python3 $cuBB_SDK/cuPHY-CP/cuphyoam/examples/aerial_cell_ctrl_cmd.py --server_ip localhost --cell_id $i --cmd 0 && sleep 1; done;
OAM 更新 小区 i 目标 MAC 更新为 RU-Emulator 侧的目标小区 i+4。即:0→4、1→5、2→6、3->7)(在 DU 服务器上执行)
cd $cuBB_SDK/build/cuPHY-CP/cuphyoam/
python3 $cuBB_SDK/cuPHY-CP/cuphyoam/examples/aerial_cell_param_net_update.py 1 20:04:9B:9E:27:05 E002 && sleep 1
python3 $cuBB_SDK/cuPHY-CP/cuphyoam/examples/aerial_cell_param_net_update.py 2 20:04:9B:9E:27:06 E002 && sleep 1
python3 $cuBB_SDK/cuPHY-CP/cuphyoam/examples/aerial_cell_param_net_update.py 3 20:04:9B:9E:27:07 E002 && sleep 1
python3 $cuBB_SDK/cuPHY-CP/cuphyoam/examples/aerial_cell_param_net_update.py 4 20:04:9B:9E:27:08 E002 && sleep 1
START.req 发送到所有小区(在 DU 服务器上执行)
cd $cuBB_SDK/build/cuPHY-CP/cuphyoam/
for i in {0..3}; do python3 $cuBB_SDK/cuPHY-CP/cuphyoam/examples/aerial_cell_ctrl_cmd.py --server_ip localhost --cell_id $i --cmd 1 && sleep 1; done;
此时,验证 RU-Emulator 是否看到小区 4~7 具有吞吐量

动态 PRACH 配置和初始序列测试#
此序列显示了在小区初始配置后更改 PCI 和 4 个 PRACH 参数的过程。还可以更改连接到小区的 RU 的 VLAN ID 和 MAC 地址。
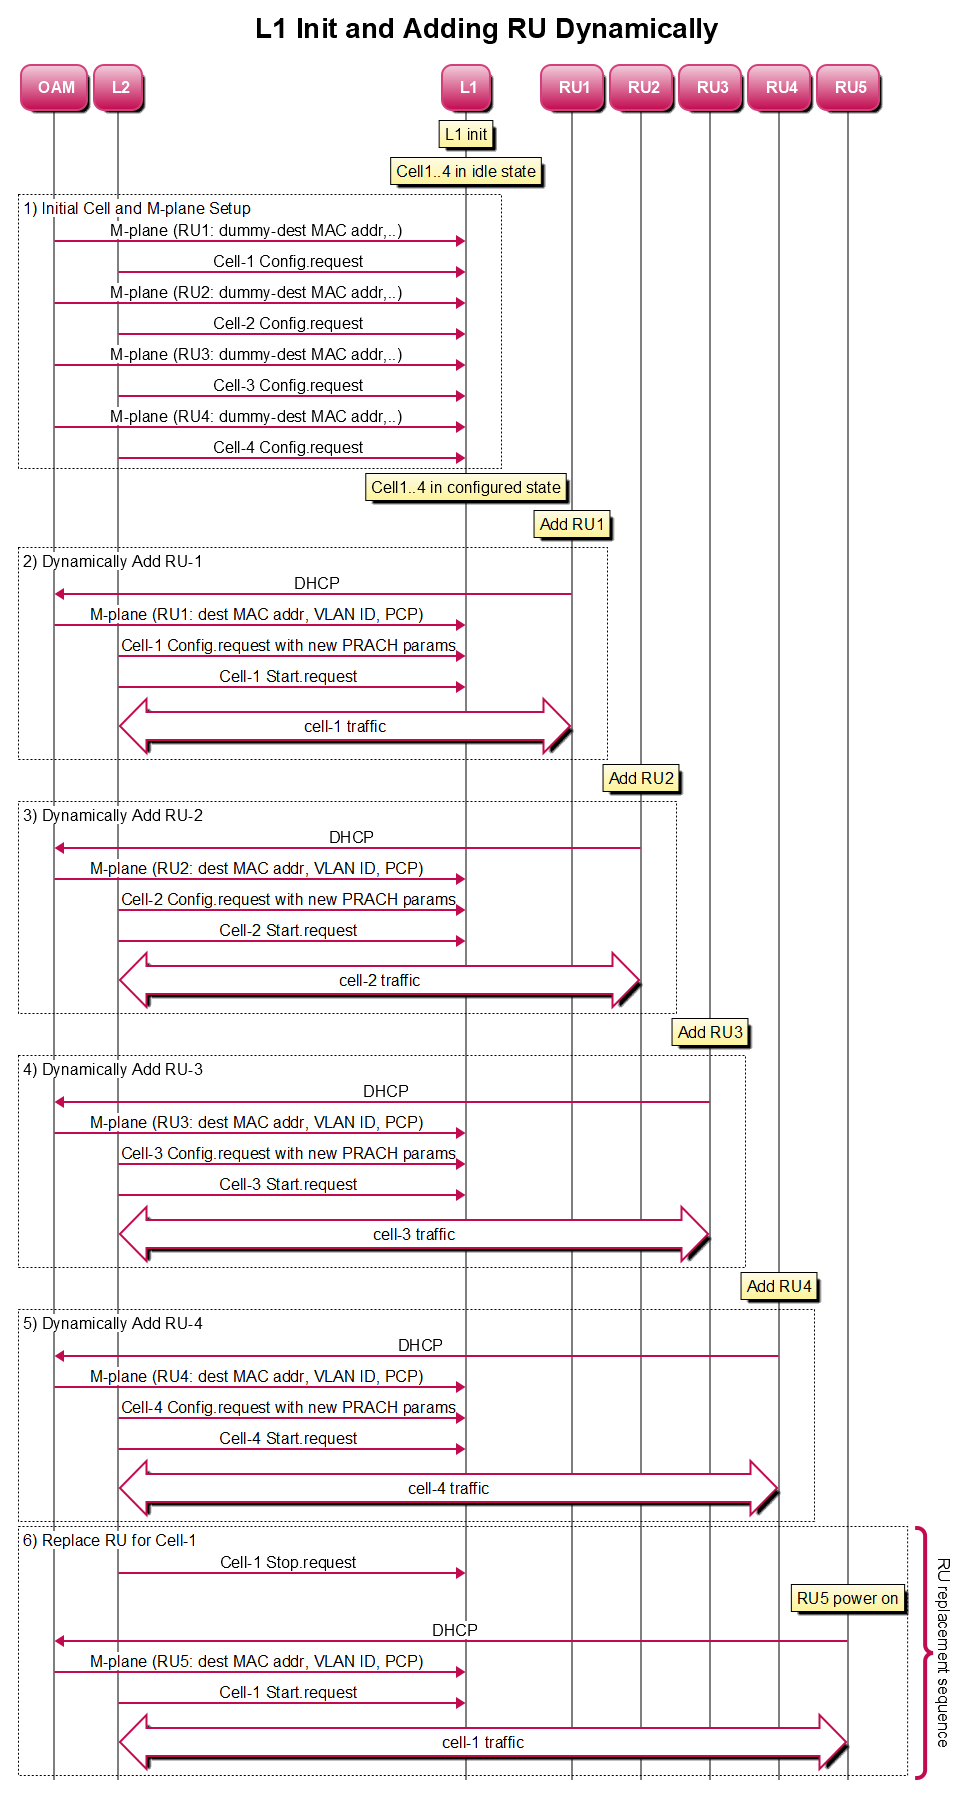
为了支持上述序列,testMac 已得到增强,可以使用 OAM 命令发送 CONFIG.req 和 START.req。Aerial 已得到增强,可以在 22-2.3 版本中支持动态 PRACH 参数配置和 PCI 更改。在以前的版本中支持更改 VLAN-id 和 DST MAC 地址,并用于支持如上所示的初始序列。可以更改的六个 PRACH 参数如下
prachRootSequenceIndex
restrictedSetConfig
prachConfigIndex
prachZeroCorrConf
numPrachFdOccasions
K1
prachConfigIndex
restrictedSetConfig
为了测试此功能,testMac 和 ru-emulator 使用来自 cuphyController 的更多小区启动,然后使用 OAM 命令来更改给定小区的配置。
启用 testMac 以接受用于小区 CONFIG 和 START 的 OAM 命令 - 更改 test_mac_config.yaml 文件,如下所示
# Send cell config/start/stop request via OAM command
oam_cell_ctrl_cmd: 1
要使用 n 个小区测试该序列,请在 cuphycontroller_F08_*.yaml 和其他相应文件中将 cell_group_num 更改为 n。
cell_group: 1
cell_group_num: n
fix_beta_dl: 0
例如,对于 8C -
cell_group: 1
cell_group_num: 8
fix_beta_dl: 0
更新 cuphycontroller 和 ru-emulator 配置上的流列表
sed -i "s/eAxC_UL:.*/eAxC_UL: \\[0,1,2,3\\]/" ${cuBB_SDK}/cuPHY-CP/ru-emulator/config/config.yaml
sed -i "s/eAxC_DL:.*/eAxC_DL: \\[0,1,2,3\\]/" ${cuBB_SDK}/cuPHY-CP/ru-emulator/config/config.yaml
sed -i "s/eAxC_prach_list:.*/eAxC_prach_list: \\[5,6,7,10\\]/" ${cuBB_SDK}/cuPHY-CP/ru-emulator/config/config.yaml

sed -i "s/\\[.*//g" ${cuBB_SDK}/cuPHY-CP/cuphycontroller/config/cuphycontroller_F08_CG1.yaml
sed -i "s/eAxC_id_.*/&\\[0, 1, 2, 3\\]/" ${cuBB_SDK}/cuPHY-CP/cuphycontroller/config/cuphycontroller_F08_CG1.yaml
sed -i "s/eAxC_id_prach.*/eAxC_id_prach: \\[5, 6, 7, 10\\]/" ${cuBB_SDK}/cuPHY-CP/cuphycontroller/config/cuphycontroller_F08_CG1.yaml
为 > nC 运行 cuphycontroller、testMac,并为 > nC 运行 ru-emulator。例如,对于 8C
sudo ./cuPHY-CP/ru-emulator/ru_emulator/ru_emulator F08 9C 14
sudo -E ./cuPHY-CP/cuphycontroller/examples/cuphycontroller_scf F08
sudo ./cuPHY-CP/testMAC/testMAC/test_mac F08 9C 14
在 testMac 创建 gRPC 服务器之后,并在 testMac 控制台上看到以下日志之后,您可以从 OAM 窗口发出 OAM 命令。
gRPC Server listening on 0.0.0.0:50052
20:33:56.124414 C [NVIPC:SHM] shm_ipc_open: forward_enable=0 fw_max_msg_buf_count=0 fw_max_data_buf_count=0
20:33:56.124434 C [MAC.PROC] set_launch_pattern_and_configs: fapi_type=1 tb_loc=1
20:33:56.124439 C [MAC.PROC] test_mac: create SCF FAPI interface
从 OAM 窗口执行 testMac 的 OAM 命令
所有 n 个小区的 CONFIG.req 命令。cmd=3 用于 CONFIG.req
启动小区 0 (cmd=1)
例如,对于 8C
export cuBB_SDK=$(pwd)
cd build/cuPHY-CP/cuphyoam/

for i in {0..7}; do python3 $cuBB_SDK/cuPHY-CP/cuphyoam/examples/aerial_cell_ctrl_cmd.py --server_ip localhost --cell_id $i --cmd 3 && sleep 1; done; //Send CONFIG.req for cell 0~7
python3 $cuBB_SDK/cuPHY-CP/cuphyoam/examples/aerial_cell_ctrl_cmd.py --server_ip localhost --cell_id 0 --cmd 1    // Send START.req for cell-0
此时,您可以在 testMac、cuphycontroller 和 ru-emulator 控制台上看到仅小区 0 正在运行流量
# testMac console
20:34:22.124683 C [MAC.SCF] cell_init: cell_id=0 fapi_type=SCF global_tick=-1 first_init=1
20:34:26.124793 C [MAC.SCF] cell_init: cell_id=1 fapi_type=SCF global_tick=-1 first_init=1
20:34:28.124858 C [MAC.SCF] cell_start: cell_id=0 fapi_type=SCF global_tick=-1
04:55:13.040024 Cell 0 | DL  829.36 Mbps 1600 Slots | UL  122.92 Mbps  400 Slots | Prmb  100 | HARQ 12000 | SR    0 | CSI1 2400 | CSI2 2400 | ERR    0 | INV 0
04:55:13.040037 Cell 1 | DL    0.00 Mbps    0 Slots | UL    0.00 Mbps    0 Slots | Prmb    0 | HARQ    0 | SR    0 | CSI1    0 | CSI2    0 | ERR    0 | INV 0
04:55:13.040045 Cell 2 | DL    0.00 Mbps    0 Slots | UL    0.00 Mbps    0 Slots | Prmb    0 | HARQ    0 | SR    0 | CSI1    0 | CSI2    0 | ERR    0 | INV 0
04:55:13.040051 Cell 3 | DL    0.00 Mbps    0 Slots | UL    0.00 Mbps    0 Slots | Prmb    0 | HARQ    0 | SR    0 | CSI1    0 | CSI2    0 | ERR    0 | INV 0
04:55:13.040058 Cell 4 | DL    0.00 Mbps    0 Slots | UL    0.00 Mbps    0 Slots | Prmb    0 | HARQ    0 | SR    0 | CSI1    0 | CSI2    0 | ERR    0 | INV 0
04:55:13.040065 Cell 5 | DL    0.00 Mbps    0 Slots | UL    0.00 Mbps    0 Slots | Prmb    0 | HARQ    0 | SR    0 | CSI1    0 | CSI2    0 | ERR    0 | INV 0
04:55:13.040069 Cell 6 | DL    0.00 Mbps    0 Slots | UL    0.00 Mbps    0 Slots | Prmb    0 | HARQ    0 | SR    0 | CSI1    0 | CSI2    0 | ERR    0 | INV 0
04:55:13.040074 Cell 7 | DL    0.00 Mbps    0 Slots | UL    0.00 Mbps    0 Slots | Prmb    0 | HARQ    0 | SR    0 | CSI1    0 | CSI2    0 | ERR    0 | INV 0
04:55:13.040081 Cell 8 | DL    0.00 Mbps    0 Slots | UL    0.00 Mbps    0 Slots | Prmb    0 | HARQ    0 | SR    0 | CSI1    0 | CSI2    0 | ERR    0 | INV 0
04:55:14.040025 Cell 0 | DL  829.36 Mbps 1600 Slots | UL  122.92 Mbps  400 Slots | Prmb  100 | HARQ 12000 | SR    0 | CSI1 2400 | CSI2 2400 | ERR    0 | INV 0
04:55:14.040037 Cell 1 | DL    0.00 Mbps    0 Slots | UL    0.00 Mbps    0 Slots | Prmb    0 | HARQ    0 | SR    0 | CSI1    0 | CSI2    0 | ERR    0 | INV 0
04:55:14.040045 Cell 2 | DL    0.00 Mbps    0 Slots | UL    0.00 Mbps    0 Slots | Prmb    0 | HARQ    0 | SR    0 | CSI1    0 | CSI2    0 | ERR    0 | INV 0
04:55:14.040049 Cell 3 | DL    0.00 Mbps    0 Slots | UL    0.00 Mbps    0 Slots | Prmb    0 | HARQ    0 | SR    0 | CSI1    0 | CSI2    0 | ERR    0 | INV 0
04:55:14.040054 Cell 4 | DL    0.00 Mbps    0 Slots | UL    0.00 Mbps    0 Slots | Prmb    0 | HARQ    0 | SR    0 | CSI1    0 | CSI2    0 | ERR    0 | INV 0
04:55:14.040061 Cell 5 | DL    0.00 Mbps    0 Slots | UL    0.00 Mbps    0 Slots | Prmb    0 | HARQ    0 | SR    0 | CSI1    0 | CSI2    0 | ERR    0 | INV 0
04:55:14.040067 Cell 6 | DL    0.00 Mbps    0 Slots | UL    0.00 Mbps    0 Slots | Prmb    0 | HARQ    0 | SR    0 | CSI1    0 | CSI2    0 | ERR    0 | INV 0
04:55:14.040071 Cell 7 | DL    0.00 Mbps    0 Slots | UL    0.00 Mbps    0 Slots | Prmb    0 | HARQ    0 | SR    0 | CSI1    0 | CSI2    0 | ERR    0 | INV 0
04:55:14.040077 Cell 8 | DL    0.00 Mbps    0 Slots | UL    0.00 Mbps    0 Slots | Prmb    0 | HARQ    0 | SR    0 | CSI1    0 | CSI2    0 | ERR    0 | INV 0

# cuphycontroller console
04:55:13.040004 C [SCF.PHY] Cell 0 | DL  829.36 Mbps 1600 Slots | UL  122.92 Mbps  400 Slots CRC   0 (     0) | Tick 142000
04:55:13.040018 C [SCF.PHY] Cell 1 | DL    0.00 Mbps    0 Slots | UL    0.00 Mbps    0 Slots CRC   0 (     0) | Tick 142000
04:55:13.040023 C [SCF.PHY] Cell 2 | DL    0.00 Mbps    0 Slots | UL    0.00 Mbps    0 Slots CRC   0 (     0) | Tick 142000
04:55:13.040027 C [SCF.PHY] Cell 3 | DL    0.00 Mbps    0 Slots | UL    0.00 Mbps    0 Slots CRC   0 (     0) | Tick 142000
04:55:13.040033 C [SCF.PHY] Cell 4 | DL    0.00 Mbps    0 Slots | UL    0.00 Mbps    0 Slots CRC   0 (     0) | Tick 142000
04:55:13.040037 C [SCF.PHY] Cell 5 | DL    0.00 Mbps    0 Slots | UL    0.00 Mbps    0 Slots CRC   0 (     0) | Tick 142000
04:55:13.040044 C [SCF.PHY] Cell 6 | DL    0.00 Mbps    0 Slots | UL    0.00 Mbps    0 Slots CRC   0 (     0) | Tick 142000
04:55:13.040051 C [SCF.PHY] Cell 7 | DL    0.00 Mbps    0 Slots | UL    0.00 Mbps    0 Slots CRC   0 (     0) | Tick 142000
04:55:14.040005 C [SCF.PHY] Cell 0 | DL  829.36 Mbps 1600 Slots | UL  122.92 Mbps  400 Slots CRC   0 (     0) | Tick 144000
04:55:14.040019 C [SCF.PHY] Cell 1 | DL    0.00 Mbps    0 Slots | UL    0.00 Mbps    0 Slots CRC   0 (     0) | Tick 144000
04:55:14.040023 C [SCF.PHY] Cell 2 | DL    0.00 Mbps    0 Slots | UL    0.00 Mbps    0 Slots CRC   0 (     0) | Tick 144000
04:55:14.040028 C [SCF.PHY] Cell 3 | DL    0.00 Mbps    0 Slots | UL    0.00 Mbps    0 Slots CRC   0 (     0) | Tick 144000
04:55:14.040033 C [SCF.PHY] Cell 4 | DL    0.00 Mbps    0 Slots | UL    0.00 Mbps    0 Slots CRC   0 (     0) | Tick 144000
04:55:14.040040 C [SCF.PHY] Cell 5 | DL    0.00 Mbps    0 Slots | UL    0.00 Mbps    0 Slots CRC   0 (     0) | Tick 144000
04:55:14.040046 C [SCF.PHY] Cell 6 | DL    0.00 Mbps    0 Slots | UL    0.00 Mbps    0 Slots CRC   0 (     0) | Tick 144000
04:55:14.040050 C [SCF.PHY] Cell 7 | DL    0.00 Mbps    0 Slots | UL    0.00 Mbps    0 Slots CRC   0 (     0) | Tick 144000
现在发出 OAM 命令,以切换小区 1 到小区 “n+1” 的 PCI 和 PRACH 参数。
例如,以下命令触发 testMac 为小区 1 发送另一个 CONFIG.req,其中包含小区 9 的参数。aerial_cell_param_new_update.py 脚本参数中的目标 DST MAC 地址必须是 cuphycontroller YAML 文件中小区 n+1 的 DST MAC 地址。例如,对于 8C 测试用例,cuphycontroller YAML 文件中小区 9 的 DST MAC 地址为
dst_mac_addr: 20:04:9B:9E:27:09
python3 $cuBB_SDK/cuPHY-CP/cuphyoam/examples/aerial_cell_ctrl_cmd.py --server_ip localhost --cell_id 1 --cmd 2 --target_cell_id 8 //Send CONFIG.req for cell-1 with PRACH parameters read from TV for cell-8 and PCI of cell-8
python3 $cuBB_SDK/cuPHY-CP/cuphyoam/examples/aerial_cell_param_net_update.py 2 xx:xx:xx:xx:xx:xx E002             // Set VLAN-id and DST MAC address of cell-1 to point to VLAN-id & DST MAC address of cell-9 in cuphycontroller yaml file
python3 $cuBB_SDK/cuPHY-CP/cuphyoam/examples/aerial_cell_ctrl_cmd.py --server_ip localhost --cell_id 1 --cmd 1    // Send START.req for cell-1
现在 testMAC 和 cuphycontroller 看到小区 0 和小区 1 的流量,而 RU-Emulator 看到小区 0 和小区 8 的流量。
# testMac console
20:35:00.125020 C [MAC.SCF] cell_start: cell_id=1 fapi_type=SCF global_tick=61130
20:35:00.560041 Cell 0 | DL 1731.61 Mbps 1600 Slots | UL  240.94 Mbps  400 Slots | Prmb  100 | HARQ 12000 | SR    0 | CSI1 2400 | CSI2 2400 | ERR    0 | INV 0
20:35:00.560053 Cell 1 | DL  752.17 Mbps  695 Slots | UL    6.63 Mbps  174 Slots | Prmb   43 | HARQ 5220 | SR    0 | CSI1 1044 | CSI2 1044 | ERR    0 | INV 174
20:35:00.560058 Cell 2 | DL    0.00 Mbps    0 Slots | UL    0.00 Mbps    0 Slots | Prmb    0 | HARQ    0 | SR    0 | CSI1    0 | CSI2    0 | ERR    0 | INV 0
20:35:00.560063 Cell 3 | DL    0.00 Mbps    0 Slots | UL    0.00 Mbps    0 Slots | Prmb    0 | HARQ    0 | SR    0 | CSI1    0 | CSI2    0 | ERR    0 | INV 0
20:35:01.560039 Cell 0 | DL 1731.61 Mbps 1600 Slots | UL  240.94 Mbps  400 Slots | Prmb  100 | HARQ 12000 | SR    0 | CSI1 2400 | CSI2 2400 | ERR    0 | INV 0
20:35:01.560050 Cell 1 | DL 1731.61 Mbps 1600 Slots | UL   15.06 Mbps  400 Slots | Prmb  100 | HARQ 12000 | SR    0 | CSI1 2400 | CSI2 2400 | ERR    0 | INV 400
20:35:01.560055 Cell 2 | DL    0.00 Mbps    0 Slots | UL    0.00 Mbps    0 Slots | Prmb    0 | HARQ    0 | SR    0 | CSI1    0 | CSI2    0 | ERR    0 | INV 0
20:35:01.560060 Cell 3 | DL    0.00 Mbps    0 Slots | UL    0.00 Mbps    0 Slots | Prmb    0 | HARQ    0 | SR    0 | CSI1    0 | CSI2    0 | ERR    0 | INV 0
20:35:02.560041 Cell 0 | DL 1731.61 Mbps 1600 Slots | UL  240.94 Mbps  400 Slots | Prmb  100 | HARQ 12000 | SR    0 | CSI1 2400 | CSI2 2400 | ERR    0 | INV 0
20:35:02.560053 Cell 1 | DL 1731.61 Mbps 1600 Slots | UL   15.06 Mbps  400 Slots | Prmb  100 | HARQ 12000 | SR    0 | CSI1 2400 | CSI2 2400 | ERR    0 | INV 400
20:35:02.560058 Cell 2 | DL    0.00 Mbps    0 Slots | UL    0.00 Mbps    0 Slots | Prmb    0 | HARQ    0 | SR    0 | CSI1    0 | CSI2    0 | ERR    0 | INV 0
20:35:02.560063 Cell 3 | DL    0.00 Mbps    0 Slots | UL    0.00 Mbps    0 Slots | Prmb    0 | HARQ    0 | SR    0 | CSI1    0 | CSI2    0 | ERR    0 | INV 0
20:35:03.560040 Cell 0 | DL 1731.61 Mbps 1600 Slots | UL  240.94 Mbps  400 Slots | Prmb  100 | HARQ 12000 | SR    0 | CSI1 2400 | CSI2 2400 | ERR    0 | INV 0
20:35:03.560051 Cell 1 | DL 1731.61 Mbps 1600 Slots | UL   15.06 Mbps  400 Slots | Prmb  100 | HARQ 12000 | SR    0 | CSI1 2400 | CSI2 2400 | ERR    0 | INV 400
20:35:03.560056 Cell 2 | DL    0.00 Mbps    0 Slots | UL    0.00 Mbps    0 Slots | Prmb    0 | HARQ    0 | SR    0 | CSI1    0 | CSI2    0 | ERR    0 | INV 0
20:35:03.560061 Cell 3 | DL    0.00 Mbps    0 Slots | UL    0.00 Mbps    0 Slots | Prmb    0 | HARQ    0 | SR    0 | CSI1    0 | CSI2    0 | ERR    0 | INV 0
20:35:04.560043 Cell 0 | DL 1731.61 Mbps 1600 Slots | UL  240.94 Mbps  400 Slots | Prmb  100 | HARQ 12000 | SR    0 | CSI1 2400 | CSI2 2400 | ERR    0 | INV 0
20:35:04.560054 Cell 1 | DL 1731.61 Mbps 1600 Slots | UL   15.06 Mbps  400 Slots | Prmb  100 | HARQ 12000 | SR    0 | CSI1 2400 | CSI2 2400 | ERR    0 | INV 400
20:35:04.560059 Cell 2 | DL    0.00 Mbps    0 Slots | UL    0.00 Mbps    0 Slots | Prmb    0 | HARQ    0 | SR    0 | CSI1    0 | CSI2    0 | ERR    0 | INV 0
20:35:04.560064 Cell 3 | DL    0.00 Mbps    0 Slots | UL    0.00 Mbps    0 Slots | Prmb    0 | HARQ    0 | SR    0 | CSI1    0 | CSI2    0 | ERR    0 | INV 0

# cuPhyController console
20:35:00.560005 C [SCF.PHY] Cell 0 | DL 1731.61 Mbps 1600 Slots | UL  240.94 Mbps  400 Slots CRC   0 (     0) | Tick 62000
20:35:00.560014 C [SCF.PHY] Cell 1 | DL  752.17 Mbps  695 Slots | UL  104.81 Mbps  174 Slots CRC   0 (     0) | Tick 62000
20:35:01.560004 C [SCF.PHY] Cell 0 | DL 1731.61 Mbps 1600 Slots | UL  240.94 Mbps  400 Slots CRC   0 (     0) | Tick 64000
20:35:01.560012 C [SCF.PHY] Cell 1 | DL 1731.61 Mbps 1600 Slots | UL  240.94 Mbps  400 Slots CRC   0 (     0) | Tick 64000
20:35:02.560005 C [SCF.PHY] Cell 0 | DL 1731.61 Mbps 1600 Slots | UL  240.94 Mbps  400 Slots CRC   0 (     0) | Tick 66000
20:35:02.560013 C [SCF.PHY] Cell 1 | DL 1731.61 Mbps 1600 Slots | UL  240.94 Mbps  400 Slots CRC   0 (     0) | Tick 66000
20:35:03.560005 C [SCF.PHY] Cell 0 | DL 1731.61 Mbps 1600 Slots | UL  240.94 Mbps  400 Slots CRC   0 (     0) | Tick 68000
20:35:03.560012 C [SCF.PHY] Cell 1 | DL 1731.61 Mbps 1600 Slots | UL  240.94 Mbps  400 Slots CRC   0 (     0) | Tick 68000
20:35:04.560006 C [SCF.PHY] Cell 0 | DL 1731.61 Mbps 1600 Slots | UL  240.94 Mbps  400 Slots CRC   0 (     0) | Tick 70000
20:35:04.560013 C [SCF.PHY] Cell 1 | DL 1731.61 Mbps 1600 Slots | UL  240.94 Mbps  400 Slots CRC   0 (     0) | Tick 70000
20:35:05.457529 C [SCF.PHY] Cell 0 | DL 1553.04 Mbps 1435 Slots | UL  215.64 Mbps  358 Slots CRC   0 (     0)
20:35:05.457541 C [SCF.PHY] Cell 1 | DL 1553.04 Mbps 1435 Slots | UL  215.64 Mbps  358 Slots CRC   0 (     0)
20:35:05.457676 C [SCF.PHY] Cell 0 | DL 1553.04 Mbps 1435 Slots | UL  215.64 Mbps  358 Slots CRC   0 (     0)
20:35:05.457681 C [SCF.PHY] Cell 1 | DL 1553.04 Mbps 1435 Slots | UL  215.64 Mbps  358 Slots CRC   0 (     0)

# ru-emulator console
12:15:45.760099 Cell 8 DL  829.36 Mbps 1600 Slots | UL  122.92 Mbps  400 Slots | PBCH   100 | PDCCH_DL  1600 | CSI_RS  1600 | PRACH  100 Slots | PUCCH  400 Slots | DL_C_ON 100.00% DL_U_ON 100.00% UL_C_ON 100.00% |Seconds    513
12:15:46.760025 Cell 0 DL  829.36 Mbps 1600 Slots | UL  122.92 Mbps  400 Slots | PBCH   100 | PDCCH_DL  1600 | CSI_RS  1600 | PRACH  100 Slots | PUCCH  400 Slots | DL_C_ON 100.00% DL_U_ON 100.00% UL_C_ON 100.00% |Seconds    514
12:15:46.760041 Cell 1 DL    0.00 Mbps    0 Slots | UL    0.00 Mbps    0 Slots | PBCH     0 | PDCCH_DL     0 | CSI_RS     0 | PRACH    0 Slots | PUCCH    0 Slots | DL_C_ON 0.00% DL_U_ON 0.00% UL_C_ON 0.00% |Seconds    514
12:15:46.760049 Cell 2 DL    0.00 Mbps    0 Slots | UL    0.00 Mbps    0 Slots | PBCH     0 | PDCCH_DL     0 | CSI_RS     0 | PRACH    0 Slots | PUCCH    0 Slots | DL_C_ON 0.00% DL_U_ON 0.00% UL_C_ON 0.00% |Seconds    514
12:15:46.760054 Cell 3 DL    0.00 Mbps    0 Slots | UL   0.00 Mbps    0 Slots | PBCH     0 | PDCCH_DL     0 | CSI_RS     0 | PRACH    0 Slots | PUCCH    0 Slots | DL_C_ON 0.00% DL_U_ON 0.00% UL_C_ON 0.00% |Seconds    514
12:15:46.760060 Cell 4 DL    0.00 Mbps    0 Slots | UL   0.00 Mbps    0 Slots | PBCH     0 | PDCCH_DL     0 | CSI_RS     0 | PRACH    0 Slots | PUCCH    0 Slots | DL_C_ON 0.00% DL_U_ON 0.00% UL_C_ON 0.00% |Seconds    514
12:15:46.760073 Cell 5 DL    0.00 Mbps    0 Slots | UL    0.00 Mbps    0 Slots | PBCH     0 | PDCCH_DL     0 | CSI_RS     0 | PRACH    0 Slots | PUCCH    0 Slots | DL_C_ON 0.00% DL_U_ON 0.00% UL_C_ON 0.00% |Seconds    514
12:15:46.760078 Cell 6 DL    0.00 Mbps    0 Slots | UL    0.00 Mbps    0 Slots | PBCH     0 | PDCCH_DL     0 | CSI_RS     0 | PRACH    0 Slots | PUCCH    0 Slots | DL_C_ON 0.00% DL_U_ON 0.00% UL_C_ON 0.00% |Seconds    514
12:15:46.760083 Cell 7 DL    0.00 Mbps    0 Slots | UL    0.00 Mbps    0 Slots | PBCH     0 | PDCCH_DL     0 | CSI_RS     0 | PRACH    0 Slots | PUCCH    0 Slots | DL_C_ON 0.00% DL_U_ON 0.00% UL_C_ON 0.00% |Seconds    514
12:15:46.760090 Cell 8 DL  829.36 Mbps 1600 Slots | UL  122.92 Mbps  400 Slots | PBCH   100 | PDCCH_DL  1600 | CSI_RS  1600 | PRACH  100 Slots | PUCCH  400 Slots | DL_C_ON 100.00% DL_U_ON 100.00% UL_C_ON 100.00% |Seconds    514
12:15:47.760024 Cell 0 DL  829.36 Mbps 1600 Slots | UL  122.92 Mbps  400 Slots | PBCH   100 | PDCCH_DL  1600 | CSI_RS  1600 | PRACH  100 Slots | PUCCH  400 Slots | DL_C_ON 100.00% DL_U_ON 100.00% UL_C_ON 100.00% |Seconds    515
12:15:47.760041 Cell 1 DL    0.00 Mbps    0 Slots | UL    0.00 Mbps    0 Slots | PBCH     0 | PDCCH_DL     0 | CSI_RS     0 | PRACH    0 Slots | PUCCH    0 Slots | DL_C_ON 0.00% DL_U_ON 0.00% UL_C_ON 0.00% |Seconds    515
12:15:47.760047 Cell 2 DL    0.00 Mbps    0 Slots | UL    0.00 Mbps    0 Slots | PBCH     0 | PDCCH_DL     0 | CSI_RS     0 | PRACH    0 Slots | PUCCH    0 Slots | DL_C_ON 0.00% DL_U_ON 0.00% UL_C_ON 0.00% |Seconds    515
12:15:47.760053 Cell 3 DL    0.00 Mbps    0 Slots | UL    0.00 Mbps    0 Slots | PBCH     0 | PDCCH_DL     0 | CSI_RS     0 | PRACH    0 Slots | PUCCH    0 Slots | DL_C_ON 0.00% DL_U_ON 0.00% UL_C_ON 0.00% |Seconds    515
12:15:47.760060 Cell 4 DL    0.00 Mbps    0 Slots | UL    0.00 Mbps    0 Slots | PBCH     0 | PDCCH_DL     0 | CSI_RS     0 | PRACH    0 Slots | PUCCH    0 Slots | DL_C_ON 0.00% DL_U_ON 0.00% UL_C_ON 0.00% |Seconds    515
12:15:47.760066 Cell 5 DL    0.00 Mbps    0 Slots | UL    0.00 Mbps    0 Slots | PBCH     0 | PDCCH_DL     0 | CSI_RS     0 | PRACH    0 Slots | PUCCH    0 Slots | DL_C_ON 0.00% DL_U_ON 0.00% UL_C_ON 0.00% |Seconds    515
12:15:47.760076 Cell 6 DL    0.00 Mbps    0 Slots | UL    0.00 Mbps    0 Slots | PBCH     0 | PDCCH_DL     0 | CSI_RS     0 | PRACH    0 Slots | PUCCH    0 Slots | DL_C_ON 0.00% DL_U_ON 0.00% UL_C_ON 0.00% |Seconds    515
12:15:47.760082 Cell 7 DL    0.00 Mbps    0 Slots | UL    0.00 Mbps    0 Slots | PBCH     0 | PDCCH_DL     0 | CSI_RS     0 | PRACH    0 Slots | PUCCH    0 Slots | DL_C_ON 0.00% DL_U_ON 0.00% UL_C_ON 0.00% |Seconds    515
12:15:47.760089 Cell 8 DL  829.36 Mbps 1600 Slots | UL  122.92 Mbps  400 Slots | PBCH   100 | PDCCH_DL  1600 | CSI_RS  1600 | PRACH  100 Slots | PUCCH  400 Slots | DL_C_ON 100.00% DL_U_ON 100.00% UL_C_ON 100.00% |Seconds    515
12:15:48.760023 Cell 0 DL  829.36 Mbps 1600 Slots | UL  122.92 Mbps  400 Slots | PBCH   100 | PDCCH_DL  1600 | CSI_RS  1600 | PRACH  100 Slots | PUCCH  400 Slots | DL_C_ON 100.00% DL_U_ON 100.00% UL_C_ON 100.00% |Seconds    516
重复配置和初始序列测试#
重复小区 Config.request 是一项功能,可以动态配置和启动单个小区。无需在发出 Start.Req 之前发送所有小区的 Config.request。要启用此功能,必须在 L2Adapter 和 testMac 中配置以下配置。
sed -i "s/duplicate_config_all_cells.*/duplicate_config_all_cells: 1/" ${cuBB_SDK}/cuPHY-CP/cuphycontroller/config/l2_adapter_config_F08_CG1.yaml

sed -i "s/cell_config_wait.*/cell_config_wait: 1000/" ${cuBB_SDK}/cuPHY-CP/testMAC/testMAC/test_mac_config.yaml

sed -i "s/oam_cell_ctrl_cmd.*/oam_cell_ctrl_cmd: 1/" ${cuBB_SDK}/cuPHY-CP/testMAC/testMAC/test_mac_config.yaml
要使用 n 个小区测试该序列,请在 cuphycontroller_F08_*.yaml 和其他相应文件中将 cell_group_num 更改为 n。
cell_group: 1
cell_group_num: n
fix_beta_dl: 0
例如,对于 8C
cell_group: 1
cell_group_num: 8
fix_beta_dl: 0
更新 cuphycontroller 和 ru-emulator 配置上的流列表
sed -i "s/eAxC_UL:.*/eAxC_UL: \\[0,1,2,3\\]/" ${cuBB_SDK}/cuPHY-CP/ru-emulator/config/config.yaml
sed -i "s/eAxC_DL:.*/eAxC_DL: \\[0,1,2,3\\]/" ${cuBB_SDK}/cuPHY-CP/ru-emulator/config/config.yaml
sed -i "s/eAxC_prach_list:.*/eAxC_prach_list: \\[5,6,7,10\\]/" ${cuBB_SDK}/cuPHY-CP/ru-emulator/config/config.yaml

sed -i "s/\\[.*//g" ${cuBB_SDK}/cuPHY-CP/cuphycontroller/config/cuphycontroller_F08_CG1.yaml
sed -i "s/eAxC_id_.*/&\\[0, 1, 2, 3\\]/" ${cuBB_SDK}/cuPHY-CP/cuphycontroller/config/cuphycontroller_F08_CG1.yaml
sed -i "s/eAxC_id_prach.*/eAxC_id_prach: \\[5, 6, 7, 10\\]/" ${cuBB_SDK}/cuPHY-CP/cuphycontroller/config/cuphycontroller_F08_CG1.yaml
为 > nC 运行 cuphycontroller、testMac,并为 > nC 运行 ru-emulator。例如,对于 8C
sudo ./cuPHY-CP/ru-emulator/ru_emulator/ru_emulator F08 8C 14
sudo -E ./cuPHY-CP/cuphycontroller/examples/cuphycontroller_scf F08_CG1
sudo ./cuPHY-CP/testMAC/testMAC/test_mac F08 8C 14
在 testMac 创建 gRPC 服务器之后,并在 testMac 控制台上看到以下日志之后,您可以从 OAM 窗口发出 OAM 命令
gRPC Server listening on 0.0.0.0:50052
20:33:56.124414 C [NVIPC:SHM] shm_ipc_open: forward_enable=0 fw_max_msg_buf_count=0 fw_max_data_buf_count=0
20:33:56.124434 C [MAC.PROC] set_launch_pattern_and_configs: fapi_type=1 tb_loc=1
20:33:56.124439 C [MAC.PROC] test_mac: create SCF FAPI interface
从 OAM 窗口执行 testMac 的 OAM 命令
一次 1 个小区的 CONFIG.req 命令。cmd=3 用于 CONFIG.req
启动小区 0 (cmd=1)
对所有小区重复上述序列
export cuBB_SDK=$(pwd)
cd build/cuPHY-CP/cuphyoam/
#Note that the config&start of cells can be in any order
for i in {0..7}; do python3 $cuBB_SDK/cuPHY-CP/cuphyoam/examples/aerial_cell_ctrl_cmd.py --server_ip localhost --cell_id $i --cmd 3 && sleep 3 && python3 $cuBB_SDK/cuPHY-CP/cuphyoam/examples/aerial_cell_ctrl_cmd.py --server_ip localhost --cell_id $i --cmd 1; done; //Send CONFIG.req  and Start.req for cell 0~7
    # testMac console
    20:34:22.124683 C [MAC.SCF] cell_init: cell_id=0 fapi_type=SCF global_tick=-1 first_init=1
    20:34:26.124793 C [MAC.SCF] cell_init: cell_id=1 fapi_type=SCF global_tick=-1 first_init=1
    20:34:28.124858 C [MAC.SCF] cell_start: cell_id=0 fapi_type=SCF global_tick=-1

04:55:13.040024 Cell 0 | DL    829.36 Mbps 1600 Slots | UL  122.92 Mbps  400 Slots | Prmb  100 | HARQ 12000 | SR    0 | CSI1 2400 | CSI2 2400 | ERR    0 | INV 0
04:55:13.040037 Cell 1 | DL    829.36 Mbps 1600 Slots| UL  122.92 Mbps  400 Slots | Prmb    0 | HARQ    0 | SR    0 | CSI1    0 | CSI2    0 | ERR    0 | INV 0
04:55:13.040045 Cell 2 | DL    829.36 Mbps 1600 Slots| UL  122.92 Mbps  400 Slots | Prmb    0 | HARQ    0 | SR    0 | CSI1    0 | CSI2    0 | ERR    0 | INV 0
04:55:13.040051 Cell 3 | DL    829.36 Mbps 1600 Slots| UL  122.92 Mbps  400 Slots | Prmb    0 | HARQ    0 | SR    0 | CSI1    0 | CSI2    0 | ERR    0 | INV 0
04:55:13.040058 Cell 4 | DL    829.36 Mbps 1600 Slots| UL  122.92 Mbps  400 Slots | Prmb    0 | HARQ    0 | SR    0 | CSI1    0 | CSI2    0 | ERR    0 | INV 0
04:55:13.040065 Cell 5 | DL    829.36 Mbps 1600 Slots| UL  122.92 Mbps  400 Slots | Prmb    0 | HARQ    0 | SR    0 | CSI1    0 | CSI2    0 | ERR    0 | INV 0
04:55:13.040069 Cell 6 | DL    829.36 Mbps 1600 Slots| UL  122.92 Mbps  400 Slots | Prmb    0 | HARQ    0 | SR    0 | CSI1    0 | CSI2    0 | ERR    0 | INV 0
04:55:13.040074 Cell 7 | DL    829.36 Mbps 1600 Slots| UL  122.92 Mbps  400 Slots | Prmb    0 | HARQ    0 | SR    0 | CSI1    0 | CSI2    0 | ERR    0 | INV 0


    # cuphycontroller console
    04:55:13.040004 C [SCF.PHY] Cell 0 | DL  829.36 Mbps 1600 Slots | UL  122.92 Mbps  400 Slots CRC   0 (     0) | Tick 142000
    04:55:13.040018 C [SCF.PHY] Cell 1 | DL  829.36 Mbps 1600 Slots | UL  122.92 Mbps  400 Slots CRC   0 (     0) | Tick 142000
    04:55:13.040023 C [SCF.PHY] Cell 2 | DL  829.36 Mbps 1600 Slots | UL  122.92 Mbps  400 Slots CRC   0 (     0) | Tick 142000
    04:55:13.040027 C [SCF.PHY] Cell 3 | DL  829.36 Mbps 1600 Slots | UL  122.92 Mbps  400 Slots CRC   0 (     0) | Tick 142000
    04:55:13.040033 C [SCF.PHY] Cell 4 | DL  829.36 Mbps 1600 Slots | UL  122.92 Mbps  400 Slots CRC   0 (     0) | Tick 142000
    04:55:13.040037 C [SCF.PHY] Cell 5 | DL  829.36 Mbps 1600 Slots | UL  122.92 Mbps  400 Slots CRC   0 (     0) | Tick 142000
    04:55:13.040044 C [SCF.PHY] Cell 6 | DL  829.36 Mbps 1600 Slots | UL  122.92 Mbps  400 Slots CRC   0 (     0) | Tick 142000
    04:55:13.040051 C [SCF.PHY] Cell 7 | DL  829.36 Mbps 1600 Slots | UL  122.92 Mbps  400 Slots CRC   0 (     0) | Tick 142000
如何获取 Aerial 指标#
在 gNB 服务器 #1 上运行以下命令。确保在 cmake 配置中添加了 -DAERIAL_METRICS=1
curl localhost:8081/metrics
将 Prometheus 线程设置为适当的 CPU 核心数。对于在 GH 设置上进行测试,请更改 F08 配置文件,以便更新与 DPDK 相关的指标,然后启动 cuphycontroller
sed -i "s/prometheus_thread.*/prometheus_thread: 23/" ${cuBB_SDK}/cuPHY-CP/cuphycontroller/config/cuphycontroller_F08_CG1.yaml
sudo -E ${cuBB_SDK}/build/cuPHY-CP/cuphycontroller/examples/cuphycontroller_scf F08_CG1
暂时不要启动 test_mac。查询指标。除了以下指标外,所有指标都应为 0
aerial_cuphycp_net_tx_accu_sched_clock_queue_jitter_ns
aerial_cuphycp_net_tx_accu_sched_clock_queue_wander_ns
启动 RU 模拟器
sudo ${cuBB_SDK}/build/cuPHY-CP/ru-emulator/ru_emulator/ru_emulator F08 8C_59
使用 20000 个时隙运行 testMAC
sed -i "s/test_slots.*/test_slots: 20000/" ${cuBB_SDK}/cuPHY-CP/testMAC/testMAC/test_mac_config.yaml
sudo -E ${cuBB_SDK}/build/cuPHY-CP/testMAC/testMAC/test_mac F08 8C_59
让测试完成。等待直到您看到 test_mac 输出显示 20000 个时隙完成
13:16:37.244835 C [MAC.FAPI] Finished running 20000 slots test
暂时不要杀死 cuphycontroller。再次查询指标,请参阅以下示例日志
...
# HELP aerial_cuphycp_slots_total Aerial cuPHY-CP total number of processed Downlink slots
# TYPE aerial_cuphycp_slots_total counter
aerial_cuphycp_slots_total{cell="8",type="UL"} 4000
aerial_cuphycp_slots_total{cell="8",type="DL"} 16000
aerial_cuphycp_slots_total{cell="7",type="UL"} 4000
aerial_cuphycp_slots_total{cell="6",type="UL"} 4000
aerial_cuphycp_slots_total{cell="3",type="DL"} 16000
aerial_cuphycp_slots_total{cell="7",type="DL"} 16000
aerial_cuphycp_slots_total{cell="2",type="UL"} 4000
aerial_cuphycp_slots_total{cell="3",type="UL"} 4000
aerial_cuphycp_slots_total{cell="1",type="DL"} 16000
aerial_cuphycp_slots_total{cell="1",type="UL"} 4000
aerial_cuphycp_slots_total{cell="2",type="DL"} 16000
aerial_cuphycp_slots_total{cell="6",type="DL"} 16000
aerial_cuphycp_slots_total{cell="4",type="UL"} 4000
aerial_cuphycp_slots_total{cell="5",type="DL"} 16000
aerial_cuphycp_slots_total{cell="4",type="DL"} 16000
aerial_cuphycp_slots_total{cell="5",type="UL"} 4000
...
# HELP aerial_cuphycp_on_time_uplane_rx_packets_total Aerial cuPHY-CP Uplink U-plane packets which arrived within their receive windows
# TYPE aerial_cuphycp_on_time_uplane_rx_packets_total counter
aerial_cuphycp_on_time_uplane_rx_packets_total{cell="7"} 1680000
aerial_cuphycp_on_time_uplane_rx_packets_total{cell="6"} 1680000
aerial_cuphycp_on_time_uplane_rx_packets_total{cell="2"} 1680000
aerial_cuphycp_on_time_uplane_rx_packets_total{cell="1"} 1680000
aerial_cuphycp_on_time_uplane_rx_packets_total{cell="8"} 1680000
aerial_cuphycp_on_time_uplane_rx_packets_total{cell="3"} 1680000
aerial_cuphycp_on_time_uplane_rx_packets_total{cell="4"} 1680000
aerial_cuphycp_on_time_uplane_rx_packets_total{cell="5"} 1680000
...
# HELP aerial_cuphycp_cplane_tx_bytes_total Aerial cuPHY-CP C-plane TX bytes
# TYPE aerial_cuphycp_cplane_tx_bytes_total counter
aerial_cuphycp_cplane_tx_bytes_total{cell="7"} 101048000
aerial_cuphycp_cplane_tx_bytes_total{cell="6"} 101048000
aerial_cuphycp_cplane_tx_bytes_total{cell="2"} 101048000
aerial_cuphycp_cplane_tx_bytes_total{cell="1"} 101048000
aerial_cuphycp_cplane_tx_bytes_total{cell="8"} 101048000
aerial_cuphycp_cplane_tx_bytes_total{cell="3"} 101048000
aerial_cuphycp_cplane_tx_bytes_total{cell="4"} 101048000
aerial_cuphycp_cplane_tx_bytes_total{cell="5"} 101048000
运行额外的日志记录流容器#
注意
nvlog_observer 和 nvlog_collect 在 23-1 中已弃用。
默认情况下,日志存储在 ‘/tmp’ 位置。您可以设置环境变量 AERIAL_LOG_PATH 以定义自定义日志文件路径。
当日志大小超过 20GB 时,将创建一个新文件。例如 phy.log、phy.log.1、phy.log.2 … phy.log.7。
使用单个 L1 实例运行多个 L2 实例#
Rel-23-3 支持为不同的 L2 实例静态分配小区。
存在一个已知限制,即所有小区都需要在任何小区开始调度之前配置(通过 FAPI CONFIG.req)。借助 23-4 中引入的重复小区 Config.request 功能,可以支持动态 L2 实例,而无需上述限制,但每个 L2 实例上的小区配置必须相同。
示例:运行两个 L2 实例,每个实例有 4 个小区,以及一个 L1 实例,有 8 个小区。
在每个 L2 实例的 nvipc 配置中分配不同的 “prefix”。“prefix” 是一个字符串,其长度应小于 32。
# nvipc config yaml for each L2 instance

# For L2 instance 0: test_mac_config.yaml
prefix: nvipc

# For L2 instance 1: test_mac_config_1.yaml
prefix: nvipc1
第一个 testMAC 实例使用默认的 test_mac_config.yaml。正确配置后,复制 test_mac_config.yaml 并为第二个 testMAC 实例配置它。要在同一台机器上运行多个 testMAC 实例,必须更改 CPU 核心、记录器名称和 OAM 服务器端口。以下是配置第二个 testMAC 实例的示例命令
cp ${cuBB_SDK}/cuPHY-CP/testMAC/testMAC/test_mac_config.yaml ${cuBB_SDK}/cuPHY-CP/testMAC/testMAC/test_mac_config_1.yaml
sed -i 's/prefix:.*/prefix: nvipc1/g' ${cuBB_SDK}/cuPHY-CP/testMAC/testMAC/test_mac_config_1.yaml
sed -i 's/log_name:.*/log_name: testmac1.log/g' ${cuBB_SDK}/cuPHY-CP/testMAC/testMAC/test_mac_config_1.yaml
sed -i 's/oam_server_addr:.*/oam_server_addr: 0.0.0.0:50053/g' ${cuBB_SDK}/cuPHY-CP/testMAC/testMAC/test_mac_config_1.yaml
sed -i '/sched_thread_config/{ N; N; N; s/cpu_affinity:[^\n]*/cpu_affinity: 14/g}' ${cuBB_SDK}/cuPHY-CP/testMAC/testMAC/test_mac_config_1.yaml
sed -i '/recv_thread_config/{ N; N; N; s/cpu_affinity:[^\n]*/cpu_affinity: 15/g}' ${cuBB_SDK}/cuPHY-CP/testMAC/testMAC/test_mac_config_1.yaml
sed -i '/builder_thread_config/{ N; N; N; s/cpu_affinity:[^\n]*/cpu_affinity: 16/g}' ${cuBB_SDK}/cuPHY-CP/testMAC/testMAC/test_mac_config_1.yaml
在 L1 中将 nvipc 配置切换到 nvipc_multi_instances.yaml。
# l2_adapter_config_XXX.yaml
nvipc_config_file: nvipc_multi_instances.yaml
在 L1 中配置 “prefix” 并为每个 L2 实例分配 L1 小区。
假设在 cuphycontroller_XXX.yaml 中配置了 8 个小区,它们的索引为 0 ~ 7。
L1 cells: 0 ~ 7
The 1st L2 instance cells: 0 ~ 3
The 2nd L2 instance cells: 4 ~ 7
然后配置
# nvipc_multi_instances.yaml
transport:
- transport_id: 0
phy_cells: [0, 1, 2, 3]
type: shm
shm_config:
prefix: nvipc
...

- transport_id: 1
phy_cells: [4, 5, 6, 7]
type: shm
shm_config:
prefix: nvipc1
...

The cell_id map between L1 and L2 is maintained in cuphycontroller:
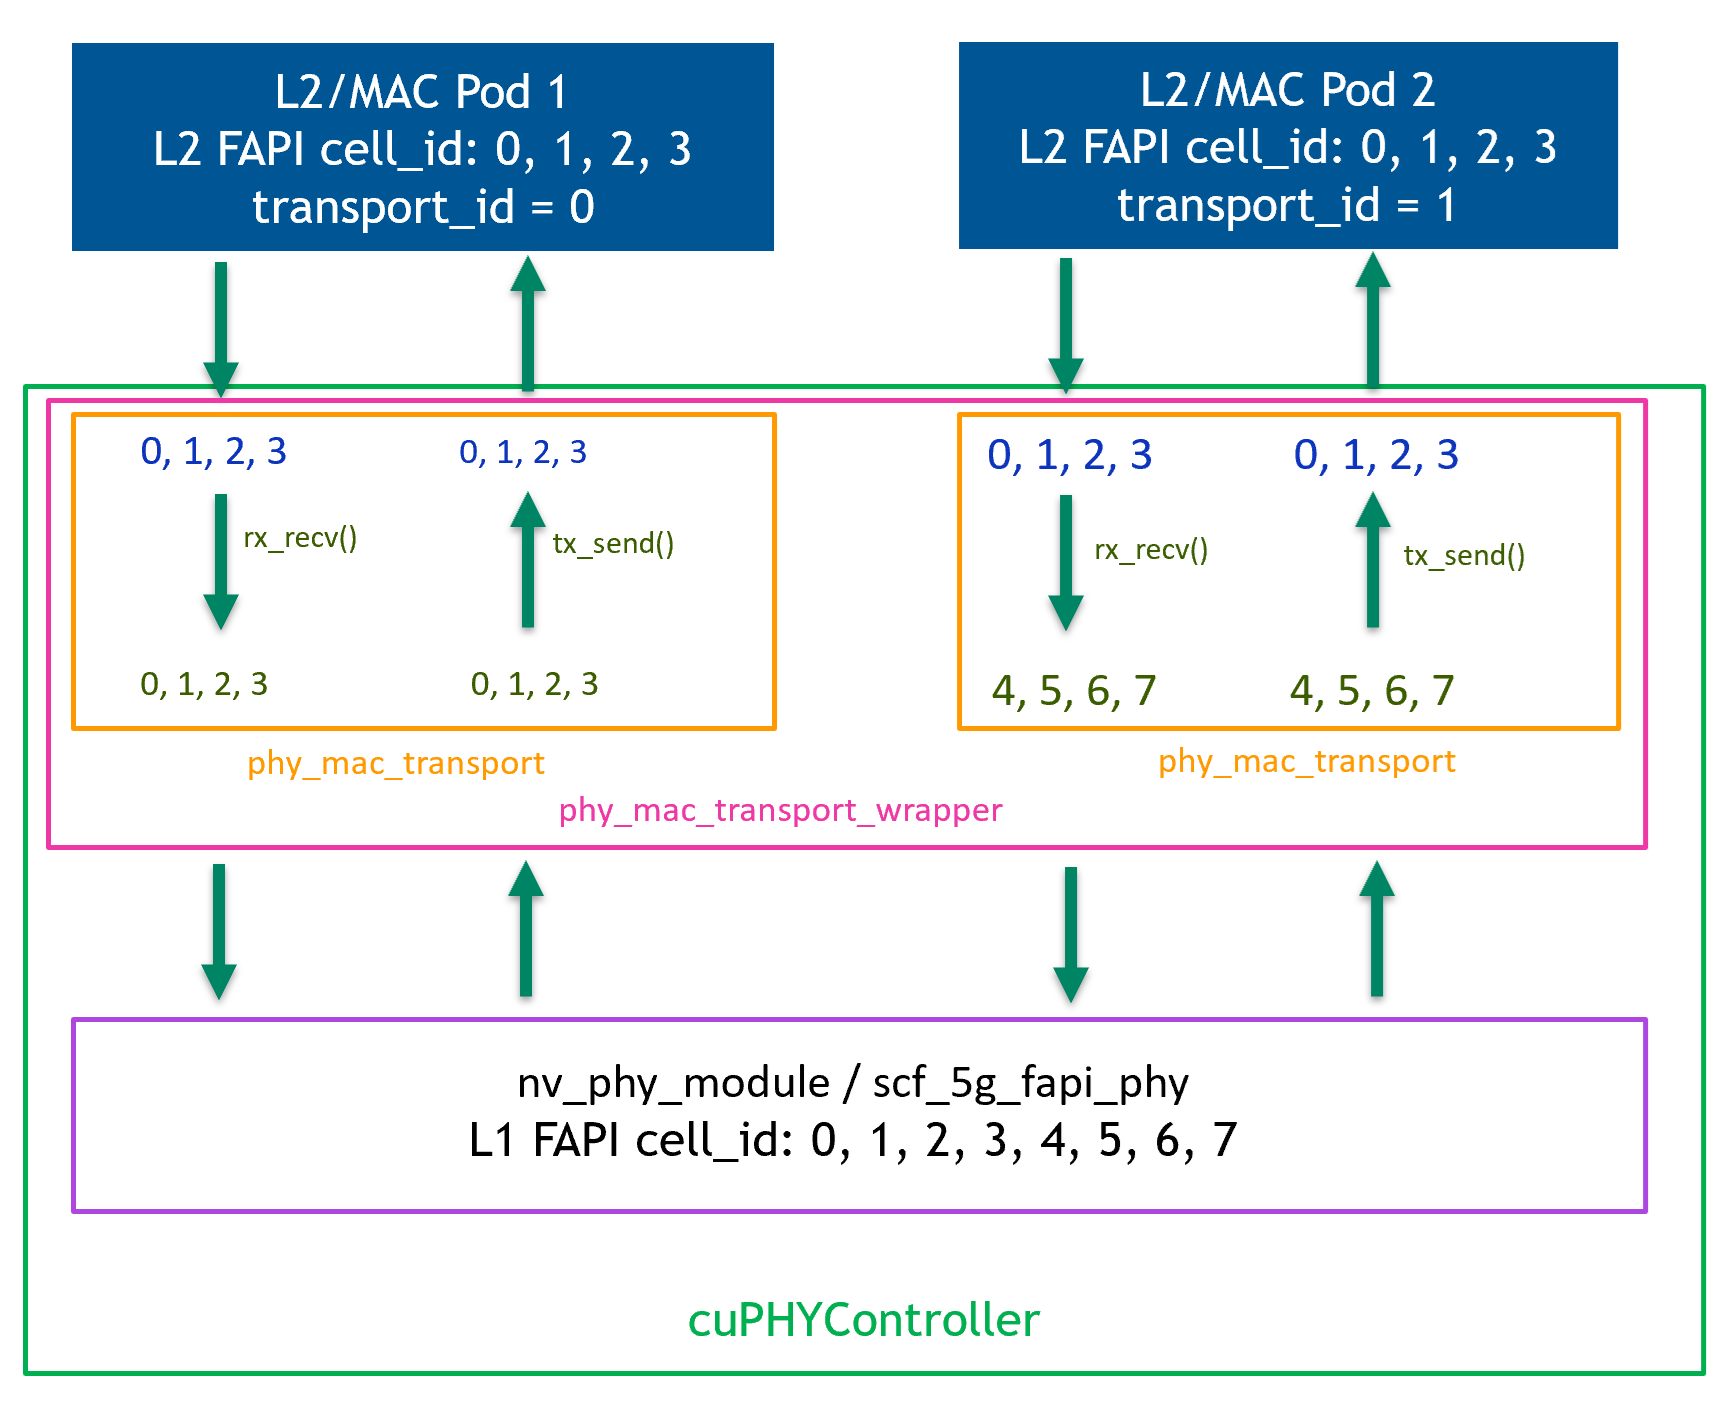
运行测试。
以 F08 8C_60 为例
sudo ./ru_emulator F08 8C_60

sudo -E ./cuphycontroller_scf F08_CG1

# Run the 1st test_mac instance with default config file: test_mac_config.yaml
sudo ./test_mac F08 8C_60 --cells 0x0F

# Run the 2nd test_mac instance with another config file: test_mac_config_1.yaml
sudo ./test_mac F08 8C_60 --cells 0xF0 --config test_mac_config_1.yaml
查看 L1 中的 8 个小区的吞吐量和每个 L2 实例中的 4 个小区的吞吐量。
多个 L2 实例中的 OAM 命令#
在多个 L2 实例的情况下,OAM 命令没有变化。请注意以下事项
在多 L2 情况下,“schedule_total_time” 容差比单 L2 情况略低。请将多 L2 情况的 schedule_total_time 设置为至少比单 L2 的相同情况低 20us。建议设置为 400000 以进行功能测试。
FAPI 时序容差的细微差异是预期的,因为有多个 NVIPC 实例在不同的进程中工作,并且添加了额外的 SLOT.ind 消息。
L1 中使用了两种类型的小区 ID
FAPI cell_id:每个应用程序中的小区实例索引。它从 0 开始,并且在每个 L1/L2 应用程序实例中是唯一的(但可以在不同的 L2 应用程序实例中重复)。它也用作 FAPI 消息中的 cell_id / handle_id。
mplane_id:在 cuphycontroller_xxx.yaml 中可配置并在 cuPHYDriver 中使用的任意整数值。
OAM 命令中的 “cell_id” 是 mplane_id,而不是 FAPI cell_id。
# cuphycontroller_XXX.yaml

cells:
  - name: O-RU 0  # FAPI cell_id is the cell instance index. For the first cell, FAPI cell_id = 0
  cell_id: 1      # Here "cell_id" is actually "mplane_id" in source code. Current default config is: mplane_id = FAPI cell_id + 1
在以下 OAM 命令示例中,传递 mplane_id = 1 以选择第一个小区。
# Usage: aerial_cell_param_net_update.py cell_id dst_mac_addr vlan_tci

cd $cuBB_SDK/build/cuPHY-CP/cuphyoam && python3 $cuBB_SDK/cuPHY-CP/cuphyoam/examples/aerial_cell_param_net_update.py 1 20:04:9B:9E:27:B3 E002