DOCA GPU 数据包处理应用程序指南
本指南描述了 GPU 数据包处理应用程序,以演示如何使用 DOCA GPUNetIO、DOCA Ethernet 和 DOCA Flow 库来实现 GPU 流量分析器。
网络数据包的实时 GPU 处理是多个不同应用领域的一项实用技术,包括信号处理、网络安全、信息收集和输入重建。这些应用程序的目标是实现一个内联数据包处理管道,以在 GPU 内存中接收数据包(无需通过 CPU 内存进行暂存副本),使用一个或多个 CUDA 内核并行处理它们,然后运行推理、评估或通过网络发送计算结果。

数据处理的类型在很大程度上取决于用例。此应用程序的目标是提供一个基本布局,以便在最常见的用例中重用,即能够接收、区分和管理以下类型的网络流量在多个队列中:UDP、TCP 和 ICMP。
此应用程序是对 这篇 关于 DOCA GPUNetIO 的 NVIDIA 博客文章中提出的用例的增强。
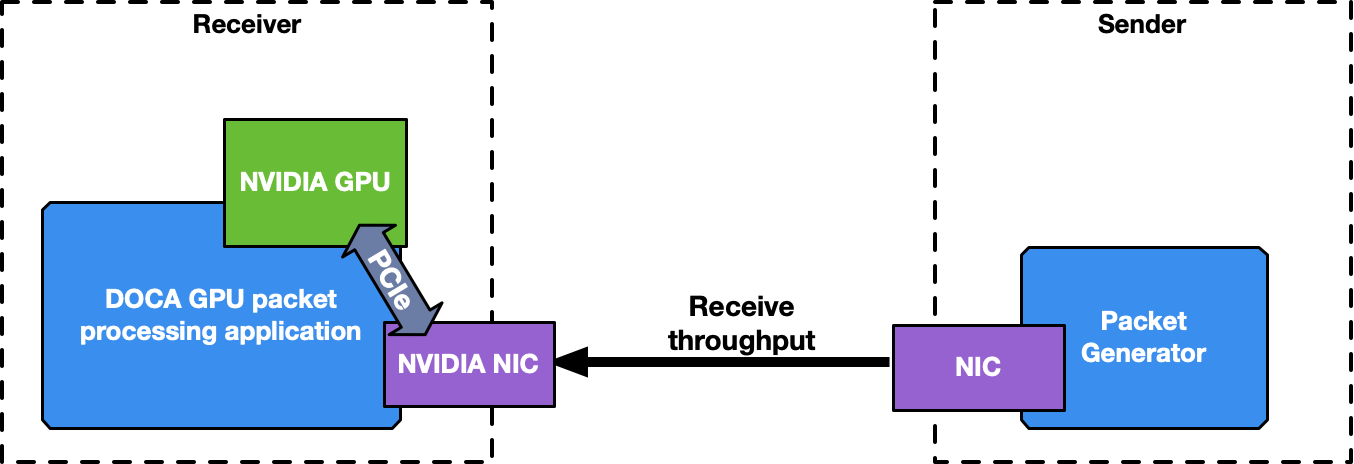
这是一个接收和处理 DOCA 应用程序,因此需要数据包生成器发送数据包来测试该应用程序。

要启动应用程序,需要 GPU 和 NIC 的 PCIe 地址。
应用程序以不同的方式管理不同类型的流量,使用 DOCA Flow 和 RSS 模式为每种流量分配最多 4 个接收队列,以将每个数据包分配到正确的队列。应用程序使用的队列越多,接收数据处理的并行度和所需时间就越高。
强烈建议为 100Gb/s 或更高的网络流量吞吐量使用多个接收队列。
ICMP 网络流量
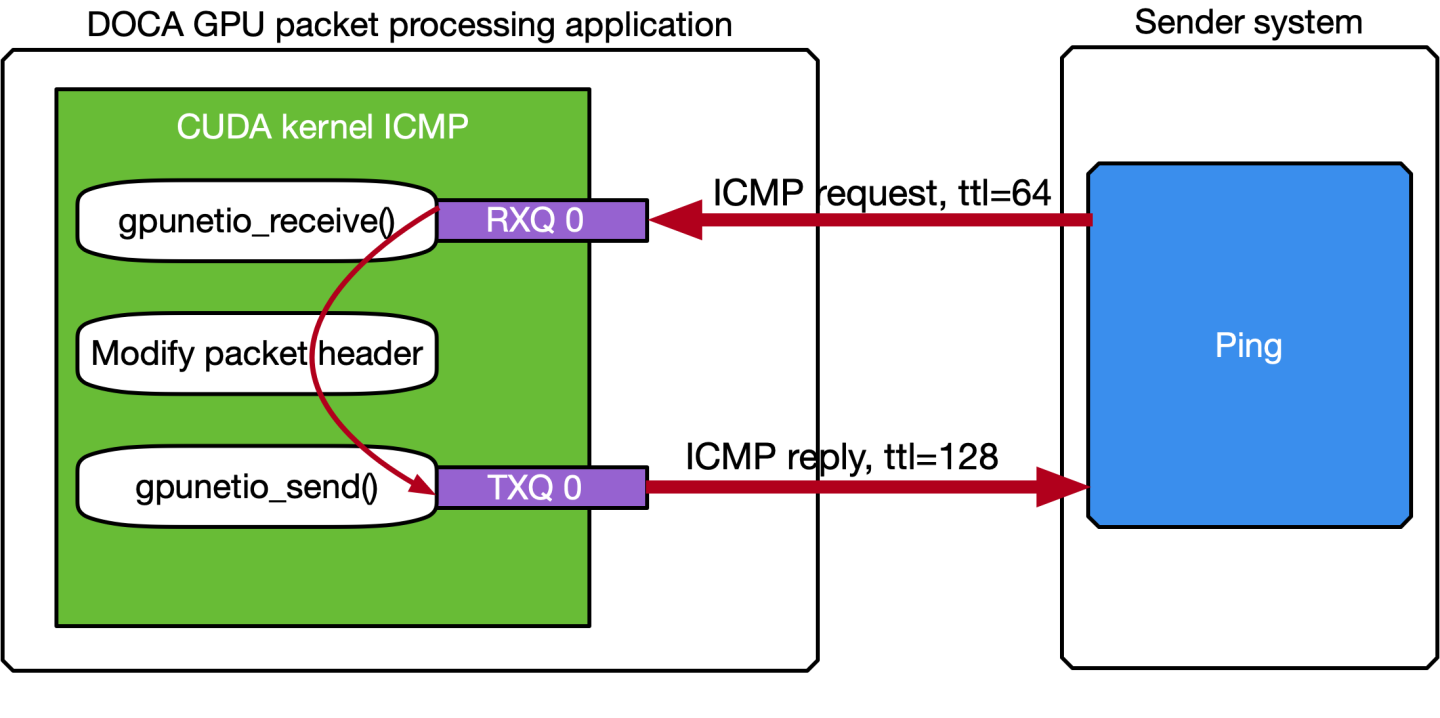
如果用于应用程序的网络接口具有 IP 地址,则可以 ping 该接口。ICMP 数据包由专用的 CUDA 内核(文件 gpu_kernels/receive_icmp.cu)接收,该内核
使用 DOCA GPUNetIO CUDA warp 级别函数
doca_gpu_dev_eth_rxq_receive_warp接收数据包。检查数据包是否为 ICMP 回显请求。
转发相同的数据包,修改一些标头信息(例如,交换 MAC 和 IP 地址,更改 ICMP 数据包类型)。
使用 DOCA GPUNetIO 线程级别函数
doca_gpu_dev_eth_txq_send_enqueue_strong将修改后的数据包推送到发送队列中。使用 DOCA GPUNetIO 线程级别函数
doca_gpu_dev_eth_txq_commit_strong和doca_gpu_dev_eth_txq_push发送数据包。
这不是计算密集型用例,因此单个 CUDA warp 仅使用一个接收队列和一个发送队列就足以保持良好的延迟。
默认情况下,OS CPU ping TTL 设置为 64。因此,为了确保 GPU 实际回复 ICMP ping 请求,在此应用程序中 TTL 设置为 128。

以下是此用例的动机
提供一个简单的工具来检查数据包生成器机器和 DOCA 应用程序机器之间的连接
使用像 ping 这样的知名工具来了解两台机器之间的网络延迟
展示一种接收和转发修改后的数据包的简便方法
提供 CUDA 内核接收和转发流量的 warp 级别实现
假设要 ping 的网络接口的 IP 地址为 192.168.1.1,这是预期的输出
            $ ping 192.168.1.1
PING 192.168.1.1 (192.168.1.1) 56(84) bytes of data.
64 bytes from 192.168.1.1: icmp_seq=1 ttl=64 time=0.324 ms
64 bytes from 192.168.1.1: icmp_seq=2 ttl=64 time=0.332 ms
64 bytes from 192.168.1.1: icmp_seq=3 ttl=64 time=0.299 ms
64 bytes from 192.168.1.1: icmp_seq=4 ttl=64 time=0.309 ms
64 bytes from 192.168.1.1: icmp_seq=5 ttl=64 time=0.323 ms
64 bytes from 192.168.1.1: icmp_seq=6 ttl=64 time=0.300 ms
64 bytes from 192.168.1.1: icmp_seq=7 ttl=64 time=0.274 ms
64 bytes from 192.168.1.1: icmp_seq=8 ttl=64 time=0.314 ms
64 bytes from 192.168.1.1: icmp_seq=9 ttl=64 time=0.327 ms
64 bytes from 192.168.1.1: icmp_seq=10 ttl=64 time=0.384 ms
# At this point, the DOCA application has been started on the 192.168.1.1 interface
# TTL becomes 128 as it's the GPU replying to ICMP requests now instead of the OS
64 bytes from 192.168.1.1: icmp_seq=11 ttl=128 time=0.346 ms
64 bytes from 192.168.1.1: icmp_seq=12 ttl=128 time=0.274 ms
64 bytes from 192.168.1.1: icmp_seq=13 ttl=128 time=0.294 ms
64 bytes from 192.168.1.1: icmp_seq=14 ttl=128 time=0.240 ms
64 bytes from 192.168.1.1: icmp_seq=15 ttl=128 time=0.273 ms
64 bytes from 192.168.1.1: icmp_seq=16 ttl=128 time=0.238 ms
64 bytes from 192.168.1.1: icmp_seq=17 ttl=128 time=0.252 ms
64 bytes from 192.168.1.1: icmp_seq=18 ttl=128 time=0.232 ms
64 bytes from 192.168.1.1: icmp_seq=19 ttl=128 time=0.278 ms
......
DOCA 进度引擎连接到用于转发 ICMP 数据包的 DOCA Ethernet Txq 上下文。这些数据包从 GPU 发送,并带有DOCA_GPU_SEND_FLAG_NOTIFY标志,这会在 NIC 发送每个数据包后创建通知。
然后 CPU 通过 doca_pe_progress 函数分析所有通知。最终效果是应用程序的输出,它返回两次 ping 之间的距离(以秒为单位)。以下是每 0.5 秒 ping 一次的示例
            $ ping -i 0.5 192.168.1.1
PING 192.168.1.1 (192.168.1.1) 56(84) bytes of data.
64 bytes from 192.168.1.1: icmp_seq=1 ttl=128 time=0.202 ms
64 bytes from 192.168.1.1: icmp_seq=2 ttl=128 time=0.179 ms
64 bytes from 192.168.1.1: icmp_seq=3 ttl=128 time=0.199 ms
64 bytes from 192.168.1.1: icmp_seq=4 ttl=128 time=0.180 ms
64 bytes from 192.168.1.1: icmp_seq=5 ttl=128 time=0.200 ms
64 bytes from 192.168.1.1: icmp_seq=6 ttl=128 time=0.189 ms
......
在 DOCA 侧,应用程序应为所有接收和重新传输的 ICMP 数据包打印日志
            Seconds 5
[UDP] QUEUE: 0 DNS: 0 OTHER: 0 TOTAL: 0
[TCP] QUEUE: 0 HTTP: 0 HTTP HEAD: 0 HTTP GET: 0 HTTP POST: 0 TCP [SYN: 0 FIN: 0 ACK: 0] OTHER: 0 TOTAL: 0
[13:54:19:202061][2688665][DOCA][INF][gpu_packet_processing.c:77][debug_send_packet_icmp_cb] ICMP debug event: Queue 0 packet 3 sent at 1702302859201997120 time from last ICMP is 0.512025 sec
[13:54:19:713960][2688665][DOCA][INF][gpu_packet_processing.c:77][debug_send_packet_icmp_cb] ICMP debug event: Queue 0 packet 4 sent at 1702302859713896620 time from last ICMP is 0.511899 sec
[13:54:20:225891][2688665][DOCA][INF][gpu_packet_processing.c:77][debug_send_packet_icmp_cb] ICMP debug event: Queue 0 packet 5 sent at 1702302860225868072 time from last ICMP is 0.511971 sec
[13:54:20:737823][2688665][DOCA][INF][gpu_packet_processing.c:77][debug_send_packet_icmp_cb] ICMP debug event: Queue 0 packet 6 sent at 1702302860737781760 time from last ICMP is 0.511914 sec
[13:54:21:249763][2688665][DOCA][INF][gpu_packet_processing.c:77][debug_send_packet_icmp_cb] ICMP debug event: Queue 0 packet 7 sent at 1702302861249723044 time from last ICMP is 0.511941 sec
[13:54:21:761614][2688665][DOCA][INF][gpu_packet_processing.c:77][debug_send_packet_icmp_cb] ICMP debug event: Queue 0 packet 8 sent at 1702302861761588848 time from last ICMP is 0.511866 sec
[13:54:22:273689][2688665][DOCA][INF][gpu_packet_processing.c:77][debug_send_packet_icmp_cb] ICMP debug event: Queue 0 packet 9 sent at 1702302862273643536 time from last ICMP is 0.512055 sec
[13:54:22:785543][2688665][DOCA][INF][gpu_packet_processing.c:77][debug_send_packet_icmp_cb] ICMP debug event: Queue 0 packet 10 sent at 1702302862785527576 time from last ICMP is 0.511884 sec
[13:54:23:297545][2688665][DOCA][INF][gpu_packet_processing.c:77][debug_send_packet_icmp_cb] ICMP debug event: Queue 0 packet 11 sent at 1702302863297501448 time from last ICMP is 0.511974 sec
[13:54:23:809406][2688665][DOCA][INF][gpu_packet_processing.c:77][debug_send_packet_icmp_cb] ICMP debug event: Queue 0 packet 12 sent at 1702302863809350664 time from last ICMP is 0.511849 sec

Seconds 10
[UDP] QUEUE: 0 DNS: 0 OTHER: 0 TOTAL: 0
[TCP] QUEUE: 0 HTTP: 0 HTTP HEAD: 0 HTTP GET: 0 HTTP POST: 0 TCP [SYN: 0 FIN: 0 ACK: 0] OTHER: 0 TOTAL: 0
[13:54:24:321405][2688665][DOCA][INF][gpu_packet_processing.c:77][debug_send_packet_icmp_cb] ICMP debug event: Queue 0 packet 13 sent at 1702302864321391148 time from last ICMP is 0.512040 sec
[13:54:24:833338][2688665][DOCA][INF][gpu_packet_processing.c:77][debug_send_packet_icmp_cb] ICMP debug event: Queue 0 packet 14 sent at 1702302864833270356 time from last ICMP is 0.511879 sec
[13:54:25:345302][2688665][DOCA][INF][gpu_packet_processing.c:77][debug_send_packet_icmp_cb] ICMP debug event: Queue 0 packet 15 sent at 1702302865345282728 time from last ICMP is 0.512012 sec
[13:54:25:857199][2688665][DOCA][INF][gpu_packet_processing.c:77][debug_send_packet_icmp_cb] ICMP debug event: Queue 0 packet 16 sent at 1702302865857133664 time from last ICMP is 0.511851 sec
[13:54:26:369131][2688665][DOCA][INF][gpu_packet_processing.c:77][debug_send_packet_icmp_cb] ICMP debug event: Queue 0 packet 17 sent at 1702302866369128728 time from last ICMP is 0.511995 sec......
UDP 网络流量
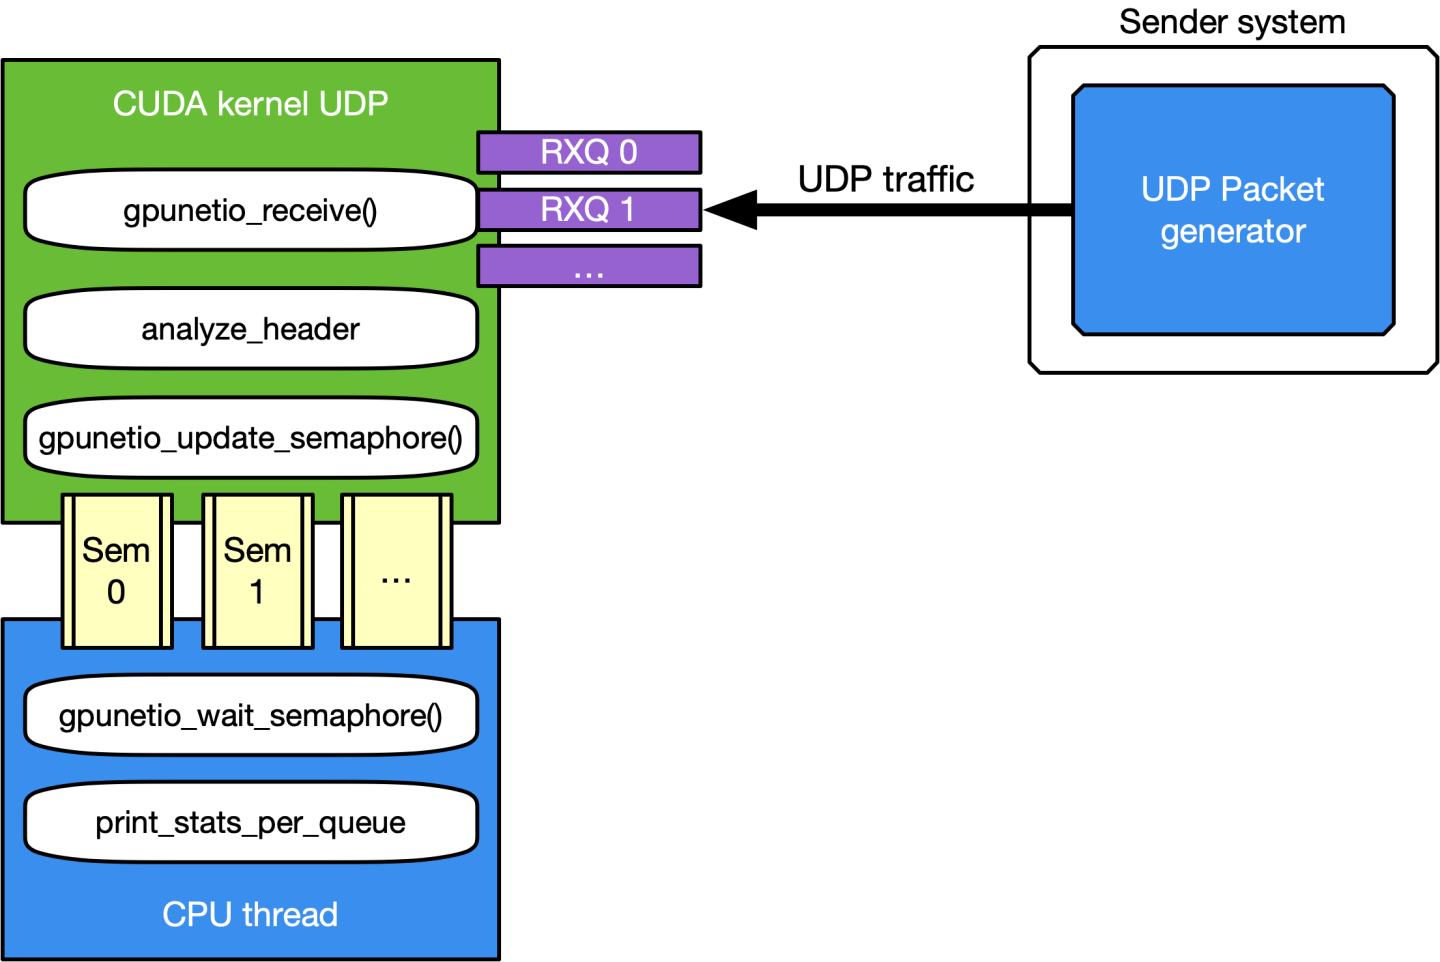
这是接收和分析数据包标头的最通用用例。CUDA 内核负责处理 UDP 流量,旨在跟上 100Gb/s 的传入网络流量,它将一个包含 512 个 CUDA 线程的 CUDA 块(文件 gpu_kernels/receive_udp.cu)专用于不同的 Ethernet UDP 接收队列。
数据路径循环为
使用 DOCA GPUNetIO CUDA 块级别函数
doca_gpu_dev_eth_rxq_receive_block接收数据包。每个 CUDA 线程处理接收到的数据包的子集。
检索包含数据包的 DOCA 缓冲区。
分析数据包有效负载,以区分 DNS 数据包和其他 UDP 通用数据包。
清除数据包有效负载,以确保不会再次分析旧的过时数据包。
每个 CUDA 块通过 DOCA GPUNetIO 信号量向 CPU 线程报告有关接收到的数据包类型的统计信息。
CPU 线程轮询信号量以检索统计信息并将其打印到控制台。

此用例的动机主要是提供一个应用程序模板,以便
接收和分析数据包标头,以区分不同的 UDP 协议
通过 DOCA GPUNetIO 信号量向 CPU 报告统计信息
可以使用多个知名的数据包生成器来测试此模式,例如 T-Rex 或 DPDK testpmd。
TCP 网络流量和 HTTP 回显服务器
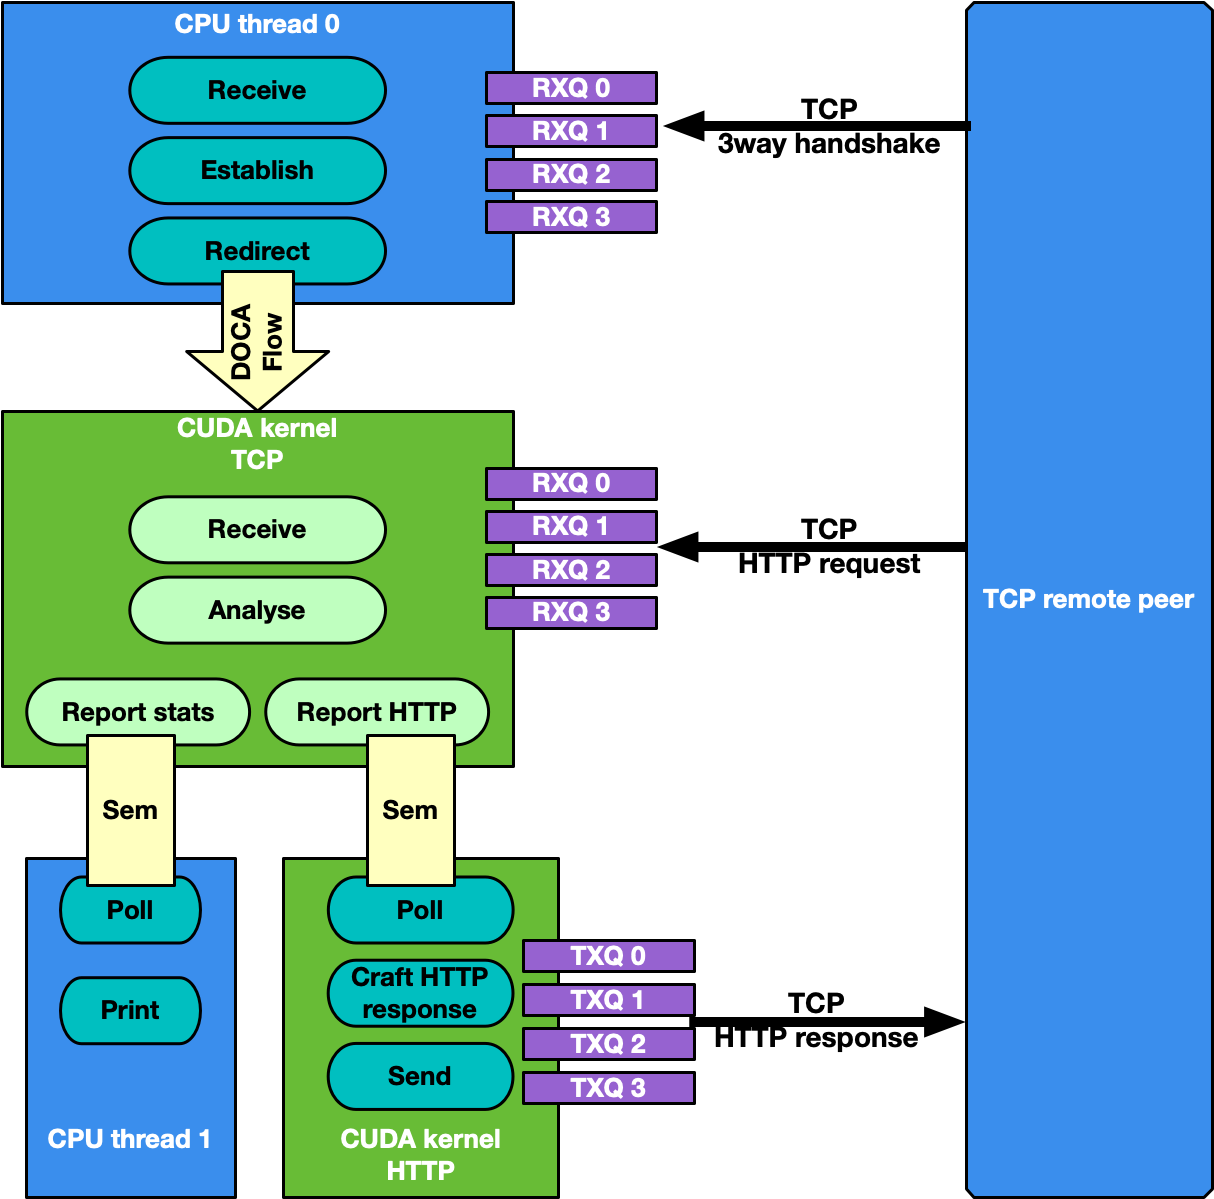
默认情况下,TCP 流管理与 UDP 相同:接收 TCP 数据包并分析其标头,以向 CPU 报告有关接收到的数据包类型的统计信息。这适用于被动流量分析器或嗅探器,但有时数据包处理应用程序需要直接从 TCP 对等方接收数据包,这意味着通过三次握手方法建立 TCP 可靠连接。因此,可以通过 -s 命令行标志启用 TCP“服务器”模式,该标志启用“HTTP 回显服务器”模式,其中 CPU 和 GPU 协作建立 TCP 连接并处理 TCP 数据包。
具体而言,在这种情况下,存在两组不同的接收队列
CPU DPDK 接收队列,用于接收 TCP“控制”数据包(例如 SYN、FIN 或 RST)
DOCA GPUNetIO 接收队列,用于接收 TCP“数据”数据包
这种区分得益于 DOCA Flow 功能。
应用程序的流程需要 CPU 和 GPU 协作,如下 subsections 中所述。
步骤 1:TCP 连接建立
CPU 线程通过 DPDK 队列从远程 TCP 对等方接收 TCP SYN 数据包。CPU 线程与对等方建立 TCP 可靠连接(回复 TCP SYN-ACK 数据包),并使用 DOCA Flow 创建新的转向规则,以将 TCP 数据数据包重定向到 DOCA GPUNetIO 接收队列之一。新的转向规则排除控制数据包(例如,SYN、FIN 或 RST)。
步骤 2:TCP 数据处理
负责 TCP 处理的 CUDA 内核接收 TCP 数据数据包并执行 TCP 数据包标头分析。如果它收到 HTTP GET 请求,则会将相关数据包的信息存储在 DOCA GPUNetIO 信号量的下一个项目中,并将其设置为 READY。
步骤 3:HTTP 回显服务器
负责 HTTP 处理的第二个 CUDA 内核轮询 DOCA GPUNetIO 信号量。一旦检测到下一个项目更新为 READY,它将读取 HTTP GET 数据包信息并制作包含 HTML 页面的 HTTP 响应数据包。
如果请求是关于 index.html 或 contacts.html,则 CUDA 内核将使用 200 OK 代码回复相应的 HTML 页面。对于所有其他请求,它将返回“找不到页面”和 404 Error 代码。
HTTP 响应数据包由第二个 HTTP CUDA 内核使用 DOCA GPUNetIO 发送。
必须注意维护数据包标头中的 TCP 序列号/确认号。
步骤 4:TCP 连接关闭
如果 CPU 通过 DPDK 队列接收到 TCP FIN 数据包,它将关闭与远程 TCP 对等方的连接,并从 DOCA GPUNetIO 队列中删除 DOCA Flow 规则,以便 CUDA 内核无法再从该 TCP 对等方接收数据包。

此用例的动机
接收和分析数据包标头,以区分不同的 TCP 协议
在被动模式(嗅探)和主动模式(可靠连接)下在 GPU 上处理 TCP 数据包
拥有一个 DOCA-DPDK 应用程序,能够建立 TCP 可靠连接,而无需使用任何 OS 套接字并绕过内核例程
通过 DOCA GPUNetIO 信号量实现 CUDA 内核到 CUDA 内核的通信
展示如何使用 DOCA GPUNetIO 从头开始创建和发送数据包
假设用于运行应用程序的网络接口的 IP 地址为 192.168.1.1,可以使用简单的工具(如 curl 或 wget)来测试此 HTTP 回显服务器模式。
使用 curl 的示例
            $ curl http://192.168.1.1/index.html -ivvv

*   Trying 192.168.1.1:80...
* Connected to 192.168.1.1 (192.168.1.1) port 80 (#0)
> GET /index.html HTTP/1.1
> Host: 192.168.1.1
> User-Agent: curl/7.81.0
> Accept: */*
>
* Mark bundle as not supporting multiuse
< HTTP/1.1 200 OK
HTTP/1.1 200 OK
< Date: Sun, 30 Apr 2023 20:30:40 GMT
Date: Sun, 30 Apr 2023 20:30:40 GMT
< Content-Type: text/html; charset=UTF-8
Content-Type: text/html; charset=UTF-8
< Content-Length: 158
Content-Length: 158
< Last-Modified: Sun, 30 Apr 2023 22:38:34 GMT
Last-Modified: Sun, 30 Apr 2023 22:38:34 GMT
< Server: GPUNetIO
Server: GPUNetIO
< Accept-Ranges: bytes
Accept-Ranges: bytes
< Connection: keep-alive
Connection: keep-alive
< Keep-Alive: timeout=5
Keep-Alive: timeout=5

<
<html>
  <head>
    <title>GPUNetIO index page</title>
  </head>
  <body>
    <p>Hello World, the GPUNetIO server Index page!</p>
  </body>
</html>

* Connection #0 to host 192.168.1.1 left intact
在运行应用程序之前,您需要确保您拥有以下内容
gdrdrv内核模块 – 在系统上处于活动状态并正在运行nvidia-peermem内核模块 – 在系统上处于活动状态并正在运行您要使用的网卡接口已启动
有关如何安装 BlueField 相关软件的详细信息,请参阅 Linux 版 DOCA 安装指南。
DOCA 参考应用程序的安装包含应用程序的源代码以及匹配的编译说明。这允许“按原样”编译应用程序,并提供修改源代码,然后编译应用程序新版本的能力。
有关应用程序以及开发和编译技巧的更多信息,请参阅 DOCA 参考应用程序页面。
应用程序的源代码可以在应用程序的目录下找到:/opt/mellanox/doca/applications/gpu_packet_processing/。
编译所有应用程序
所有 DOCA 应用程序都在单个 meson 项目下定义。因此,默认情况下,编译包括所有应用程序。
要一起构建所有应用程序,请运行
            cd /opt/mellanox/doca/applications/
meson /tmp/build
ninja -C /tmp/build
doca_gpu_packet_processing 在 /tmp/build/gpu_packet_processing/ 下创建。
仅编译当前应用程序
要直接仅构建 GPU 数据包处理应用程序
            cd /opt/mellanox/doca/applications/
meson /tmp/build -Denable_all_applications=false -Denable_gpu_packet_processing=true
ninja -C /tmp/build
doca_gpu_packet_processing 在 /tmp/build/gpu_packet_processing/ 下创建。
或者,用户可以在 meson_options.txt 文件中设置所需的标志,而不是在编译命令行中提供它们
在
/opt/mellanox/doca/applications/meson_options.txt中编辑以下标志将
enable_all_applications设置为false将
enable_gpu_packet_processing设置为true
运行以下编译命令
            cd /opt/mellanox/doca/applications/
meson /tmp/build
ninja -C /tmp/build
信息doca_gpu_packet_processing在/tmp/build/gpu_packet_processing/下创建。
故障排除
有关应用程序编译过程中遇到的任何问题,请参阅 DOCA 故障排除。
GPU 数据包处理应用程序以源代码形式提供。因此,在执行应用程序之前需要进行编译。
应用程序使用说明
Usage: doca_gpu_packet_processing [DOCA Flags] [Program Flags] DOCA Flags: -h, --help Print a help synopsis -v, --version Print program version information -l, --log-level Set the (numeric) log level
forthe program <10=DISABLE,20=CRITICAL,30=ERROR,40=WARNING,50=INFO,60=DEBUG,70=TRACE> --sdk-log-level Set the SDK (numeric) log levelforthe program <10=DISABLE,20=CRITICAL,30=ERROR,40=WARNING,50=INFO,60=DEBUG,70=TRACE> -j, --json <path> Parse all command flags from an input json file Program Flags: -g, --gpu <GPU PCIe address> GPU PCIe address to be used by the app -n, --nic <NIC PCIe address> DOCA device PCIe address used by the app -q, --queue <GPU receive queues> DOCA GPUNetIO receive queue per flow -s, --httpserver <Enable GPU HTTP server> Enable GPU HTTP server mode信息此用法打印输出可以使用
-h(或--help)选项打印到命令行./doca_gpu_packet_processing -h
信息有关更多信息,请参阅“命令行标志”部分。
在主机上运行应用程序的 CLI 示例
假设 GPU PCIe 地址为
ca:00.0,NIC PCIe 地址为17:00.0,具有 2 个 GPUNetIO 接收队列./doca_gpu_packet_processing -n 17:00.0 -g ca:00.0 -q 2
注意请参阅 DOCA 虚拟功能用户指南中的“在主机上运行 DOCA 应用程序”部分。
命令行标志
标志类型 | 短标志 | 长标志 | 描述 |
通用标志 |
|
| 打印帮助概要 |
|
| 打印程序版本信息 | |
|
| 设置应用程序的日志级别
| |
N/A |
| 设置程序的日志级别
| |
|
| 从输入 JSON 文件解析所有命令标志 | |
程序标志 |
|
| GPU PCIe 地址,格式为 |
|
| 网卡端口 PCIe 地址,格式为 | |
|
| 示例中要使用的接收队列数。默认为 1,最大允许值为 4。 | |
|
| 启用 TCP HTTP 服务器模式。使用此标志,TCP 数据包不会像常规嗅探器那样被 GPUNetIO 接收,因为它需要先进行 TCP 三次握手以建立可靠的连接。 |
有关支持的标志和执行模式的更多信息,请参阅 DOCA Arg Parser。
故障排除
有关 DOCA 应用程序的安装或执行过程中遇到的任何问题,请参阅 DOCA 故障排除。
以下说明应用程序的流程,重点介绍主要代码块和函数
解析应用程序参数。
            doca_argp_init();
register_application_params();
doca_argp_start();
将网络设备初始化为 DOCA 设备,初始化 DPDK,并获取设备 DPDK 端口 ID。
init_doca_device();
使用空标志调用
rte_eal_init()以初始化 EAL 资源。初始化 GPU 设备,为其创建 DOCA GPUNetIO 句柄。
doca_gpu_create();
初始化 DOCA Flow,启动 DPDK 端口。
init_doca_flow();
用于初始化 DOCA Flow 的标志是 VNF、HW 转向和隔离模式(以防止默认 RSS 流干扰 GPUNetIO 队列)。
创建 RX 和 TX 队列相关对象(即,以太网处理程序、GPUNetIO 处理程序、流规则、信号量)以管理 UDP、TCP 和 ICMP 流。
create_udp_queues(); create_tcp_queues(); create_icmp_queues();
/* Depending on TCP mode (HTTP server or not) properly connect different DOCA Flow pipes */create_root_pipe();分配通用退出标志。所有 CUDA 内核定期轮询此标志。如果 CPU 将其设置为 1,则 CUDA 内核从其主循环退出并返回。
doca_gpu_mem_alloc(gpu_dev, sizeof(uint32_t), alignment, DOCA_GPU_MEM_GPU_CPU, (
void**)&gpu_exit_condition, (void**)&cpu_exit_condition);启动 CUDA 内核,每个内核在不同的流上启动。
kernel_receive_udp(rx_udp_stream, gpu_exit_condition, &udp_queues); kernel_receive_tcp(rx_tcp_stream, gpu_exit_condition, &tcp_queues, app_cfg.http_server); kernel_receive_icmp(rx_icmp_stream, gpu_exit_condition, &icmp_queues);
if(app_cfg.http_server) kernel_http_server(tx_http_server, gpu_exit_condition, &tcp_queues, &http_queues);启动 CPU 线程,负责轮询 DOCA GPUNetIO 信号量并在控制台上打印 UDP 和 TCP 统计信息。
rte_eal_remote_launch((
void*)stats_core, NULL, current_lcore);启动 CPU 线程,负责管理 TCP 三次握手连接。
if(app_cfg.http_server) { ... rte_eal_remote_launch(tcp_cpu_rss_func, &tcp_queues, current_lcore); }等待用户发送信号以退出应用程序。发生这种情况时,信号处理程序函数会将
force_quit标志设置为 true,这将导致主线程向前移动并将退出条件设置为 1。while(DOCA_GPUNETIO_VOLATILE(force_quit) ==false); DOCA_GPUNETIO_VOLATILE(*cpu_exit_condition) =1;等待 CUDA 内核退出并完成所有 DOCA Flow 和 GPUNetIO 资源。
cudaStreamSynchronize(rx_udp_stream); cudaStreamSynchronize(rx_tcp_stream); cudaStreamSynchronize(rx_icmp_stream);
if(app_cfg.http_server) cudaStreamSynchronize(tx_http_server); destroy_flow_queue(); doca_gpu_destroy();
/opt/mellanox/doca/applications/gpu_packet_processing/