在断开连接或气隙环境中部署 GPU Operator#
简介#
本页介绍如何在断开连接或气隙环境中的 Openshift Container Platform 集群上成功部署 NVIDIA GPU Operator。
对于安装在受限网络(也称为断开连接的集群)上的 OpenShift Container Platform 集群,默认情况下,Operator Lifecycle Manager (OLM) 无法访问 Red Hat 提供的、托管在远程注册中心上的 OperatorHub 源,因为这些远程源需要完整的互联网连接。
但是,作为集群管理员,如果您拥有具有完整互联网访问权限的工作站,您仍然可以在受限网络中启用集群以使用 OLM。该工作站需要完整的互联网访问权限才能拉取远程 OperatorHub 内容,用于准备远程源的本地镜像,并将内容推送到镜像注册中心。
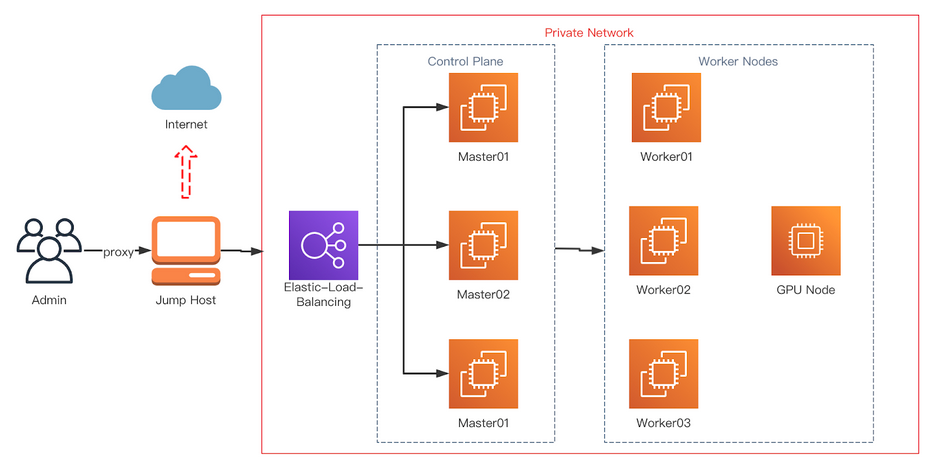
镜像注册中心可以位于堡垒主机上,堡垒主机需要连接到您的工作站和断开连接的集群;或者位于完全断开连接的气隙主机上,气隙主机需要可移动介质才能将镜像内容物理移动到断开连接的环境中。
下图显示了断开连接的集群的典型拓扑。
本指南介绍了在受限网络中启用 OLM 所需的流程
禁用 OLM 的默认远程 OperatorHub 源。
使用具有完整互联网访问权限的工作站来创建 OperatorHub 内容的本地镜像并将其推送到镜像注册中心。
配置 OLM 以从镜像注册中心上的本地源而不是默认远程源安装和管理 Operator。
(可选)镜像 GPU Operator 所需的 yum 仓库。
OpenShift Container Platform 文档提供了关于在受限网络上使用 Operator Lifecycle Manager 的通用指南。
前提条件#
正在运行的 OpenShift 集群,并配置有 GPU 工作节点。有关安装 OpenShift Container Platform 的指南,请参阅 OpenShift Container Platform 安装。
注意
如果在 OpenShift Container Platform 版本 <
4.9.9上安装 NVIDIA GPU Operator,您需要执行以下标记为可选的步骤。 有关更多信息,请参阅 broken driver toolkit。以具有
cluster-admin角色的用户身份访问集群。访问支持 Docker v2-2 的注册中心。 必须在堡垒主机上配置私有注册中心。 这可以是以下注册中心之一
使用
podman创建私有注册中心,相关指南请参见 此处 以及 创建私有注册中心 部分。如果您拥有 Red Hat Quay 的授权,请参阅关于部署 Red Hat Quay 以进行 概念验证目的 或使用 Quay Operator 的文档。 如果您在选择和安装注册中心时需要其他帮助,请联系您的销售代表或 Red Hat 支持。 有关更多信息,请参阅 Red Hat OpenShift Container Platform 文档中的 关于断开连接安装镜像。
注意
当创建自签名证书并且为本地注册中心启用 HTTPS 时,请确保您已将
-addext "subjectAltName=DNS:${JUMP_HOST}"附加到您的openssl命令,否则 OpenShift Container Platform 无法从私有注册中心拉取镜像。如果您未设置使用者备用名称,请在后续章节中运行
oc命令之前,导出环境变量GODEBUG=x509ignoreCN=0。如果您未设置此变量,则oc命令将失败并显示以下错误$ x509: certificate relies on legacy Common Name field, use SANs or temporarily enable Common Name matching with ``GODEBUG=x509ignoreCN=0``.
注意
如果您使用 HTTP,请在 OpenShift Container Platform 中将
insecureRegistries添加到image.config.openshift.io/cluster。 有关该配置的指南,请参见 此处。
在跳转主机上
可选:安装
yum-utils。 这提供了reposync脚本,并且仅在 OpenShift Container Platform 版本4.8.19、4.8.21或4.9.8上安装 NVIDIA GPU Operator 时才需要。
程序包镜像需要 yum-utils,而其余先决条件(如下所列)是镜像镜像所必需的。
podman版本 1.9.3+安装 OpenShift CLI (
oc)。跳转主机上的 Red Hat Enterprise Linux (RHEL)。 配置后,跳转主机将成为私有注册中心主机。
安装用于修剪默认目录的
opmCLI (opm 版本 1.12.3+)。 有关使用 CLI 的信息,请参阅 Red Hat OpenShift Container Platform 文档中的 opm CLI 参考。
设置基本 HTTP 服务器#
镜像镜像需要一个简单的 HTTP 服务器,请按照以下指南设置基本 Web 服务器
安装 Apache
httpd$ yum install httpd -y首次启动 Apache Web 服务器
$ systemctl restart httpd启用 Apache Web 服务器以在系统启动时自动启动
$ systemctl enable httpd
打开端口 80 和 443 以允许 Web 流量访问 Apache Web 服务器服务,并更新系统防火墙规则以允许 HTTP 和 HTTPS 上的入站数据包。
更新 HTTP 的系统防火墙规则
$ firewall-cmd --zone=public --permanent --add-service=http
更新 HTTPS 的系统防火墙规则
$ firewall-cmd --zone=public --permanent --add-service=https
重新加载防火墙
$ firewall-cmd --reload
可选:检查集群中使用的 RHEL 版本#
仅当在 OpenShift Container Platform 版本 4.8.19、4.8.21 或 4.9.8 上安装 NVIDIA GPU Operator 时才需要执行这些步骤。
在镜像 RPM 程序包之前,请检查集群中使用的 RHEL 版本。
要确定集群上运行的 RHEL 版本,请使用 OpenShift CLI 并运行以下命令
$ oc debug $(oc get nodes -oname -lnode-role.kubernetes.io/worker | head -1) -- cat /host/etc/os-release | grep RHEL
输出示例
Starting pod/openshift-worker-0openshiftpool2practiceredhatcom-debug ...
To use host binaries, run `chroot /host`
RHEL_VERSION="8.4"

Removing debug pod ...
这为您提供了 releasever,作为 reposync 的命令行参数提供。
有关登录 OpenShift CLI 的指南,请参见 OpenShift CLI 入门。
可选:镜像 RPM 程序包#
仅当在 OpenShift Container Platform 版本 4.8.19、4.8.21 或 4.9.8 上安装 NVIDIA GPU Operator 时才需要执行这些步骤。
按照以下指南同步所需的 yum 仓库
注意
整个 yum 仓库的大小非常大,请确保您的跳转主机上有足够的空间。 至少需要 50GB。
如果您有权访问 GPG 公钥,请使用以下命令手动导入密钥
$ rpm --import /etc/pki/rpm-gpg/RPM-GPG-KEY-redhat-release创建一个目录以存储下载的仓库
$ mkdir -p /opt/mirror-repos/列出系统启用的所有可用仓库
$ subscription-manager repos --list-enabled输出示例
+----------------------------------------------------------+
      Available Repositories in /etc/yum.repos.d/redhat.repo
+----------------------------------------------------------+
Repo ID:   rhel-8-for-x86_64-appstream-rpms
Repo Name: Red Hat Enterprise Linux 8 for x86_64 - AppStream (RPMs)
Repo URL:  https://cdn.redhat.com/content/dist/rhel8/$releasever/x86_64/appstream/os
Enabled:   1

Repo ID:   rhel-8-for-x86_64-baseos-rpms
Repo Name: Red Hat Enterprise Linux 8 for x86_64 - BaseOS (RPMs)
Repo URL:  https://cdn.redhat.com/content/dist/rhel8/$releasever/x86_64/baseos/os
Enabled:   1
这为您提供了步骤 4 和 5 中需要的
repoid。运行
reposync以将 BaseOS 仓库同步到本地创建的目录$ reposync --gpgcheck --repoid=rhel-8-for-x86_64-baseos-rpms \ --releasever=8.4 \ --download-path=/opt/mirror-repos/ \ --downloadcomps \ --download-metadata \ --nodocs
运行
reposync以将 AppStream 仓库同步到本地创建的目录$ reposync --gpgcheck --repoid=rhel-8-for-x86_64-appstream-rpms \ --releasever=8.4 \ --download-path=/opt/mirror-repos/ \ --downloadcomps \ --download-metadata \ --nodocs
创建一个目录以托管和提供 AppStream RPM 程序包
mkdir -p /var/www/html/content/dist/rhel8/8/x86_64/appstream/创建一个目录以托管和提供 BaseOS RPM 程序包
$ mkdir -p /var/www/html/content/dist/rhel8/8/x86_64/baseos/在下载的仓库和跳转主机上用于提供 RPM 的文档根目录之间创建符号链接。
在下载的 BaseOS 仓库和文档根目录之间创建符号链接
$ ln -s /opt/mirror-repos/rhel-8-for-x86_64-baseos-rpms/ /var/www/html/content/dist/rhel8/8/x86_64/baseos/os在下载的 AppStream 仓库和文档根目录之间创建符号链接
$ ln -s /opt/mirror-repos/rhel-8-for-x86_64-appstream-rpms /var/www/html/content/dist/rhel8/8/x86_64/appstream/os
创建私有注册中心#
创建一个私有注册中心以托管镜像 Operator Catalog 所需的镜像内容。 目标注册中心必须支持 Docker v2-2。 对于受限网络上的集群,此注册中心可以是集群可以网络访问的注册中心。
注意
Red Hat 不支持基于 docker.io/library/registry:2 API 部署断开连接的注册中心主机。 您可以使用以下不受支持的步骤基于 docker.io/library/registry:2 API 创建镜像主机。
以下步骤创建一个简单的注册中心,该注册中心将数据存储在 /opt/registry 文件夹中,并在 podman 容器中运行。 您可以使用不同的注册中心解决方案,例如 Red Hat Quay。 有关如何 镜像断开连接安装的镜像 的说明,请参阅 Red Hat OpenShift Container Platform 文档。
使用以下步骤在跳转主机上配置私有注册中心
安装所需的程序包
$ yum -y install podman httpd httpd-toolspodman程序包提供了运行注册中心所在的容器程序包。httpd-tools程序包提供了htpasswd实用程序,您可以使用它来创建用户。为注册中心创建文件夹
$ mkdir -p /opt/registry/{auth,certs,data}
这些文件夹安装在注册中心容器内。
设置以下环境变量
$ export JUMP_HOST=<Your_jump_hostname>
访问
cd /opt/registry/certs目录$ cd /opt/registry/certs
为注册中心提供证书。 如果您没有现有的受信任的证书颁发机构,则可以生成自签名证书
$ openssl req -addext "subjectAltName=DNS:${JUMP_HOST}" -newkey rsa:4096 -nodes -sha256 -keyout domain.key -x509 -days 365 -out domain.crt
注意
需要 OpenSSL 版本 1.1.1 或更高版本。
在提示符下,提供证书的所需值
字段
描述
国家名称(两位字母代码)
指定您所在位置的两位字母 ISO 国家代码。 请参阅 ISO 3166 国家代码标准。
州或省名称(全名)
输入您的州或省的完整名称。
城市名称(例如,城市)
输入您的城市名称。
组织名称(例如,公司)
输入您的公司名称。
组织单位名称(例如,部门)
输入您的部门名称。
常用名称(例如,您的姓名或服务器的主机名)
输入注册中心主机的主机名。 确保您的主机名在 DNS 中,并且可以解析为预期的 IP 地址。
电子邮件地址
有关更多信息,请参阅 OpenSSL 文档中的 req 描述。
为您的注册中心生成使用
bcrpt格式的用户名和密码$ htpasswd -bBc /opt/registry/auth/htpasswd <user_name> <password>将
<user_name>和<password>替换为用户名和密码。创建 mirror-registry 容器以托管您的注册中心
$ podman run --name mirror-registry -p $JUMP_HOST_PORT:5000 \
          -v /opt/registry/data:/var/lib/registry:z \
          -v /opt/registry/auth:/auth:z \
          -e "REGISTRY_AUTH=htpasswd" \
          -e "REGISTRY_AUTH_HTPASSWD_REALM=Registry Realm" \
          -e REGISTRY_AUTH_HTPASSWD_PATH=/auth/htpasswd \
          -v /opt/registry/certs:/certs:z \
          -e REGISTRY_HTTP_TLS_CERTIFICATE=/certs/domain.crt \
          -e REGISTRY_HTTP_TLS_KEY=/certs/domain.key \
          -e REGISTRY_COMPATIBILITY_SCHEMA1_ENABLED=true \
          -d docker.io/library/registry:2
选项的详细信息如下
--namemirror-registry 为容器指定名称mirror-registry。-p $JUMP_HOST_PORT:5000例如-p 5000:5000将容器中的端口5000作为主机上的端口5000公开。-v
/opt/registry/data:/var/lib/registry:z将主机上的/opt/registry/data作为容器中的/var/lib/registry挂载,并具有正确的 SELinux 上下文-v
/opt/registry/auth:/auth:z将主机上的/opt/registry/auth作为容器中的`/auth挂载,并具有正确的 SELinux 上下文。-v
/opt/registry/certs:/certs:z将主机上的/opt/registry/certs作为容器中的/certs挂载,并具有正确的 SELinux 上下文。-e
REGISTRY_AUTH=htpasswd使用bcrypt加密的htpasswd文件进行身份验证。 文件位置由容器的REGISTRY_AUTH_HTPASSWD_PATH环境变量设置。-e
REGISTRY_AUTH_HTPASSWD_REALM=Registry Realm指定用于htpasswd的 realm。-e
REGISTRY_AUTH_HTPASSWD_PATH=/auth/htpasswd使用容器中 bcrypt 加密的/auth/htpasswd文件。-e
REGISTRY_HTTP_TLS_CERTIFICATE=/certs/domain.crt设置证书文件的路径。-e
REGISTRY_HTTP_TLS_KEY=/certs/domain.key设置私钥的路径。-e
REGISTRY_COMPATIBILITY_SCHEMA1_ENABLED=true为 schema1 清单提供向后兼容性。-d 表示
--detach,它在后台运行 pod。docker.io/library/registry:latest是一个注册中心应用程序,允许存储和分发镜像。
示例:
$ podman run --name mirror-registry -p 5000:5000 \
   -v /opt/registry/data:/var/lib/registry:z \
   -v /opt/registry/auth:/auth:z \
   -e "REGISTRY_AUTH=htpasswd" \
   -e "REGISTRY_AUTH_HTPASSWD_REALM=Registry Realm" \
   -e REGISTRY_AUTH_HTPASSWD_PATH=/auth/htpasswd \
   -v /opt/registry/certs:/certs:z \
   -e REGISTRY_HTTP_TLS_CERTIFICATE=/certs/domain.crt \
   -e REGISTRY_HTTP_TLS_KEY=/certs/domain.key \
   -e REGISTRY_COMPATIBILITY_SCHEMA1_ENABLED=true \
   -d docker.io/library/registry:2
打开注册中心所需的端口
打开内部端口
$ firewall-cmd --add-port=$JUMP_HOST_PORT/tcp --zone=internal --permanent
打开公共端口
$ firewall-cmd --add-port=$JUMP_HOST_PORT/tcp --zone=public --permanent
重新加载防火墙
$ firewall-cmd --reload
注意
对于
$JUMP_HOST_PORT,指定您的镜像注册中心用于提供内容的端口,如下例所示为 5000。示例:
$ firewall-cmd --add-port=5000/tcp --zone=internal --permanent
$ firewall-cmd --add-port=5000/tcp --zone=public --permanent
$ firewall-cmd --reload将自签名证书添加到您的受信任证书列表中
$ cp /opt/registry/certs/domain.crt /etc/pki/ca-trust/source/anchors/信任您的证书以便在镜像过程中登录到您的注册中心
$ update-ca-trust验证证书。
$ openssl verify /etc/pki/ca-trust/source/anchors/domain.crt确认注册中心可用
$ curl -u <user_name>:<password> -k https://$JUMP_HOST:JUMP_HOST_PORT/v2/_catalog
对于
<user_name>和<password>,指定您的注册中心的用户名和密码。export JUMP_HOST=<Your_jump_hostname>确保设置了正确的$JUMP_HOST。 对于JUMP_HOST_PORT,指定您的镜像注册中心用于提供内容的端口。注意
如果命令输出显示空仓库,则您的注册中心可用。
验证镜像注册中心#
为了验证您的镜像注册中心,您需要在您的 OpenShift Container Platform 集群中为镜像注册中心访问配置额外的信任存储。 您可以在 openshift-config 命名空间中创建一个 ConfigMap,并在 image.config.openshift.io 资源中的 AdditionalTrustedCA 中使用其名称。 这提供了在联系外部注册中心时应信任的其他 CA。
设置以下环境变量
$ export JUMP_HOST=<Your_jump_hostname>
在
openshift-config命名空间中创建 ConfigMap$ oc create configmap registry-config \ --from-file=${JUMP_HOST}..5000=/etc/pki/ca-trust/source/anchors/domain.crt \ -n openshift-config
更新
image.config.openshift.io资源中的AdditionalTrustedCA$ oc patch image.config.openshift.io/cluster \ --patch '{"spec":{"additionalTrustedCA":{"name":"registry-config"}}}' --type=merge \ --type=merge
配置允许镜像镜像的凭据#
创建一个容器镜像注册中心凭据文件,该文件允许将镜像从 Red Hat 镜像到您的镜像注册中心。
警告
安装集群时,请勿使用此镜像注册中心凭据文件作为拉取密钥。 如果您在安装集群时提供此文件,则集群中的所有计算机都将具有对您的镜像注册中心的写入访问权限。
警告
此过程要求您对镜像注册中心上的容器镜像注册中心具有写入访问权限,并将凭据添加到注册中心拉取密钥。
从 Red Hat OpenShift 集群管理器站点上的 拉取密钥 页面下载您的拉取密钥。
为您的镜像注册中心生成 base64 编码的用户名和密码或令牌
$ echo -n '<user_name>:<password>' | base64 -w0
输出示例
BGVtbYk3ZHAtqXs=注意
对于
<user_name>和<password>,指定您为注册中心配置的用户名和密码。制作 JSON 格式的拉取密钥副本
$ cat <path_to_pull_secret>/pull-secret.text | jq . > <path>/<pull-secret-file>
注意
指定存储拉取密钥的文件夹的路径以及您创建的 JSON 文件的名称。
输出示例
文件内容类似于以下示例
{
   "auths": {
     "cloud.openshift.com": {
       "auth": "b3BlbnNo...",
       "email": "you@example.com"
    },
    "quay.io": {
      "auth": "b3BlbnNo...",
      "email": "you@example.com"
    },
    "registry.connect.redhat.com": {
      "auth": "NTE3Njg5Nj...",
      "email": "you@example.com"
    },
    "registry.redhat.io": {
      "auth": "NTE3Njg5Nj...",
      "email": "you@example.com"
    }
   }
}
编辑新文件并添加描述您的注册中心的部分
"auths": {
  "<mirror_registry>:5000": {
    "auth": "<credentials>",
    "email": "you@example.com"
}
注意
对于 <mirror_registry>,指定注册中心域名,以及您的镜像注册中心用于提供内容的可选端口。 按照此示例的逻辑,注册中心设置在跳转主机上,这是
jump_hostname或jump_hostname:5000。 对于 <credentials>,指定镜像注册中心的 base64 编码的用户名和密码。输出示例
文件类似于以下示例
{
  "auths": {
    "jump_hostname:5000": {
      "auth": "BGVtbYk3ZHAtqXs=",
      "email": "you@example.com"
    },
    "cloud.openshift.com": {
      "auth": "b3BlbnNo...",
      "email": "you@example.com"
    },
    "quay.io": {
      "auth": "b3BlbnNo...",
      "email": "you@example.com"
    },
    "registry.connect.redhat.com": {
      "auth": "NTE3Njg5Nj...",
      "email": "you@example.com"
    },
    "registry.redhat.io": {
      "auth": "NTE3Njg5Nj...",
      "email": "you@example.com"
    }
  }
}
通过替换当前拉取密钥或附加新的拉取密钥来更新集群的全局拉取密钥。 有关更多信息和通用说明,请参见 此处。
警告
集群资源必须调整为新的拉取密钥,这可能会暂时限制集群的可用性。
通过完成以下步骤将新的拉取密钥附加到现有拉取密钥
输入以下命令下载拉取密钥
$ oc get secret/pull-secret -n openshift-config --template='{{index .data ".dockerconfigjson" | base64decode}}' >/tmp/pull-secret.json
输入以下命令添加新的拉取密钥
$ oc registry login --registry="${JUMP_HOST}:5000" --auth-basic="<username>:<password>" --to=/tmp/pull-secret.json
输入以下命令更新集群的全局拉取密钥
$ oc set data secret/pull-secret -n openshift-config --from-file=.dockerconfigjson=/tmp/pull-secret.json
在断开连接的集群上镜像 Operator Catalog#
您可以将特定索引镜像的所有 Operator 镜像到断开连接的集群中,但是镜像可能很大,因此您可以修剪索引镜像以仅保留您想要使用的一些 Operator。
本指南演示了如何镜像特定的 Operator,即 节点功能发现 (Node Feature Discovery) 和 NVIDIA GPU Operator。 有关更多通用信息,请参见 在受限网络上使用 Operator Lifecycle Manager。
禁用默认 OperatorHub 源#
在 OpenShift Container Platform 安装期间,默认情况下,为 OperatorHub 配置了来自 Red Hat 和社区项目的内容的 Operator Catalog。 在受限网络环境中,作为集群管理员,您必须禁用默认 Catalog。 然后,您可以配置 OperatorHub 以使用本地 Catalog 源。
通过将
disableAllDefaultSources: true添加到 OperatorHub 对象来禁用默认 Catalog 的源$ oc patch OperatorHub cluster --type json \ -p '[{"op": "add", "path": "/spec/disableAllDefaultSources", "value": true}]'
镜像节点功能发现 (NFD) 和 NVIDIA GPU Operator Catalog#
您可以使用 oc-mirror 命令将 Red Hat 提供的 Catalog 或自定义 Catalog 的 Operator 内容镜像到容器镜像注册中心。 目标注册中心必须支持 Docker v2-2。 对于受限网络上的集群,此注册中心可以是集群可以网络访问的注册中心,例如在受限网络集群安装期间创建的镜像注册中心。
oc-mirror 命令还会自动将镜像过程中指定的索引镜像(无论是 Red Hat 提供的索引镜像还是您自己的自定义构建的索引镜像)镜像到目标注册中心。 然后,您可以使用镜像的索引镜像来创建 Catalog 源,该源允许 Operator Lifecycle Manager (OLM) 将镜像的 Catalog 加载到您的 OpenShift Container Platform 集群。
前提条件#
下载 oc-mirror 工具
$ wget https://mirror.openshift.com/pub/openshift-v4/x86_64/clients/ocp/stable/oc-mirror.tar.gz将
oc-mirror二进制文件复制到 PATH 环境变量中的目录,例如/usr/bin。 运行oc mirror help以确认插件已安装。创建
pull-secret.json文件:创建pull-secret.json文件,然后将该文件复制到~/.docker/config.json cp ~/pull-secret.json ~/.docker/config.json。
步骤#
设置以下环境变量
$ export REGISTRY_AUTH_FILE=<path_to_pull_secret>/pull-secret.json
$ export JUMP_HOST=<Your_jump_hostname>
注意
为 <Your_jump_hostname> 指定完全限定域名 (FQDN)。
导出
JUMP_HOST=ec2-3-16-218-255.us-east-2.compute.amazonaws.com。 如果您不知道 Catalog 镜像索引,请使用以下命令$ oc-mirror list operators --catalogs --version=4.12
可用的 OpenShift OperatorHub Catalog 包括
registry.redhat.io/redhat/redhat-operator-index:v4.12registry.redhat.io/redhat/certified-operator-index:v4.12registry.redhat.io/redhat/community-operator-index:v4.12registry.redhat.io/redhat/redhat-marketplace-index:v4.12
使用以下命令检查镜像索引中是否包含正确的 Operator 名称
$ oc-mirror list operators --catalog=registry.redhat.io/redhat/redhat-operator-index:v4.11 --version=4.11
镜像节点功能发现 (NFD) CatalogSource#
导出
JUMP_HOST=ec2-3-16-218-255.us-east-2.compute.amazonaws.com$ oc mirror init --registry ${JUMP_HOST}:5000/oc-mirror-nfd-metadata > imageset-config-nfd.yaml
注意
如果您要镜像其他 Operator,则需要使用不同的元数据名称创建不同的
imageset-config.yaml文件。 例如,NFD 可以使用 oc-mirror-nfd-metadata,而 GPU 可以使用 oc-mirror-gpu-metadata。 否则,oc-mirror工具将覆盖以前镜像的镜像。如下所示编辑
imageset-config-nfd.yaml文件将
skipTLS设置为true。将
catalog设置为registry.redhat.io/redhat/redhat-operator-index:v4.12。将
packagesname设置为nfd。
kind: ImageSetConfiguration
apiVersion: mirror.openshift.io/v1alpha2
storageConfig:
  registry:
    imageURL: ec2-3-16-218-255.us-east-2.compute.amazonaws.com:5000/oc-mirror-nfd-metadata
    skipTLS: true
mirror:
operators:
- catalog: registry.redhat.io/redhat/redhat-operator-index:v4.11
packages:
- name: nfd
additionalImages:
- name: registry.redhat.io/ubi8/ubi:latest
helm: {}
将镜像集镜像到私有镜像注册中心
$ oc-mirror --dest-skip-tls=true --config=./imageset-config-nfd.yaml docker://${JUMP_HOST}:5000
输出示例
Rendering catalog image
"ec2-3-16-218-255.us-east-2.compute.amazonaws.com:5000/redhat/redhat-operator-index:v4.11"
with file-based catalog

Writing image mapping to oc-mirror-workspace/results-1670391296/mapping.txt
Writing CatalogSource manifests to oc-mirror-workspace/results-1670391296
Writing ICSP manifests to oc-mirror-workspace/results-1670391296
oc-mirror命令创建的文件之一是mapping.txt。mapping.txt文件包含公开可用的外部镜像名称到私有镜像注册中心名称的映射。通过使用以下命令,使用该文件中的映射将工作区镜像从公共注册中心镜像到本地私有注册中心
$ oc apply -f ./oc-mirror-workspace/results-1670391296/Warning: resource catalogsources/redhat-operator-index is missing the kubectl.kubernetes.io/last-applied-configuration annotation which is required by oc apply. oc apply should only be used on resources created declaratively by either oc create --save-config or oc apply. The missing annotation will be patched automatically. catalogsource.operators.coreos.com/redhat-operator-index configured imagecontentsourcepolicy.operator.openshift.io/generic-0 created imagecontentsourcepolicy.operator.openshift.io/operator-0 created imagecontentsourcepolicy.operator.openshift.io/release-0 created
mapping.txt文件包含公开可用的外部镜像名称到内部私有注册中心名称的映射。$ oc image mirror -f mapping.txt -a ${REGISTRY_AUTH_FILE} --insecure
ec2-3-138-34-203.us-east-2.compute.amazonaws.com:5000/openshift/release manifests:
sha256:01296142b77456d1a513ce92b6d1d0964cfb3e4565659da33979f4755f20e607 -> 4.10.45-x86_64-telemeter
sha256:035b1f48ff64b6c899a861e62b6f1641363caa3b0f4b8ce9ba413cb98c005b8d -> 4.10.45-x86_64-cli
sha256:03dd364864aa85a01e316db55f0fb23d95a8d276e521ba34ab359b9a01436786 -> 4.10.45-x86_64-gcp-machine-controllers
sha256:04a087af6c1a10d54e32ea1ed875970dc90e9934970f1d38c11d90fdc9126a22 -> 4.10.45-x86_64-machine-api-operator
sha256:066a32be9820c8191935c7351ad013eae7966a3248c3b3b4f7b9c16a54de2288 ->
.
.
.
.
sha256:fce9d5a42056d5db78343d7a3d643de941c8906e5c67d83da6717d91727010b4 -> 4.10.45-x86_64-libvirt-machine-controllers
sha256:fd375538a5d564710e073df41d1eedc4c6b44dc07d5ad9b60d275dce8751d1bd -> 4.10.45-x86_64-kube-proxy
sha256:fef1efe256b360a71c08ff853f98c5f0adc9d2d4dacb7e4da4e649bef9311f7d -> 4.10.45-x86_64-cluster-policy-controller
openshift/release-images manifests:
sha256:5f9ac79c9c257c28b8b51e79a0382de285d6e4c4e4537710b7c117601d320293 -> 4.10.45-x86_64
openshift4/ose-cluster-nfd-operator manifests:
sha256:18b25b256d3e8d0faa0d7b3adde3523530c0c3835ceafddf1644e8789245f99a -> 261da60b
openshift4/ose-cluster-nfd-operator-bundle manifests:
sha256:ef887a73afba03421fb8e521ab9b04b68e501345864f7c538e36c963d18a3a30 -> 1d4bfde1
openshift4/ose-kube-rbac-proxy manifests:
sha256:9958a0bf32e9d936366cd8d68306ef951e9a0da8b9a426454bd2dcd026b26260 -> eec3eee9
openshift4/ose-node-feature-discovery manifests:
sha256:f1e137e47da161d4f9e0d08fc9dc8e9fcfac83802136af4572906aa5a585513c -> 27356c40
redhat/redhat-operator-index blobs:
registry.redhat.io/redhat/redhat-operator-index sha256:f0e75f0712cb54427ddf23f001cb109d505557b677f932717bbd1e6219bcecb3 1.469KiB
registry.redhat.io/redhat/redhat-operator-index sha256:76f350503d543ff41e7ce886825e5d294695df71693d7a187ff434b74bb178ef 23.98KiB
registry.redhat.io/redhat/redhat-operator-index sha256:b3df9fea55ab39308e944627140218620ee2236bce74d76857856f90025d1e6d 7.484MiB
registry.redhat.io/redhat/redhat-operator-index sha256:558efb586a99ff292b3bbbef6e0f8cf6ac35d526457dbc62e05af7cb7d3ee644 11.05MiB
registry.redhat.io/redhat/redhat-operator-index sha256:26be6f36c89f3628abb68fef7b0f471945c70459cee10d3903ba2d59f8f6431d 36.6MiB
registry.redhat.io/redhat/redhat-operator-index sha256:9df9aa2998cab73cb8c78646332865ce19dd4dc59f2d0d246b82d52befa48d22 81.72MiB
registry.redhat.io/redhat/redhat-operator-index sha256:9f58a5c0884cff9baed5059eae0dde7fa69fdef5d3aa3efd7a87891166d63d94 133MiB
manifests:
sha256:7f7318ee33093c95e0c641881c16b0fc683e028c7e8fdf4ce0bbb4e3cde77b1d -> v4.10
ubi8/ubi
manifests:
sha256:7772c4e458ad8e38d2b37916d0bb3d4d403e025b9148668152eb71c062a2c78d -> latest
stats: shared=0 unique=7 size=269.9MiB ratio=1.00
phase 0:
ec2-3-138-34-203.us-east-2.compute.amazonaws.com:5000 openshift4/ose-cluster-nfd-operator        blobs=0 mounts=0 manifests=1   shared=0
ec2-3-138-34-203.us-east-2.compute.amazonaws.com:5000 openshift4/ose-node-feature-discovery      blobs=0 mounts=0 manifests=1   shared=0
ec2-3-138-34-203.us-east-2.compute.amazonaws.com:5000 ubi8/ubi                                   blobs=0 mounts=0 manifests=1   shared=0
ec2-3-138-34-203.us-east-2.compute.amazonaws.com:5000 openshift4/ose-kube-rbac-proxy             blobs=0 mounts=0 manifests=1   shared=0
ec2-3-138-34-203.us-east-2.compute.amazonaws.com:5000 openshift/release-images                   blobs=0 mounts=0 manifests=1   shared=0
ec2-3-138-34-203.us-east-2.compute.amazonaws.com:5000 redhat/redhat-operator-index               blobs=7 mounts=0 manifests=1   shared=0
ec2-3-138-34-203.us-east-2.compute.amazonaws.com:5000 openshift/release                          blobs=0 mounts=0 manifests=161 shared=0
ec2-3-138-34-203.us-east-2.compute.amazonaws.com:5000 openshift4/ose-cluster-nfd-operator-bundle blobs=0 mounts=0 manifests=1   shared=0
info: Planning completed in 31.83s
sha256:7772c4e458ad8e38d2b37916d0bb3d4d403e025b9148668152eb71c062a2c78d ec2-3-138-34-203.us-east-2.compute.amazonaws.com:5000/ubi8/ubi:latest
sha256:f1e137e47da161d4f9e0d08fc9dc8e9fcfac83802136af4572906aa5a585513c ec2-3-138-34-203.us-east-2.compute.amazonaws.com:5000/openshift4/ose-node-feature-discovery:27356c40
.
.
.
sha256:b497c394e241ae617b201019685e600c5c20fd7a47a39ff3db048a6fff48cc8e ec2-3-138-34-203.us-east-2.compute.amazonaws.com:5000/openshift/release:4.10.45-x86_64-ovirt-machine-controllers
sha256:3985503d42e64383dc1bae41a6746bad3d5130b354e4c579658491374eef0f5c ec2-3-138-34-203.us-east-2.compute.amazonaws.com:5000/openshift/release:4.10.45-x86_64-cluster-image-registry-operator
sha256:c5ef6f0e2424116f05316e25c4c86edee5e46a8151bbeaf2a041efb539416f15 ec2-3-138-34-203.us-east-2.compute.amazonaws.com:5000/openshift/release:4.10.45-x86_64-vsphere-csi-driver-operator
sha256:7f7318ee33093c95e0c641881c16b0fc683e028c7e8fdf4ce0bbb4e3cde77b1d ec2-3-138-34-203.us-east-2.compute.amazonaws.com:5000/redhat/redhat-operator-index:v4.10
info: Mirroring completed in 1.24s (19.68kB/s)`
使用以下命令显示命名空间
openshift-marketplace中的 catalogsource pod$ oc get pods -n openshift-marketplace输出示例
NAME                                    READY   STATUS    RESTARTS   AGE
marketplace-operator-845d9d7557-hfzqp   1/1     Running   0          6d19h
qe-app-registry-lbdlp                   1/1     Running   0          4h40m
redhat-operator-index-gqvwn             1/1     Running   0          85s
镜像 GPU CatalogSource#
使用以下命令检查 GPU Operator 的正确程序包名称
$ oc-mirror list operators --catalog=registry.redhat.io/redhat/certified-operator-index:v4.12 --version=4.12
$ oc-mirror list operators --catalog=registry.redhat.io/redhat/certified-operator-index:v4.12 --package=gpu-operator-certified
输出示例
NAME                    DISPLAY NAME         DEFAULT CHANNEL  PACKAGE   CHANNEL HEAD
gpu-operator-certified  NVIDIA   GPU Operator  v22.9
gpu-operator-certified  stable   gpu-operator-certified.v22.9.0
gpu-operator-certified  v1.10    gpu-operator-certified.v1.10.1
gpu-operator-certified  v1.11    gpu-operator-certified.v1.11.1
gpu-operator-certified  v22.9    gpu-operator-certified.v22.9.0
使用以下命令创建
imageset-config-gpu.yaml文件oc-mirror init --registry ${JUMP_HOST}:5000/oc-mirror-gpu-metadata > imageset-config-gpu.yaml编辑
imageset-config-gpu.yaml文件以镜像您要镜像的 Operator 镜像。要镜像 Operator 的所有版本,请执行以下编辑
将
skipTLS设置为true。将
catalog设置为registry.redhat.io/redhat/redhat-operator-index:v4.12。将
packagesname设置为gpu-operator-certified。
kind: ImageSetConfiguration
apiVersion: mirror.openshift.io/v1alpha2
storageConfig:
  registry:
    imageURL: ec2-3-16-218-255.us-east-2.compute.amazonaws.com:5000/oc-mirror-gpu-metadata
  skipTLS: true
mirror:
  platform:
    channels:
    - name: stable-4.12
      type: ocp
operators:
- catalog: registry.redhat.io/redhat/certified-operator-index:v4.12
  packages:
  - name: gpu-operator-certified
additionalImages:
- name: registry.redhat.io/ubi8/ubi:latest
helm: {}
要仅镜像 v22.9.0,请进行与前面示例相同的编辑,并指定
minversion值kind: ImageSetConfiguration apiVersion: mirror.openshift.io/v1alpha2 storageConfig: registry: imageURL: ec2-3-16-218-255.us-east-2.compute.amazonaws.com:5000/oc-mirror-gpu-metadata skipTLS: true mirror: platform: channels: - name: stable-4.12 type: ocp operators: - catalog: registry.redhat.io/redhat/certified-operator-index:v4.12 packages: - name: gpu-operator-certified minversion: "22.9.0" additionalImages: - name: registry.redhat.io/ubi8/ubi:latest helm: {}
使用以下命令镜像 GPU Operator CatalogSource
$ oc-mirror --dest-skip-tls=true --skip-missing --continue-on-error --config=./imageset-config-gpu.yaml docker://${JUMP_HOST}:5000
oc-mirror工具生成一个类似于oc-mirror-workspace/results-1670395763的文件夹。使用以下命令为 GPU Operator 创建 Catalog 源
$ oc apply -f oc-mirror-workspace/results-1670395763输出示例
catalogsource.operators.coreos.com/certified-operator-index created
imagecontentsourcepolicy.operator.openshift.io/generic-0 unchanged
imagecontentsourcepolicy.operator.openshift.io/operator-0 configured
imagecontentsourcepolicy.operator.openshift.io/release-0 unchanged
验证镜像的 Catalog 源#
验证是否已成功创建以下资源。
检查 pod
$ oc get pods -n openshift-marketplace输出示例
NAME                                   READY   STATUS             RESTARTS      AGE
certified-operator-index-bq7bt         0/1     Running            0             17h
marketplace-operator-d65d479cc-7zblj   1/1     Running            1 (23d ago)   23d
redhat-operator-index-725tv            0/1     Running            0             17h
检查程序包清单
$ oc get packagemanifest -n openshift-marketplace输出示例
NAME                       DISPLAY                       TYPE   PUBLISHER        AGE
certified-operator-index   Openshift Telco Docs          grpc   Openshift Docs   20h
redhat-operator-index      Openshift Telco Docs          grpc   Openshift Docs   20h
检查 catalogsource
$ oc get catalogsource -n openshift-marketplace$ oc get pods -n openshift-marketplace登录到 OpenShift Container Platform Web 控制台,然后单击 Operators → OperatorHub。
登录到 OpenShift Container Platform 控制台后,您可以找到镜像的 Operator。 您现在可以开始在断开连接的集群中部署 Operator 了!
安装节点功能发现 Operator#
按照 在 OpenShift 上安装节点功能发现 Operator 中的指南安装 节点功能发现 (NFD) Operator。 如果您要在 4.8.19、4.8.21 或 4.9.8 以外的任何 OpenShift Container Platform 版本上安装,请继续 安装 NVIDIA GPU Operator。
可选:使用本地 Yum 仓库配置 repoConfig#
仅当在 OpenShift Container Platform 版本 4.8.19、4.8.21 或 4.9.8 上安装 NVIDIA GPU Operator 时才需要执行这些步骤。
当跳转主机连接到集群时,在跳转主机上继续执行以下步骤。
如下所示创建 Local-Base.repo
$ export JUMP_HOST=<Your_jump_hostname>
输出示例
$ cat <<EOF >Local-Base.repo
[rhel-8-for-x86_64-baseos-rpms]
name=Red Hat Enterprise Linux 8 for  - BaseOS from RHUI (RPMs)
baseurl= http://${JUMP_HOST}:8080/content/dist/rhel8/8/x86_64/baseos/os
gpgcheck=1
gpgkey=file:/etc/pki/rpm-gpg/RPM-GPG-KEY-CentOS-6
protect=1
priority=1
enabled=1

[rhel-8-for-x86_64-appstream-rpms]
name=Red Hat Enterprise Linux 8 for  - AppStream from RHUI (RPMs)
baseurl= http://${JUMP_HOST}:8080/content/dist/rhel8/8/x86_64/appstream/os
enabled=1
gpgcheck=0
gpgkey=file:///etc/pki/rpm-gpg/RPM-GPG-KEY-redhat-release
protect=1
priority=1
EOF
可选:在 OpenShift 版本 4.8.19, 4.8.21, 4.9.8 上安装 NVIDIA GPU Operator#
仅当在 OpenShift Container Platform 版本 4.8.19、4.8.21 或 4.9.8 上安装 NVIDIA GPU Operator 时才需要执行这些步骤。
在安装了 Node Feature Discovery Operator 之后,您可以继续执行最后一步并安装 NVIDIA GPU Operator。
在 OpenShift Container Platform Web 控制台中,从侧边菜单选择 Operators > OperatorHub,然后搜索 NVIDIA GPU Operator。 有关更多信息,请参阅 Red Hat OpenShift Container Platform 文档。
选择 NVIDIA GPU Operator,点击 Install。 在随后的屏幕中点击 Install。
注意
在这里,您可以选择要部署 GPU Operator 的命名空间。 建议使用的命名空间是
nvidia-gpu-operator。 您可以选择任何现有的命名空间或在 Select a Namespace 下创建新的命名空间。如果您安装在
nvidia-gpu-operator之外的任何其他命名空间中,GPU Operator 将 不会 自动启用命名空间监控,并且 Prometheus 将 不会 收集指标和警报。 如果此命名空间中仅安装了受信任的 Operator,则可以使用以下命令手动启用命名空间监控$ oc label ns/$NAMESPACE_NAME openshift.io/cluster-monitoring=true
返回 Installed Operators 菜单选项,选择 NVIDIA GPU Operator 和 ClusterPolicy 选项卡,然后单击 Create ClusterPolicy。 平台会分配默认名称 gpu-cluster-policy。
编辑
Config Map Name字段,输入值yum-repos-d。编辑
Destination Dir字段,输入值/etc/yum.repos.d。点击 Create。
此时,GPU Operator 将继续并安装所有必需的组件,以在 OpenShift 4 集群中设置 NVIDIA GPU。 这可能需要一段时间,请耐心等待至少 10-20 分钟,然后再深入研究任何形式的故障排除。
一旦安装成功,新部署的 NVIDIA GPU Operator 的 ClusterPolicy gpu-cluster-policy 的状态将更改为
State:ready。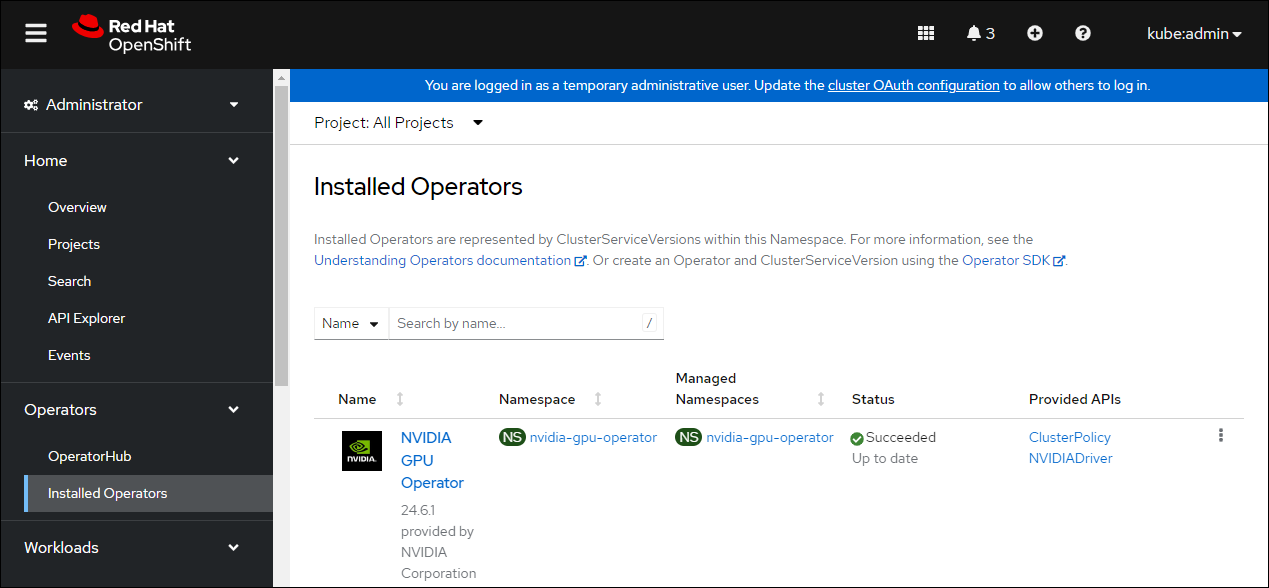
现在您可以继续 安装并验证 NVIDIA GPU Operator。
安装 NVIDIA GPU Operator#
现在您可以继续 安装并验证 NVIDIA GPU Operator。