Hello World
准备工作
请参阅《入门指南》文档,了解如何安装和设置
microk8s
UCS 工具
访问 NGC
设置存储库
简介
在本教程中,我们将创建一个简单的单服务“hello world”应用程序,该应用程序将休眠 10,000 秒。
这将帮助您熟悉以下基础知识:
定义微服务,
使用
ucf_ms_builder_cli构建微服务,从微服务定义应用程序,
使用
ucf_app_builder_cli构建应用程序,部署和运行微服务和应用程序,
检查和调试正在运行的服务,
停止和清理微服务和应用程序。
在执行此操作之前,让我们创建一个空项目
cd $HOME
mkdir -p ucf_tutorial/{services,apps}
创建微服务
现在,让我们创建我们的第一个微服务: .. code-block
cd $HOME/ucf_tutorial/services
ucf_ms_builder_cli service create -n hello-world -i container-image
这应该在 ucf_tutorial/services 中生成并填充 hello-world 目录
将默认的 hello-world/manifest.yaml 替换为以下内容
type: msapplication
specVersion: 2.5.0
name: ucf.svc.hello-world
chartName: hello-world
description: my first ucf microservice
version: 0.0.1
tags: []
keywords: []
publish: false

---
spec:
  - name: hello-world-service-a
    type: ucf.k8s.app.deployment
    parameters:
      apptype: stateless

  - name: hello-world-service-a-container
    type: ucf.k8s.container
    parameters:
      image:
        repository: nvcr.io/nvidia/pytorch
        tag: 22.04-py3
      command: [sh, -c]
      args: ["echo 'hello, world!' && sleep 10000"]
前几行定义了微服务本身 - 微服务的类型、规范的版本、Chart 的名称、描述、微服务的版本、标签和关键字,以及是否在 CI 通过时发布到 UCS 注册表。这些对于每个微服务都非常简单和样板化。
我们微服务的真正细节在 spec 关键字之后定义 - 此后列出的每个部分都是遵循以下结构的 UCS 组件
名称
类型
参数
在这个简单的微服务中,我们定义了两个组件
一个名为
hello-world-service-a且类型为ucf.k8s.app.deployment的组件,其参数apptype设置为stateless,以及一个名为
hello-world-service-a-container且类型为ucf.k8s.container的组件,带有多个参数。
在未来的教程中,我们将探索添加其他组件,例如
ucf.k8s.service用于 Ingress/Egress 连接,ucf.k8s.volume用于添加存储,ucf.k8s.initcontainer用于在运行另一个容器之前执行设置步骤,ucf.k8s.podSecurityContext用于在非 root 容器中使用 root 权限,ucf.k8s.restartPolicy用于定义容器在重启后应如何表现,以及更多。
现在,对于我们的“hello world”示例来说,理解我们正在定义一个 Deployment(一种 K8s 构造,用于控制 Pod 的行为方式)以及一个将用于填充我们 Pod 的 Container 就足够了。
有关 UCS 组件(例如其用途和属性)的更多信息,您可以运行以下命令
$ ucf_ms_builder_cli component info -c ucf.k8s.app.deployment
type:        ucf.k8s.app.deployment
description: Deployment workload
properties:
             apptype: (string ), Pod deployment type (stateful/stateless). [Mandatory:True, Allowed Values:{ stateful, stateless, job, cronjob, daemonset, replicaset }]


$ ucf_ms_builder_cli component info -c ucf.k8s.container
type:        ucf.k8s.container
description: Container as per AppSpec
properties:
               image: (object ), Container image. [Mandatory:True]
                  repository: (string ), Container image repository address. [Mandatory:True]
                         tag: (['string', 'number']), Container image tag. [Mandatory:True]
                  pullPolicy: (string ), Container image pull policy [Mandatory:False, Allowed Values:{ Always, Never, IfNotPresent }]
            workload: (string ), Name reference to a workload defined. [Mandatory:False]
             command: (array  ), Array of command line strings to be executed. [Mandatory:False]
                args: (array  ), List of arguments to the entrypoint. [Mandatory:False]
                 env: (array  ), Array of environment variables to be set. [Mandatory:False]
       livenessProbe: (object ), Liveness probe for the container [Mandatory:False]
      readinessProbe: (object ), Readiness probe for the container [Mandatory:False]
        startupProbe: (object ), Startup probe for the container [Mandatory:False]
               ports: (array  ), List of container ports to be exposed [Mandatory:False]
           resources: (object ), Container resource requirements [Mandatory:False]
                      limits: (object ), Maximum amount of compute resources allowed [Mandatory:False]
                    requests: (object ), Minimum amount of compute resources requires [Mandatory:False]
        volumeMounts: (array  ), Container volume mounts. [Mandatory:False]
                        name: (string ), Volume mount name. [Mandatory:True]
                   mountPath: (string ), Volume mount path. [Mandatory:True]
使用 ucf_ms_builder_cli 构建微服务
现在我们已经定义了我们的微服务,让我们使用 ucf_ms_builder_cli 构建它
$ ucf_ms_builder_cli service build -d hello-world/
2022-12-05 15:02:50,264 - Registry - INFO - Building: hello-world/
2022-12-05 15:02:51,641 - MsBuilder - INFO - Helm chart generated in hello-world/output/helm
2022-12-05 15:02:51,651 - MsBuilder - INFO - MS spec generated in hello-world/output/msspec
2022-12-05 15:02:51,887 - MsBuilder - WARNING - Mandatory compliance checks failed. Check hello-world/output/compliance_test_logs.txt for more information
2022-12-05 15:02:51,995 - MsBuilder - INFO - MS spec generated in hello-world/output/msspec
2022-12-05 15:02:51,998 - MsBuilder - INFO - Tests generated in hello-world/output/tests
2022-12-05 15:02:52,005 - Registry - INFO - Generating service helm chart package...
2022-12-05 15:02:52,254 - MsBuilder - INFO - Added microservice 'ucf.svc.hello-world:0.0.1' to local repository
这将为微服务创建 Helm Chart,该 Chart 可用于创建应用程序。
由于我们的服务是独立的,我们可以简单地部署我们的微服务,因为它没有依赖项。要在我们的本地 microk8s 集群上部署,请运行:
microk8s helm install myfirstservice hello-world/output/helm/
输出
NAME: myfirstservice
LAST DEPLOYED: Tue Nov 29 10:29:01 2022
NAMESPACE: default
STATUS: deployed
REVISION: 1
TEST SUITE: None
一旦 Pod 处于 Running 状态(可以使用 microk8s kubectl get pods 找到),您可以运行 microk8s kubectl logs <POD_NAME>,它应该打印:
hello, world!
您刚刚创建并部署了您的第一个 UCS 微服务!通常,微服务将作为应用程序的一部分部署。我们将在下一节中介绍如何创建一个应用程序。
使用微服务创建应用程序 - CLI 工具和文本格式
在本节中,我们将使用我们刚刚创建的微服务创建一个简单的应用程序。
运行
$ cd $HOME/ucf_tutorial/apps
$ ucf_app_builder_cli app create hello-world-app
这将创建一个目录 hello-world-app,其中包含 app.yaml 和 README.md 文件。
将默认的 app.yaml 的内容替换为以下内容
specVersion: 2.5.0
version: 0.0.1
doc: README.md
name: hello-world-app
description: Hello World Application

dependencies:
- ucf.svc.hello-world:0.0.1

components:
- name: helloworld
  type: ucf.svc.hello-world
现在让我们尝试理解我们的应用程序。顶部的几行再次指定了应用程序的元数据 - 类似于我们定义 hello-world 微服务的方式。
在 dependencies 下,我们可以指定我们将用于组成应用程序的各种微服务及其版本。
在 components 下,我们可以指定 UCS 组件及其参数,即用于创建应用程序的不同微服务。对于此应用程序,我们只有一个微服务。
在 connections 下(此处未显示)- 我们可以指定微服务之间的 Egress/Ingress 连接,以使它们能够相互通信。我们将在下一章中演示这一点。
使用 ucf_app_builder_cli 构建应用程序
现在我们已经定义了我们的应用程序,让我们使用 ucf_app_builder_cli 构建它:
$ ucf_app_builder_cli app build hello-world-app/
2022-12-05 15:37:45,567 - AppBuilder - INFO - Syncing any missing service versions to cache...
2022-12-05 15:37:45,568 - AppBuilder - INFO - Validating application ...
2022-12-05 15:37:45,570 - AppBuilder - INFO - Building application hello-world-app-0.0.1 ...
2022-12-05 15:37:45,845 - AppBuilder - INFO - Application compliance report generated at hello-world-app/hello-world-app-0.0.1/compliance_report.json
2022-12-05 15:37:45,845 - AppBuilder - INFO - Application Helm Chart generated in hello-world-app/hello-world-app-0.0.1
2022-12-05 15:37:45,845 - AppBuilder - INFO - App built
太棒了!应用程序已构建。
使用 Studio 创建和构建应用程序
构建微服务还会将其添加到本地存储库,并可用于使用 UCS Studio 构建应用程序。
启动 UCS Studio 并创建一个新图
按照 启动 UCS Studio 和 创建新图 中的步骤操作
搜索新构建的微服务
通过在左侧窗格中微服务的搜索框中键入其名称来搜索新构建的微服务
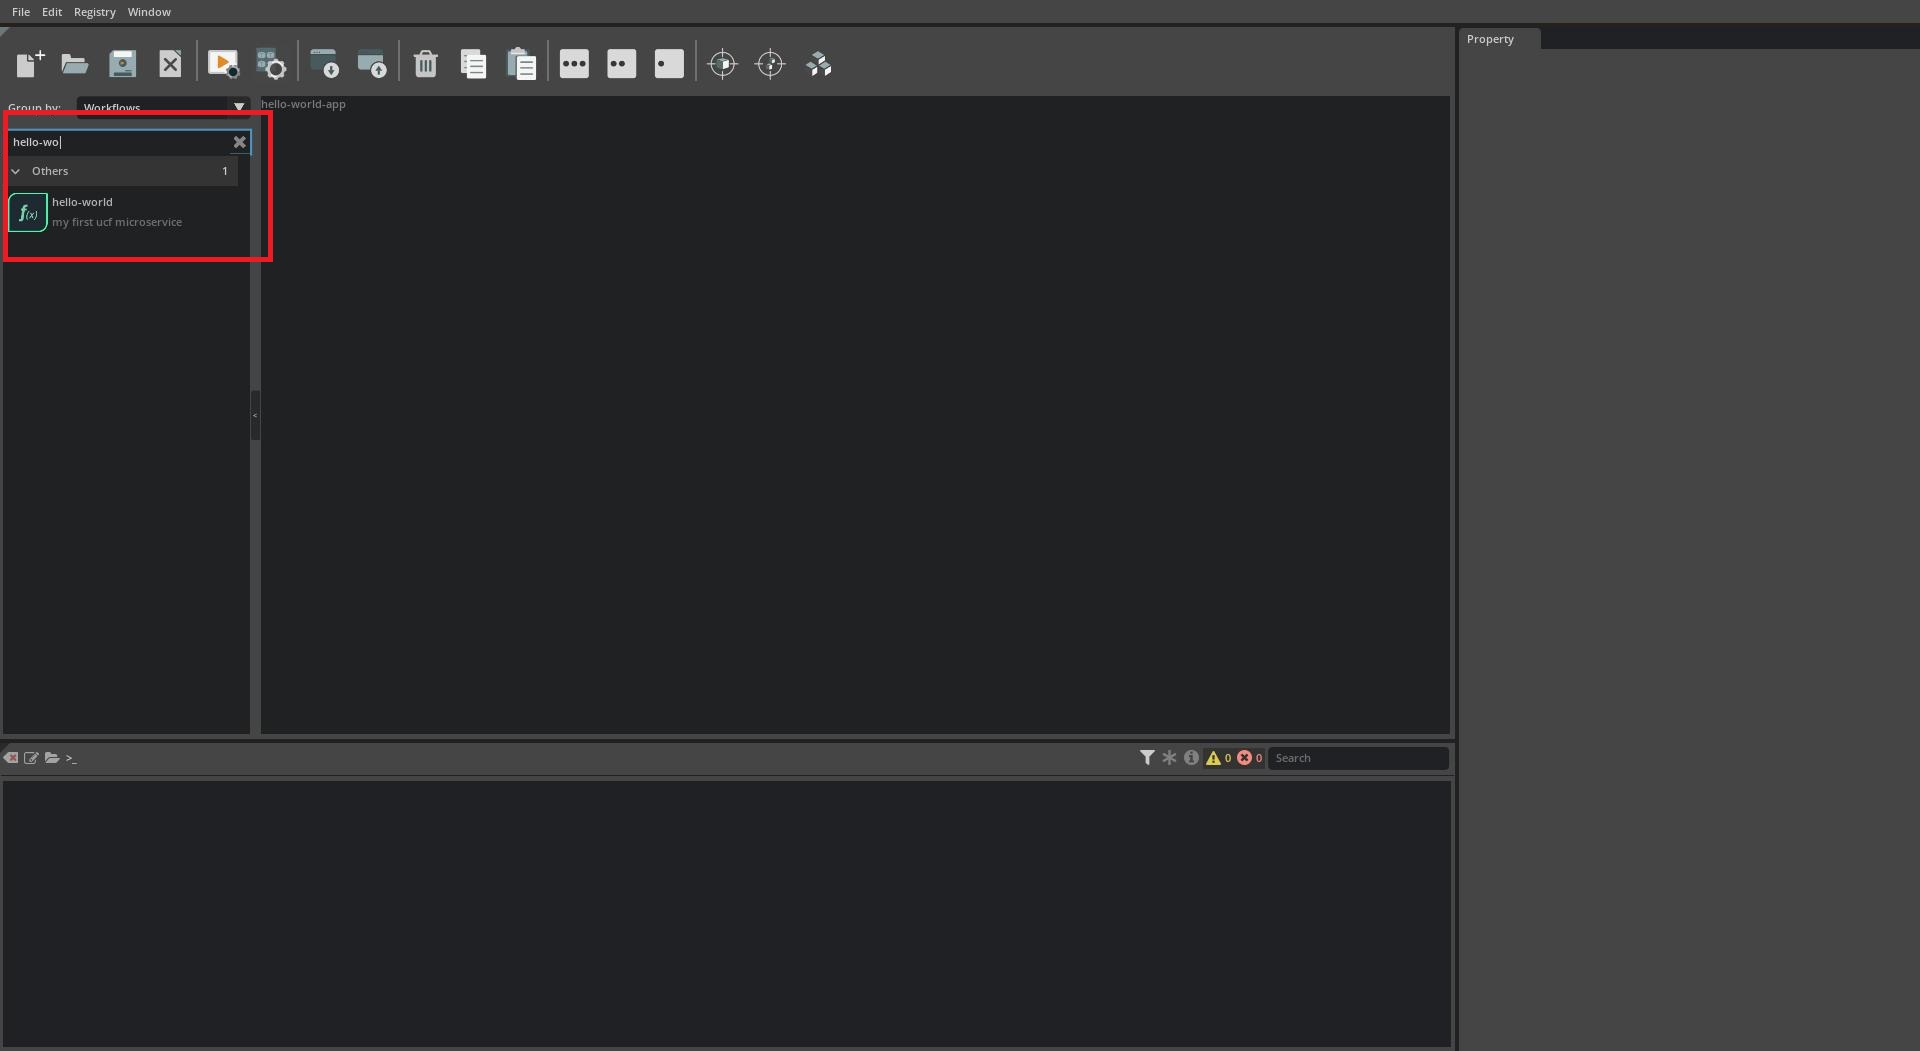
将微服务添加到应用程序
通过在左侧的微服务列表中选择微服务并将其拖放到画布上,将微服务添加到应用程序。

保存并构建应用程序
按照 保存并构建应用程序 中的步骤生成应用程序 Helm Chart
部署和运行微服务和应用程序
接下来,让我们通过查看当前是否正在运行任何服务来准备运行应用程序:
$ microk8s kubectl get all
NAME                 TYPE        CLUSTER-IP     EXTERNAL-IP   PORT(S)   AGE
service/kubernetes   ClusterIP   10.152.183.1   <none>        443/TCP   12d
要运行应用程序,请执行
$ microk8s helm3 install helloworld ./hello-world-app/hello-world-app-0.0.1/
WARNING: Kubernetes configuration file is group-readable. This is insecure. Location: /var/snap/microk8s/3597/credentials/client.config
NAME: helloworld
LAST DEPLOYED: Mon Aug  8 15:02:53 2022
NAMESPACE: default
STATUS: deployed
REVISION: 1
TEST SUITE: None
检查和调试微服务和应用程序
成功部署应用程序后,我们可以检查部署
$ microk8s kubectl get all
NAME                                                            READY   STATUS    RESTARTS         AGE
pod/hello-world-hello-world-service-a-7b786695ff-4wwz7          1/1     Running   0                65m

NAME                   TYPE           CLUSTER-IP       EXTERNAL-IP   PORT(S)        AGE
service/kubernetes     ClusterIP      10.152.183.1     <none>        443/TCP        81d

NAME                                                       READY   UP-TO-DATE   AVAILABLE   AGE
deployment.apps/hello-world-hello-world-service-a          1/1     1            1           73m

NAME                                                                  DESIRED   CURRENT   READY   AGE
replicaset.apps/hello-world-hello-world-service-a-7b786695ff          1         1         1       65m
我们还可以描述 Pod 并查看事件部分以了解当前状态
$ microk8s kubectl describe pod hello-world-hello-world-service-a-7b786695ff-4wwz7

<omitting>
...
...
...
<omitting>


Events:
  Type     Reason            Age                From               Message
  ----     ------            ----               ----               -------
  Normal   Scheduled         98s                default-scheduler  Successfully assigned default/hello-world-hello-world-service-a-7b786695ff-4wwz7 to rtxstation
  Normal   Pulling           98s                kubelet            Pulling image "nvcr.io/nvidia/pytorch:22.04-py3"
  Normal   Pulled            90s                kubelet            Successfully pulled image "nvcr.io/nvidia/pytorch:22.04-py3" in 8.651257285s
  Normal   Created           90s                kubelet            Created container hello-world-service-a-container
  Normal   Started           89s                kubelet            Started container hello-world-service-a-container
  Warning  DNSConfigForming  17s (x5 over 99s)  kubelet            Search Line limits were exceeded, some search paths have been omitted, the applied search line is: default.svc.cluster.local svc.cluster.local cluster.local hsd1.il.comcast.net vdiclient.nvidia.com nvprod.nvidia.com
我们可以通过运行以下命令查看 Pod 中特定容器的尾部日志
$ microk8s kubectl logs -f hello-world-hello-world-service-a-7b786695ff-4wwz7
hello, world!
^C
我们可以通过运行以下命令进入 Pod 中的容器
$ microk8s kubectl exec -it hello-world-hello-world-service-a-7b786695ff-4wwz7 -- bash
root@hello-world-hello-world-service-a-7b786695ff-4wwz7:/workspace# ps aux
USER         PID %CPU %MEM    VSZ   RSS TTY      STAT START   TIME COMMAND
root           1  0.0  0.0   4280   580 ?        Ss   20:03   0:00 sleep 10000
root          18  0.7  0.0   9828  7720 pts/0    Ss   20:05   0:00 bash
root         322  0.0  0.0   7652  3204 pts/0    R+   20:05   0:00 ps aux
停止和清理微服务和应用程序
最后,要停止和清理应用程序,我们可以运行
$ microk8s helm3 uninstall helloworld
WARNING: Kubernetes configuration file is group-readable. This is insecure. Location: /var/snap/microk8s/3597/credentials/client.config
release "helloworld" uninstalled