AKS (Azure Kubernetes 服务)#
版本 4.1 中新增。
概述#
Azure AKS 是一项托管的 Kubernetes 服务,用于在 Azure 云中运行 Kubernetes。NVIDIA AI Enterprise 是 NVIDIA AI 平台的端到端软件,支持在 AKS 上运行。在云中,Azure AKS 自动管理 Kubernetes 控制平面节点的可用性和可扩展性,这些节点负责调度容器、管理应用程序可用性、存储集群数据以及其他关键任务。本指南详细介绍了如何在具有 GPU 加速节点的 AKS 集群上部署和运行 NVIDIA AI Enterprise。
注意
NVIDIA Terraform 模块提供了一种简便的方法来部署托管的 Kubernetes 集群,当与受支持的操作系统和 GPU Operator 版本一起使用时,这些集群可以获得 NVIDIA AI Enterprise 的支持。
先决条件#
通过 BYOL 或私有报价获得的NVIDIA AI Enterprise 许可证
创建 AKS 资源的 Azure 所有者/管理员访问权限
创建 Azure Kubernetes 服务 (AKS) 集群#
登录到 Azure CLI
az login --use-device-code
导航到 Azure 门户以查找 Azure 订阅 ID,转到“订阅”,您可以在订阅名称旁边找到订阅 ID。
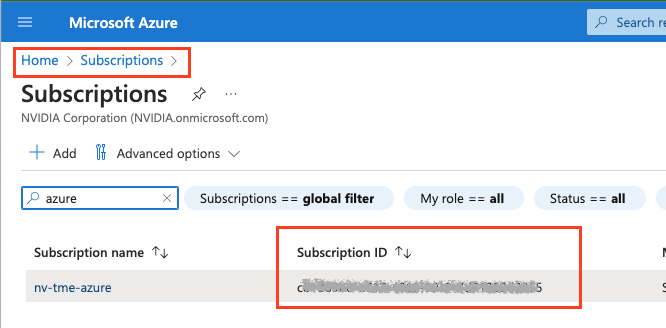
az account set --subscription <Subscription ID>
安装 Azure CLI 插件,这将安装 kubectl。
az aks install-cli
创建资源组,位置为您计划创建 AKS 集群的位置。https://learn.microsoft.com/en-us/azure/aks/availability-zones
az group create --name nvidia-aks-cluster-rg --location <location>
示例
az group create --name nvidia-aks-cluster-rg --location westus2
创建 AKS 集群,并在下方更新 <location>。
az aks create -g nvidia-aks-cluster-rg -n aks-nvaie -l <location> --enable-node-public-ip --node-count 1 --generate-ssh-keys --node-vm-size Standard_NC4as_T4_v3 --nodepool-tags SkipGPUDriverInstall=true
注意
在上面我们选择 T4 节点作为示例,但您可以选择此处列出的任何 NVIDIA GPU 节点:https://learn.microsoft.com/en-us/azure/virtual-machines/sizes-gpu
验证 Kubernetes 服务已在 Azure 门户上创建。

现在获取 Azure Kubernetes 集群凭据,导航到“Kubernete 服务”,然后选择集群,您将看到如下所示的“连接”按钮,当您单击“连接”时,您将看到如何获取凭据,如下所示。
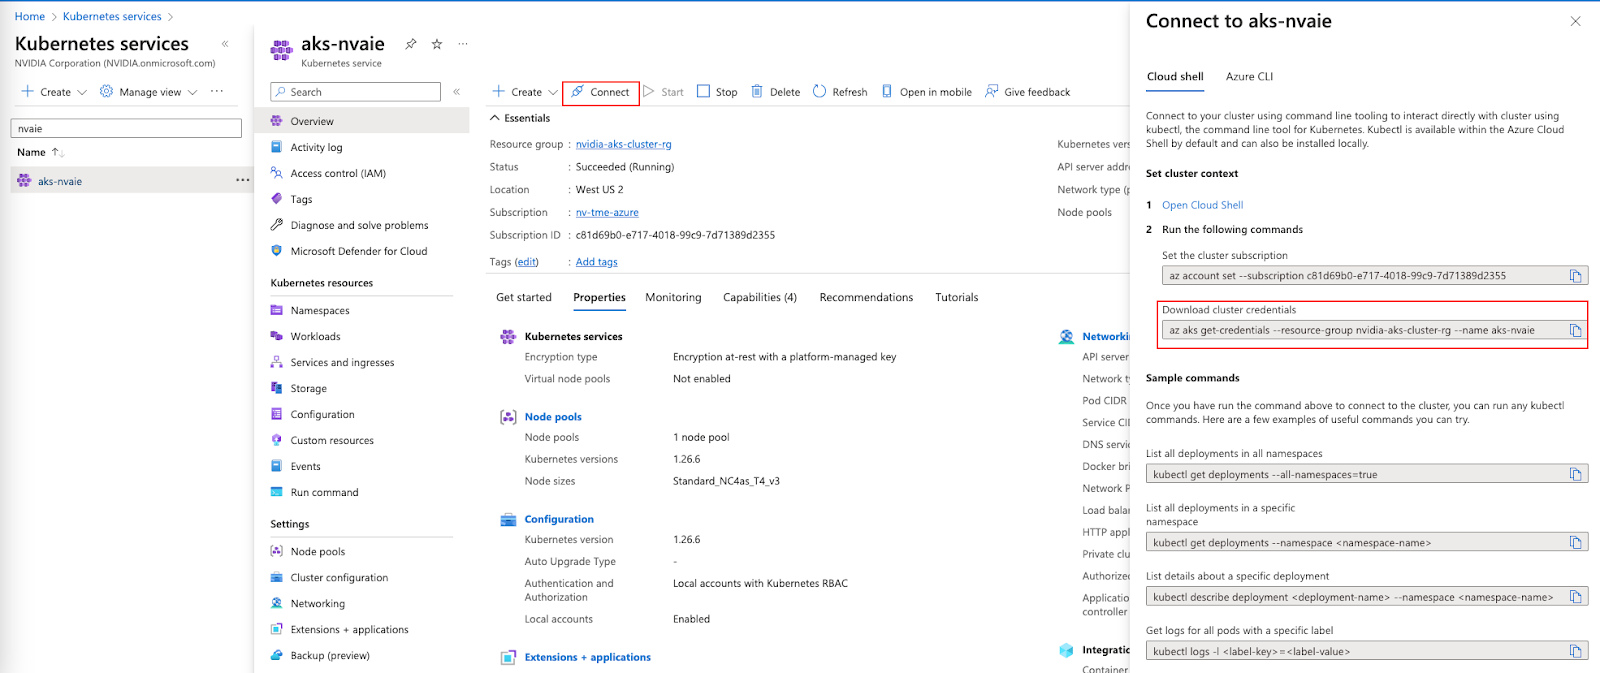
运行以下命令以将 kubeconfig 凭据获取到本地系统。
az aks get-credentials --resource-group nvidia-aks-cluster-rg --name aks-nvaie
运行以下命令以验证节点信息。
kubectl get nodes -o wide
示例输出结果
1NAME                                STATUS   ROLES   AGE     VERSION   INTERNAL-IP   EXTERNAL-IP    OS-IMAGE             KERNEL-VERSION      CONTAINER-RUNTIME
2aks-nodepool1-21142003-vmss000000   Ready    agent   2m50s   v1.26.6   10.224.0.4    20.114.32.13   Ubuntu 22.04.3 LTS   5.15.0-1049-azure   containerd://1.7.5-1
运行以下命令以验证所有 Pod 都在运行
 1kubectl get pods -A
 2NAMESPACE     NAME                                  READY   STATUS    RESTARTS   AGE
 3kube-system   azure-ip-masq-agent-j4bgl             1/1     Running   0          6m17s
 4kube-system   cloud-node-manager-nfw89              1/1     Running   0          6m17s
 5kube-system   coredns-76b9877f49-bv74d              1/1     Running   0          5m19s
 6kube-system   coredns-76b9877f49-rrlj7              1/1     Running   0          6m36s
 7kube-system   coredns-autoscaler-85f7d6b75d-vt47r   1/1     Running   0          6m36s
 8kube-system   csi-azuredisk-node-bxcd2              3/3     Running   0          6m17s
 9kube-system   csi-azurefile-node-vlnqm              3/3     Running   0          6m17s
10kube-system   konnectivity-agent-75fb8dbd69-5lw87   1/1     Running   0          6m36s
11kube-system   konnectivity-agent-75fb8dbd69-xxgkb   1/1     Running   0          6m36s
12kube-system   kube-proxy-9q55z                      1/1     Running   0          6m17s
13kube-system   metrics-server-c456c67cb-f72kc        2/2     Running   0          5m15s
14kube-system   metrics-server-c456c67cb-lw8pn        2/2     Running   0          5m15s
部署 GPU Operator#
运行以下命令以在 AKS 集群上创建命名空间。
kubectl create ns gpu-operator
添加 Helm repo 并使用以下命令更新。
1helm repo add nvidia https://helm.ngc.nvidia.com/nvaie --username='$oauthtoken' --password=<YOUR API KEY>
2helm repo update
在“gpu-operator”命名空间中使用您的 NGC API 密钥创建一个 NGC Secret,如下所示。
kubectl create secret docker-registry ngc-secret --docker-server=nvcr.io/nvaie --docker-username=\$oauthtoken --docker-password=<NGC-API-KEY> --docker-email=<your_email_id> -n gpu-operator
创建一个空的 gridd.conf 文件,然后使用 NVIDIA vGPU 许可证令牌文件创建一个 configmap,如下所示。
kubectl create configmap licensing-config -n gpu-operator --from-file=./client_configuration_token.tok --from-file=./gridd.conf
从 NGC Catalog 安装 GPU Operator,其中包含许可证令牌和驱动程序存储库。
1helm install gpu-operator nvaie/gpu-operator-4-0 --version 23.6.1 --set driver.repository=nvcr.io/nvaie,driver.licensingConfig.configMapName=licensing-config --namespace gpu-operator
验证 GPU Operator 安装#
使用以下命令验证 NVIDIA GPU 驱动程序是否已加载。
kubectl get pods -n gpu-operator
 1NAME                                                          READY   STATUS      RESTARTS   AGE
 2gpu-feature-discovery-tgk44                                   1/1     Running     0          5m11s
 3gpu-operator-74759dfc4b-kk5ks                                 1/1     Running     0          6m13s
 4gpu-operator-node-feature-discovery-gc-7c8b8d65fd-kf4dz       1/1     Running     0          6m13s
 5gpu-operator-node-feature-discovery-master-56874d94b9-7qdmz   1/1     Running     0          6m13s
 6gpu-operator-node-feature-discovery-worker-plcg5              1/1     Running     0          6m13s
 7nvidia-container-toolkit-daemonset-48p26                      1/1     Running     0          5m11s
 8nvidia-cuda-validator-pxbt4                                   0/1     Completed   0          97s
 9nvidia-dcgm-exporter-qrwdp                                    1/1     Running     0          5m11s
10nvidia-device-plugin-daemonset-9grxf                          1/1     Running     0          5m11s
11nvidia-driver-daemonset-696m4                                 1/1     Running     0          5m36s
12nvidia-operator-validator-zqvgh                               1/1     Running     0          5m11s
kubectl exec -it -n gpu-operator nvidia-driver-daemonset-696m4 -- nvidia-smi
 1Wed Oct 25 16:25:42 2023
 2+---------------------------------------------------------------------------------------+
 3| NVIDIA-SMI 535.129.01             Driver Version: 535.129.01   CUDA Version: 12.2     |
 4|-----------------------------------------+----------------------+----------------------+
 5| GPU  Name                 Persistence-M | Bus-Id        Disp.A | Volatile Uncorr. ECC |
 6| Fan  Temp   Perf          Pwr:Usage/Cap |         Memory-Usage | GPU-Util  Compute M. |
 7|                                         |                      |               MIG M. |
 8|=========================================+======================+======================|
 9|   0  Tesla T4                       On  | 00000001:00:00.0 Off |                  Off |
10| N/A   34C    P8              15W /  70W |      0MiB / 16384MiB |      0%      Default |
11|                                         |                      |                  N/A |
12+-----------------------------------------+----------------------+----------------------+
13+---------------------------------------------------------------------------------------+
14| Processes:                                                                            |
15|  GPU   GI   CI        PID   Type   Process name                            GPU Memory |
16|        ID   ID                                                             Usage      |
17|=======================================================================================|
18|  No running processes found                                                           |
19+---------------------------------------------------------------------------------------+
注意
nvidia-driver-daemonset-xxxxx 在您自己的环境中将有所不同,用于上述命令以验证 NVIDIA vGPU 驱动程序。
运行示例 NVIDIA AI Enterprise 容器#
创建一个 docker-registry secret。这将用于自定义 yaml 中,以从 NGC Catalog 拉取容器。
1kubectl create secret docker-registry regcred --docker-server=nvcr.io/nvaie --docker-username=\$oauthtoken --docker-password=<YOUR_NGC_KEY> --docker-email=<your_email_id> -n default
创建一个自定义 yaml 文件以部署 NVIDIA AI Enterprise 容器并运行示例训练代码。
nano pytoch-mnist.yaml
将以下内容粘贴到文件中并保存。
 1---
 2apiVersion: apps/v1
 3kind: Deployment
 4metadata:
 5  name: pytorch-mnist
 6  labels:
 7    app: pytorch-mnist
 8spec:
 9  replicas: 1
10  selector:
11    matchLabels:
12      app: pytorch-mnist
13  template:
14    metadata:
15      labels:
16        app: pytorch-mnist
17    spec:
18      containers:
19        - name: pytorch-container
20          image: nvcr.io/nvaie/pytorch-2-0:22.02-nvaie-2.0-py3
21          command:
22            - python
23          args:
24            - /workspace/examples/upstream/mnist/main.py
25          resources:
26            requests:
27              nvidia.com/gpu: 1
28            limits:
29              nvidia.com/gpu: 1
30      imagePullSecrets:
31        - name: regcred
检查 Pod 的状态。
1kubectl get pods
查看示例 mnist 训练作业的输出。
1kubectl logs -l app=pytorch-mnist
输出将类似于这样。
 1Train Epoch: 4 [55680/60000 (93%)]  Loss: 0.007223
 2Train Epoch: 4 [56320/60000 (94%)]  Loss: 0.029804
 3Train Epoch: 4 [56960/60000 (95%)]  Loss: 0.018922
 4Train Epoch: 4 [57600/60000 (96%)]  Loss: 0.037932
 5Train Epoch: 4 [58240/60000 (97%)]  Loss: 0.044342
 6Train Epoch: 4 [58880/60000 (98%)]  Loss: 0.046980
 7Train Epoch: 4 [59520/60000 (99%)]  Loss: 0.057098
 8
 9
10Test set: Average loss: 0.0319, Accuracy: 9897/10000 (99%)
删除 AKS 集群#
运行以下命令以删除 AKS 集群。
az aks delete --resource-group aks-rg --name aks-nvaie --yes