VirtualBox 和 Vagrant
本节介绍如何在 VirtualBox 和 Vagrant 中安装和设置 Cumulus VX,以创建如下所示的两个叶和一个脊拓扑。
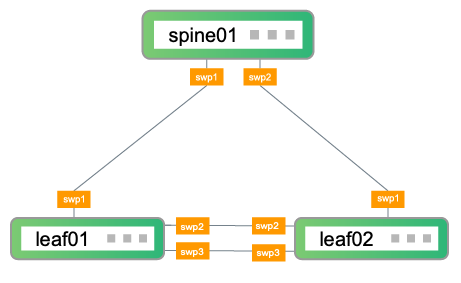
在此拓扑中,leaf01 和 leaf02 是网络上的接入层交换机。leaf01 和 leaf02 连接到 spine01,后者是网络上的汇聚层交换机。为了便于在本指南中描述的初始设置之后进行额外的配置,leaf01 和 leaf02 之间也相互连接。
按照以下步骤进行操作
- 创建三个虚拟机(leaf01、leaf02 和 spine01)以及它们之间的网络连接
- 登录到交换机
- 执行基本交换机配置
- 验证配置
这些步骤已在 macOS 10.14.6 上使用 Cumulus VX 4.2、VirtualBox 6.1.12 版和 Vagrant 2.2.9 版进行了测试。
创建和配置虚拟机
以下步骤创建 leaf01、leaf02 和 spine01 以及它们之间的网络连接。本节假设您具备 Vagrant、VirtualBox 和 Linux 经验。
下载并安装软件
- 下载并安装 VirtualBox。
- 下载并安装 Vagrant。
创建虚拟机和网络连接
Cumulus VX VirtualBox 镜像定义了 CPU、内存和磁盘要求。Cumulus VX 至少需要 768MB 的 RAM 和 6GB 的磁盘空间。
CumulusVX 4.3 及更高版本需要 2 个 vCPU。
创建一个文件夹来包含 Vagrant 环境,然后将目录更改到该文件夹。
local@host:~$ mkdir vagrant
local@host:~$ cd vagrant
初始化 Vagrant 环境以在您刚刚创建的文件夹中创建一个名为
Vagrantfile的文件。local@host:~/vagrant$ vagrant init A `Vagrantfile` has been placed in this directory. You are now ready to `vagrant up` your first virtual environment! Please read the comments in the Vagrantfile as well as documentation on `vagrantup.com` for more information on using Vagrant.
编辑
Vagrantfile。在Vagrant.configure("2") do |config|下添加以下部分以创建 leaf01、leaf02 和 spine01,以及它们之间的网络连接。local@host:~/vagrant$ vi Vagrantfile Vagrant.configure("2") do |config| config.vm.define "leaf01" do |leaf01| leaf01.vm.box = "CumulusCommunity/cumulus-vx" # Internal network for swp* interfaces. leaf01.vm.network "private_network", virtualbox__intnet: "intnet-1", auto_config: false leaf01.vm.network "private_network", virtualbox__intnet: "intnet-3", auto_config: false leaf01.vm.network "private_network", virtualbox__intnet: "intnet-4", auto_config: false leaf01.vm.provider "virtualbox" do |vbox| vbox.customize ['modifyvm', :id, '--nicpromisc2', 'allow-vms'] vbox.customize ['modifyvm', :id, '--nicpromisc3', 'allow-vms'] vbox.customize ['modifyvm', :id, '--nicpromisc4', 'allow-vms'] end end config.vm.define "leaf02" do |leaf02| leaf02.vm.box = "CumulusCommunity/cumulus-vx" # Internal network for swp* interfaces. leaf02.vm.network "private_network", virtualbox__intnet: "intnet-2", auto_config: false leaf02.vm.network "private_network", virtualbox__intnet: "intnet-3", auto_config: false leaf02.vm.network "private_network", virtualbox__intnet: "intnet-4", auto_config: false leaf02.vm.provider "virtualbox" do |vbox| vbox.customize ['modifyvm', :id, '--nicpromisc2', 'allow-vms'] vbox.customize ['modifyvm', :id, '--nicpromisc3', 'allow-vms'] vbox.customize ['modifyvm', :id, '--nicpromisc4', 'allow-vms'] end end config.vm.define "spine01" do |spine01| spine01.vm.box = "CumulusCommunity/cumulus-vx" # Internal network for swp* interfaces. spine01.vm.network "private_network", virtualbox__intnet: "intnet-1", auto_config: false spine01.vm.network "private_network", virtualbox__intnet: "intnet-2", auto_config: false spine01.vm.provider "virtualbox" do |vbox| vbox.customize ['modifyvm', :id, '--nicpromisc2', 'allow-vms'] vbox.customize ['modifyvm', :id, '--nicpromisc3', 'allow-vms'] end end end运行
vagrant up以启动虚拟机local@host:~/vagrant$ vagrant up Bringing machine 'leaf01' up with 'virtualbox' provider... Bringing machine 'leaf02' up with 'virtualbox' provider... Bringing machine 'spine01' up with 'virtualbox' provider... ...
登录到交换机
使用 vagrant ssh 命令登录到每个交换机。例如
local@host:~/vagrant$ vagrant ssh leaf01
基本交换机配置
在每个交换机上运行这些命令,以便能够运行 NCLU 命令而无需 sudo,更改主机名并启动接口。退出交换机,然后重新登录以在提示符下查看新的主机名。
cumulus@cumulus:mgmt:~$ sudo usermod -a -G netedit vagrant
cumulus@cumulus:mgmt:~$ net add hostname leaf01
cumulus@cumulus:mgmt:~$ net add interface swp1,swp2,swp3
cumulus@cumulus:mgmt:~$ net commit
cumulus@cumulus:mgmt:~$ exit
cumulus@cumulus:mgmt:~$ sudo usermod -a -G netedit vagrant
cumulus@cumulus:mgmt:~$ net add hostname leaf02
cumulus@cumulus:mgmt:~$ net add interface swp1,swp2,swp3
cumulus@cumulus:mgmt:~$ net commit
cumulus@cumulus:mgmt:~$ exit
cumulus@cumulus:mgmt:~$ sudo usermod -a -G netedit vagrant
cumulus@cumulus:mgmt:~$ net add hostname spine01
cumulus@cumulus:mgmt:~$ net add interface swp1,swp2
cumulus@cumulus:mgmt:~$ net commit
cumulus@cumulus:mgmt:~$ exit
验证配置
在每个交换机上运行以下命令以验证配置
LLDP 信息可能需要几分钟才能更新。如果您的命令输出与下面显示的输出不同,请等待几分钟,然后再次运行该命令。
cumulus@leaf01:mgmt:~$ net show lldp
LocalPort    Speed    Mode          RemoteHost     RemotePort
-----------  -------  ------------  ------------   ------------
swp1         1G       Default       spine01        swp1
swp2         1G       Default       leaf02         swp2
swp3         1G       Default       leaf02         swp3
cumulus@leaf02:mgmt:~$ net show lldp
LocalPort    Speed    Mode          RemoteHost     RemotePort
-----------  -------  ------------  ------------   ------------
swp1         1G       Default       spine01        swp2
swp2         1G       Default       leaf01         swp2
swp3         1G       Default       leaf01         swp3
cumulus@spine01:mgmt:~$ net show lldp
LocalPort    Speed    Mode          RemoteHost     RemotePort
-----------  -------  ------------  ------------   ------------
swp1         1G       Default       leaf01         swp1
swp2         1G       Default       leaf02         swp1
在每个交换机上运行以下命令以显示系统信息
cumulus@leaf01:mgmt:~$ net show system
Hostname..............leaf01
Build.................Cumulus Linux 4.2.0
Uptime................0.00.23.740000
Model.................Cumulus VX
Memory................768MB
Disk..................6GB
Vendor Name...........Cumulus Networks
Part Number...........4.2.0
Base MAC Address......4:00:27:39:B1:12
Serial Number.........4:00:27:39:B1:12
Product Name..........VX
后续步骤
- 尝试 高级配置。您可以更新您的虚拟环境,以便能够使用 Cumulus Linux 按需自学实验室(一种快速简便的学习基础知识的方法)。您还可以运行 拓扑转换器,以使用 VirtualBox 和 Vagrant 或 KVM-QEMU 和 Vagrant 模拟自定义网络拓扑。
- 尝试 NVIDIA Air,这是一个免费的个人虚拟数据中心网络,它提供了一种轻松的方式来了解 Cumulus Networks 技术的实际应用。如果您有平台或磁盘限制,这是试用 Cumulus Linux 的一个好方法。