配置和监控刚刚发生事件
刚刚发生事件 (WJH) 流式传输详细且上下文相关的遥测数据以进行分析。这提供了网络问题的实时可见性,例如由于缓冲区拥塞导致的硬件丢包、错误路由以及 ACL 或第 1 层问题。
将 WJH 与 NetQ 结合使用可帮助您识别网络结构中任何位置的丢包。通过单个管理控制台,您可以
- 查看任何当前或历史丢包信息,包括丢包原因
- 识别有问题的数据流或端点,并查明网络中通信失败的位置
有关支持的 WJH 事件列表,请参阅WJH 事件参考。
要使用 gNMI 客户端将 WJH 数据导出到收集器,请参阅使用 gNMI 收集 WJH 数据。
WJH 仅在运行 Cumulus Linux 4.4.0 或更高版本的 NVIDIA Spectrum 交换机上受支持。WJH 延迟和拥塞监控在 NVIDIA Spectrum-2 交换机或更高版本上受支持。SONiC 仅支持使用 gNMI 收集 WJH 数据。
默认情况下,Cumulus Linux 4.4.0 及更高版本包含 NetQ 代理和 CLI。根据您的 NVIDIA 交换机上运行的 Cumulus Linux 版本,您可能需要将 NetQ 代理和 CLI 升级到最新版本
cumulus@<hostname>:~$ sudo apt-get update
cumulus@<hostname>:~$ sudo apt-get install -y netq-agent
cumulus@<hostname>:~$ sudo netq config restart agent
cumulus@<hostname>:~$ sudo apt-get install -y netq-apps
cumulus@<hostname>:~$ sudo netq config restart cli
配置刚刚发生事件
在运行 Cumulus Linux 4.4.0 或更高版本的 NVIDIA Spectrum 交换机上,默认启用 WJH。在 WJH 可以收集数据之前,您必须在交换机和服务器上启用 NetQ 代理。
要在任何交换机或服务器上启用 WJH
在交换机上配置 NetQ 代理
cumulus@switch:~$ sudo netq config add agent wjh重新启动 NetQ 代理以开始收集 WJH 数据
cumulus@switch:~$ sudo netq config restart agent
当您完成查看 WJH 指标后,可以停止 NetQ 代理收集 WJH 数据以减少网络流量。使用 netq config del agent wjh,然后使用 netq config restart agent 在给定交换机上禁用 WJH。
在运行 Cumulus Linux 和 NetQ 代理的 NVIDIA 平台上使用 wjh_dump.py 会导致 NetQ WJH 客户端停止接收丢包回调。为防止此问题,请在 NetQ 代理未启用 WJH 的系统上运行 wjh_dump.py,或禁用 wjh_dump.py 并使用 netq config restart agent 重新启动 NetQ 代理。
查看刚刚发生事件指标
您可以从 NetQ UI 或 NetQ CLI 查看 WJH 指标。WJH 指标在 WJH 卡片和事件卡片上可见。要在事件卡片上查看指标,请打开大卡片并选择卡片顶部的 WJH 选项卡。要获得更详细的视图,请打开 WJH 卡片。
要将 WJH 卡片添加到您的工作台,请导航到标题并选择 ![]() 添加卡片 > 事件 > 刚刚发生事件 > 打开卡片
添加卡片 > 事件 > 刚刚发生事件 > 打开卡片
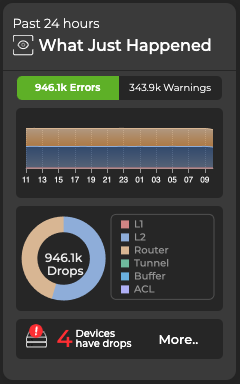
您可以展开卡片以查看 WJH 数据的详细摘要,包括丢包最多的设备、丢包数量、其分布以及时间线

将其卡片扩展到最大尺寸以打开 WJH 仪表板。您也可以通过单击 ![]() 菜单,然后单击 刚刚发生事件 来访问此仪表板。
菜单,然后单击 刚刚发生事件 来访问此仪表板。
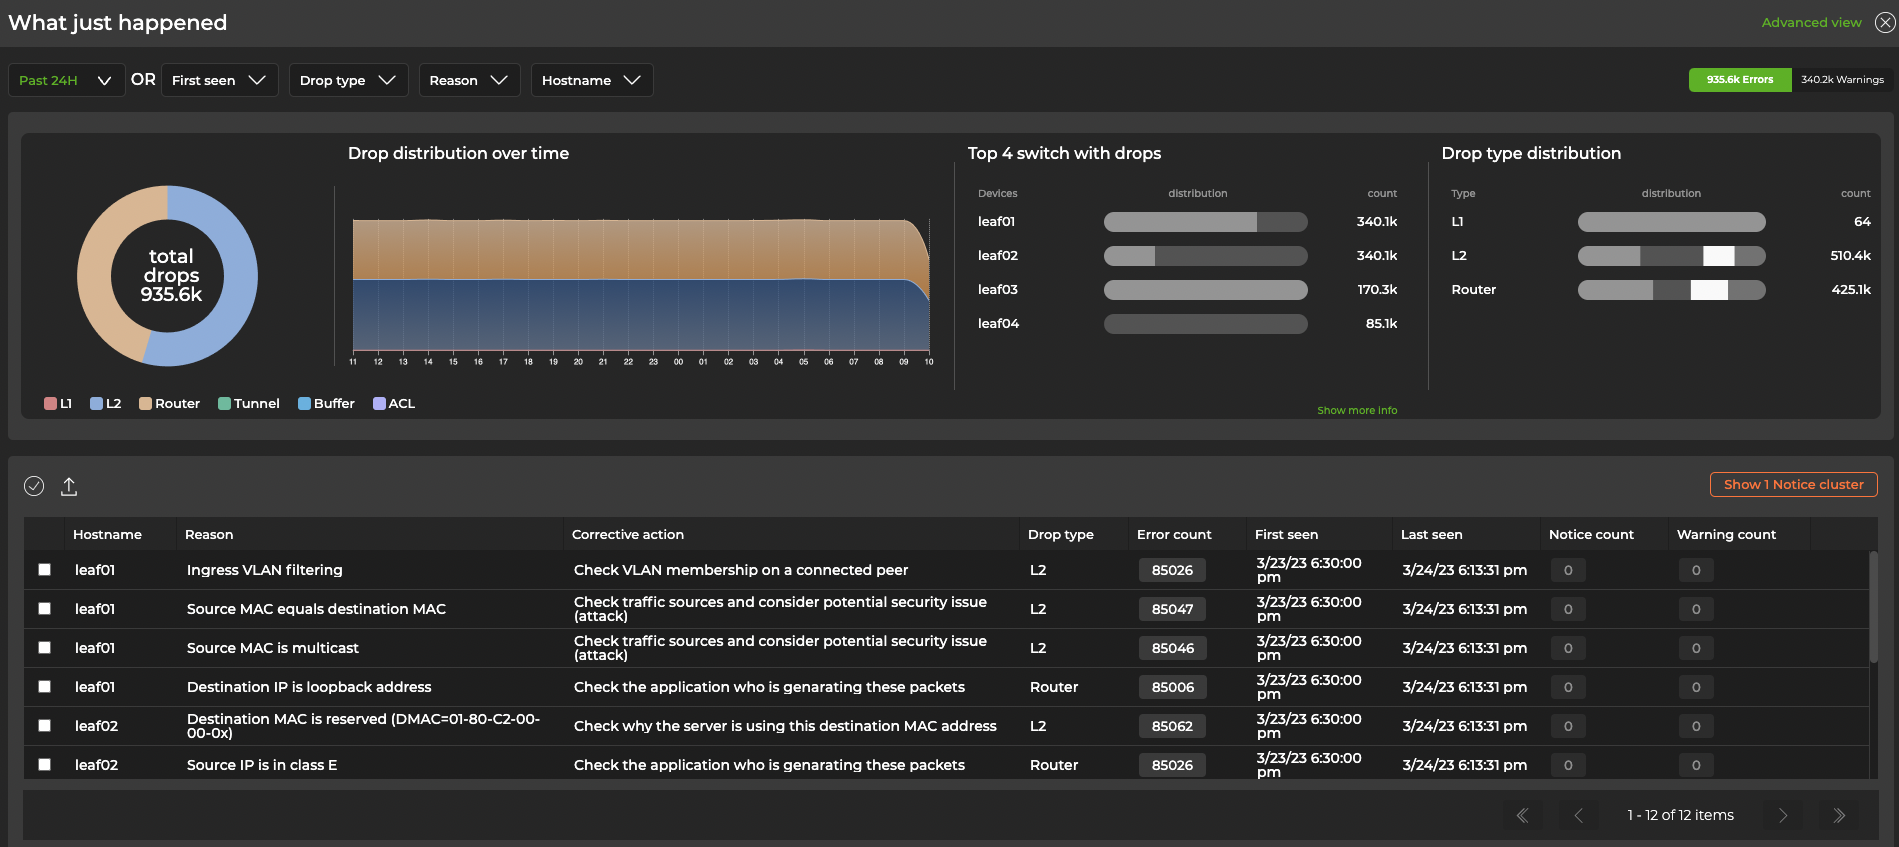
图表下方的表格显示 WJH 事件和解决这些事件的建议。将鼠标悬停在颜色编码的图表上以查看 WJH 事件类别
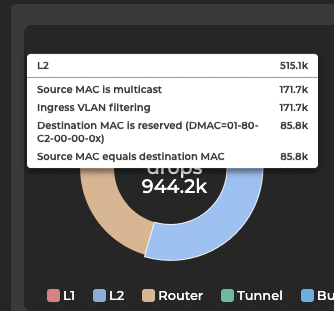
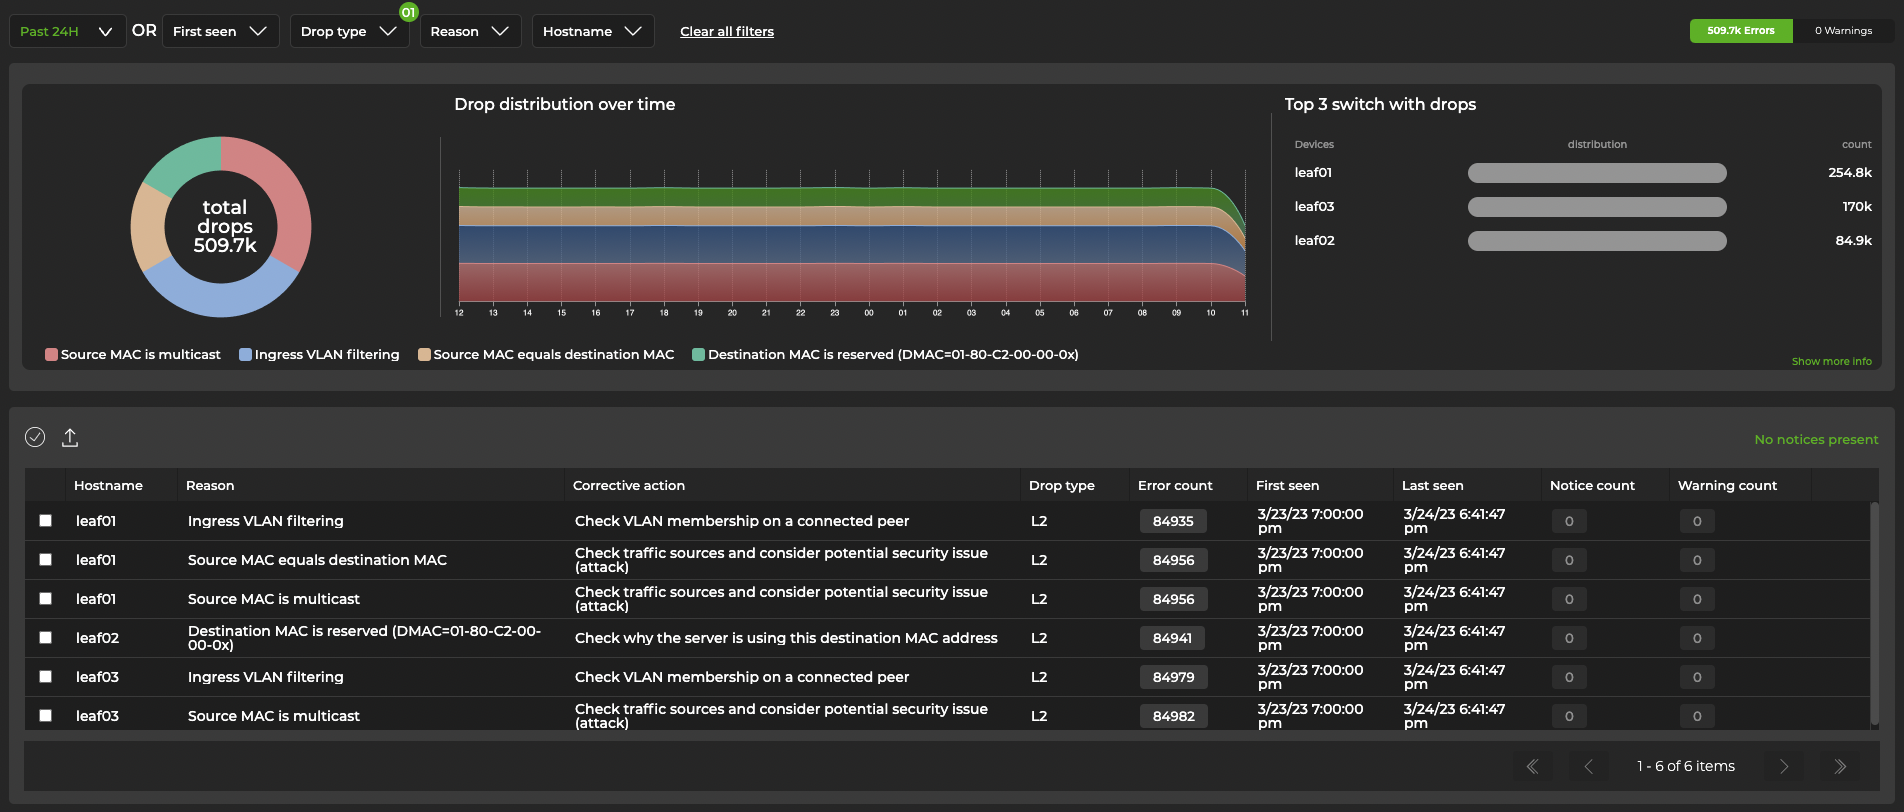
单击图表中的类别以获得详细视图
选择右上角的 高级视图 以获得按丢包类型排序的表格显示。此显示包括其他信息,例如源和目标 IP 地址、端口和 MAC 地址。
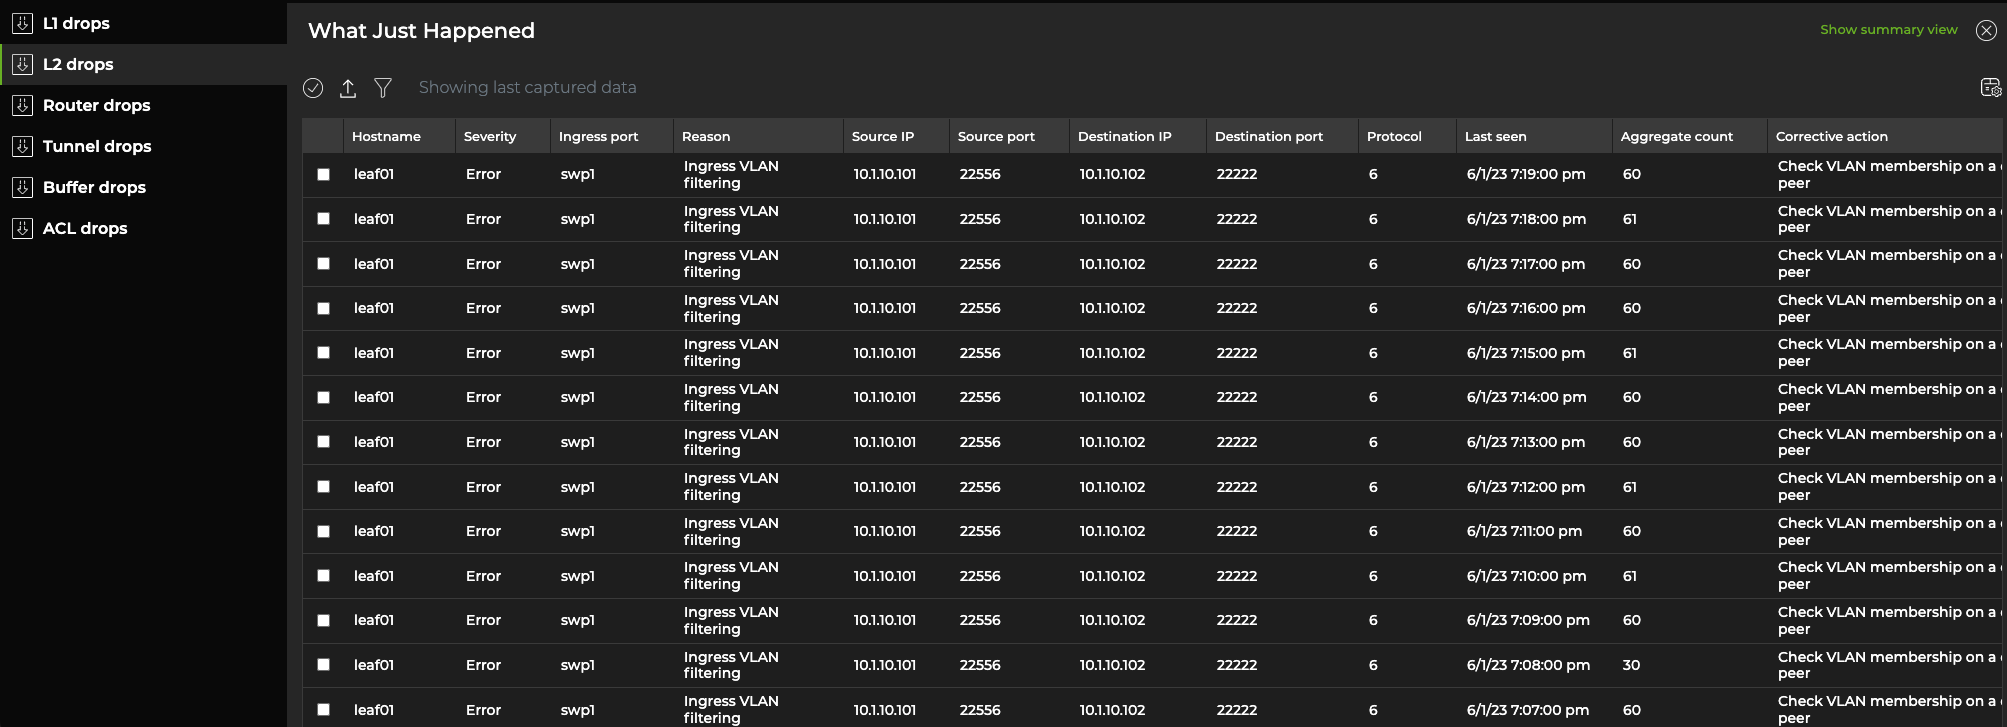
对于 L1 事件,您可以按交换机和入口端口对条目进行分组,以减少显示的事件数量。为此,请选择右上角的 按端口聚合 开关。

要查看 WJH 丢包,请运行以下命令之一。有关选项和定义的完整列表,请参阅命令行参考。
netq [<hostname>] show wjh-drop
    [severity <text-severity>]
    [details]
    [between <text-fixed-time> and <text-fixed-endtime>]
    [around <text-fixed-time>]
    [json]

netq [<hostname>] show wjh-drop <text-drop-type>
    [ingress-port <text-ingress-port>]
    [severity <text-severity>]
    [reason <text-reason>]
    [src-ip <text-src-ip>]
    [dst-ip <text-dst-ip>]
    [proto <text-proto>]
    [src-port <text-src-port>]
    [dst-port <text-dst-port>]
    [src-mac <text-src-mac>]
    [dst-mac <text-dst-mac>]
    [egress-port <text-egress-port>]
    [traffic-class <text-traffic-class>]
    [rule-id-acl <text-rule-id-acl>]
    [vlan <text-vlan>]
    [between <text-time> and <text-endtime>]
    [around <text-time>]
    [json]
还有一个额外的命令可用于聚合在同一入口端口上发生的 WJH L1 错误。
netq [<hostname>] show wjh-drop l1
    [ingress-port <text-ingress-port>]
    [severity <text-severity>]
    [reason <text-reason>]
    [port-aggregate <text-port-aggregate>]
    [between <text-time> and <text-endtime>]
    [around <text-time>] [json]
此示例使用命令的第一种形式显示过去一周 leaf03 交换机上的丢包。
cumulus@switch:~$ netq leaf03 show wjh-drop between now and 7d
Matching wjh records:
Drop type          Aggregate Count
------------------ ------------------------------
L1                 560
Buffer             224
Router             144
L2                 0
ACL                0
Tunnel             0
此示例使用命令的第二种形式显示过去一周 leaf03 交换机上的丢包,包括丢包原因。
cumulus@switch:~$ netq leaf03 show wjh-drop details between now and 7d

Matching wjh records:
Drop type          Aggregate Count                Reason
------------------ ------------------------------ ---------------------------------------------
L1                 556                            None
Buffer             196                            WRED
Router             144                            Blackhole route
Buffer             14                             Packet Latency Threshold Crossed
Buffer             14                             Port TC Congestion Threshold
L1                 4                              Oper down
此示例显示在网络第 2 层看到的丢包。
cumulus@mlx-2700-03:mgmt:~$ netq show wjh-drop l2
Matching wjh records:
Hostname          Ingress Port             Reason                                        Agg Count          Src Ip           Dst Ip           Proto  Src Port         Dst Port         Src Mac            Dst Mac            First Timestamp                Last Timestamp
----------------- ------------------------ --------------------------------------------- ------------------ ---------------- ---------------- ------ ---------------- ---------------- ------------------ ------------------ ------------------------------ ----------------------------
mlx-2700-03       swp1s2                   Port loopback filter                          10                 27.0.0.19        27.0.0.22        0      0                0                00:02:00:00:00:73  0c:ff:ff:ff:ff:ff  Mon Dec 16 11:54:15 2019       Mon Dec 16 11:54:15 2019
mlx-2700-03       swp1s2                   Source MAC equals destination MAC             10                 27.0.0.19        27.0.0.22        0      0                0                00:02:00:00:00:73  00:02:00:00:00:73  Mon Dec 16 11:53:17 2019       Mon Dec 16 11:53:17 2019
mlx-2700-03       swp1s2                   Source MAC equals destination MAC             10                 0.0.0.0          0.0.0.0          0      0                0                00:02:00:00:00:73  00:02:00:00:00:73  Mon Dec 16 11:40:44 2019       Mon Dec 16 11:40:44 2019
以下两个示例包括 ACL 和路由器的丢包事件的严重性(错误、警告或注意)。
cumulus@switch:~$ netq show wjh-drop acl
Matching wjh records:
Hostname          Ingress Port             Reason                                        Severity         Agg Count          Src Ip           Dst Ip           Proto  Src Port         Dst Port         Src Mac            Dst Mac            Acl Rule Id            Acl Bind Point               Acl Name         Acl Rule         First Timestamp                Last Timestamp
----------------- ------------------------ --------------------------------------------- ---------------- ------------------ ---------------- ---------------- ------ ---------------- ---------------- ------------------ ------------------ ---------------------- ---------------------------- ---------------- ---------------- ------------------------------ ----------------------------
leaf01            swp2                     Ingress router ACL                            Error            49                 55.0.0.1         55.0.0.2         17     8492             21423            00:32:10:45:76:89  00:ab:05:d4:1b:13  0x0                    0                                                              Tue Oct  6 15:29:13 2020       Tue Oct  6 15:29:39 2020
cumulus@switch:~$ netq show wjh-drop router
Matching wjh records:
Hostname          Ingress Port             Reason                                        Severity         Agg Count          Src Ip           Dst Ip           Proto  Src Port         Dst Port         Src Mac            Dst Mac            First Timestamp                Last Timestamp
----------------- ------------------------ --------------------------------------------- ---------------- ------------------ ---------------- ---------------- ------ ---------------- ---------------- ------------------ ------------------ ------------------------------ ----------------------------
leaf01            swp1                     Blackhole route                               Notice           36                 46.0.1.2         47.0.2.3         6      1235             43523            00:01:02:03:04:05  00:06:07:08:09:0a  Tue Oct  6 15:29:13 2020       Tue Oct  6 15:29:47 2020
配置延迟和拥塞阈值
WJH 延迟和拥塞指标取决于阈值设置来触发事件。WJH 将数据包延迟测量为在单个系统(交换机)内部花费的时间。指定后,当测量值超过高阈值时,WJH 会触发事件;当值低于低阈值时,事件会被抑制。
要配置这些阈值,请运行
netq config add agent wjh-threshold
    (latency|congestion)
    (<text-tc-list>|all)
    (<text-port-list>|all)
    <text-th-hi>
    <text-th-lo>
您可以通过逗号(无空格)分隔类别或端口来指定多个流量类别和多个端口。
例如,以下命令为端口 swp1 上的类别 3 流量创建延迟阈值,其中上限阈值为 10 微秒,下限阈值为 1 微秒
cumulus@switch:~$ sudo netq config add agent wjh-threshold latency 3 swp1 10 1
此示例为端口 swp1 上的类别 4 流量创建拥塞阈值,其中上限阈值为 200 个单元,下限阈值为 10 个单元,其中一个单元为 144 字节
cumulus@switch:~$ sudo netq config add agent wjh-threshold congestion 4 swp1 200 10
有关此命令的选项和定义的完整列表,请参阅命令行参考。
使用过滤器抑制事件
您可以使用 UI 或 CLI 创建过滤器,以防止 WJH 生成事件。过滤器可以应用于丢包类别(例如第 1 层丢包或缓冲区丢包)、丢包原因(例如,“解封装错误”或“多播 MAC 不匹配”)或根据严重级别(注意、警告或错误)。使用 CLI,您可以创建过滤器以根据其源或目标 IP 地址来抑制事件。
有关丢包类型、原因和严重级别的完整列表,请参阅WJH 事件参考。
在配置 NetQ 代理以过滤 WJH 丢包之前,您必须生成 AuthKeys。将访问密钥和秘密密钥复制到可访问的位置。您将在最后步骤之一中输入它们。
展开
 菜单,然后选择 管理交换机。
选择 NetQ 代理配置 选项卡。
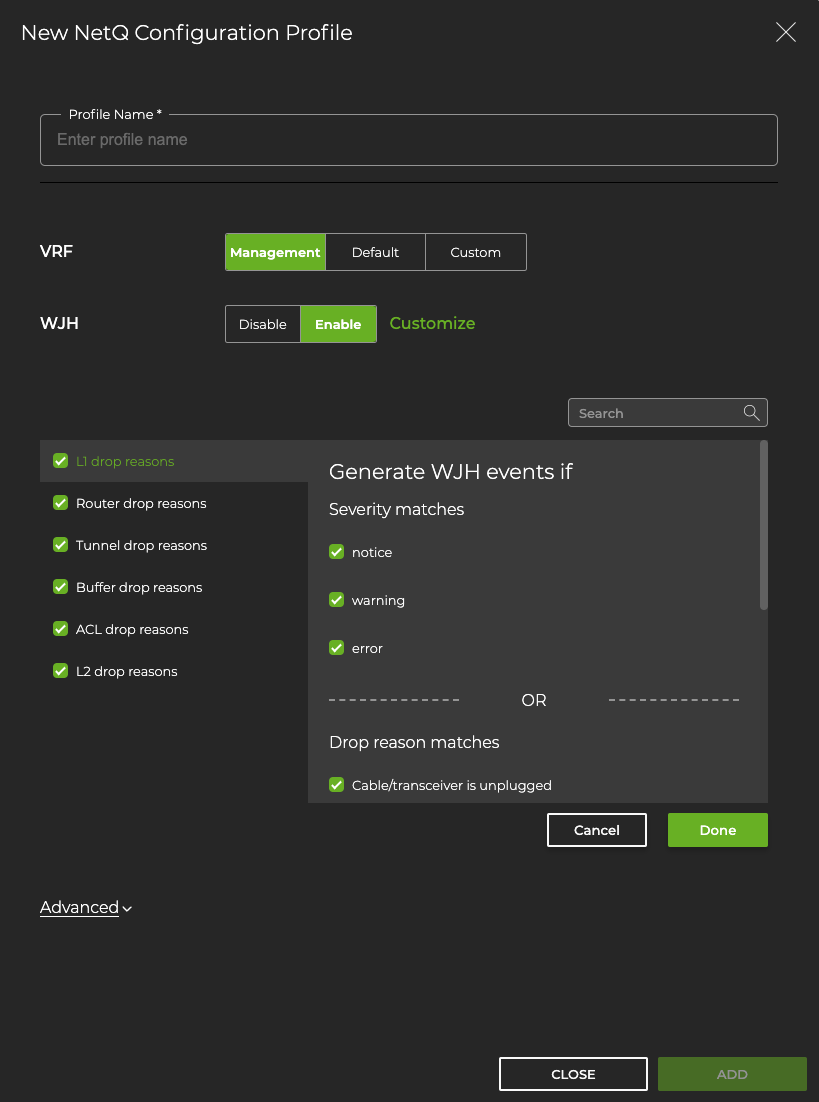
在 NetQ 代理配置卡片上,选择 添加配置。
输入配置文件的名称。在 WJH 行中,选择 启用,然后选择 自定义。默认情况下,WJH 包括所有丢包原因和严重性。取消选中您不希望生成 WJH 事件的任何丢包原因或严重性,然后单击 完成。
输入您的 NetQ 访问密钥和秘密密钥。
选择 添加 以保存配置配置文件,或单击 关闭 以放弃它。
要配置 NetQ 代理以过滤 WJH 丢包,请运行 netq config add agent wjh-drop-filter。使用 Tab 键完成以查看可用的丢包类型、丢包原因和严重性值。
netq config add agent wjh-drop-filter
   drop-type <text-wjh-drop-type>
   [drop-reasons <text-wjh-drop-reasons>]
   [severity <text-drop-severity-list>]
要配置 NetQ 代理以忽略基于 IP 地址(源地址和目标地址)的 WJH 丢包,请运行
netq config add agent wjh-drop-filter
   ips [<text-wjh-ips>]
要显示过滤器配置,请运行 netq config show agent wjh-drop-filter。要删除过滤器,请运行 netq config del agent wjh-drop-filter。