EVPN 增强功能
本节介绍 EVPN 增强功能。
定义 RD 和 RT
第 2 层 VNI 的 RD 和 RT 与租户 VRF RD 和 RT 不同。要定义租户 VRF RD 和 RT,请参阅 为租户 VRF 配置 RD 和 RT。
当 FRR 了解本地 VNI 并且 FRR 中没有针对该 VNI 的显式配置时,交换机会自动为此 VNI 派生 RD 以及导入和导出 RT。RD 使用路由器 ID:VNI 索引,导入和导出 RT 使用AS:VNI。对于来自第 2 层 VNI(类型 2 和类型 3)的路由,RD 使用第 2 层 VNI 接口中的 VXLAN 本地隧道 IP 地址 (vxlan-local-tunnelip) 而不是路由器 ID (vxlan-local-tunnelip:VNI)。EVPN 路由交换使用 RD 和 RT。
RD 消除了不同 VNI 中 EVPN 路由的歧义(它们可以具有相同的 MAC 和 IP 地址),而 RT 描述了路由的 VPN 成员资格。RD 的VNI 索引是交换机生成的唯一编号。它仅具有本地意义;在远程交换机上,它的唯一作用是消除路由歧义。交换机使用此编号而不是 VNI 值本身,因为此编号必须小于或等于 65535。在 RT 中,AS 始终是一个 2 字节的值,以便为大型 VNI 留出空间。如果路由器具有 4 字节 AS,则它仅使用低 2 个字节。这确保了不同 VNI 的 RT 是唯一的,同时在同一 AS 中路由器的同一 VNI 的 RT 是相同的。
对于 eBGP EVPN 对等互连,对等方位于不同的 AS 中,因此使用 AS:VNI 的自动 RT 不适用于路由导入。因此,Cumulus Linux 将导入 RT 视为 *:VNI,以确定哪些接收到的路由适用于特定的 VNI。这仅在交换机自动派生导入 RT 时适用。
如果您不想自动派生 RD 和 RT(第 2 层 RTS),则可以手动定义它们。以下示例命令是每个 VNI 的命令。
cumulus@leaf01:~$ nv set evpn vni 10 rd 10.10.10.1:20
cumulus@leaf01:~$ nv set evpn vni 10 route-target export 65101:10
cumulus@leaf01:~$ nv set evpn vni 10 route-target import 65102:10
cumulus@leaf01:~$ nv config apply
cumulus@leaf03:~$ nv set evpn vni 10 rd 10.10.10.3:20
cumulus@leaf03:~$ nv set evpn vni 10 route-target export 65102:10
cumulus@leaf03:~$ nv set evpn vni 10 route-target import 65101:10
cumulus@leaf03:~$ nv config apply
cumulus@leaf01:~$ sudo vtysh
...
leaf01# configure terminal
leaf01(config)# router bgp 65101
leaf01(config-router)# address-family l2vpn evpn
leaf01(config-router-af)# vni 10
leaf01(config-router-af-vni)# rd 10.10.10.1:20
leaf01(config-router-af-vni)# route-target export 65101:10
leaf01(config-router-af-vni)# route-target import 65102:10
leaf01(config-router-af-vni)# exit
leaf01(config-router-af)# advertise-all-vni
leaf01(config-router-af)# end
leaf01# write memory
leaf01# exit
vtysh 命令在 /etc/frr/frr.conf 文件中创建以下配置代码段。
...
address-family l2vpn evpn
  advertise-all-vni
  vni 10
   rd 10.10.10.1:20
   route-target export 65101:10
   route-target import 65102:10
...
cumulus@leaf03:~$ sudo vtysh
...
leaf03# configure terminal
leaf03(config)# router bgp 65102
leaf03(config-router)# address-family l2vpn evpn
leaf03(config-router-af)# vni 10
leaf03(config-router-af-vni)# rd 10.10.10.3:20
leaf03(config-router-af-vni)# route-target export 65102:10
leaf03(config-router-af-vni)# route-target import 65101:10
leaf03(config-router-af-vni)# exit
leaf03(config-router-af)# advertise-all-vni
leaf03(config-router-af)# end
leaf03# write memory
leaf03# exit
vtysh 命令在 /etc/frr/frr.conf 文件中创建以下配置代码段
...
address-family l2vpn evpn
  advertise-all-vni
  vni 10
   rd 10.10.10.3:20
   route-target export 65102:10
   route-target import 65101:10
- 如果您稍后删除 RD 或 RT,它将恢复为其对应的默认值。
- 路由目标自动派生不支持 4 字节 AS 编号;如果路由器具有 4 字节 AS,则必须手动定义 RT。
您可以配置多个 RT 值。此外,您可以使用 route-target both 通过单个命令配置导入和导出路由目标
cumulus@leaf01:~$ nv set evpn vni 10 route-target import 65102:10
cumulus@leaf01:~$ nv set evpn vni 10 route-target import 65102:20
cumulus@leaf01:~$ nv set evpn vni 20 route-target both 65101:10
cumulus@leaf01:~$ nv config apply
cumulus@leaf03:~$ nv set evpn vni 10 route-target import 65101:10
cumulus@leaf03:~$ nv set evpn vni 10 route-target import 65101:20
cumulus@leaf03:~$ nv set evpn vni 20 route-target both 65102:10
cumulus@leaf03:~$ nv config apply
cumulus@leaf01:~$ sudo vtysh
...
leaf01# configure terminal
leaf01(config)# router bgp 65101
leaf01(config-router)# address-family l2vpn evpn
leaf01(config-router-af)# vni 10
leaf01(config-router-af-vni)# route-target import 65102:10
leaf01(config-router-af-vni)# route-target import 65102:20
leaf01(config-router-af-vni)# exit
leaf01(config-router-af)# vni 20
leaf01(config-router-af-vni)# route-target both 65101:10
leaf01(config-router-af)# end
leaf01# write memory
leaf01# exit
vtysh 命令在 /etc/frr/frr.conf 文件中创建以下配置代码段
...
address-family l2vpn evpn
  vni 10
    route-target import 65102:10
    route-target import 65102:20
  vni 20
    route-target import 65101:10
    route-target export 65101:10
...
cumulus@leaf03:~$ sudo vtysh
...
leaf03# configure terminal
leaf03(config)# router bgp 65102
leaf03(config-router)# address-family l2vpn evpn
leaf03(config-router-af)# vni 10
leaf03(config-router-af-vni)# route-target import 65101:10
leaf03(config-router-af-vni)# route-target import 65101:20
leaf03(config-router-af-vni)# exit
leaf03(config-router-af)# vni 20
leaf03(config-router-af-vni)# route-target both 65102:10
leaf03(config-router-af)# end
leaf03# write memory
leaf03# exit
vtysh 命令在 /etc/frr/frr.conf 文件中创建以下配置代码段
...
address-family l2vpn evpn
  vni 10
    route-target import 65101:10
    route-target import 65101:20
  vni 20
    route-target import 65102:10
    route-target export 65102:10
...
在具有 OSPF 底层网络的 iBGP 环境中启用 EVPN
您可以将 EVPN 与 OSPF 或静态路由底层网络一起使用。这比使用 eBGP 更复杂的配置。在这种情况下,iBGP 在 VTEP 之间直接通告 EVPN 路由,而主干网络不知道 EVPN 或 BGP。
叶子节点在 EVPN 地址族内的全网状网络中相互对等,而无需使用路由反射器。叶子节点通常与其环回地址对等,环回地址在 OSPF 中通告。接收 VTEP 将路由导入到具有匹配路由目标社区的特定 VNI 中。
cumulus@leaf01:~$ nv set router bgp autonomous-system 65101
cumulus@leaf01:~$ nv set router bgp router-id 10.10.10.1
cumulus@leaf01:~$ nv set vrf default router bgp neighbor 10.10.10.2 remote-as internal
cumulus@leaf01:~$ nv set vrf default router bgp neighbor 10.10.10.3 remote-as internal
cumulus@leaf01:~$ nv set vrf default router bgp neighbor 10.10.10.4 remote-as internal
cumulus@leaf01:~$ nv set evpn enable on
cumulus@leaf01:~$ nv set vrf default router bgp address-family l2vpn-evpn enable on
cumulus@leaf01:~$ nv set vrf default router bgp neighbor 10.10.10.2 address-family l2vpn-evpn enable on
cumulus@leaf01:~$ nv set vrf default router bgp neighbor 10.10.10.3 address-family l2vpn-evpn enable on
cumulus@leaf01:~$ nv set vrf default router bgp neighbor 10.10.10.4 address-family l2vpn-evpn enable on
cumulus@leaf01:~$ nv set vrf default router ospf router-id 10.10.10.1
cumulus@leaf01:~$ nv set vrf default router ospf area 0 network 10.10.10.1/32
cumulus@leaf01:~$ nv set interface lo router ospf passive on
cumulus@leaf01:~$ nv set interface swp49 router ospf area 0.0.0.0
cumulus@leaf01:~$ nv set interface swp50 router ospf area 0.0.0.0
cumulus@leaf01:~$ nv set interface swp51 router ospf area 0.0.0.0
cumulus@leaf01:~$ nv set interface swp52 router ospf area 0.0.0.0
cumulus@leaf01:~$ nv set interface swp49 router ospf network-type point-to-point
cumulus@leaf01:~$ nv set interface swp50 router ospf network-type point-to-point
cumulus@leaf01:~$ nv set interface swp51 router ospf network-type point-to-point
cumulus@leaf01:~$ nv set interface swp52 router ospf network-type point-to-point
cumulus@leaf01:~$ nv config apply
NVUE 在 /etc/nvue.d/startup.yaml 文件中创建以下配置代码段
cumulus@leaf01:~$ sudo cat /etc/nvue.d/startup.yaml
- set:
      lo:
        ip:
          address:
            10.10.10.1/32: {}
        router:
          ospf:
            area: 0
            enable: on
            network-type: point-to-point
        type: loopback
      swp49:
        router:
          ospf:
            area: 0.0.0.0
            enable: on
        type: swp
      swp50:
        router:
          ospf:
            area: 0.0.0.0
            enable: on
            network-type: point-to-point
        type: swp
      swp51:
        router:
          ospf:
            area: 0.0.0.0
            enable: on
            network-type: point-to-point
        type: swp
      swp52:
        router:
          ospf:
            area: 0.0.0.0
            enable: on
            network-type: point-to-point
        type: swp
    bridge:
      domain:
        br_default:
          multicast:
            snooping:
              enable: off
              querier:
                enable: on
    router:
      bgp:
        autonomous-system: 65101
        enable: on
        router-id: 10.10.10.1
      ospf:
        router-id: 10.10.10.1
        enable: on
    vrf:
      default:
        router:
          bgp:
            peer:
              10.10.10.2:
                remote-as: internal
                type: numbered
                address-family:
                  l2vpn-evpn:
                    enable: on
              10.10.10.3:
                remote-as: internal
                type: numbered
                address-family:
                  l2vpn-evpn:
                    enable: on
              10.10.10.4:
                remote-as: internal
                type: numbered
                address-family:
                  l2vpn-evpn:
                    enable: on
            enable: on
            address-family:
              l2vpn-evpn:
                enable: on
    evpn:
      enable: on
    nve:
      vxlan:
        enable: on
cumulus@leaf01:~$ sudo vtysh
...
leaf01# configure terminal
leaf01(config)# router bgp 65101
leaf01(config-router)# neighbor 10.10.10.2 remote-as internal
leaf01(config-router)# neighbor 10.10.10.3 remote-as internal
leaf01(config-router)# neighbor 10.10.10.4 remote-as internal
leaf01(config-router)# address-family l2vpn evpn
leaf01(config-router-af)# neighbor 10.10.10.2 activate
leaf01(config-router-af)# neighbor 10.10.10.3 activate
leaf01(config-router-af)# neighbor 10.10.10.4 activate
leaf01(config-router-af)# advertise-all-vni
leaf01(config-router-af)# exit
leaf01(config-router)# exit
leaf01(config)# router ospf
leaf01(config-router)# router-id 10.10.10.1
leaf01(config-router)# passive-interface lo
leaf01(config-router)# exit
leaf01(config)# interface lo
leaf01(config-if)# ip ospf area 0.0.0.0
leaf01(config-if)# exit
leaf01(config)# interface swp49
leaf01(config-if)# ip ospf area 0.0.0.0
leaf01(config-if)# ospf network point-to-point
leaf01(config-if)# exit
leaf01(config)# interface swp50
leaf01(config-if)# ip ospf area 0.0.0.0
leaf01(config-if)# ospf network point-to-point
leaf01(config-if)# exit
leaf01(config)# interface swp51
leaf01(config-if)# ip ospf area 0.0.0.0
leaf01(config-if)# ospf network point-to-point
leaf01(config-if)# exit
leaf01(config)# interface swp52
leaf01(config-if)# ip ospf area 0.0.0.0
leaf01(config-if)# ospf network point-to-point
leaf01(config-if)# end
leaf01# write memory
leaf01# exit
vtysh 命令在 /etc/frr/frr.conf 文件中创建以下配置代码段。
...
interface lo
  ip ospf area 0.0.0.0
!
interface swp49
  ip ospf area 0.0.0.0
  ip ospf network point-to-point
!
interface swp50
  ip ospf area 0.0.0.0
  ip ospf network point-to-point
!
interface swp51
  ip ospf area 0.0.0.0
  ip ospf network point-to-point
!
interface swp52
  ip ospf area 0.0.0.0
  ip ospf network point-to-point
!
router bgp 65101
  neighbor 10.10.10.2 remote-as internal
  neighbor 10.10.10.3 remote-as internal
  neighbor 10.10.10.4 remote-as internal
  !
  address-family l2vpn evpn
  neighbor 10.10.10.2 activate
  neighbor 10.10.10.3 activate
  neighbor 10.10.10.4 activate
  advertise-all-vni
  exit-address-family
  !
Router ospf
  Ospf router-id 10.10.10.1
  Passive-interface lo
...
ARP 和 ND 抑制
带有 EVPN 的 ARP 抑制允许 VTEP 最大程度地抑制 VXLAN 隧道上的 ARP 洪泛。本地代理处理来自本地连接主机对远程主机的 ARP 请求。ARP 抑制用于 IPv4;ND 抑制用于 IPv6。
Cumulus Linux 默认在所有 VNI 上启用 ARP 和 ND 抑制,以减少 VXLAN 隧道上的 ARP 和 ND 数据包洪泛;但是,您必须配置第 3 层接口 (SVI) 以使 ARP 和 ND 抑制与 EVPN 一起工作。
ND 抑制和 IPv6 地址重用
如果您禁用 ND 抑制并重用 IPv6 地址,则 IPv6 重复地址检测将失败,并且该地址将保持暂定状态且不可用。以下示例显示了 vlan10 上的 IPv6 重复地址检测失败
cumulus@switch:~$ ip address show vlan10 | grep dad
inet6 2001:db8::1/32 scope global dadfailed tentative
为防止 IPv6 重复地址检测失败,您可以全局或在接口地址上禁用 IPv6 重复地址检测。
要全局禁用 IPv6 重复地址检测,请在 /etc/sysctl.conf 文件中添加以下行,然后重新启动交换机。
cumulus@switch:~$ sudo nano /etc/sysctl.conf
...
net.ipv6.conf.default.accept_dad = 0
要在接口地址上禁用 IPv6 重复地址检测,请创建 NVUE 代码段,然后修补并应用配置。以下代码段在 IP 地址为 2001:db8::1/32 的 vlan10 上禁用重复地址检测
cumulus@switch:~$ sudo nano DisableDadVlan10.yaml
- set:
    system:
      config:
        snippet:
          ifupdown2_eni:
            vlan10: |
              post-up ip address add 2001:db8::1/32 dev vlan10 nodad
cumulus@switch:~$ nv config patch DisableDadVlan10.yaml
cumulus@switch:~$ nv config apply
创建并应用代码段后,无需重新启动交换机。
ARP ND 抑制和集中式路由
在集中式路由部署中,即使您仅将交换机配置为第 2 层(您不使用 VXLAN 路由),也必须配置第 3 层接口。为避免安装不必要的第 3 层信息,您可以关闭 IP 转发。
以下示例命令关闭 VLAN 10 和 VLAN 20 上的 IPv4 和 IPv6 转发。
cumulus@leaf01:~$ nv set interface vlan10 ip ipv4 forward off
cumulus@leaf01:~$ nv set interface vlan10 ip ipv6 forward off
cumulus@leaf01:~$ nv set interface vlan20 ip ipv4 forward off
cumulus@leaf01:~$ nv set interface vlan20 ip ipv6 forward off
cumulus@leaf01:~$ nv config apply
编辑 /etc/network/interfaces 文件。
cumulus@leaf01:~$ sudo nano /etc/network/interfaces
...
auto vlan10
iface vlan10
    ip6-forward off
    ip-forward off
    vlan-id 10
    vlan-raw-device bridge

auto vlan20
iface vlan20
    ip6-forward off
    ip-forward off
    vlan-id 20
    vlan-raw-device bridge

auto vni10
iface vni10
    bridge-access 10
    vxlan-id 10
    bridge-learning off

auto vni20
iface vni20
      bridge-access 20
      vxlan-id 20
      bridge-learning off
...
对于 传统模式 中的网桥,您必须使用文本编辑器编辑 /etc/network/interfaces 文件中的网桥配置
cumulus@leaf01:~$ sudo nano /etc/network/interfaces
...
auto bridge1
iface bridge1
    bridge-ports swp1.10 swp2.10 vni10
    ip6-forward off
    ip-forward off
...
禁用 ARP 和 ND 抑制
NVIDIA 建议您保持启用 ARP 和 ND 抑制,以减少 VXLAN 隧道上的 ARP 和 ND 数据包洪泛。但是,如果您确实需要禁用 ARP 和 ND 抑制,请运行 NVUE nv set nve vxlan arp-nd-suppress off 命令或在 /etc/network/interfaces 文件中设置 bridge-arp-nd-suppress off
cumulus@leaf01:~$ nv set nve vxlan arp-nd-suppress off
cumulus@leaf01:~$ nv config apply
编辑 /etc/network/interfaces 文件以在 VXLAN 设备上设置 bridge-arp-nd-suppress off,然后运行 ifreload -a 命令。
cumulus@leaf01:~$ sudo nano /etc/network/interfaces
...

auto vxlan48
iface vxlan48
    bridge-vlan-vni-map 10=10 20=20 30=30 4036=4002 4024=4001
    bridge-learning off
    bridge-arp-nd-suppress off

...
cumulus@leaf01:~$ sudo ifreload -a
邻居管理器服务依赖于 ARP 和 ND 抑制来窥探数据包并根据邻居更改更新转发条目。如果禁用抑制,则必须手动启用邻居管理器窥探器
使用以下内容创建 systemd 覆盖配置文件
/etc/systemd/system/neighmgrd.service[Service] ExecStart=/usr/bin/neighmgrd --snoop-all-bridges使用
sudo systemctl daemon-reload命令重新加载 systemd 单元配置。使用
sudo systemctl restart neighmgrd.service命令重新启动neighmgrd服务。
配置静态 MAC 地址
您可以将您打算固定到 VTEP 上特定 VTEP 的 MAC 地址配置为静态网桥 FDB 条目。EVPN 拾取这些 MAC 地址并将它们作为远程静态 MAC 通告给对等方。您可以在网桥配置下为 MAC 地址配置静态网桥 FDB 条目
编辑 /etc/network/interfaces 文件。例如
cumulus@leaf01:~$ sudo nano /etc/network/interfaces
...
auto bridge
iface bridge
    bridge-ports bond1 vni10
    bridge-vids 10
    bridge-vlan-aware yes
    post-up bridge fdb add 26:76:e6:93:32:78 dev bond1 vlan 10 master static sticky
...
对于 传统模式 中的网桥,您必须使用文本编辑器编辑 /etc/network/interfaces 文件中的网桥配置
cumulus@leaf01:~$ sudo nano /etc/network/interfaces
...
auto br10
iface br10
    bridge-ports swp1.10 vni10
    post-up bridge fdb add 26:76:e6:93:32:78 dev swp1.10 master static sticky
...
为 MLAG 配置站点 ID
当您将 EVPN 与 MLAG 一起使用时,EVPN 可能会将本地 MAC 地址或邻居条目安装为远程条目。为防止 EVPN 从 MLAG 获取本地 MAC 地址或邻居条目的所有权,您可以将所有本地第 2 层 VNI 与唯一站点 ID 相关联,该站点 ID 代表 MLAG 对。
当您配置站点 ID 时,Cumulus Linux
- 将使用本地站点 ID 编码的
Site-of-Origin扩展社区添加到源自本地第 2 层 VNI 的 EVPN 路由。Cumulus Linux 在创建路由时添加Site-of-Origin扩展社区。 - 过滤所有接收到的具有与本地站点 ID 匹配的
Site-of-Origin扩展社区的 EVPN 路由。Cumulus Linux 在将路由从全局表导入到第 2 层 VNI 或第 3 层 VNI 表时过滤路由。
站点 ID 的格式为 <IPv4 地址>:<2 字节值>,其中 IPv4 地址是任播 IP 地址(用于 VXLAN 数据路径终止的虚拟 IP 地址),而 2 字节值是 0 到 65535 之间的整数。例如:10.0.1.12:10
cumulus@leaf01:~$ nv set evpn mac-vrf-soo 10.0.1.12:10
cumulus@leaf01:~$ nv config apply
cumulus@leaf01:~$ sudo vtysh
...
leaf01# configure terminal
leaf01(config)# router bgp 65101
leaf01(config-router)# address-family l2vpn evpn
leaf01(config-router-af)# mac-vrf soo 10.0.1.12:10
leaf01(config-router-af)# end
leaf01# write memory
leaf01# exit
NVIDIA 建议您不要在独立或多宿主 VTEP 上配置站点 ID。
过滤 EVPN 路由
通常将数据中心细分为多个 pod,pod 内具有完全主机移动性,但仅跨 pod 进行基于前缀的路由。您可以通过仅跨 pod 交换 EVPN 类型 5 路由来实现此目的。
以下示例命令配置 EVPN 以通告类型 5 路由
cumulus@leaf01:~$ nv set router policy route-map map1 rule 10 match type ipv4
cumulus@leaf01:~$ nv set router policy route-map map1 rule 10 match evpn-route-type ip-prefix
cumulus@leaf01:~$ nv set router policy route-map map1 rule 10 action permit
cumulus@leaf01:~$ nv set vrf default router bgp address-family ipv4-unicast route-export to-evpn route-map map1
cumulus@leaf01:~$ nv config apply
cumulus@leaf01:~$ sudo vtysh
..
leaf01# configure terminal
leaf01(config)# route-map map1 permit 1
leaf01(config)# match evpn route-type prefix
leaf01(config)# end
leaf01# write memory
leaf01# exit
您必须应用路由图才能使配置生效。有关更多信息,请参阅 路由图。
在许多情况下,也希望仅交换携带特定 VXLAN ID 的 EVPN 路由。例如,如果数据中心或数据中心内的 pod 仅共享某些租户,则可以使用路由图来控制基于 VNI 交换的 EVPN 路由。
以下示例配置了一个路由图,该路由图仅通告来自 VNI 1000 的 EVPN 路由
cumulus@switch:~$ nv set router policy route-map map1 rule 10 match evpn-vni 1000
cumulus@switch:~$ nv set router policy route-map map1 rule 10 action permit
cumulus@switch:~$ nv config apply
cumulus@switch:~$ sudo vtysh
...
switch# configure terminal
switch(config)# route-map map1 permit 1
switch(config)# match evpn vni 1000
switch(config)# end
switch# write memory
switch# exit
您只能基于 VNI 匹配类型 2 和类型 5 路由。
EVPN 的 BGP 邻居前缀限制
Cumulus Linux 提供了命令来控制允许来自 BGP 邻居的 EVPN 入站前缀的数量。
要配置入站前缀限制,请设置
- 来自 BGP 邻居的最大入站前缀限制。您可以设置介于 0 和 4294967295 之间的值,或
none。 - 何时生成警告 syslog 消息并关闭 BGP 会话。这是最大入站前缀限制的百分比。您可以设置介于 0 和 100 之间的值。或者,您可以将交换机配置为仅生成警告 syslog 消息,而不关闭 BGP 会话。
- 在再次与邻居建立 BGP 会话之前要等待的时间(以秒为单位)。默认值为
auto,它使用标准 BGP 计时器和处理(通常在 2 到 3 秒之间)。您可以设置介于 1 和 65535 之间的值。
在配置前缀限制之前,请确定远程 BGP 邻居通常发送多少路由,并设置一个略高于您在正常操作期间预期接收的 BGP 前缀数量的阈值。
以下示例将来自邻居 swp51 的最大入站前缀限制设置为 3,当接收到的前缀数量达到最大限制的 50% 时,会生成警告 syslog 消息并关闭 BGP 会话。60 秒后,与对等方的 BGP 会话将重新建立。
cumulus@switch:~$ nv set vrf default router bgp neighbor swp51 address-family l2vpn-evpn prefix-limits inbound maximum 3
cumulus@switch:~$ nv set vrf default router bgp neighbor swp51 address-family l2vpn-evpn prefix-limits inbound warning-threshold 50
cumulus@switch:~$ nv set vrf default router bgp neighbor swp51 address-family l2vpn-evpn prefix-limits inbound reestablish-wait 60
cumulus@switch:~$ nv config apply
以下示例将来自对等方 swp51 的最大入站前缀限制设置为 3,并且仅生成警告 syslog 消息(而不关闭 BGP 会话),当接收到的前缀数量达到最大限制的 50% 时。
cumulus@switch:~$ nv set vrf default router bgp neighbor swp51 address-family l2vpn-evpn prefix-limits inbound maximum 3
cumulus@switch:~$ nv set vrf default router bgp neighbor swp51 address-family l2vpn-evpn prefix-limits inbound warning-threshold 50
cumulus@switch:~$ nv set vrf default router bgp neighbor swp51 address-family l2vpn-evpn prefix-limits inbound warning-only on
cumulus@switch:~$ nv config apply
以下示例将来自邻居 swp51 的最大入站前缀限制设置为 3,当接收到的前缀数量达到最大限制的 50% 时,会生成警告 syslog 消息并关闭 BGP 会话。1 分钟后,与对等方的 BGP 会话将重新建立。
cumulus@switch:~$ sudo vtysh
...
switch# configure terminal
switch(config)# router bgp 65101
switch(config-router)# address-family l2vpn evpn
switch(config-router-af)# neighbor swp51 maximum-prefix 3 50 restart 1
switch(config-router-af)# end
switch# write memory
switch# exit
您可以使用 force 选项 (neighbor swp51 maximum-prefix 3 50 restart 1 force) 来强制检查所有接收到的路由,而不仅仅是接受的路由。
以下示例将来自对等方 swp51 的最大入站前缀限制设置为 3,并且仅生成警告 syslog 消息(而不关闭 BGP 会话),当接收到的前缀数量达到最大限制的 50% 时。
cumulus@switch:~$ sudo vtysh
...
switch# configure terminal
switch(config)# router bgp 65101
switch(config-router)# address-family l2vpn evpn
switch(config-router-af)# neighbor swp51 maximum-prefix 3 50 warning-only
switch(config-router-af)# end
switch# write memory
switch# exit
您可以使用 force 选项 (neighbor swp51 maximum-prefix 3 50 warning-only force) 来强制检查所有接收到的路由,而不仅仅是接受的路由。
vtysh 命令将配置保存在 /etc/frr/frr.conf 文件中。例如
cumulus@switch:~$ sudo cat /etc/frr/frr.conf
...
address-family l2vpn evpn
advertise-all-vni
neighbor peerlink.4094 activate
neighbor swp51 activate
neighbor swp51 maximum-prefix 5 warning-only
...
通告 SVI IP 地址
在典型的 EVPN 部署中,您在多个机架上的 VTEP 上重用 SVI IP 地址。但是,如果您在多个机架上使用唯一 SVI IP 地址,并且希望本地 SVI IP 地址可以通过远程 VTEP 访问,则可以启用通告 SVI IP 和 MAC 地址选项。此选项将 SVI IP 和 MAC 地址通告为类型 2 路由,并消除了通过 VXLAN 访问来自远程 VTEP 或机架的 IP 地址的任何洪泛的需要。
要通告交换机上的所有 SVI IP 和 MAC 地址,请运行以下命令
cumulus@leaf01:~$ nv set evpn route-advertise svi-ip on
cumulus@leaf01:~$ nv config apply
cumulus@leaf01:~$ sudo vtysh
...
leaf01# configure terminal
leaf01(config)# router bgp 65101
leaf01(config-router)# address-family l2vpn evpn
leaf01(config-router-af)# advertise-svi-ip
leaf01(config-router-af)# end
leaf01# write memory
leaf01# exit
要通告特定 SVI IP/MAC 地址,请运行以下命令
cumulus@leaf01:~$ nv set evpn vni 10 route-advertise svi-ip on
cumulus@leaf01:~$ nv config apply
cumulus@leaf01:~$ sudo vtysh
...
leaf01# configure terminal
leaf01(config)# router bgp 65101
leaf01(config-router)# address-family l2vpn evpn
leaf01(config-router-af)# vni 10
leaf01(config-router-af-vni)# advertise-svi-ip
leaf01(config-router-af-vni)# end
leaf01# write memory
leaf01# exit
vtysh 命令将配置保存在 /etc/frr/frr.conf 文件中。例如
cumulus@leaf01:~$ sudo cat /etc/frr/frr.conf
...
address-family l2vpn evpn
  vni 10
  advertise-svi-ip
exit-address-family
...
禁用 BUM 洪泛
默认情况下,VTEP 将其接收到的所有广播以及未知单播和组播数据包(例如 ARP、NS 或 DHCP)洪泛到所有接口(传入接口除外)以及同一广播域中的所有 VXLAN 隧道接口。当交换机在 VXLAN 隧道接口上接收到此类数据包时,它会将数据包洪泛到数据包广播域中的所有接口。
您可以禁用 VXLAN 隧道上的 BUM 洪泛,以便 EVPN 不会为每个本地 VNI 通告类型 3 路由,并停止对接收到的类型 3 路由执行操作。
在具有控制器或编排器的部署中,禁用 BUM 洪泛非常有用,在这种部署中,交换机是预先配置的,并且不需要洪泛任何 ARP、NS 或 DHCP 数据包。
有关具有 PIM 的 EVPN BUM 洪泛的信息,请参阅 具有 PIM-SM 的 EVPN BUM 流量。
要禁用 BUM 洪泛
cumulus@leaf01:~$ nv set nve vxlan flooding enable off
cumulus@leaf01:~$ nv config apply
要重新启用 BUM 洪泛,请运行以下命令。启用 BUM 洪泛需要头端复制。
cumulus@leaf01:~$ nv set nve vxlan flooding enable on
cumulus@leaf01:~$ nv set nve vxlan flooding head-end-replication evpn
cumulus@leaf01:~$ nv config apply
cumulus@leaf01:~$ sudo vtysh
...
leaf01# configure terminal
leaf01(config)# router bgp 65101
leaf01(config-router)# address-family l2vpn evpn
leaf01(config-router-af)# flooding disable
leaf01(config-router-af)# end
leaf01# write memory
leaf01# exit
vtysh 命令将配置保存在 /etc/frr/frr.conf 文件中。例如
...
router bgp 65101
 !
 address-family l2vpn evpn
  flooding disable
 exit-address-family
...
要重新启用 BUM 洪泛,请运行 vtysh flooding head-end-replication 命令。
cumulus@leaf01:~$ sudo vtysh
...
leaf01# configure terminal
leaf01(config)# router bgp 65101
leaf01(config-router)# address-family l2vpn evpn
leaf01(config-router-af)# flooding head-end-replication
leaf01(config-router-af)# end
leaf01# write memory
leaf01# exit
要显示 BUM 洪泛已关闭,请运行 vtysh show bgp l2vpn evpn vni 命令。例如
cumulus@leaf01:~$ sudo vtysh
...
leaf01# show bgp l2vpn evpn vni
Advertise Gateway Macip: Disabled
Advertise SVI Macip: Disabled
Advertise All VNI flag: Enabled
BUM flooding: Disabled
Number of L2 VNIs: 3
Number of L3 VNIs: 2
Flags: * - Kernel
  VNI        Type RD                    Import RT                 Export RT                Tenant VRF
* 20         L2   10.10.10.1:3          65101:20                  65101:20                 RED
* 30         L2   10.10.10.1:4          65101:30                  65101:30                 BLUE
* 10         L2   10.10.10.1:6          65101:10                  65101:10                 RED
* 4002       L3   10.1.30.2:2           65101:4002                65101:4002               BLUE
* 4001       L3   10.1.20.2:5           65101:4001                65101:4001               RED
运行 vtysh show bgp l2vpn evpn route type multicast 命令以确保没有本地始发的 EVPN 类型 3 路由。
扩展移动性
Cumulus Linux 支持主机或虚拟机的 IP 到 MAC 绑定在移动过程中发生更改的场景。除了主机或虚拟机绑定为 IP1, MAC1 从一个机架移动到另一个机架的简单移动性场景之外,Cumulus Linux 还支持其他场景,其中主机或虚拟机绑定为 IP1, MAC1 移动并采用新的绑定 IP2, MAC1 或 IP1, MAC2。用于处理扩展移动性的 EVPN 协议机制继续使用 MAC 移动性扩展社区,并且与标准移动性程序相同。扩展移动性定义了当绑定发生更改时如何计算此属性中的序列号。
扩展移动性不仅支持虚拟机移动,还支持一个虚拟机关闭,您在另一个机架上配置另一个虚拟机,该虚拟机使用先前虚拟机的 IP 地址或 MAC 地址。例如,在具有 OpenStack 的 EVPN 部署中,租户的虚拟机动态地配置和关闭,新的虚拟机可以使用与较早的虚拟机相同的 IP 地址,但具有不同的 MAC 地址。
要在 VLAN 结构范围内重用相同的分布式网关,您可以设置结构范围的 MAC 地址;请参阅 更改 VRR MAC 地址。
Cumulus Linux 默认启用扩展移动性。
要检查主机或虚拟机 MAC 地址和 IP 地址的序列号,请运行 vtysh show evpn mac vni <vni> mac <address> 命令。例如
cumulus@switch:~$ sudo vtysh
...
switch# show evpn mac vni 10100 mac 00:02:00:00:00:42
MAC: 00:02:00:00:00:42
  Remote VTEP: 10.0.0.2
  Local Seq: 0 Remote Seq: 3
  Neighbors:
    10.1.1.74 Active

switch# show evpn arp vni 10100 ip 10.1.1.74
IP: 10.1.1.74
  Type: local
  State: active
  MAC: 44:39:39:ff:00:24
  Local Seq: 2 Remote Seq: 3
重复地址检测
Cumulus Linux 可以检测 VXLAN-EVPN 配置中主机或虚拟机上的重复 MAC 和 IPv4 或 IPv6 地址。如果主机 MAC 或 IP 地址在一定时间内(默认情况下为 180 秒内 5 次移动)在网络中移动超过一定次数,则 Cumulus Linux 交换机 (VTEP) 会将该地址视为重复地址。除了合法的主机或 VM 移动性场景外,当您在主机上错误配置 IP 地址或由于错误的配置或行为而导致网络中发生数据包环路时,也可能发生地址移动。
Cumulus Linux 默认启用重复地址检测,当以下情况发生时触发
- 两台主机具有相同的 MAC 地址(主机 IP 地址相同或不同)
- 两台主机具有相同的 IP 地址但 MAC 地址不同
默认情况下,当交换机检测到重复地址时,它会将该地址标记为重复地址,并在 syslog 中生成错误,以便您可以排除原因并解决故障,然后清除重复地址标志。交换机不会对该地址执行任何功能性操作。
- 如果交换机将 MAC 地址标记为重复地址,它还会将与该 MAC 关联的所有 IP 地址标记为重复地址。但是,在 MLAG 配置中,有时只有 MLAG 对等方之一将关联的 IP 地址标记为重复地址。
- 在 MLAG 配置中,MAC 移动性检测在 MLAG 对中的每个交换机上独立运行。根据本地学习和/或来自远程 VTEP 的路由撤回发生的顺序,类型 2 路由的 MAC 移动性计数器仅在 MLAG 对中的一个交换机上递增。在极少数情况下,两个 VTEP 都可能不会递增类型 2 前缀的 MAC 移动性计数器。
- 在 EVPN 多宿主 配置中不支持重复地址检测。
何时触发重复地址检测?
看到地址从远程移动到本地的 VTEP 通过启动计时器来开始检测过程。每个 VTEP 独立运行重复地址检测。检测始终从来自远程到本地的第一个移动事件开始。如果地址最初是远程的,则检测计数可以从地址的第一次移动开始。如果地址最初是本地的,则检测计数仅从地址的第二次或更高次移动开始。如果地址在远程 VTEP 之间经历移动性事件,则重复检测不会开始。
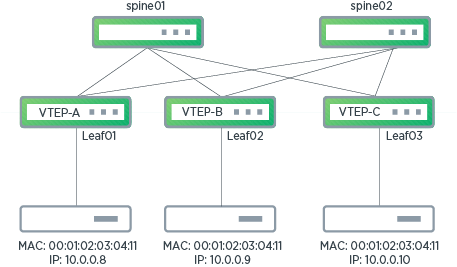
下图显示了 EVPN 配置中的 VTEP-A、VTEP-B 和 VTEP-C。当连接到 VTEP-A 和 VTEP-B 的两台主机存在重复 MAC 地址时,会在 VTEP-A 上触发重复地址检测。但是,当移动性事件发生在两个远程 VTEP(VTEP-B 和 VTEP-C)之间时,不会在 VTEP-A 上触发重复检测。
配置重复地址检测
您可以配置 MAC 和 IP 地址移动的阈值。允许的最大移动次数可以在 2 到 1000 之间,检测时间间隔可以在 2 到 1800 秒之间。
以下示例命令将允许的最大地址移动次数设置为 10,并将重复地址检测时间间隔设置为 1200 秒。
cumulus@switch:~$ nv set evpn dad mac-move-threshold 10
cumulus@switch:~$ nv set evpn dad move-window 1200
cumulus@switch:~$ nv config apply
cumulus@switch:~$ sudo vtysh
...
switch# configure terminal
switch(config)# router bgp 65101
switch(config-router)# address-family l2vpn evpn
switch(config-router-af)# dup-addr-detection max-moves 10 time 1200
switch(config-router-af)# end
switch# write memory
switch# exit
要禁用重复地址检测,请参阅下面的 禁用重复地址检测。
示例 syslog 消息
以下示例显示了当 Cumulus Linux 在本地更新期间检测到 MAC 地址为重复地址时生成的 syslog 消息
2018/11/06 18:55:29.463327 ZEBRA: [EC 4043309149] VNI 1001: MAC 00:01:02:03:04:11 detected as duplicate during local update, last VTEP 172.16.0.16
以下示例显示了当 Cumulus Linux 在远程更新期间检测到 IP 地址为重复地址时生成的 syslog 消息
2018/11/09 22:47:15.071381 ZEBRA: [EC 4043309151] VNI 1002: MAC aa:22:aa:aa:aa:aa IP 10.0.0.9 detected as duplicate during remote update, from VTEP 172.16.0.16
冻结检测到的重复地址
Cumulus Linux 提供了一个冻结选项,该选项对检测到的重复地址执行操作。您可以永久冻结地址(直到您进行干预)或在定义的时间量内冻结地址,之后地址会自动清除。
启用冻结选项后,当交换机检测到重复地址时
- 如果交换机在冻结时从远程 VTEP 学习到 MAC 或 IP 地址,则内核和硬件中的转发信息不会更新,而是保持之前的状态。任何未来的远程更新都会被处理,但不会反映在内核条目中。如果远程 VTEP 发送 MAC-IP 路由撤回,则本地 VTEP 会删除冻结的远程条目。然后,如果本地 VTEP 的内核中已存在本地学习到的条目,FRR 会发起相应的 MAC-IP 路由并将其通告给所有远程 VTEP。
- 如果 MAC 或 IP 地址在冻结时是在此 VTEP 上本地学习到的,则该地址不会通告给远程 VTEP。未来的本地更新会被处理,但不会通告给远程 VTEP。如果 FRR 收到本地条目删除事件,它会从 FRR 数据库中删除冻结的条目。任何远程更新(来自其他 VTEP)都会将条目的状态更改为远程,但该条目不会安装到内核中(直到清除为止)。
要从冻结状态恢复,请关闭故障主机或 VM,或修复网络中的任何其他错误配置。如果地址永久冻结,请在地址重复的 VTEP 上运行clear 命令。如果地址冻结了一段定义的时间,它会在计时器到期后自动清除(您可以使用clear 命令在计时器到期前清除重复地址)。
如果您在解决故障之前运行 clear 命令或计时器到期,则重复地址检测可能会继续发生。
清除冻结的地址后,如果它存在于远程 VTEP 后,内核和硬件转发表将更新。如果此 VTEP 在本地学习到该地址,则该地址将通告给远程 VTEP。一旦主机通信,所有 VTEP 都会获得正确的地址。交换机仅在错误条目老化超时后,或您进行干预并清除错误的 MAC 和 ARP 表条目后,才会学习到静默主机。
配置冻结选项
您可以启用 Cumulus Linux 来冻结检测到的重复地址。持续时间可以是 30 到 3600 秒之间的任何秒数。
以下示例命令将重复地址冻结 1000 秒,之后会自动清除
cumulus@switch:~$ nv set evpn dad duplicate-action freeze duration 1000
cumulus@switch:~$ nv config apply
cumulus@switch:~$ sudo vtysh
...
switch# configure terminal
switch(config)# router bgp 65101
switch(config-router)# address-family l2vpn evpn
switch(config-router-af)# dup-addr-detection freeze 1000
switch(config-router-af)# end
switch# write memory
switch# exit
将冻结计时器设置为重复地址检测窗口的三倍。例如,如果重复地址检测窗口为 180 秒,则将冻结计时器设置为 540 秒。
以下示例命令永久冻结重复地址(直到您运行clear 命令)
cumulus@switch:~$ nv set evpn dad duplicate-action freeze duration permanent
cumulus@switch:~$ nv config apply
cumulus@switch:~$ sudo vtysh
...
switch# configure terminal
switch(config)# router bgp 65101
switch(config-router)# address-family l2vpn evpn
switch(config-router-af)# dup-addr-detection freeze permanent
switch(config-router-af)# end
switch# write memory
switch# exit
清除重复地址
您可以清除所有 VNI 的重复地址,或清除重复的 MAC 或 IP 地址(并取消冻结冻结的地址)。
要清除所有 VNI 的重复地址
cumulus@switch:~$ nv action clear evpn vni
Action succeeded
要清除 VNI 10 的重复 IP 地址 10.0.0.9
cumulus@switch:~$ nv action clear evpn vni 10 host 10.0.0.9
Action succeeded
要清除 VNI 10 的重复 MAC 地址 00:e0:ec:20:12:62
cumulus@switch:~$ nv action clear evpn vni 10 mac 00:e0:ec:20:12:62
Action succeeded
要清除所有 VNI 的重复地址
cumulus@switch:~$ sudo vtysh
...
switch# clear evpn dup-addr vni all
switch# exit
要清除 VNI 10 的重复 IP 地址 10.0.0.9
cumulus@switch:~$ sudo vtysh
...
switch# clear evpn dup-addr vni 10 ip 10.0.0.9
switch# exit
要清除 VNI 10 的重复 MAC 地址 00:e0:ec:20:12:62
cumulus@switch:~$ sudo vtysh
...
switch# clear evpn dup-addr vni 10 mac 00:e0:ec:20:12:62
switch# exit
- 在 MLAG 配置中,您需要在 MLAG 主交换机和辅助交换机上都运行 clear 命令。
- 当您清除重复的 MAC 地址时,其所有关联的 IP 地址也会被清除。但是,如果关联的 IP 地址的 MAC 地址仍处于重复状态,则您无法清除该 IP 地址。
禁用重复地址检测
重复地址检测默认处于启用状态。当交换机检测到重复地址时,会生成 syslog 错误。要禁用重复地址检测,请运行以下命令。
cumulus@switch:~$ nv set evpn dad enable off
cumulus@switch:~$ nv config apply
cumulus@switch:~$ sudo vtysh
...
switch# configure terminal
switch(config)# router bgp 65101
switch(config-router)# address-family l2vpn evpn
switch(config-router-af)# no dup-addr-detection
switch(config-router-af)# end
switch# write memory
switch# exit
当您禁用重复地址检测时,Cumulus Linux 会清除配置和所有现有的重复地址。
显示检测到的重复地址信息
在重复地址检测过程中,您可以使用 vtysh show evpn mac vni <vni_id> mac <mac_addr> 命令查看开始时间和当前检测计数。以下命令示例显示 VNI 1001 上 MAC 地址 00:01:02:03:04:11 的检测于 11 月 6 日星期二 18:55:05 开始,Cumulus Linux 检测到一次移动。
cumulus@switch:~$ sudo vtysh
...
switch# show evpn mac vni 1001 mac 00:01:02:03:04:11
MAC: 00:01:02:03:04:11
  Intf: hostbond3(15) VLAN: 1001
  Local Seq: 1 Remote Seq: 0
  Duplicate detection started at Tue Nov  6 18:55:05 2018, detection count 1
  Neighbors:
    10.0.1.26 Active
在重复的 MAC 地址清除后,vtysh show evpn mac vni <vni_id> mac <mac_addr> 命令显示
MAC: 00:01:02:03:04:11
  Remote VTEP: 172.16.0.16
  Local Seq: 13 Remote Seq: 14
  Duplicate, detected at Tue Nov  6 18:55:29 2018
  Neighbors:
    10.0.1.26 Active
要显示重复 IP 地址的信息,请运行 vtysh show evpn arp-cache vni <vni_id> ip <ip_addr> 命令。以下命令示例显示 VNI 1001 的 IP 地址 10.0.0.9 的信息。
cumulus@switch:~$ sudo vtysh
...
switch# show evpn arp-cache vni 1001 ip 10.0.0.9
IP: 10.0.0.9
  Type: remote
  State: inactive
  MAC: 00:01:02:03:04:11
  Remote VTEP: 10.0.0.34
  Local Seq: 0 Remote Seq: 14
  Duplicate, detected at Tue Nov  6 18:55:29 2018
要显示检测为重复的 MAC 地址列表,针对特定 VNI 或所有 VNI,请运行 vtysh show evpn mac vni <vni-id|all> duplicate 命令。以下示例命令显示 VNI 1001 的重复 MAC 地址列表
cumulus@switch:~$ sudo vtysh
...
switch# show evpn mac vni 1001 duplicate
Number of MACs (local and remote) known for this VNI: 16
MAC               Type   Intf/Remote VTEP      VLAN
aa:bb:cc:dd:ee:ff local  hostbond3             1001
要显示检测为重复的 IP 地址列表,针对特定 VNI 或所有 VNI,请运行 vtysh show evpn arp-cache vni <vni-id|all> duplicate 命令。以下示例命令显示 VNI 1001 的重复 IP 地址列表
cumulus@switch:~$ sudo vtysh
...
switch# show evpn arp-cache vni 1001 duplicate
Number of ARPs (local and remote) known for this VNI: 20
IP                Type   State    MAC                Remote VTEP
10.0.0.8          local  active   aa:11:aa:aa:aa:aa
10.0.0.9          local  active   aa:11:aa:aa:aa:aa
10.10.0.12        remote active   aa:22:aa:aa:aa:aa  172.16.0.16
要显示配置的重复地址检测参数,请运行 vtysh show evpn 命令
cumulus@switch:~$ sudo vtysh
...
switch# show evpn
L2 VNIs: 4
L3 VNIs: 2
Advertise gateway mac-ip: No
Duplicate address detection: Enable
  Detection max-moves 7, time 300
  Detection freeze permanent
要显示配置的当交换机检测到重复地址时采取的操作,请运行 nv show evpn dad duplicate-action 命令
cumulus@switch:~$ nv show evpn dad duplicate-action
operational   applied
------------  ------------
warning-only  warning-only
显示当前 EVPN 配置
要在交换机上显示当前 EVPN 配置,请运行 nv show evpn 命令
cumulus@leaf01:~$ nv show evpn
                       operational   applied
---------------------  ------------  -------------
enable                               on
route-advertise
  nexthop-setting                    system-ip-mac
  svi-ip               off           off
  default-gateway      off           off
dad
  enable               on            on
  mac-move-threshold   5             5
  move-window          180           180
  duplicate-action     warning-only  warning-only
[vni]
multihoming
  enable                             off
  mac-holdtime         1080
  neighbor-holdtime    1080
  startup-delay        180
  startup-delay-timer  --:--:--
  uplink-count         0
  uplink-active        0
l2vni-count            3
l3vni-count            2
您还可以使用 nv show evpn -o json 命令以 json 格式显示 EVPN 配置,或使用 nv show evpn -o yaml 命令以 yaml 格式显示 EVPN 配置。
cumulus@leaf01:~$ nv show evpn -o json
{
  "dad": {
    "duplicate-action": {
      "warning-only": {}
    },
    "enable": "on",
    "mac-move-threshold": 5,
    "move-window": 180
  },
  "l2vni-count": 3,
  "l3vni-count": 2,
  "multihoming": {
    "mac-holdtime": 1080,
    "neighbor-holdtime": 1080,
    "startup-delay": 180,
    "startup-delay-timer": "--:--:--",
    "uplink-active": 0,
    "uplink-count": 0
  },
  "route-advertise": {
    "default-gateway": "off",
    "svi-ip": "off"
  }
}
cumulus@leaf01:~$ nv show evpn -o yaml
dad:
  duplicate-action:
    warning-only: {}
  enable: on
  mac-move-threshold: 5
  move-window: 180
l2vni-count: 3
l3vni-count: 2
multihoming:
  mac-holdtime: 1080
  neighbor-holdtime: 1080
  startup-delay: 180
  startup-delay-timer: --:--:--
  uplink-active: 0
  uplink-count: 0
route-advertise:
  default-gateway: off
  svi-ip: off