静态 VXLAN 隧道
静态 VXLAN 隧道用于在给定环境中连接两个 VTEP。静态 VXLAN 隧道是小规模环境中最简单的部署机制,并且可以与其他遵守 VXLAN 标准的供应商互操作。由于您映射了特定 VNI 中的 VTEP,因此可以避免为每个机架上的每个其他 VTEP 上的每个 VLAN 定义连接的繁琐过程。
Cumulus Linux 在 VLAN 感知桥接模式下支持每个桥接 *多个* VXLAN ID,但在传统桥接模式下不支持每个桥接多个 VXLAN ID。
配置静态 VXLAN 隧道
要配置静态 VXLAN 隧道,您需要创建 VXLAN 设备。Cumulus Linux 支持
- *传统 VXLAN 设备*,您可以在其中配置唯一的 VXLAN 设备并将每个设备添加到桥接。
- *单个 VXLAN 设备*,其中具有相同设置(本地隧道 IP 地址和 VXLAN 远程 IP 地址)的所有 VXLAN 隧道可以共享同一个 VXLAN 设备,您只需将单个 VXLAN 设备添加到桥接。
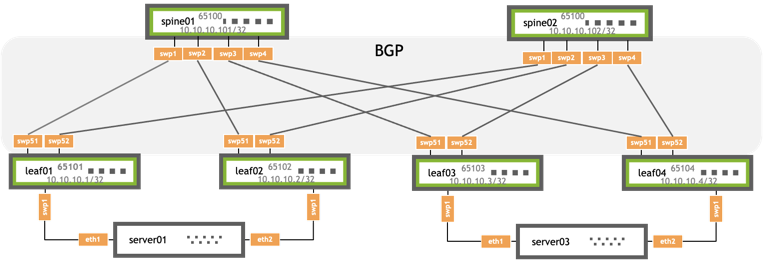
配置示例使用以下拓扑。每个 IP 地址对应于交换机的环回地址。
传统 VXLAN 设备
以下是传统 VXLAN 设备配置
- 在每个叶子节点上设置环回地址
- 创建两个唯一的 VXLAN 设备 (vni10 和 vni20)
- 将本地隧道 IP 地址配置为交换机的环回地址
- 在每个 VXLAN 设备上启用桥接学习
- 通过指定其他叶子节点的环回地址,在每个 VXLAN 设备上创建隧道
- 将两个 VXLAN 设备 (vni10 和 vni20) 添加到名为 `bridge` 的桥接
编辑 `/etc/network/interfaces` 文件,然后运行 `ifreload -a` 命令。
auto lo iface lo inet loopback address 10.10.10.1/32 vxlan-local-tunnelip 10.10.10.1auto mgmt iface mgmt address 127.0.0.1/8 address ::1/128 vrf-table auto
auto eth0 iface eth0 inet dhcp ip-forward off ip6-forward off vrf mgmt
auto swp1 iface swp1 bridge-access 10
auto swp2 iface swp2 bridge-access 20
auto vni10 iface vni10 bridge-access 10 vxlan-remoteip 10.10.10.2 vxlan-remoteip 10.10.10.3 vxlan-remoteip 10.10.10.4 vxlan-id 10
auto vni20 iface vni20 bridge-access 20 vxlan-remoteip 10.10.10.2 vxlan-remoteip 10.10.10.3 vxlan-remoteip 10.10.10.4 vxlan-id 20
auto bridge iface bridge bridge-ports swp1 swp2 vni10 vni20 bridge-vlan-aware yes bridge-vids 10 20 bridge-pvid 1
auto lo iface lo inet loopback address 10.10.10.2/32 vxlan-local-tunnelip 10.10.10.2auto mgmt iface mgmt address 127.0.0.1/8 address ::1/128 vrf-table auto
auto eth0 iface eth0 inet dhcp ip-forward off ip6-forward off vrf mgmt
auto swp1 iface swp1 bridge-access 10
auto swp2 iface swp2 bridge-access 20
auto vni10 iface vni10 bridge-access 10 vxlan-remoteip 10.10.10.1 vxlan-remoteip 10.10.10.3 vxlan-remoteip 10.10.10.4 vxlan-id 10
auto vni20 iface vni20 bridge-access 20 vxlan-remoteip 10.10.10.1 vxlan-remoteip 10.10.10.3 vxlan-remoteip 10.10.10.4 vxlan-id 20
auto bridge iface bridge bridge-ports swp1 swp2 vni10 vni20 bridge-vlan-aware yes bridge-vids 10 20 bridge-pvid 1
auto lo iface lo inet loopback address 10.10.10.3/32 vxlan-local-tunnelip 10.10.10.3auto mgmt iface mgmt address 127.0.0.1/8 address ::1/128 vrf-table auto
auto eth0 iface eth0 inet dhcp ip-forward off ip6-forward off vrf mgmt
auto swp1 iface swp1 bridge-access 10
auto swp2 iface swp2 bridge-access 20
auto vni10 iface vni10 bridge-access 10 vxlan-remoteip 10.10.10.1 vxlan-remoteip 10.10.10.2 vxlan-remoteip 10.10.10.4 vxlan-id 10
auto vni20 iface vni20 bridge-access 20 vxlan-remoteip 10.10.10.1 vxlan-remoteip 10.10.10.2 vxlan-remoteip 10.10.10.4 vxlan-id 20
auto bridge iface bridge bridge-ports swp1 swp2 vni10 vni20 bridge-vlan-aware yes bridge-vids 10 20 bridge-pvid 1
auto lo iface lo inet loopback address 10.10.10.4/32 vxlan-local-tunnelip 10.10.10.3auto mgmt iface mgmt address 127.0.0.1/8 address ::1/128 vrf-table auto
auto eth0 iface eth0 inet dhcp ip-forward off ip6-forward off vrf mgmt
auto swp1 iface swp1 bridge-access 10
auto swp2 iface swp2 bridge-access 20
auto vni10 iface vni10 bridge-access 10 vxlan-remoteip 10.10.10.1 vxlan-remoteip 10.10.10.2 vxlan-remoteip 10.10.10.3 vxlan-id 10
auto vni20 iface vni20 bridge-access 20 vxlan-remoteip 10.10.10.1 vxlan-remoteip 10.10.10.2 vxlan-remoteip 10.10.10.3 vxlan-id 20
auto bridge iface bridge bridge-ports swp1 swp2 vni10 vni20 bridge-vlan-aware yes bridge-vids 10 20 bridge-pvid 1
单个 VXLAN 设备
以下是单个 VXLAN 设备示例配置
- 在每个叶子节点上设置环回地址
- 创建一个单个 VXLAN 设备 (`vxlan48`),并将 `vlan 10` 映射到 `VNI 10`,`vlan 20` 映射到 `VNI 20`
- 在单个 VXLAN 设备上启用桥接学习
- 将 VXLAN 设备添加到默认桥接 `br_default`
- 将本地隧道 IP 地址配置为交换机的环回地址
- 通过指定其他叶子节点的环回地址,创建静态 VXLAN 隧道
cumulus@leaf01:~$ nv set interface lo ip address 10.10.10.1/32
cumulus@leaf01:~$ nv set bridge domain br_default vlan 10 vni 10
cumulus@leaf01:~$ nv set bridge domain br_default vlan 20 vni 20
cumulus@leaf01:~$ nv set nve vxlan mac-learning on
cumulus@leaf01:~$ nv set nve vxlan source address 10.10.10.1
cumulus@leaf01:~$ nv set bridge domain br_default vlan 10 vni 10 flooding head-end-replication 10.10.10.2
cumulus@leaf01:~$ nv set bridge domain br_default vlan 10 vni 10 flooding head-end-replication 10.10.10.3
cumulus@leaf01:~$ nv set bridge domain br_default vlan 20 vni 20 flooding head-end-replication 10.10.10.4
cumulus@leaf01:~$ nv set interface swp1 bridge domain br_default access 10
cumulus@leaf01:~$ nv set interface swp2 bridge domain br_default access 20
cumulus@leaf01:~$ nv config apply
cumulus@leaf02:~$ nv set interface lo ip address 10.10.10.2/32
cumulus@leaf02:~$ nv set bridge domain br_default vlan 10 vni 10
cumulus@leaf02:~$ nv set bridge domain br_default vlan 20 vni 20
cumulus@leaf02:~$ nv set nve vxlan mac-learning on
cumulus@leaf02:~$ nv set nve vxlan source address 10.10.10.2
cumulus@leaf02:~$ nv set bridge domain br_default vlan 10 vni 10 flooding head-end-replication 10.10.10.1
cumulus@leaf02:~$ nv set bridge domain br_default vlan 10 vni 10 flooding head-end-replication 10.10.10.3
cumulus@leaf02:~$ nv set bridge domain br_default vlan 20 vni 20 flooding head-end-replication 10.10.10.4
cumulus@leaf02:~$ nv set interface swp1 bridge domain br_default access 10
cumulus@leaf02:~$ nv set interface swp2 bridge domain br_default access 20
cumulus@leaf02:~$ nv config apply
cumulus@leaf03:~$ nv set interface lo ip address 10.10.10.3/32
cumulus@leaf03:~$ nv set bridge domain br_default vlan 10 vni 10
cumulus@leaf03:~$ nv set bridge domain br_default vlan 20 vni 20
cumulus@leaf03:~$ nv set nve vxlan mac-learning on
cumulus@leaf03:~$ nv set nve vxlan source address 10.10.10.3
cumulus@leaf03:~$ nv set bridge domain br_default vlan 10 vni 10 flooding head-end-replication 10.10.10.1
cumulus@leaf03:~$ nv set bridge domain br_default vlan 10 vni 10 flooding head-end-replication 10.10.10.2
cumulus@leaf03:~$ nv set bridge domain br_default vlan 20 vni 20 flooding head-end-replication 10.10.10.4
cumulus@leaf03:~$ nv set interface swp1 bridge domain br_default access 10
cumulus@leaf03:~$ nv set interface swp2 bridge domain br_default access 20
cumulus@leaf03:~$ nv config apply
cumulus@leaf04:~$ nv set interface lo ip address 10.10.10.4/32
cumulus@leaf04:~$ nv set bridge domain br_default vlan 10 vni 10
cumulus@leaf04:~$ nv set bridge domain br_default vlan 20 vni 20
cumulus@leaf01:~$ nv set nve vxlan mac-learning on
cumulus@leaf04:~$ nv set nve vxlan source address 10.10.10.4
cumulus@leaf04:~$ nv set bridge domain br_default vlan 10 vni 10 flooding head-end-replication 10.10.10.1
cumulus@leaf04:~$ nv set bridge domain br_default vlan 10 vni 10 flooding head-end-replication 10.10.10.2
cumulus@leaf04:~$ nv set bridge domain br_default vlan 20 vni 20 flooding head-end-replication 10.10.10.3
cumulus@leaf04:~$ nv set interface swp1 bridge domain br_default access 10
cumulus@leaf04:~$ nv set interface swp2 bridge domain br_default access 20
cumulus@leaf04:~$ nv config apply
编辑 `/etc/network/interfaces` 文件,然后运行 `sudo ifreload -a` 命令。
auto lo iface lo inet loopback address 10.10.10.1/32 vxlan-local-tunnelip 10.10.10.1auto swp1 iface swp1 bridge-access 10
auto swp2 iface swp2 bridge-access 20
auto vxlan48 iface vxlan48 vxlan-remoteip-map 10=10.10.10.2 10=10.10.10.3 20=10.10.10.4 bridge-vlan-vni-map 10=10 20=20 bridge-vids 10 20
auto br_default iface br_default bridge-ports swp1 swp2 vxlan48 hwaddress 44:38:39:22:01:aa bridge-vlan-aware yes bridge-vids 10 20 bridge-pvid 1
auto lo iface lo inet loopback address 10.10.10.2/32 vxlan-local-tunnelip 10.10.10.2auto swp1 iface swp1 bridge-access 10
auto swp2 iface swp2 bridge-access 20
auto vxlan48 iface vxlan48 vxlan-remoteip-map 10=10.10.10.1 10=10.10.10.3 20=10.10.10.4 bridge-vlan-vni-map 10=10 20=20 bridge-vids 10 20
auto br_default iface br_default bridge-ports swp1 swp2 vxlan48 hwaddress 44:38:39:22:01:ab bridge-vlan-aware yes bridge-vids 10 20 bridge-pvid 1
auto lo iface lo inet loopback address 10.10.10.3/32 vxlan-local-tunnelip 10.10.10.3auto swp1 iface swp1 bridge-access 10
auto swp2 iface swp2 bridge-access 20
auto vxlan48 iface vxlan48 vxlan-remoteip-map 10=10.10.10.1 10=10.10.10.2 20=10.10.10.4 bridge-vlan-vni-map 10=10 20=20 bridge-vids 10 20
auto br_default iface br_default bridge-ports swp1 swp2 vxlan48 hwaddress 44:38:39:22:01:bb bridge-vlan-aware yes bridge-vids 10 20 bridge-pvid 1
auto lo iface lo inet loopback address 10.10.10.4/32 vxlan-local-tunnelip 10.10.10.4auto swp1 iface swp1 bridge-access 10
auto swp2 iface swp2 bridge-access 20
auto vxlan48 iface vxlan48 vxlan-remoteip-map 10=10.10.10.1 10=10.10.10.2 20=10.10.10.3 bridge-vlan-vni-map 10=10 20=20 bridge-vids 10 20
auto br_default iface br_default bridge-ports swp1 swp2 vxlan48 hwaddress 44:38:39:22:01:c1 bridge-vlan-aware yes bridge-vids 10 20 bridge-pvid 1
此模拟正在运行 Cumulus Linux 5.11。Cumulus Linux 5.12 模拟即将推出。
模拟以静态 VXLAN 配置示例启动。该演示使用 NVUE 命令预先配置。
要验证配置,请运行下面显示的验证命令。
上面的 NVUE 命令为每个 VNI 指定了不同的洪泛列表。如果要为所有 VNI 设置相同的洪泛列表,可以使用 `nv set nve vxlan flooding head-end-replication` 命令;例如
cumulus@leaf01:~$ nv set interface lo ip address 10.10.10.1/32
cumulus@leaf01:~$ nv set bridge domain br_default vlan 10 vni 10
cumulus@leaf01:~$ nv set bridge domain br_default vlan 20 vni 20
cumulus@leaf01:~$ nv set nve vxlan mac-learning on
cumulus@leaf01:~$ nv set nve vxlan source address 10.10.10.1
cumulus@leaf01:~$ nv set nve vxlan flooding head-end-replication 10.10.10.2
cumulus@leaf01:~$ nv set nve vxlan flooding head-end-replication 10.10.10.3
cumulus@leaf01:~$ nv set nve vxlan flooding head-end-replication 10.10.10.4
cumulus@leaf01:~$ nv set interface swp1 bridge domain br_default access 10
cumulus@leaf01:~$ nv set interface swp2 bridge domain br_default access 20
cumulus@leaf01:~$ nv config apply
上面的命令在 `/etc/network/interfaces` 文件中创建此配置
...
auto vxlan48
iface vxlan48
    vxlan-remoteip-map 10=10.10.10.2 10=10.10.10.3 10=10.10.10.4 20=10.10.10.2 20=10.10.10.3 20=10.10.10.4
    bridge-vlan-vni-map 10=10 20=20
    bridge-learning on
...
验证配置
配置完所有叶子节点后,运行以下命令以检查复制条目。传统和单个 VXLAN 设备的命令输出不同。
对于传统 VXLAN 设备
cumulus@leaf01:~$ sudo bridge fdb show | grep 00:00:00:00:00:00
00:00:00:00:00:00 dev vni10 dst 10.10.10.3 self permanent
00:00:00:00:00:00 dev vni10 dst 10.10.10.2 self permanent
00:00:00:00:00:00 dev vni20 dst 10.10.10.4 self permanent
对于单个 VXLAN 设备
cumulus@leaf01:mgmt:~$ sudo bridge fdb show | grep 00:00:00:00:00:00
00:00:00:00:00:00 dev vxlan48 dst 10.10.10.2 src_vni 10 self permanent
00:00:00:00:00:00 dev vxlan48 dst 10.10.10.3 src_vni 10 self permanent
00:00:00:00:00:00 dev vxlan48 dst 10.10.10.4 src_vni 20 self permanent
默认情况下,Cumulus Linux 在 VXLAN 接口上禁用桥接学习并启用 ARP 抑制。您可以更改默认行为,通过在 `/etc/network/ifupdown2/policy.d/` 目录中创建一个名为 `bridge.json` 的策略文件,为所有 VNI 启用桥接学习并禁用 ARP 抑制。例如
cumulus@leaf01:~$ sudo cat /etc/network/ifupdown2/policy.d/bridge.json
{
    "bridge": {
        "module_globals": {
            "bridge_vxlan_port_learning" : "on",
            "bridge-vxlan-arp-nd-suppress" : "off"
        }
    }
}
创建文件后,运行 `ifreload -a` 以加载新配置。