开放最短路径优先 v2 - OSPFv2
本主题介绍 OSPFv2,它是 IPv4 的链路状态路由协议。有关 IPv6 命令,请参阅开放最短路径优先 v3 - OSPFv3。
基本 OSPFv2 配置
您可以使用编号接口或未编号接口配置 OSPF。
当您启用或禁用 OSPF 时,FRR 服务会重新启动,这可能会影响流量。
OSPFv2 编号
要使用编号接口配置 OSPF,您需要指定路由器 ID、IP 子网前缀和区域地址。您必须将交换机上所有 IP 地址与网络子网匹配的接口放入指定的区域。OSPF 尝试在这些接口上发现其他 OSPF 路由器。Cumulus Linux 将所有匹配的接口网络地址添加到类型 1 LSA,并通告给已发现的邻居,以实现正确的可达性。
如果您不想在某些接口上建立 OSPF 邻接关系,但又想在 OSPF 数据库中通告这些网络,您可以将这些接口配置为被动接口。被动接口会创建数据库条目,但不发送或接收 OSPF Hello 数据包。例如,在数据中心拓扑中,面向主机的接口不需要运行 OSPF,但是,您需要将相应的 IP 地址通告给邻居。
网络语句可以根据需要具有包含性或通用性,以覆盖接口网络。
以下示例命令在 leaf01 和 spine01 上配置编号 OSPF。

| leaf01 | spine01 |
|---|---|
|
|
cumulus@leaf01:~$ nv set interface lo ip address 10.10.10.1/32
cumulus@leaf01:~$ nv set interface swp51 ip address 10.0.1.0/31
cumulus@leaf01:~$ nv set vrf default router ospf router-id 10.10.10.1
cumulus@leaf01:~$ nv set vrf default router ospf area 0 network 10.10.10.1/32
cumulus@leaf01:~$ nv set vrf default router ospf area 0 network 10.0.1.0/31
cumulus@leaf01:~$ nv set interface swp1 router ospf passive on
cumulus@leaf01:~$ nv set interface swp2 router ospf passive on
cumulus@leaf01:~$ nv config apply
cumulus@spine01:~$ nv set interface lo ip address 10.10.10.101/32
cumulus@spine01:~$ nv set interface swp1 ip address 10.0.1.1/31
cumulus@spine01:~$ nv set vrf default router ospf router-id 10.10.10.101
cumulus@spine01:~$ nv set vrf default router ospf area 0 network 10.10.10.101/32
cumulus@spine01:~$ nv set vrf default router ospf area 0 network 10.0.1.1/31
cumulus@spine01:~$ nv config apply
在初始配置后更改路由器 ID 时,您必须运行 nv action clear vrf <vrf> router ospf database 命令。
编辑
/etc/frr/daemons文件以启用ospf守护程序,然后启动 FRR 服务(请参阅FRRouting)。编辑
/etc/network/interfaces文件以配置环回和 swp51 的 IP 地址
cumulus@leaf01:~$ sudo nano /etc/network/interfaces
...
auto lo
iface lo inet loopback
  address 10.10.10.1/32
auto swp51
iface swp51
address 10.0.1.0/31
运行
ifreload -a命令以加载新配置cumulus@leaf01:~$ sudo ifreload -a从 vtysh shell,配置 OSPF
cumulus@leaf01:~$ sudo vtysh
...
leaf01# configure terminal
leaf01(config)# router ospf
leaf01(config-router)# ospf router-id 10.10.10.1
leaf01(config-router)# network 10.10.10.1/32 area 0
leaf01(config-router)# network 10.0.1.0/31 area 0
leaf01(config-router)# passive-interface swp1
leaf01(config-router)# passive-interface swp2
leaf01(config-router)# exit
leaf01(config)# exit
leaf01# write memory
leaf01# exit
您可以使用 passive-interface default 命令将所有接口设置为被动,并有选择地在某些接口上建立协议邻接关系
leaf01(config)# router ospf
leaf01(config-router)# passive-interface default
leaf01(config-router)# no passive-interface swp51
vtysh 命令将配置保存在 /etc/frr/frr.conf 文件中。例如
...
router ospf
 ospf router-id 10.10.10.1
 network 10.10.10.1/32 area 0
 network 10.0.1.0/31 area 0
 passive-interface swp1
 passive-interface swp2
...
编辑
/etc/frr/daemons文件以启用ospf守护程序,然后启动 FRR 服务(请参阅FRRouting)。编辑
/etc/network/interfaces文件以配置环回和 swp1 的 IP 地址cumulus@spine01:~$ sudo nano /etc/network/interfaces ... auto lo iface lo inet loopback address 10.10.10.101/32auto swp51 iface swp51 address 10.0.1.1/31运行
ifreload -a命令以加载新配置cumulus@spine01:~$ sudo ifreload -a从 vtysh shell,配置 OSPF
cumulus@spine01:~$ sudo vtysh
...
spine01# configure terminal
spine01(config)# router ospf
spine01(config-router)# ospf router-id 10.10.101.1
spine01(config-router)# network 10.10.10.101/32 area 0
spine01(config-router)# network 10.0.1.1/31 area 0
spine01(config-router)# exit
spine01(config)# exit
spine01# write memory
spine01# exit
您可以使用 passive-interface default 命令将所有接口设置为被动,并有选择地在某些接口上建立协议邻接关系
spine01(config)# router ospf
spine01(config-router)# passive-interface default
spine01(config-router)# no passive-interface swp1
vtysh 命令将配置保存在 /etc/frr/frr.conf 文件中。例如
...
router ospf
 ospf router-id 10.10.10.101
 network 10.10.10.101/32 area 0
 network 10.0.1.1/31 area 0
...
OSPFv2 未编号
未编号接口是没有唯一 IP 地址的接口;多个接口共享同一个 IP 地址。在 OSPFv2 中,未编号接口不需要 leaf 和 spine 接口上的唯一 IP 地址,并简化了 OSPF 数据库,从而减少了内存占用并缩短了 SPF 收敛时间。
要配置未编号接口,请获取环回接口(称为锚点)的 IP 地址,并将其用作未编号接口的 IP 地址。
OSPF 未编号仅支持点对点接口,并且不支持网络语句。
以下示例命令在 leaf01 和 spine01 上配置未编号 OSPF。

| leaf01 | spine01 |
|---|---|
|
|
配置未编号接口
cumulus@leaf01:~$ nv set interface lo ip address 10.10.10.1/32
cumulus@leaf01:~$ nv set interface swp51 ip address 10.10.10.1/32
cumulus@leaf01:~$ nv config apply
配置 OSPF
cumulus@leaf01:~$ nv set vrf default router ospf router-id 10.10.10.1
cumulus@leaf01:~$ nv set interface lo router ospf area 0
cumulus@leaf01:~$ nv set interface swp51 router ospf area 0
cumulus@leaf01:~$ nv set interface swp1 router ospf passive on
cumulus@leaf01:~$ nv set interface swp2 router ospf passive on
cumulus@leaf01:~$ nv set interface swp51 router ospf network-type point-to-point
cumulus@leaf01:~$ nv config apply
配置未编号接口
cumulus@spine01:~$ nv set interface lo ip address 10.10.10.101/32
cumulus@spine01:~$ nv set interface swp1 ip address 10.10.10.101/32
cumulus@spine01:~$ nv config apply
配置 OSPF
cumulus@spine01:~$ nv set vrf default router ospf router-id 10.10.10.101
cumulus@spine01:~$ nv set interface lo router ospf area 0
cumulus@spine01:~$ nv set interface swp1 router ospf area 0
cumulus@spine01:~$ nv set interface swp1 router ospf network-type point-to-point
cumulus@spine01:~$ nv config apply
在初始配置后更改路由器 ID 时,您必须运行 nv action clear vrf <vrf> router ospf database 命令。
编辑
/etc/frr/daemons文件以启用ospf守护程序,然后启动 FRR 服务(请参阅FRRouting)。编辑
/etc/network/interfaces文件以配置环回和未编号接口地址cumulus@leaf01:~$ sudo nano /etc/network/interfaces ... auto lo iface lo inet loopback address 10.10.10.1/32auto swp51 iface swp51 address 10.10.10.1/32运行
ifreload -a命令以加载新配置cumulus@leaf01:~$ ifreload -a从 vtysh shell,配置 OSPF
cumulus@leaf01:~$ sudo vtysh
...
leaf01# configure terminal
leaf01(config)# router ospf
leaf01(config-router)# ospf router-id 10.10.10.1
leaf01(config-router)# interface swp51
leaf01(config-if)# ip ospf area 0
leaf01(config-if)# ip ospf network point-to-point
leaf01(config-if)# exit
leaf01(config)# interface lo
leaf01(config-if)# ip ospf area 0
leaf01(config-if)# exit
leaf01(config)# router ospf
leaf01(config-router)# passive-interface swp1,swp2
leaf01(config-router)# end
leaf01# write memory
leaf01# exit
您可以使用
passive-interface default命令将所有接口设置为被动,并有选择地在某些接口上建立协议邻接关系leaf01(config)# router ospf leaf01(config-router)# passive-interface default leaf01(config-router)# no passive-interface swp51
vtysh 命令将配置保存在 /etc/frr/frr.conf 文件中。例如
...
interface lo
 ip ospf area 0
interface swp51
 ip ospf area 0
 ip ospf network point-to-point
router ospf
 ospf router-id 10.10.10.1
 passive-interface swp1,swp2
...
编辑
/etc/frr/daemons文件以启用ospf守护程序,然后启动 FRR 服务(请参阅FRRouting)。编辑
/etc/network/interfaces文件以配置环回和未编号接口地址cumulus@spine01:~$ sudo nano /etc/network/interfaces ... auto lo iface lo inet loopback address 10.10.10.101/32auto swp1 iface swp1 address 10.10.10.101/32运行
ifreload -a命令以加载新配置cumulus@spine01:~$ sudo ifreload -a从 vtysh shell,配置 OSPF
cumulus@spine01:~$ sudo vtysh
...
spine01# configure terminal
spine01(config)# router ospf
spine01(config)# ospf router-id 10.10.10.101
spine01(config)# interface swp1
spine01(config-if)# ip ospf area 0
spine01(config-if)# ip ospf network point-to-point
spine01(config-if)# exit
spine01(config)# interface lo
spine01(config-if)# ip ospf area 0
spine01(config-if)# exit
spine01(config-if)# end
spine01# write memory
spine01# exit
您可以使用
passive-interface default命令将所有接口设置为被动,并有选择地在某些接口上建立协议邻接关系spine01(config)# router ospf spine01(config-router)# passive-interface default spine01(config-router)# no passive-interface swp1
vtysh 命令将配置保存在 /etc/frr/frr.conf 文件中。例如
...
interface lo
 ip ospf area 0
interface swp1
 ip ospf area 0
 ip ospf network point-to-point
router ospf
 ospf router-id 10.10.10.101
...
可选 OSPFv2 配置
本节介绍可选配置。本节中提供的步骤假定您已按照上面的基本 OSPF 配置中所述配置了基本 OSPFv2。
接口参数
您可以为每个接口定义以下 OSPF 参数
- 网络类型(点对点或广播)。广播是默认设置。除非您打算将以太网介质用作具有多个连接路由器的 LAN,否则请将接口配置为点对点。点对点提供简化的邻接状态机,因此无需 DR/BDR 选举和LSA 反射。有关更多信息,请参阅 RFC5309。
Cumulus Linux 要求 OSPFv2 未编号使用点对点。
- Hello 间隔。在接口上发送 Hello 数据包的间隔秒数。默认值为 10 秒。
- 死亡间隔。邻居在停止听到 Hello 数据包后声明路由器宕机之前的秒数。默认值为 40 秒。
- 在广播接口上成为 OSPF 指定路由器 (DR) 的优先级。默认优先级为 1。
以下命令示例将网络类型设置为点对点。
cumulus@switch:~$ nv set interface swp51 router ospf network-type point-to-point
cumulus@switch:~$ nv config apply
cumulus@switch:~$ sudo vtysh
...
switch# configure terminal
switch(config)# interface swp51
switch(config-if)# ip ospf network point-to-point
switch(config-if)# end
switch# write memory
switch# exit
vtysh 命令将配置保存在 /etc/frr/frr.conf 文件中。例如
...
interface swp51
 ip ospf network point-to-point
...
以下命令示例将 Hello 间隔设置为 5 秒,将死亡间隔设置为 60 秒。Hello 间隔和死亡间隔可以是 1 到 65535 秒之间的任何值。
cumulus@switch:~$ nv set interface swp51 router ospf timers hello-interval 5
cumulus@switch:~$ nv config apply
cumulus@switch:~$ sudo vtysh
...
switch# configure terminal
switch(config)# interface swp51
switch(config-if)# ip ospf network hello-interval 5
switch(config-if)# ip ospf network dead-interval 60
switch(config-if)# end
switch# write memory
switch# exit
vtysh 命令将配置保存在 /etc/frr/frr.conf 文件中。例如
...
interface swp51
 ip ospf hello-interval 5
 ip ospf dead-interval 60
...
以下命令示例将 swp51 的优先级设置为 5。优先级可以是 0 到 255 之间的任何值。0 配置接口永远不会成为广播接口上的 OSPF 指定路由器 (DR)。
cumulus@switch:~$ nv set interface swp51 router ospf priority 5
cumulus@switch:~$ nv config apply
cumulus@switch:~$ sudo vtysh
...
switch# configure terminal
switch(config)# interface swp51
switch(config-if)# ip ospf network priority 5
switch(config-if)# end
switch# write memory
switch# exit
vtysh 命令将配置保存在 /etc/frr/frr.conf 文件中。例如
...
interface swp51
 ip ospf priority 5
...
要查看配置的 OSPF 接口参数值,请运行 vtysh show ip ospf interface 命令。
SPF 计时器默认值
OSPF 使用以下默认计时器来防止连续 SPF 使 CPU 负担过重
- 从初始事件到 SPF 运行的 0 毫秒
- 连续 SPF 运行之间的 50 毫秒(该数字随每个 SPF 翻倍,直到达到 SPF 运行之间的最大时间)
- SPF 之间最多 5000 毫秒
以下示例命令将从初始事件到 SPF 运行的毫秒数更改为 80,将连续 SPF 运行之间的毫秒数更改为 100,并将 SPF 之间最大毫秒数更改为 6000。
cumulus@switch:~$ nv set router ospf timers spf delay 80
cumulus@switch:~$ nv set router ospf timers spf holdtime 100
cumulus@switch:~$ nv set router ospf timers spf max-holdtime 6000
cumulus@switch:~$ nv config apply
cumulus@switch:~$ sudo vtysh
...
switch# configure terminal
switch(config)# router ospf
switch(config-router)# timers throttle spf 80 100 6000
switch(config-router)# end
switch# write memory
switch# exit
vtysh 命令将配置保存在 /etc/frr/frr.conf 文件中。例如
...
router ospf
 ospf router-id 10.10.10.1
 passive-interface swp1
 passive-interface swp2
 network 10.10.10.1/32 area 0
 timers throttle spf 80 100 6000
...
要查看配置的 SPF 计时器值,请运行 vtysh show ip ospf 命令。
MD5 身份验证
要在交换机上配置 MD5 身份验证,您需要创建密钥和密钥 ID,然后启用 MD5 身份验证。密钥 ID 必须是介于 1 和 255 之间的值,表示用于创建消息摘要的密钥。此值在链路上的所有路由器上必须一致。密钥必须是上限为 16 个字符的值(更长的字符串会被截断),表示实际的消息摘要。
以下示例命令创建密钥 ID 1,密钥为 thisisthekey,并在 leaf01 上的 swp51 和 spine01 上的 swp1 上启用 MD5 身份验证。
cumulus@leaf01:~$ nv set interface swp51 router ospf authentication message-digest-key 1
cumulus@leaf01:~$ nv set interface swp51 router ospf authentication md5-key thisisthekey
cumulus@leaf01:~$ nv set interface swp51 router ospf authentication enable on
cumulus@leaf01:~$ nv config apply
cumulus@spine01:~$ nv set interface swp1 router ospf authentication message-digest-key 1
cumulus@spine01:~$ nv set interface swp1 router ospf authentication md5-key thisisthekeynet
cumulus@spine01:~$ nv set interface swp1 router ospf authentication enable on
cumulus@spine01:~$ nv config apply
cumulus@leaf01:~$ sudo vtysh
...
leaf01# configure terminal
leaf01(config)# interface swp51
leaf01(config-if)# ip ospf authentication message-digest
leaf01(config-if)# ip ospf message-digest-key 1 md5 thisisthekey
leaf01(config-if)# end
leaf01# write memory
leaf01# exit
vtysh 命令将配置保存在 /etc/frr/frr.conf 文件中。例如
...
interface swp51
 ip ospf authentication message-digest
 ip ospf message-digest-key 1 md5 thisisthekey
 ...
cumulus@spine01:~$ sudo vtysh
...
spine01# configure terminal
spine01(config)# interface swp1
spine01(config-if)# ip ospf authentication message-digest
spine01(config-if)# ip ospf message-digest-key 1 md5 thisisthekey
spine01(config-if)# end
spine01# write memory
spine01# exit
vtysh 命令将配置保存在 /etc/frr/frr.conf 文件中。例如
...
interface swp1
 ip ospf authentication message-digest
 ip ospf message-digest-key 1 md5 thisisthekey
 ...
要删除现有的 MD5 身份验证哈希,请运行 vtysh no ip ospf 命令 (no ip ospf message-digest-key 1 md5 thisisthekey)。
汇总和前缀范围
默认情况下,ABR 为区域中的每个路由创建一个摘要(类型 3)LSA,并在相邻区域中通告它。前缀范围配置通过为多个路由创建和通告一个摘要 LSA 来优化此行为。OSPF 仅允许在 ABR 上区域之间进行路由汇总。
以下示例显示了划分为区域 0 和区域 1 的拓扑。border01 和 border02 是 ABR,它们具有到多个区域的链路并执行一组专门任务,例如每个区域的 SPF 计算和跨区域的路由汇总。
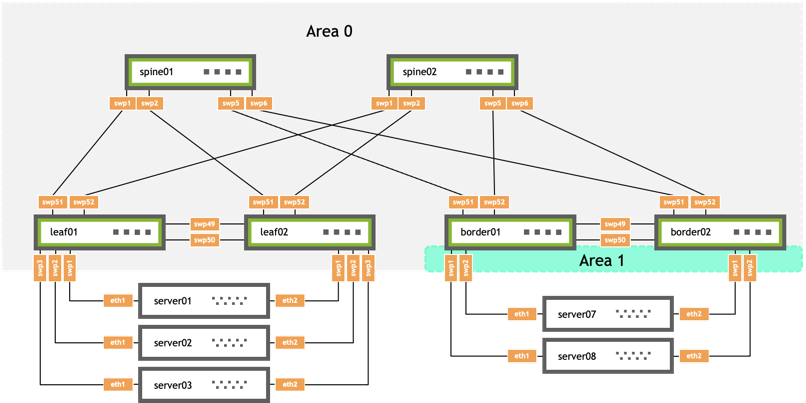
在 border01 上
- swp1 在区域 1 中,IP 地址为 10.0.0.24/31、172.16.1.1/32、172.16.1.2/32 和 172.16.1.3/32
- swp51 在区域 0 中,IP 地址为 10.0.1.9/31
这些命令为区域 0 中范围 172.16.1.0/24 中的所有路由创建摘要路由
cumulus@leaf01:~$ nv set vrf default router ospf area 0 range 172.16.1.0/24
cumulus@leaf01:~$ nv config apply
cumulus@leaf01:~$ sudo vtysh
...
leaf01# configure terminal
leaf01(config)# router ospf
leaf01(config-router)# area 0 range 172.16.1.0/24
leaf01(config-router)# end
leaf01# write memory
leaf01# exit
vtysh 命令将配置保存在 /etc/frr/frr.conf 文件中。例如
cumulus@border01:mgmt:~$ sudo cat /etc/frr/frr.conf
...
interface lo
 ip ospf area 0
interface swp1
 ip ospf area 1
interface swp2
 ip ospf area 1
interface swp51
 ip ospf area 0
interface swp52
 ip ospf area 0
router ospf
 ospf router-id 10.10.10.63
 area 0 range 172.16.1.0/24
存根区域
外部路由是从另一个协议重新分发到 OSPF 中的路由。它们具有 AS 范围的洪泛范围。通常,外部链路状态占链路状态数据库 (LSDB) 的很大一部分。存根区域通过不洪泛 AS 外部 LSA 来减小 LSDB 大小。
所有路由器都必须同意某个区域是存根区域,否则它们不会成为 OSPF 邻居。
要配置存根区域
cumulus@switch:~$ nv set vrf default router ospf area 1 type stub
cumulus@switch:~$ nv config apply
cumulus@switch:~$ sudo vtysh
...
switch# configure terminal
switch(config)# router ospf
switch(config-router)# area 1 stub
switch(config-router)# end
switch# write memory
switch# exit
vtysh 命令将配置保存在 /etc/frr/frr.conf 文件中。例如
...
router ospf
 router-id 10.10.10.63
 area 1 stub
...
存根区域仍然接收有关属于同一 OSPF 域的其他区域的网络的信息。如果未配置汇总(或汇总不全面),则信息可能会使节点不堪重负。完全存根区域解决了这个问题。完全存根区域中的路由器将其区域内的路由信息保存在其 LSDB 中。
要配置完全存根区域
cumulus@switch:~$ nv set vrf default router ospf area 1 type totally-stub
cumulus@switch:~$ nv config apply
cumulus@switch:~$ sudo vtysh
...
switch# configure terminal
switch(config)# router ospf
switch(config-router)# area 1 stub no-summary
switch(config-router)# end
switch# write memory
switch# exit
vtysh 命令将配置保存在 /etc/frr/frr.conf 文件中。例如
...
router ospf
 router-id 10.10.10.63
 area 1 stub no-summary
...
以下是区域类型差异的简要摘要
| 类型 | 行为 |
|---|---|
| 正常非零区域 | LSA 类型 1、2、3、4 区域范围,类型 5 外部,区域间路由已汇总 |
| 存根区域 | LSA 类型 1、2、3、4 区域范围,无类型 5 外部,区域间路由已汇总 |
| 完全存根区域 | LSA 类型 1、2 区域范围,默认摘要,不允许使用类型 3、4、5 LSA 类型 |
自动成本参考带宽
当您设置自动成本参考带宽时,Cumulus Linux 会动态计算 OSPF 接口成本以支持更高速率的链路。100Gbps 链路速度的默认值为 100000。链路速度低于 100Gbps 的接口的成本更高。
为避免路由环路,请在所有 OSPF 路由器上将带宽设置为一致的值。
以下示例命令配置 90Gbps 链路速度的自动成本参考带宽
cumulus@switch:~$ nv set vrf default router ospf reference-bandwidth 9000
cumulus@switch:~$ nv config apply
cumulus@switch:~$ sudo vtysh
...
switch# configure terminal
switch(config)# router ospf
switch(config-router)# auto-cost reference-bandwidth 90000
switch(config-router)# end
switch# write memory
switch# exit
vtysh 命令将配置保存在 /etc/frr/frr.conf 文件中。例如
...
router ospf
 router-id 10.10.10.1
 auto-cost reference-bandwidth 90000
...
管理距离
当两个不同的协议为同一目标提供路由信息时,Cumulus Linux 使用管理距离来选择要使用的路由协议。距离越小,协议越可靠。例如,如果交换机从管理距离为 110 的 OSPF 接收到一个路由,并从管理距离为 100 的 BGP 接收到相同的路由,则交换机选择 BGP。
Cumulus Linux 提供了多个命令来更改 OSPF 路由的距离。默认值为 110。
以下示例命令设置整组路由的距离
cumulus@switch:~$ sudo vtysh
...
switch# configure terminal
switch(config)# router ospf
switch(config-router)# distance 254
switch(config-router)# end
switch# write memory
switch# exit
以下示例命令将内部路由的 OSPF 管理距离更改为 150,将外部路由的 OSPF 管理距离更改为 220
cumulus@switch:~$ nv set vrf default router ospf distance intra-area 150
cumulus@switch:~$ nv set vrf default router ospf distance inter-area 150
cumulus@switch:~$ nv set vrf default router ospf distance external 220
cumulus@switch:~$ nv config apply
cumulus@switch:~$ sudo vtysh
...
switch# configure terminal
switch(config)# router ospf
switch(config-router)# distance ospf intra-area 150 inter-area 150 external 220
switch(config-router)# end
switch# write memory
switch# exit
以下示例命令将路由器所在同一区域内的子网或网络的内部路由的 OSPF 管理距离更改为 150
cumulus@switch:~$ nv set vrf default router ospf distance intra-area 150
cumulus@switch:~$ nv config apply
cumulus@switch:~$ sudo vtysh
...
switch# configure terminal
switch(config)# router ospf
switch(config-router)# distance ospf intra-area 150
switch(config-router)# end
switch# write memory
switch# exit
以下示例命令将路由器不属于的区域中的子网的内部路由的 OSPF 管理距离更改为 150
cumulus@switch:~$ nv set vrf default router ospf distance inter-area 150
cumulus@switch:~$ nv config apply
cumulus@switch:~$ sudo vtysh
...
switch# configure terminal
switch(config)# router ospf
switch(config-router)# distance ospf inter-area 150
switch(config-router)# end
switch# write memory
switch# exit
vtysh 命令将配置保存到 /etc/frr/frr.conf 文件中。例如
...
router ospf
  ospf router-id 10.10.10.1
  distance ospf intra-area 150 inter-area 150 external 220
...
拓扑更改和 OSPF 重新收敛
当您删除路由器或 OSPF 接口时,LSA 更新会在整个网络中触发,以告知所有路由器拓扑更改。当交换机接收到 LSA 并运行 OSPF 时,会发生路由更新。这可能会导致短时间中断,而网络会检测到故障并更新 OSPF 数据库。
对于计划内中断(例如在维护窗口期间),您可以将 OSPF 路由器配置为 OSPF 最大指标,以通知其邻居不要将其用作 OSPF 拓扑的一部分。当网络收敛时,转发到最大指标路由器的所有流量仍会转发。更新网络后,最大指标路由器将不再接收任何流量,您可以配置最大指标设置。要删除单个接口,您可以为该特定接口配置 OSPF 成本。
对于故障事件,重新收敛期间可能会发生流量丢失(直到所有节点上的 SPF 计算出绕过故障链路或节点到达每个目的地的替代路径)。
要配置最大指标(对于所有接口)
cumulus@switch:~$ nv set vrf default router ospf max-metric administrative on
cumulus@switch:~$ nv config apply
cumulus@switch:~$ sudo vtysh
...
switch# configure terminal
switch(config)# router ospf
switch(config-router)# max-metric router-lsa administrative
switch(config-router)# end
switch# write memory
switch# exit
要配置成本(对于特定接口)
cumulus@switch:~$ nv set interface swp51 router ospf cost 65535
cumulus@switch:~$ nv config apply
cumulus@switch:~$ sudo vtysh
...
switch# configure terminal
switch(config)# interface swp51
switch(config-if)# ospf cost 65535
switch(config-if)# end
switch# write memory
switch# exit
故障排除
NVUE 提供了多个命令来显示 OSPF 接口和 OSPF 邻居配置和统计信息。
- NVUE 命令显示简要输出。要显示更详细的操作信息,请使用
--operational -o json选项运行 NVUE 命令,或运行 vtysh 命令。 - 以下 NVUE
nv show命令仅支持 OSPF编号。
| 描述 | NVUE 命令 |
|---|---|
nv show vrf <vrf> router ospf interface | 显示所有 OSPF 接口。 |
nv show vrf <vrf> router ospf interface <interface> | 显示有关特定 OSPF 接口的信息。 |
nv show vrf <vrf> router ospf interface <interface> local-ip | 显示指定 OSPF 接口的本地 IP 地址。 |
nv show vrf <vrf> router ospf interface <interface> local-ip <IPv4_address> | 显示特定 OSPF 接口本地 IP 地址的统计信息。 |
nv show vrf <vrf> router ospf neighbor | 显示所有 OSPF 邻居的 OSPF 邻居 ID 和 OSPF 接口。 |
nv show vrf <vrf> router ospf neighbor <IPv4-address> | 显示特定 OSPF 邻居的接口和本地 IP 地址。 |
nv show vrf <vrf> router ospf neighbor <IPv4-address> interface | 显示 OSPF 邻居的所有接口的本地 IP 地址。 |
nv show vrf <vrf> router ospf neighbor <IPv4-address> interface <interface> local-ip | 显示特定 OSPF 邻居接口的本地 IP 地址。 |
nv show vrf <vrf> router ospf neighbor <IPv4-address> interface <interface> local-ip <IPv4-address> | 显示特定 OSPF 邻居接口本地 IP 地址的统计信息。 |
以下示例显示所有 OSPF 接口
cumulus@leaf01:mgmt:~$ nv show vrf default router ospf interface
Interface  Summary
---------  --------------------
lo         local-ip: 10.10.10.1
swp51      local-ip:   10.0.1.0
以下示例显示所有 OSPF 邻居的 OSPF 邻居 ID 和 OSPF 接口
cumulus@switch:~$ nv show vrf default router ospf neighbor
              Summary
------------  ----------------
10.10.10.101  Interface: swp51
以下示例显示详细的 OSPF 邻居信息,其中包括统计信息
cumulus@leaf01:mgmt:~$ nv show vrf default router ospf neighbor --operational -o json
{
  "10.10.10.101": {
    "interface": {
      "swp51": {
        "local-ip": {
          "10.0.1.0": {
            "bdr-router-id": "10.10.10.101",
            "dead-timer-expiry": 33519,
            "dr-router-id": "10.10.10.1",
            "neighbor-ip": "10.0.1.1",
            "priority": 1,
            "role": "BDR",
            "state": "full",
            "statistics": {
              "db-summary-qlen": 0,
              "ls-request-qlen": 0,
              "ls-retrans-qlen": 0,
              "state-changes": 5
            }
          }
        }
      }
    }
  }
}
以下示例显示 OSPF 邻居 10.10.10.101 的接口和本地 IP 地址。
cumulus@switch:~$ nv show vrf default router ospf neighbor 10.10.10.101
Interface  Summary
---------  --------------------
swp51      local-ip: 10.0.1.0
以下示例显示 OSPF 邻居 10.10.10.101 的更详细信息,其中包括统计信息
cumulus@switch:~$ nv show vrf default router ospf neighbor 10.10.10.101 --operational -o json
{
  "interface": {
    "swp51": {
      "local-ip": {
        "10.0.1.0": {
          "bdr-router-id": "10.10.10.101",
          "dead-timer-expiry": 30794,
          "dr-router-id": "10.10.10.1",
          "neighbor-ip": "10.0.1.1",
          "priority": 1,
          "role": "BDR",
          "state": "full",
          "statistics": {
            "db-summary-qlen": 0,
            "ls-request-qlen": 0,
            "ls-retrans-qlen": 0,
            "state-changes": 5
          }
        }
      }
    }
  }
}
以下示例显示接口 swp51 上本地 IP 地址为 10.10.10.1 的 OSPF 邻居 10.10.10.101 的配置和统计信息
cumulus@leaf01:mgmt:~$ nv show vrf default router ospf neighbor 10.10.10.101 interface swp51 local-ip 10.0.1.0
                   operational   applied
-----------------  ------------  -------
bdr-router-id      10.10.10.101
dead-timer-expiry  30042
dr-router-id       10.10.10.1
neighbor-ip        10.0.1.1
priority           1
role               BDR
state              full
statistics
  db-summary-qlen  0
  ls-request-qlen  0
  ls-retrans-qlen  0
  state-changes    5
FRR (vtysh) 提供了多个 OSPF 故障排除命令
| 描述 | vtysh 命令 |
|---|---|
show ip ospf neighbor | 显示 OSPF 邻居信息。 |
show ip ospf database | 显示 LSDB 是否在网络中的所有路由器之间同步。 |
show ip route ospf | 显示 Cumulus Linux 是否未正确转发 OSPF 路由。 |
show ip ospf interface | 显示 OSPF 接口。 |
show ip ospf | 显示有关 OSPF 进程的信息。 |
以下示例显示 OSPF 邻居信息
cumulus@leaf01:mgmt:~$ sudo vtysh
...
leaf01# show ip ospf neighbor
Neighbor ID     Pri State           Dead Time Address         Interface                        RXmtL RqstL DBsmL
10.10.10.101      1 Full/Backup       30.307s 10.0.1.1        swp51:10.0.1.0                       0     0     0
以下示例显示 Cumulus Linux 是否未正确转发 OSPF 路由
cumulus@leaf01:mgmt:~$ sudo vtysh
...
leaf01# show ip route ospf
Codes: K - kernel route, C - connected, S - static, R - RIP,
       O - OSPF, I - IS-IS, B - BGP, E - EIGRP, N - NHRP,
       T - Table, v - VNC, V - VNC-Direct, A - Babel, D - SHARP,
       F - PBR, f - OpenFabric,
       > - selected route, * - FIB route, q - queued route, r - rejected route

O   10.0.1.0/31 [110/100] is directly connected, swp51, weight 1, 00:02:37
O   10.10.10.1/32 [110/0] is directly connected, lo, weight 1, 00:02:37
O>* 10.10.10.101/32 [110/100] via 10.0.1.1, swp51, weight 1, 00:00:57
要捕获 OSPF 数据包,请运行 sudo tcpdump -v -i swp1 ip proto ospf 命令。
清除 OSPF 计数器
您可以运行以下命令来清除 NVUE show 命令中显示的 OSPF 计数器。
nv action clear vrf <vrf> router ospf interface清除所有 OSPF 接口的所有计数器。nv action clear vrf <vrf> router ospf interface <interface>清除特定 OSPF 接口的所有计数器。
以下示例命令清除 OSPF 接口 swp51 的所有计数器
cumulus@leaf01:mgmt:~$ nv action clear vrf default router ospf interface swp51
...
Action succeeded
清除 OSPF 数据库
要清除 OSPF 数据库、重新建立邻居关系并重新发起 LSA,请运行 nv action clear vrf <vrf>> router ospf database 命令
cumulus@leaf01:mgmt:~$ nv action clear vrf default router ospf database
Action executing ...
Cleared vrf default ospf database
Action succeeded
注意事项
使用 NVUE,您不能在同一配置中同时运行 nv set vrf default router ospf area <area> network 命令和 nv set interface <interface> router ospf area 命令;例如,如果您运行以下命令,NVUE 会显示无效的配置错误
cumulus@switch:~$ nv set router ospf enable on
cumulus@switch:~$ nv set vrf default router ospf area 0 network 10.10.10.101/32
cumulus@switch:~$ nv set vrf default router ospf enable on
cumulus@switch:~$ nv set vrf default router ospf router-id 10.10.10.101
cumulus@switch:~$ nv set interface swp1 router ospf area 10
cumulus@switch:~$ nv config apply
Invalid config [rev_id: 3]
  Please remove all network commands from `vrf.default.router.ospf.area.42` first.
相关信息
- FRR OSPFv2
- Perlman, Radia (1999); 互连:桥接器、路由器、交换机和互联网络协议(第 2 版);Addison-Wesley
- Moy, John T.; OSPF:互联网路由协议剖析;Addison-Wesley
- RFC 2328 OSPFv2
- RFC 3101 OSPFv2 非完全末梢区域 (NSSA)