DGX Station A100 入门#
本节介绍如何连接 DGX Station A100 并为其供电。
连接 DGX Station A100 并为其供电#
要完成此任务,您需要以下物品(DGX Station A100 未随附):
Mini DisplayPort 1.2 转 DisplayPort。
USB 键盘
USB 鼠标
以太网电缆
将显示器连接到任意 DisplayPort 接口,并将键盘和鼠标连接到任意两个 USB 端口。
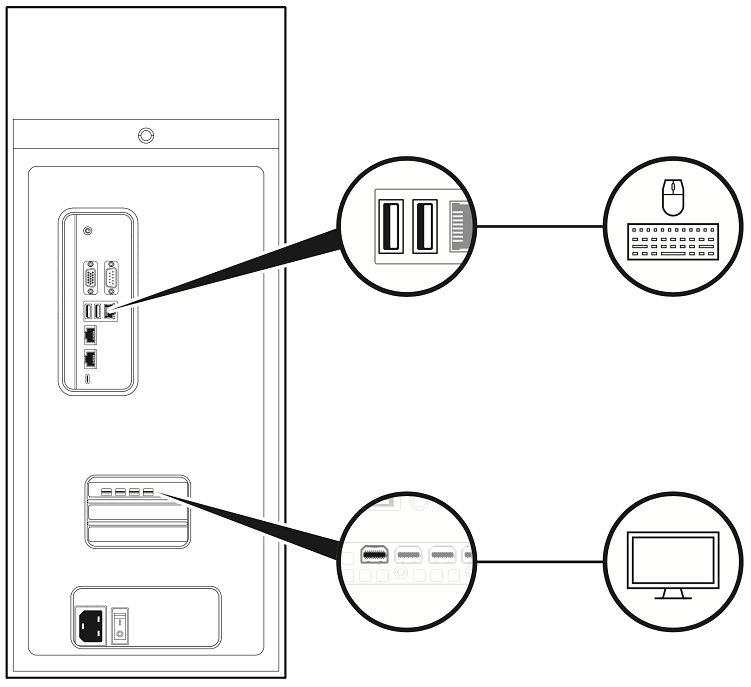
注意
对于初始设置,仅连接一个显示器到 DGX Station A100。完成初始 Ubuntu 操作系统配置后,您可以配置 DGX Station A100 以使用多个显示器。有关更多信息,请参阅NVDIA DGX OS 5 用户指南。
使用任意两个以太网端口将 DGX Station A100 连接到具有互联网连接的 LAN。

注意
请记住以下信息
仅将 DGX Station A100 上的一个以太网端口连接到互联网,除非您计划手动配置端口并在至少一个端口上禁用 DHCP。
默认情况下,DGX Station A100 上的两个以太网端口都配置为 DHCP。如果两个端口同时连接,则每个端口都将获得自己的 IP 地址。然后,Linux 操作系统 (OS) 使用的 IP 地址将在这些地址之间交替,导致操作系统和应用程序出现故障。
重要提示
在启动系统并完成初始配置后,请勿编辑网络管理器配置文件。
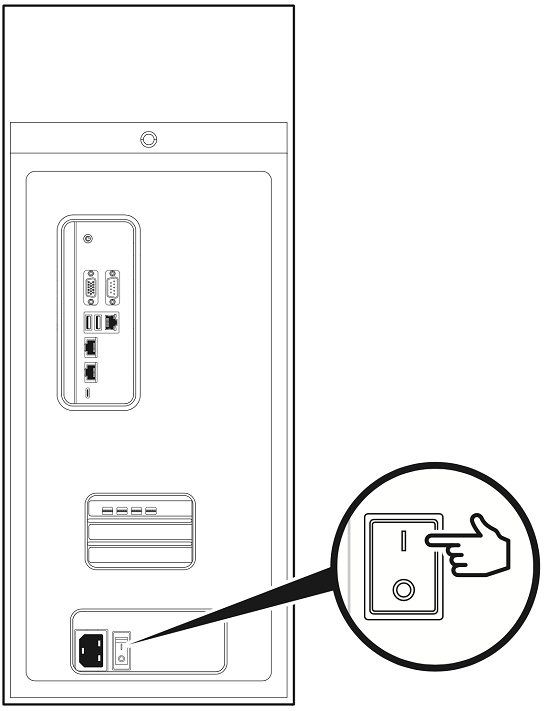
确保电源开关处于 OFF 位置。
将随附的电源线从设备背面的电源插座连接到额定电压适当的接地交流电源插座。
有关 DGX Station A100 的功耗、输入电压和电流额定值的详细信息,请参阅电源规格。
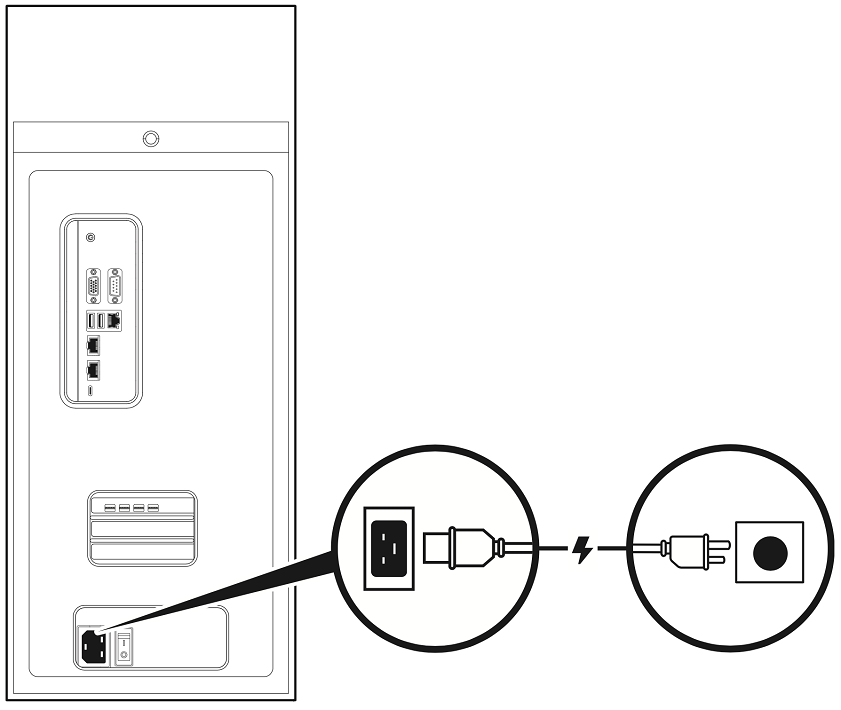
注意
DGX Station A100 的电源必须为 100V,并且不能低于 90V。
警告
请记住以下信息
仅使用随附的电源线,请勿将此电源线用于任何其他产品或任何其他目的。并非所有电源线都具有相同的电流额定值。
请勿将家用延长线与您的产品一起使用。家用延长线没有过载保护,不适用于计算机系统。
将显示器连接到合适的交流电源插座并打开显示器电源。
将 DGX Station A100 电源开关拨到 ON 位置。
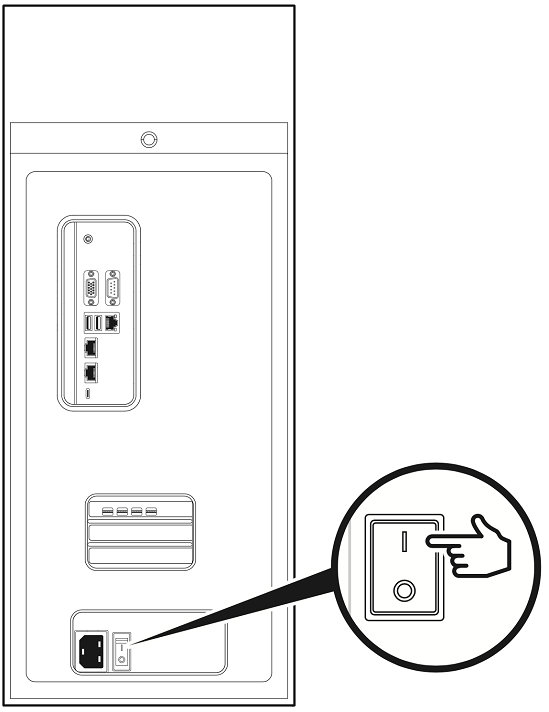
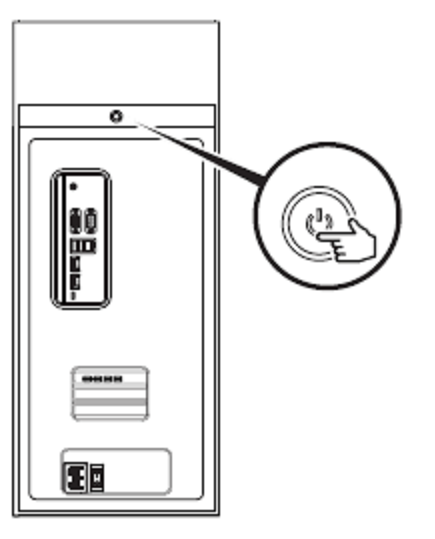
按下设备正面的电源按钮以打开 DGX Station A100 的电源。
将 DGX Station A100 用作无显示器服务器#
默认情况下,DGX Station A100 发货时显示器中自动选择 DP 端口。
要进入 SBIOS 设置,请参阅使用系统 BIOS 配置 BMC 静态 IP 地址。
如果您计划将 DGX Station A100 用作桌面系统,请使用本用户指南中的信息开始使用。
您无需更改 SBIOS。
如果您计划将其用作无显示器服务器,则在机器在桌面 GUI 中启动后,BMC 远程控制台将不显示显示内容。
在这种情况下,返回 BIOS 并完成以下步骤。
重要提示
如果您不更改 SBIOS 设置,则在机器在桌面 GUI 中启动后,BMC 远程控制台将不显示显示内容。
要更改 SBIOS 设置
提示
SBIOS 屏幕将显示在连接到 DP 端口、VGA 端口或 BMC 远程控制台的任何显示器上。
在设置实用程序中,单击高级选项卡。
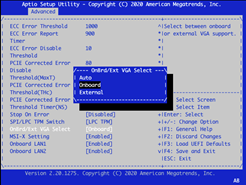
选择 芯片组配置。
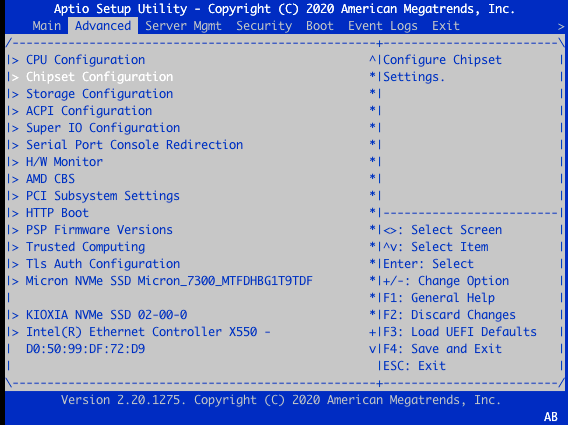
在板载/外接 VGA 选择对话框中,选择板载。
要保存并退出,请按 F4。
在具有混合 GPU 类型的系统上运行工作负载#
DGX Station A100 配备了四个高性能 NVIDIA A100 GPU 和一个 DGX 显示 GPU。NVIDIA A100 GPU 用于运行高性能和 AI 工作负载,DGX 显示卡用于驱动显示器上的高质量显示。
在此系统上运行应用程序时,务必确定启动应用程序和工作负载的最佳方法,以确保使用高性能 NVIDIA A100 GPU。您可以通过以下方式之一实现此目的:
当您登录系统并检查可用的 GPU 时,您会发现以下内容:
lab@ro-dvt-058-80gb:~$ nvidia-smi -L
GPU 0: Graphics Device (UUID: GPU-269d95f8-328a-08a7-5985-ab09e6e2b751)
GPU 1: Graphics Device (UUID: GPU-0f2dff15-7c85-4320-da52-d3d54755d182)
GPU 2: Graphics Device (UUID: GPU-dc598de6-dd4d-2f43-549f-f7b4847865a5)
GPU 3: DGX Display (UUID: GPU-91b9d8c8-e2b9-6264-99e0-b47351964c52)
GPU 4: Graphics Device (UUID: GPU-e32263f2-ae07-f1db-37dc-17d1169b09bf)
nvidia-smi 列出了总共五个 GPU。这是因为 nvidia-smi 包括用于驱动显示器和高质量图形输出的 DGX 显示 GPU。
在运行应用程序或工作负载时,DGX 显示 GPU 可能会妨碍,因为它没有直接的 NVlink 连接、足够的内存或安装在系统上的 NVIDIA A100 GPU 的性能特征。因此,您应确保正在使用正确的 GPU。
使用 Docker 容器运行#
在 DGX OS 上,由于 Docker 已配置为识别高性能 NVIDIA A100 GPU 并将其分配给容器,因此此方法是最简单的方法。
一个简单的测试是使用 --gpus all 标志运行一个小容器,并在正在运行的容器中使用 nvidia-smi。输出显示只有高性能 GPU 可供容器使用
lab@ro-dvt-058-80gb:~$ docker run --gpus all --rm -it ubuntu nvidia-smi -L
GPU 0: Graphics Device (UUID: GPU-269d95f8-328a-08a7-5985-ab09e6e2b751)
GPU 1: Graphics Device (UUID: GPU-0f2dff15-7c85-4320-da52-d3d54755d182)
GPU 2: Graphics Device (UUID: GPU-dc598de6-dd4d-2f43-549f-f7b4847865a5)
GPU 3: Graphics Device (UUID: GPU-e32263f2-ae07-f1db-37dc-17d1169b09bf)
当使用 --gpus n 标志时,此步骤也有效,其中 n 可以是 1、2、3 或 4。这些值表示应分配给该容器的 GPU 数量。例如
lab@ro-dvt-058-80gb:~ $ docker run --gpus 2 --rm -it ubuntu nvidia-smi -L
GPU 0: Graphics Device (UUID: GPU-269d95f8-328a-08a7-5985-ab09e6e2b751)
GPU 1: Graphics Device (UUID: GPU-0f2dff15-7c85-4320-da52-d3d54755d182)
在此示例中,Docker 选择前两个 GPU 来运行容器,但如果使用 device 选项,您可以指定要使用的 GPU
lab@ro-dvt-058-80gb:~$ docker run --gpus '"device=GPU-dc598de6-dd4d-2f43-549f-f7b4847865a5,GPU-e32263f2-ae07-f1db-37dc-17d1169b09bf"' --rm -it ubuntu nvidia-smi -L
GPU 0: Graphics Device (UUID: GPU-dc598de6-dd4d-2f43-549f-f7b4847865a5)
GPU 1: Graphics Device (UUID: GPU-e32263f2-ae07-f1db-37dc-17d1169b09bf)
在此示例中,之前未使用的两个 GPU 现在被分配到容器上运行。
在裸机上运行#
要使用四个高性能 GPU 运行应用程序,必须在运行应用程序之前指定 CUDA_VISIBLE_DEVICES 变量。
注意
此方法不使用容器。
CUDA 按性能对 GPU 进行排序,因此 GPU 0 将是性能最高的 GPU,最后一个 GPU 将是性能最低的 GPU。
重要提示
如果 CUDA_DEVICE_ORDER 变量设置为 PCI_BUS_ID,则此排序将被覆盖。
在以下示例中,运行了 CUDA 示例附带的 CUDA 应用程序。在输出中,GPU 0 是 DGX Station A100 中最快的,GPU 4 (DGX 显示 GPU) 是最慢的
lab@ro-dvt-058-80gb:~$ sudo apt install cuda-samples-11-2
lab@ro-dvt-058-80gb:~$ cd /usr/local/cuda-11.2/samples/1_Utilities/p2pBandwidthLatencyTest
lab@ro-dvt-058-80gb:/usr/local/cuda-11.2/samples/1_Utilities/p2pBandwidthLatencyTest$ sudo make
/usr/local/cuda/bin/nvcc -ccbin g++ -I../../common/inc  -m64    --threads
0 -gencode arch=compute_35,code=sm_35 -gencode arch=compute_37,code=sm_37
-gencode arch=compute_50,code=sm_50 -gencode arch=compute_52,code=sm_52
-gencode arch=compute_60,code=sm_60 -gencode arch=compute_61,code=sm_61
-gencode arch=compute_70,code=sm_70 -gencode arch=compute_75,code=sm_75
-gencode arch=compute_80,code=sm_80 -gencode arch=compute_86,code=sm_86
-gencode arch=compute_86,code=compute_86 -o p2pBandwidthLatencyTest.o -c p2pBandwidthLatencyTest.cu
nvcc warning : The 'compute_35', 'compute_37', 'compute_50', 'sm_35', 'sm_37' and 'sm_50' architectures are deprecated, and may be removed in a future release (Use -Wno-deprecated-gpu-targets to suppress warning).
/usr/local/cuda/bin/nvcc -ccbin g++   -m64
-gencode arch=compute_35,code=sm_35 -gencode arch=compute_37,code=sm_37
-gencode arch=compute_50,code=sm_50 -gencode arch=compute_52,code=sm_52
-gencode arch=compute_60,code=sm_60 -gencode arch=compute_61,code=sm_61
-gencode arch=compute_70,code=sm_70 -gencode arch=compute_75,code=sm_75
-gencode arch=compute_80,code=sm_80 -gencode arch=compute_86,code=sm_86
-gencode arch=compute_86,code=compute_86 -o p2pBandwidthLatencyTest p2pBandwidthLatencyTest.o
nvcc warning : The 'compute_35', 'compute_37', 'compute_50', 'sm_35', 'sm_37' and 'sm_50' architectures are deprecated, and may be removed in a future release (Use -Wno-deprecated-gpu-targets to suppress warning).
mkdir -p ../../bin/x86_64/linux/release
cp p2pBandwidthLatencyTest ../../bin/x86_64/linux/release
lab@ro-dvt-058-80gb:/usr/local/cuda-11.2/samples/1_Utilities/p2pBandwidthLatencyTest $ cd /usr/local/cuda-11.2/samples/bin/x86_64/linux/release
lab@ro-dvt-058-80gb:/usr/local/cuda-11.2/samples/bin/x86_64/linux/release $ ./p2pBandwidthLatencyTest
[P2P (Peer-to-Peer) GPU Bandwidth Latency Test]
Device: 0, Graphics Device, pciBusID: 1, pciDeviceID: 0, pciDomainID:0
Device: 1, Graphics Device, pciBusID: 47, pciDeviceID: 0, pciDomainID:0
Device: 2, Graphics Device, pciBusID: 81, pciDeviceID: 0, pciDomainID:0
Device: 3, Graphics Device, pciBusID: c2, pciDeviceID: 0, pciDomainID:0
Device: 4, DGX Display, pciBusID: c1, pciDeviceID: 0, pciDomainID:0
Device=0 CAN Access Peer Device=1
Device=0 CAN Access Peer Device=2
Device=0 CAN Access Peer Device=3
Device=0 CANNOT Access Peer Device=4
Device=1 CAN Access Peer Device=0
Device=1 CAN Access Peer Device=2
Device=1 CAN Access Peer Device=3
Device=1 CANNOT Access Peer Device=4
Device=2 CAN Access Peer Device=0
Device=2 CAN Access Peer Device=1
Device=2 CAN Access Peer Device=3
Device=2 CANNOT Access Peer Device=4
Device=3 CAN Access Peer Device=0
Device=3 CAN Access Peer Device=1
Device=3 CAN Access Peer Device=2
Device=3 CANNOT Access Peer Device=4
Device=4 CANNOT Access Peer Device=0
Device=4 CANNOT Access Peer Device=1
Device=4 CANNOT Access Peer Device=2
Device=4 CANNOT Access Peer Device=3


***NOTE: In case a device doesn't have P2P access to other one, it falls back to normal memcopy procedure.
So you can see lesser Bandwidth (GB/s) and unstable Latency (us) in those cases.

P2P Connectivity Matrix
     D\D     0     1     2     3     4
     0            1     1     1     1     0
     1            1     1     1     1     0
     2            1     1     1     1     0
     3            1     1     1     1     0
     4            0     0     0     0     1
Unidirectional P2P=Disabled Bandwidth Matrix (GB/s)
   D\D     0      1      2      3      4
     0 1323.03  15.71  15.37  16.81  12.04
     1  16.38 1355.16  15.47  15.81  11.93
     2  16.25  15.85 1350.48  15.87  12.06
     3  16.14  15.71  16.80 1568.78  11.75
     4  12.61  12.47  12.68  12.55 140.26
Unidirectional P2P=Enabled Bandwidth (P2P Writes) Matrix (GB/s)
   D\D     0      1      2      3      4
     0 1570.35  93.30  93.59  93.48  12.07
     1  93.26 1583.08  93.55  93.53  11.93
     2  93.44  93.58 1584.69  93.34  12.05
     3  93.51  93.55  93.39 1586.29  11.79
     4  12.68  12.54  12.75  12.51 140.26
Bidirectional P2P=Disabled Bandwidth Matrix (GB/s)
   D\D     0      1      2      3      4
     0 1588.71  19.60  19.26  19.73  16.53
     1  19.59 1582.28  19.85  19.13  16.43
     2  19.53  19.39 1583.88  19.61  16.58
     3  19.51  19.11  19.58 1592.76  15.90
     4  16.36  16.31  16.39  15.80 139.42
Bidirectional P2P=Enabled Bandwidth Matrix (GB/s)
   D\D     0      1      2      3      4
     0 1590.33 184.91 185.37 185.45  16.46
     1 185.04 1587.10 185.19 185.21  16.37
     2 185.15 185.54 1516.25 184.71  16.47
     3 185.55 185.32 184.86 1589.52  15.71
     4  16.26  16.28  16.16  15.69 139.43
P2P=Disabled Latency Matrix (us)
   GPU     0      1      2      3      4
     0   3.53  21.60  22.22  21.38  12.46
     1  21.61   2.62  21.55  21.65  12.34
     2  21.57  21.54   2.61  21.55  12.40
     3  21.57  21.54  21.58   2.51  13.00
     4  13.93  12.41  21.42  21.58   1.14

   CPU     0      1      2      3      4
     0   4.26  11.81  13.11  12.00  11.80
     1  11.98   4.11  11.85  12.19  11.89
     2  12.07  11.72   4.19  11.82  12.49
     3  12.14  11.51  11.85   4.13  12.04
     4  12.21  11.83  12.11  11.78   4.02
P2P=Enabled Latency (P2P Writes) Matrix (us)
   GPU     0      1      2      3      4
     0   3.79   3.34   3.34   3.37  13.85
     1   2.53   2.62   2.54   2.52  12.36
     2   2.55   2.55   2.61   2.56  12.34
     3   2.58   2.51   2.51   2.53  14.39
     4  19.77  12.32  14.75  21.60   1.13

   CPU     0      1      2      3      4
     0   4.27   3.63   3.65   3.59  13.15
     1   3.62   4.22   3.61   3.62  11.96
     2   3.81   3.71   4.35   3.73  12.15
     3   3.64   3.61   3.61   4.22  12.06
     4  12.32  11.92  13.30  12.03   4.05

NOTE: The CUDA Samples are not meant for performance measurements. Results may vary when GPU Boost is enabled.
上面的示例显示了所有五个 GPU(包括 DGX 显示 GPU)之间的对等带宽和延迟测试。该应用程序还显示,任何 GPU 与 GPU 4 之间都没有对等连接。这表明 GPU 4 不应用于高性能工作负载。
通过使用 CUDA_VISIBLE_DEVICES 变量再次运行该示例,该变量限制了应用程序可以看到的 GPU 数量。
注意
所有 GPU 都可以与所有其他对等设备通信。
lab@ro-dvt-058-80gb:/usr/local/cuda-11.2/samples/bin/x86_64/linux/release$ CUDA_VISIBLE_DEVICES=0,1,2,3 ./p2pBandwidthLatencyTest
[P2P (Peer-to-Peer) GPU Bandwidth Latency Test]
Device: 0, Graphics Device, pciBusID: 1, pciDeviceID: 0, pciDomainID:0
Device: 1, Graphics Device, pciBusID: 47, pciDeviceID: 0, pciDomainID:0
Device: 2, Graphics Device, pciBusID: 81, pciDeviceID: 0, pciDomainID:0
Device: 3, Graphics Device, pciBusID: c2, pciDeviceID: 0, pciDomainID:0
Device=0 CAN Access Peer Device=1
Device=0 CAN Access Peer Device=2
Device=0 CAN Access Peer Device=3
Device=1 CAN Access Peer Device=0
Device=1 CAN Access Peer Device=2
Device=1 CAN Access Peer Device=3
Device=2 CAN Access Peer Device=0
Device=2 CAN Access Peer Device=1
Device=2 CAN Access Peer Device=3
Device=3 CAN Access Peer Device=0
Device=3 CAN Access Peer Device=1
Device=3 CAN Access Peer Device=2

***NOTE: In case a device doesn't have P2P access to other one, it falls back to normal memcopy procedure.
So you can see lesser Bandwidth (GB/s) and unstable Latency (us) in those cases.

P2P Connectivity Matrix
     D\D     0     1     2     3
     0            1     1     1     1
     1            1     1     1     1
     2            1     1     1     1
     3            1     1     1     1
Unidirectional P2P=Disabled Bandwidth Matrix (GB/s)
   D\D     0      1      2      3
     0 1324.15  15.54  15.62  15.47
     1  16.55 1353.99  15.52  16.23
     2  15.87  17.26 1408.93  15.91
     3  16.33  17.31  18.22 1564.06
Unidirectional P2P=Enabled Bandwidth (P2P Writes) Matrix (GB/s)
   D\D     0      1      2      3
     0 1498.08  93.30  93.53  93.48
     1  93.32 1583.08  93.54  93.52
     2  93.55  93.60 1583.08  93.36
     3  93.49  93.55  93.28 1576.69
Bidirectional P2P=Disabled Bandwidth Matrix (GB/s)
   D\D     0      1      2      3
     0 1583.08  19.92  20.47  19.97
     1  20.74 1586.29  20.06  20.22
     2  20.08  20.59 1590.33  20.01
     3  20.44  19.92  20.60 1589.52
Bidirectional P2P=Enabled Bandwidth Matrix (GB/s)
   D\D     0      1      2      3
     0 1592.76 184.88 185.21 185.30
     1 184.99 1589.52 185.19 185.32
     2 185.28 185.30 1585.49 185.01
     3 185.45 185.39 184.84 1587.91
P2P=Disabled Latency Matrix (us)
   GPU     0      1      2      3
     0   2.38  21.56  21.61  21.56
     1  21.70   2.34  21.54  21.56
     2  21.55  21.56   2.41  21.06
     3  21.57  21.34  21.56   2.39

   CPU     0      1      2      3
     0   4.22  11.99  12.71  12.09
     1  11.86   4.09  12.00  11.71
     2  12.52  11.98   4.27  12.24
     3  12.22  11.75  12.19   4.25
P2P=Enabled Latency (P2P Writes) Matrix (us)
   GPU     0      1      2      3
     0   2.32   2.57   2.55   2.59
     1   2.55   2.32   2.59   2.52
     2   2.59   2.56   2.41   2.59
     3   2.57   2.55   2.56   2.40

   CPU     0      1      2      3
     0   4.24   3.57   3.72   3.81
     1   3.68   4.26   3.75   3.63
     2   3.79   3.75   4.34   3.71
     3   3.72   3.64   3.66   4.32

NOTE: The CUDA Samples are not meant for performance measurements. Results may vary when GPU Boost is enabled.
对于裸机应用程序,UUID 也可以在 CUDA_VISIBLE_DEVICES 变量中指定,如下所示
lab@ro-dvt-058-80gb:/usr/local/cuda-11.2/samples/bin/x86_64/linux/release $ CUDA_VISIBLE_DEVICES=GPU-0f2dff15-7c85-4320-da52-d3d54755d182,GPU-dc598de6-dd4d-2f43-549f-f7b4847865a5 ./p2pBandwidthLatencyTest
由于 UUID 的性质,GPU 规范更长,但这是将特定 GPU 绑定到应用程序的最精确方法。
使用多实例 GPU#
多实例 GPU (MIG) 是 NVIDIA A100 GPU 上提供的一项技术。如果在 GPU 上启用了 MIG,并且 GPU 已分区,则可以将应用程序限制为在这些设备上运行。
这适用于 Docker 容器和裸机,使用 CUDA_VISIBLE_DEVICES,如下面的示例所示。有关如何配置和使用 MIG 的说明,请参阅NVIDIA 多实例 GPU 用户指南。
识别将要使用的 MIG 实例。以下是从 GPU 0 分区为 7 个 MIG 的系统输出:
lab@ro-dvt-058-80gb:~$ nvidia-smi -L
GPU 0: Graphics Device (UUID: GPU-269d95f8-328a-08a7-5985-ab09e6e2b751)
  MIG 1g.10gb Device 0: (UUID: MIG-GPU-269d95f8-328a-08a7-5985-ab09e6e2b751/7/0)
  MIG 1g.10gb Device 1: (UUID: MIG-GPU-269d95f8-328a-08a7-5985-ab09e6e2b751/8/0)
  MIG 1g.10gb Device 2: (UUID: MIG-GPU-269d95f8-328a-08a7-5985-ab09e6e2b751/9/0)
  MIG 1g.10gb Device 3: (UUID: MIG-GPU-269d95f8-328a-08a7-5985-ab09e6e2b751/11/0)
  MIG 1g.10gb Device 4: (UUID: MIG-GPU-269d95f8-328a-08a7-5985-ab09e6e2b751/12/0)
  MIG 1g.10gb Device 5: (UUID: MIG-GPU-269d95f8-328a-08a7-5985-ab09e6e2b751/13/0)
  MIG 1g.10gb Device 6: (UUID: MIG-GPU-269d95f8-328a-08a7-5985-ab09e6e2b751/14/0)
GPU 1: Graphics Device (UUID: GPU-0f2dff15-7c85-4320-da52-d3d54755d182)
GPU 2: Graphics Device (UUID: GPU-dc598de6-dd4d-2f43-549f-f7b4847865a5)
GPU 3: DGX Display (UUID: GPU-91b9d8c8-e2b9-6264-99e0-b47351964c52)
GPU 4: Graphics Device (UUID: GPU-e32263f2-ae07-f1db-37dc-17d1169b09bf)
在 Docker 中,从此输出输入 MIG UUID,其中选择了 GPU 0 和 Device 0。
如果您在 DGX Station A100 上运行,则在创建、销毁或修改 MIG 实例时,随时重启 nv-docker-gpus 和 docker 系统服务,方法是运行以下命令:
lab@ro-dvt-058-80gb:~$ sudo systemctl restart nv-docker-gpus; sudo systemctl restart docker
nv-docker-gpus 必须在 DGX Station A100 上重启,因为此服务用于屏蔽 Docker 可以使用的可用 GPU。当 GPU 架构更改时,需要刷新该服务。
lab@ro-dvt-058-80gb:~$ docker run --gpus '"device=MIG-GPU-269d95f8-328a-08a7-5985-ab09e6e2b751/7/0"' --rm -it ubuntu nvidia-smi -L
GPU 0: Graphics Device (UUID: GPU-269d95f8-328a-08a7-5985-ab09e6e2b751)
  MIG 1g.10gb Device 0: (UUID: MIG-GPU-269d95f8-328a-08a7-5985-ab09e6e2b751/7/0)
在裸机上,指定 MIG 实例
注意
此应用程序测量跨 GPU 的通信,并且仅使用一个 GPU MIG 读取带宽和延迟是不相关的。
此示例的目的是说明如何将特定 GPU 用于应用程序,这在下面清楚地说明了。
lab@ro-dvt-058-80gb: /usr/local/cuda-11.2/samples/bin/x86_64/linux/release$ CUDA_VISIBLE_DEVICES=MIG-GPU-269d95f8-328a-08a7-5985-ab09e6e2b751/7/0 ./p2pBandwidthLatencyTest
[P2P (Peer-to-Peer) GPU Bandwidth Latency Test]
Device: 0, Graphics Device MIG 1g.10gb, pciBusID: 1, pciDeviceID: 0, pciDomainID:0

***NOTE: In case a device doesn't have P2P access to other one, it falls back to normal memcopy procedure.
So you can see lesser Bandwidth (GB/s) and unstable Latency (us) in those cases.

P2P Connectivity Matrix
     D\D     0
     0            1
Unidirectional P2P=Disabled Bandwidth Matrix (GB/s)
   D\D     0
     0 176.20
Unidirectional P2P=Enabled Bandwidth (P2P Writes) Matrix (GB/s)
   D\D     0
     0 187.87
Bidirectional P2P=Disabled Bandwidth Matrix (GB/s)
   D\D     0
     0 190.77
Bidirectional P2P=Enabled Bandwidth Matrix (GB/s)
   D\D     0
     0 190.53
P2P=Disabled Latency Matrix (us)
   GPU     0
     0   3.57

   CPU     0
     0   4.07
P2P=Enabled Latency (P2P Writes) Matrix (us)
   GPU     0
     0   3.55

   CPU     0
     0   4.07

NOTE: The CUDA Samples are not meant for performance measurements. Results may vary when GPU Boost is enabled.
完成 Ubuntu 操作系统的初始配置#
首次打开 DGX Station A100 的电源时,系统会提示您接受 NVIDIA 软件的最终用户许可协议。然后,系统将引导您完成完成 Ubuntu 操作系统初始配置的过程。
有关完整过程,请参阅NVIDIA DGX OS 5 用户指南。