高可用性#
验证主节点是否具有对集群节点的电源控制。
1% device
2% power -c  dgx-h100 status
3[-head1->device]%  power -c  dgx-h100 status
4ipmi0 .................... [   ON    ]  bcm-dgx-h100-01
5ipmi0 .................... [   ON    ]  bcm-dgx-h100-02
6ipmi0 .................... [   ON    ]  bcm-dgx-h100-03
7ipmi0 .................... [   ON    ]  bcm-dgx-h100-04
8[bcm-head-01->device]%
- 关闭集群节点电源。
必须先关闭集群节点电源,然后才能配置 HA。
1% power -c  dgx-h100 off
2ipmi0 .................... [   OFF   ] bcm-dgx-h100-01
3ipmi0 .................... [   OFF   ] bcm-dgx-h100-02
4ipmi0 .................... [   OFF   ] bcm-dgx-h100-03
5ipmi0 .................... [   OFF   ] bcm-dgx-h100-04
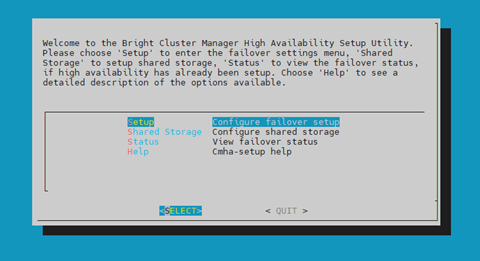
以 root 用户身份在主头节点上启动 cmha-setup CLI 向导。
# cmha-setup选择 Setup,然后选择 SELECT。
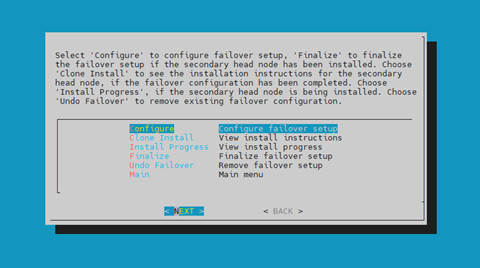
选择 Configure,然后选择 NEXT。
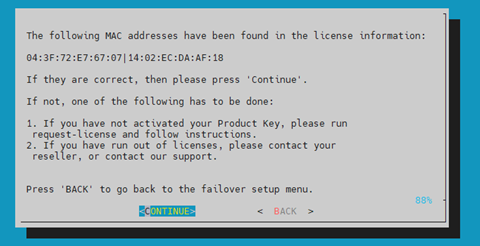
验证在 cmha-setup 中找到的集群许可证信息是否正确,然后选择 CONTINUE。
- 配置一个外部虚拟 IP 地址,该地址将由 HA 配置中的活动主节点使用,然后选择 NEXT。
这将是应始终用于访问活动主节点的 IP。
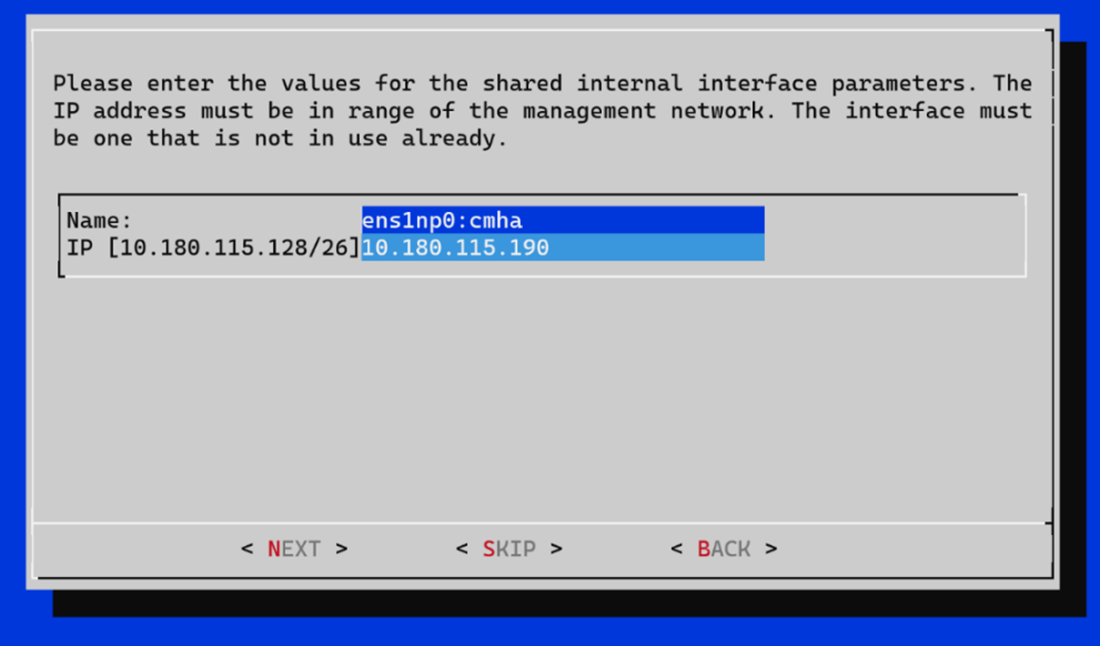
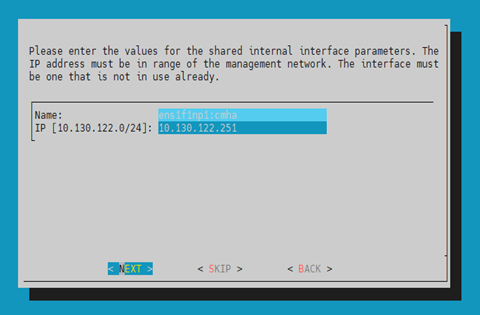
提供一个内部虚拟 IP 地址,该地址将由 HA 配置中的活动主节点使用。
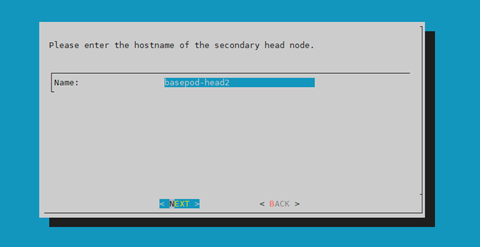
提供辅助主节点的名称,然后选择 NEXT。
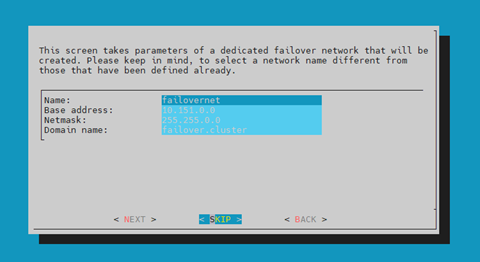
由于 DGX SuperPOD 使用内部网络作为故障转移网络,请选择 SKIP。
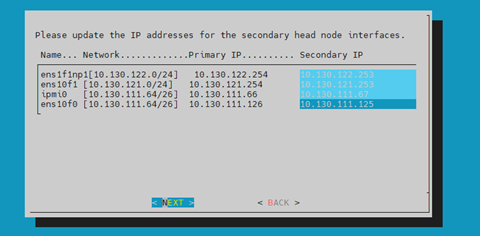
配置向导即将创建的辅助主节点的 IP 地址,然后选择 NEXT。
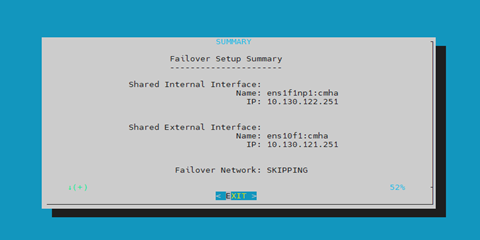
向导显示了它收集的信息摘要。将分别分配给内部和外部接口的 VIP。
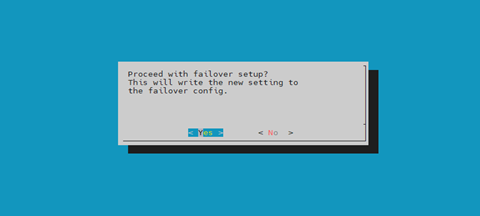
选择 Yes 以继续进行故障转移配置。
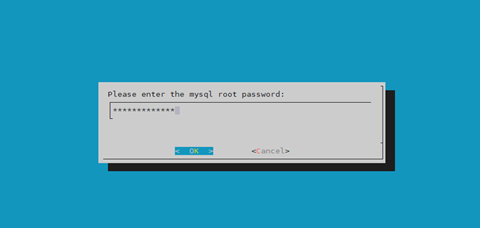
输入 root 密码,然后选择 OK。
向导执行 HA 配置中的第一步。如果所有步骤都显示 OK,请按 ENTER 继续。进度显示在此处。
1Initializing failover setup on master.............. [  OK  ]
2Updating shared internal interface................. [  OK  ]
3Updating shared external interface................. [  OK  ]
4Updating extra shared internal interfaces.......... [  OK  ]
5Cloning head node.................................. [  OK  ]
6Updating secondary master interfaces............... [  OK  ]
7Updating Failover Object........................... [  OK  ]
8Restarting cmdaemon................................ [  OK  ]
9Press any key to continue
当主主节点上的故障转移设置安装完成后,选择 OK 退出向导。
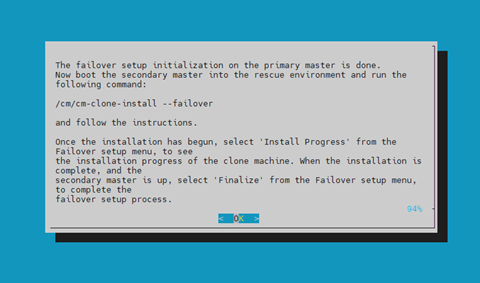
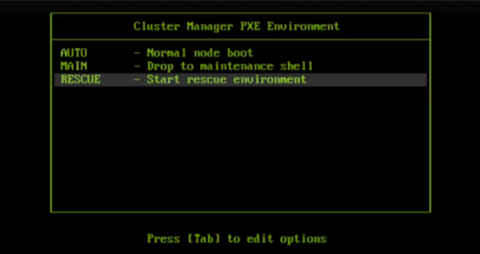
- PXE 启动辅助主节点,然后从 grub 菜单中选择 RESCUE。
因为这是此节点的初始启动,所以必须在 Base Command Manager (BMC 或物理电源按钮) 之外完成。
从 grub 菜单中选择 RESCUE。
- 在辅助主节点启动到救援环境后,运行
/cm/cm-clone-install --failover命令,然后在提示时输入 YES。 将从主节点克隆辅助主节点。
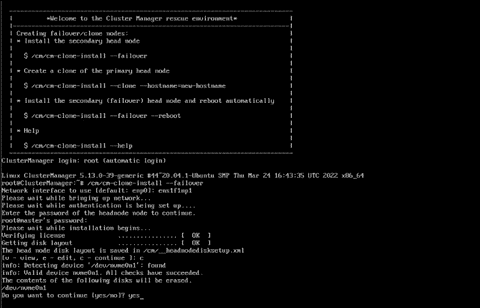
- 在辅助主节点启动到救援环境后,运行
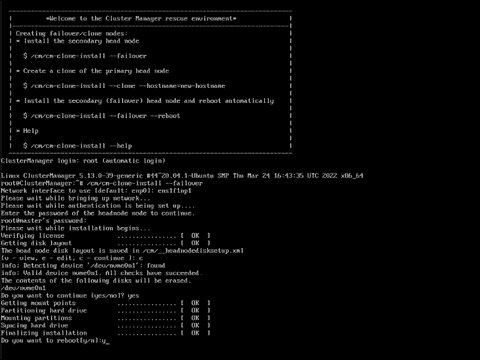
克隆完成后,输入 y 以重新启动辅助主节点。
必须将辅助节点设置为从其硬盘驱动器启动。不应启用 PXE 启动。
等待辅助主节点重新启动,然后在主主节点上继续 HA 设置过程。
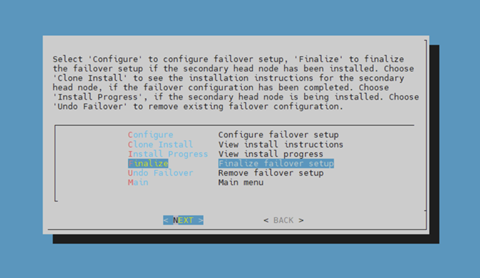
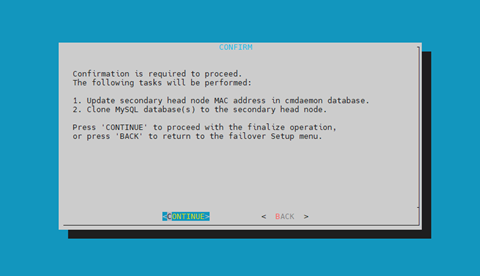
- 从 cmha-setup 菜单中选择 Finalize,然后选择 NEXT。
这将把 MySQL 数据库从主节点克隆到辅助主节点。
在确认屏幕上选择 CONTINUE。
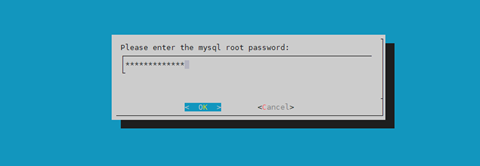
输入 root 密码,然后选择 OK。
cmha-setup 向导继续。出现提示时,按 ENTER 继续。
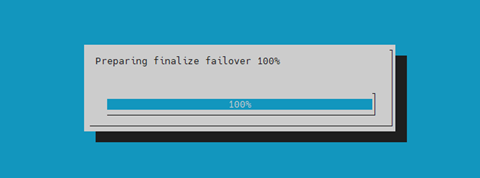
进度显示在此处
 1Updating secondary master mac address.............. [  OK  ]
 2Initializing failover setup on bcm-head-02......... [  OK  ]
 3Stopping cmdaemon.................................. [  OK  ]
 4Cloning cmdaemon database.......................... [  OK  ]
 5Checking database consistency...................... [  OK  ]
 6Starting cmdaemon, chkconfig services.............. [  OK  ]
 7Cloning workload manager databases................. [  OK  ]
 8Cloning additional databases....................... [  OK  ]
 9Update DB permissions.............................. [  OK  ]
10Checking for dedicated failover network............ [  OK  ]
11Press any key to continue
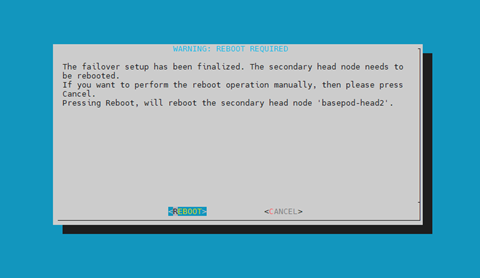
Finalize 步骤现已完成。选择 REBOOT 并等待辅助主节点重新启动。
辅助主节点现在已启动。
1% device list -f hostname:20,category:12,ip:20,status:15
2hostname (key)       category     ip                   status
3-------------------- ---------- -------------------- ---------------
4bcm-head-01                     10.130.122.254       [   UP   ]
5bcm-head-02                     10.130.122.253       [   UP   ]
6bcm-dgx-h100-01      dgx-h100   10.130.122.5         [  DOWN  ]
7bcm-dgx-h100-02      dgx-h100   10.130.122.6         [  DOWN  ]
8bcm-dgx-h100-03      dgx-h100   10.130.122.7         [  DOWN  ]
9bcm-dgx-h100-04      dgx-h100   10.130.122.8         [  DOWN  ]
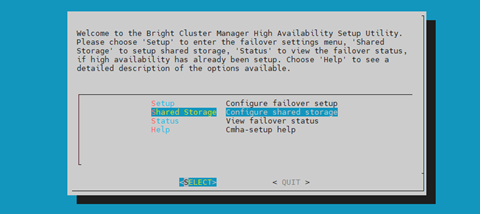
- 从 cmha-setup 菜单中选择 Shared Storage,然后选择 SELECT。
在此最终 HA 配置步骤中,cmha-setup 会将 /cm/shared 和 /home 目录复制到共享存储,并配置主节点和所有集群节点来挂载它。
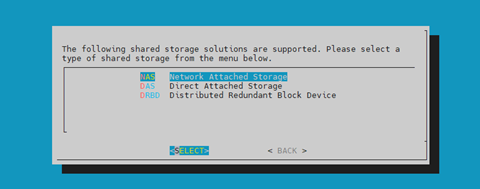
选择 NAS,然后选择 SELECT。
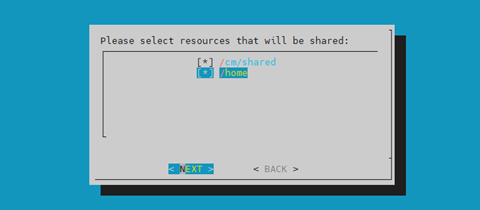
选择 /cm/shared 和 /home,然后选择 NEXT。
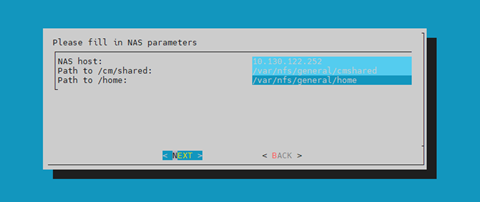
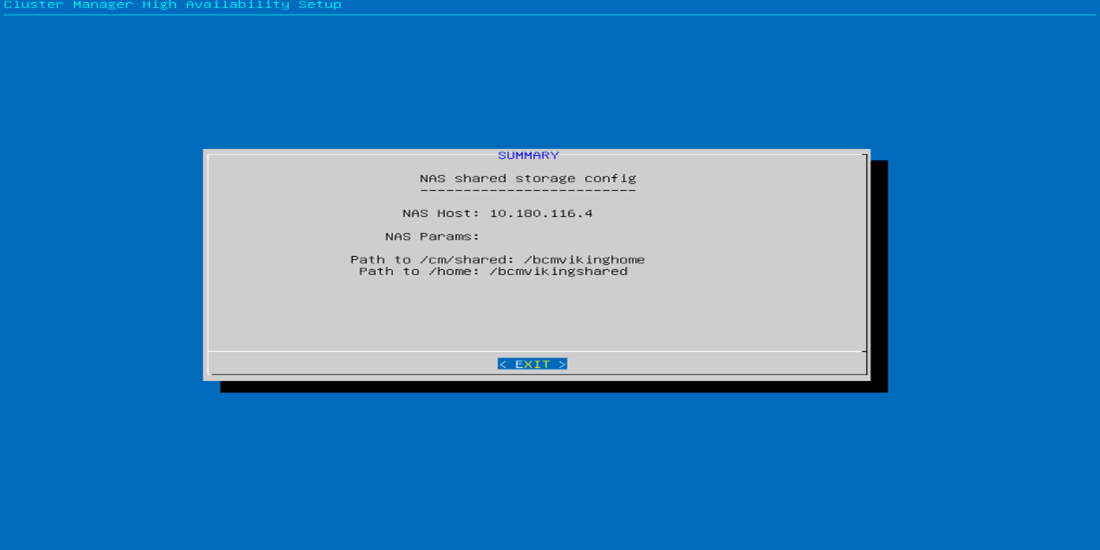
- 提供 NAS 主机的 IP 地址、/cm/shared 和 /home *目录应复制到的共享存储上的路径,然后选择 **NEXT*。
在本例中,/var/nfs/general 已导出,因此 /cm/shared 目录将被复制到 10.130.122.252:/var/nfs/general/cmshared,并且它将被挂载到集群节点上的 /cm/shared 上。
向导显示了它收集的信息摘要。选择 EXIT 继续。
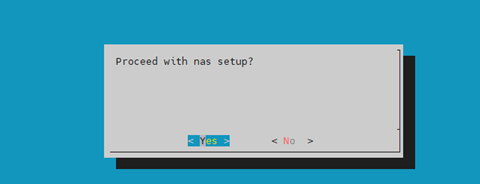
当询问是否继续进行 NAS 设置时,选择 Yes 继续。
这将启动复制并更新到 fsexports。
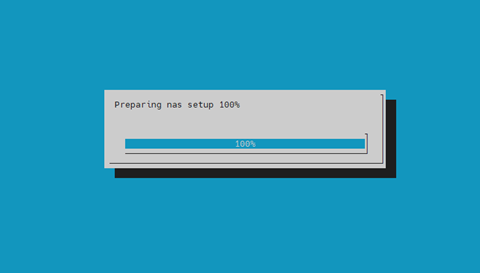
cmha-setup 向导继续工作。
设置完成后,选择 ENTER 完成 HA 设置。
1The progress is shown here:
2Copying NAS data................................... [  OK  ]
3Mount NAS storage.................................. [  OK  ]
4Remove old fsmounts................................ [  OK  ]
5Add new fsmounts................................... [  OK  ]
6Remove old fsexports............................... [  OK  ]
7Write NAS mount/unmount scripts.................... [  OK  ]
8Copy mount/unmount scripts......................... [  OK  ]
9Press any key to continue
cmha-setup 现在已完成。EXIT 向导返回到 shell 提示符。

- 运行
cmsh status命令以验证故障转移配置是否正确且按预期工作。 该命令从两个方向测试配置:从主主节点到辅助节点,以及从辅助节点到主节点。活动主节点用星号表示。
 1# cmha status
 2Node Status: running in active mode
 3
 4bcm-head-01* -> bcm-head-02
 5failoverping  [  OK  ]
 6mysql         [  OK  ]
 7ping          [  OK  ]
 8status        [  OK  ]
 9
10bcm-head-02 -> bcm-head-01*
11failoverping  [  OK  ]
12mysql         [  OK  ]
13ping          [  OK  ]
14status        [  OK  ]
- 运行
验证 /cm/shared 和 /home 目录是否从 NAS 服务器挂载。
1# mount
2. . . some output omitted . . .
310.130.122.252:/var/nfs/general/cmshared on /cm/shared type nfs4 (rw,relatime,vers=4.2,rsize=32768,wsize=32768,namlen=255,hard,proto=tcp,timeo=600,retrans=2,sec=sys,clientaddr=10.130.122.253,local_lock=none,addr=10.130.122.252)
410.130.122.252:/var/nfs/general/home on /home type nfs4 (rw,relatime,vers=4.2,rsize=32768,wsize=32768,namlen=255,hard,proto=tcp,timeo=600,retrans=2,sec=sys,clientaddr=10.130.122.253,local_lock=none,addr=10.130.122.252)
登录到要设为活动状态的主节点,并运行
cmha makeactive。1# ssh bcm-head-02 2# cmha makeactive 3========================================================================= 4This is the passive head node. Please confirm that this node should become 5the active head node. After this operation is complete, the HA status of 6the head nodes will be as follows: 7 8bcm-head-02 will become active head node (current state: passive) 9bcm-head-01 will become passive head node (current state: active) 10========================================================================= 11 12Continue(c)/Exit(e)? c 13 14Initiating failover.............................. [ OK ] 15 16bcm-head-02 is now active head node, makeactive successful
再次运行
cmsh status命令以验证辅助主节点是否已成为活动主节点。1# cmha status 2Node Status: running in active mode 3 4bcm-head-02* -> bcm-head-01 5failoverping [ OK ] 6mysql [ OK ] 7ping [ OK ] 8status [ OK ] 9 10bcm-head-01 -> bcm-head-02* 11failoverping [ OK ] 12mysql [ OK ] 13ping [ OK ] 14status [ OK ]
通过运行
cmha makeactive手动故障转移回主主节点。1# ssh bcm-head-01 2# cmha makeactive 3 4=========================================================================== 5This is the passive head node. Please confirm that this node should become 6the active head node. After this operation is complete, the HA status of 7the head nodes will be as follows: 8 9bcm-head-01 will become active head node (current state: passive) 10bcm-head-02 will become passive head node (current state: active) 11=========================================================================== 12 13Continue(c)/Exit(e)? c 14 15Initiating failover.............................. [ OK ] 16 17bcm-head-01 is now active head node, makeactive successful
再次运行
cmsh status命令以验证主主节点是否已成为活动主节点。1# cmha status 2Node Status: running in active mode 3 4bcm-head-01* -> bcm-head-02 5failoverping [ OK ] 6mysql [ OK ] 7ping [ OK ] 8status [ OK ] 9 10bcm-head-02 -> bcm-head-01* 11failoverping [ OK ] 12mysql [ OK ] 13ping [ OK ] 14status [ OK ]
开启集群节点电源。
1#  cmsh -c "device ; power -c  dgx-h100 on"
2ipmi0 .................... [   ON    ] bcm-dgx-h100-01
3ipmi0 .................... [   ON    ] bcm-dgx-h100-02
4ipmi0 .................... [   ON    ] bcm-dgx-h100-03
5ipmi0 .................... [   ON    ] bcm-dgx-h100-04
HA 的设置和验证到此结束。