NVIDIA GPU 与 Google Anthos#
更新日志#
- 2020 年 3 月 22 日 (作者: PR)
修复了 URL
- 2020 年 11 月 30 日 (作者: PR/DF)
添加了关于 Anthos on bare metal 的信息
- 2020 年 11 月 25 日 (作者: PR)
将文档迁移到新格式
- 2020 年 8 月 14 日 (作者: PR)
初始版本
简介#
Google Cloud 的 Anthos 是一个现代应用程序管理平台,让用户能够在任何地方以安全、一致的方式构建、部署和管理应用程序。该平台在跨部署提供一致的开发和运营体验,同时降低运营开销并提高开发人员的工作效率。Anthos 在混合和多云环境中运行,这些环境跨越 Google Cloud、本地,并且通常在 Amazon Web Services (AWS) 上可用。对 Microsoft Azure 上 Anthos 的支持正在预览中。有关 Anthos 的更多信息,请参阅产品概述。
配备 NVIDIA GPU 的系统可以部署在各种配置中,以与 Google Cloud 的 Anthos 一起使用。本文档的目的是为用户提供关于开始在各种配置中使用 NVIDIA GPU 和 Anthos 的步骤。
部署配置#
Anthos 可以部署在不同的配置中。根据您的部署,选择以下部分之一开始使用 Google Cloud Anthos 中的 NVIDIA GPU
支持的平台#
GPU#
支持以下 GPU
NVIDIA A100、T4 和 V100
DGX 系统#
支持以下 NVIDIA DGX 系统
NVIDIA DGX A100
NVIDIA DGX-2 和 DGX-1 (Volta)
Linux 发行版#
支持以下 Linux 发行版
Ubuntu 18.04.z, 20.04.z LTS
有关 Anthos Ready 平台的更多信息,请访问此页面。
获取支持#
如需获得关于将 GPU 与 Anthos 结合使用的支持问题,请在 NVIDIA GPU Operator GitHub 项目上打开工单。感谢您的反馈。
DGX 客户可以访问 NVIDIA DGX Systems 支持门户。
裸金属 Anthos 集群与 NVIDIA DGX 系统和 GPU 加速服务器#
在裸金属上使用 DGX A100 或 NVIDIA GPU 加速服务器系统的 Anthos 能够在跨部署中实现一致的开发和运营体验,同时减少昂贵的开销并提高开发人员的工作效率。有关 Anthos 集群环境的更多信息,请参阅 Anthos 文档。
安装流程#
本文档中描述的基本步骤遵循以下工作流程
配置节点
确保每个节点(包括控制平面)都满足先决条件,包括时间同步、Docker 的正确版本和其他条件。
配置网络(可选)
确保控制平面和节点之间的网络连接——理想情况下,VIP、控制平面和集群中的节点位于同一网络子网中。
配置管理工作站并设置 Anthos 以创建集群
使用裸金属上的 Anthos 设置集群
在 GPU 节点上设置 NVIDIA 软件
在 GPU 节点上设置 NVIDIA 软件组件,以确保您的集群可以运行 CUDA 应用程序。
在安装流程结束时,您应该拥有一个带有启用 GPU 节点的的用户集群,您可以使用该集群来部署应用程序。
配置节点#
这些步骤是集群中每个节点(包括控制平面)上都需要的。
时间同步#
确保
apparmor已停止$ apt-get install -y apparmor-utils policycoreutils$ systemctl --now enable apparmor \ && systemctl stop apparmor
同步每个节点上的时间
检查当前时间
$ timedatectlLocal time: Fri 2020-11-20 10:38:06 PST Universal time: Fri 2020-11-20 18:38:06 UTC RTC time: Fri 2020-11-20 18:38:08 Time zone: US/Pacific (PST, -0800) System clock synchronized: no NTP service: active RTC in local TZ: no
在
/etc/systemd/timesyncd.conf中配置 NTP 服务器NTP=time.google.com调整系统时钟
$ timedatectl set-local-rtc 0 --adjust-system-clock
重启服务
$ systemctl restart systemd-timesyncd.service验证与时间服务器的同步
$ timedatectlLocal time: Fri 2020-11-20 11:03:22 PST Universal time: Fri 2020-11-20 19:03:22 UTC RTC time: Fri 2020-11-20 19:03:22 Time zone: US/Pacific (PST, -0800) System clock synchronized: yes NTP service: active RTC in local TZ: no
测试网络连接#
确保您可以对hostname 执行
nslookup$ systemctl restart systemd-resolved \ && ping us.archive.ubuntu.com
ping: us.archive.ubuntu.com: Temporary failure in name resolution检查
resolve.conf中的 nameserver$ cat <<EOF > /etc/resolv.conf nameserver 8.8.8.8 EOF
并重新测试
ping$ ping us.archive.ubuntu.com PING us.archive.ubuntu.com (91.189.91.38) 56(84) bytes of data. 64 bytes from banjo.canonical.com (91.189.91.38): icmp_seq=1 ttl=49 time=73.4 ms 64 bytes from banjo.canonical.com (91.189.91.38): icmp_seq=2 ttl=49 time=73.3 ms 64 bytes from banjo.canonical.com (91.189.91.38): icmp_seq=3 ttl=49 time=73.4 ms
安装 Docker#
按照以下步骤安装 Docker。在 DGX 系统上,可能已经使用 docker-ce 包安装了 Docker。在这种情况下,使用 docker.io 作为 Docker 的基本安装包,以确保使用 Anthos 成功设置集群。
停止使用 docker 的服务
$ systemctl stop kubelet \
   && systemctl stop docker \
   && systemctl stop containerd \
   && systemctl stop containerd.io
清除 Docker 和
nvidia-docker2的现有软件包(如果有)$ systemctl stop run-docker-netns-default.mount \ && systemctl stop docker.haproxy
$ dpkg -r nv-docker-options \
   && dpkg --purge nv-docker-options \
   && dpkg -r nvidia-docker2 \
   && dpkg --purge nvidia-docker2 \
   && dpkg -r docker-ce \
   && dpkg --purge docker-ce \
   && dpkg -r docker-ce-cli \
   && dpkg -r containerd \
   && dpkg --purge containerd \
   && dpkg -r containerd.io \
   && dpkg --purge
重新安装 Docker
$ apt-get update \
   && apt-get install -y apt-transport-https \
      ca-certificates \
      curl \
      software-properties-common \
      inetutils-traceroute \
      conntrack
$ curl -fsSL https://download.docker.com/linux/ubuntu/gpg | apt-key add -
$ add-apt-repository \
   "deb [arch=amd64] https://download.docker.com/linux/ubuntu \
   $(lsb_release -cs) stable"
$ apt-get update \
   && apt-get install -y docker.io
$ systemctl --now enable docker
在 GPU 节点上安装 nvidia-docker#
注意
此步骤应仅在 GPU 节点上执行
对于 DGX 系统,从 DGX 存储库重新安装 nvidia-docker2
$ apt-get install -y nvidia-docker2
由于 Kubernetes 尚不支持 Docker 的 --gpus 选项,因此应将 nvidia 运行时设置为 GPU 节点上 Docker 的默认容器运行时。这可以通过将 default-runtime 行添加到 Docker 守护程序配置文件中来完成,该文件通常位于系统上的 /etc/docker/daemon.json
{
   "default-runtime": "nvidia",
   "runtimes": {
        "nvidia": {
            "path": "/usr/bin/nvidia-container-runtime",
            "runtimeArgs": []
      }
   }
}
重启 Docker 守护程序以在设置默认运行时后完成安装
$ sudo systemctl restart docker
对于非 DGX 系统,请参阅 NVIDIA Container Toolkit 安装指南 以设置 nvidia-docker2。
配置网络(可选)#
注意
以下步骤作为参考,用于配置网络,以便控制平面和节点通过使用隧道和 DNAT 位于同一子网中。如果集群中的节点位于同一子网中,则可以跳过此步骤。
在以下示例中
控制平面位于
10.117.29.41GPU 节点或管理工作站位于
10.110.20.149控制平面 VIP 是
10.0.0.8
如果机器彼此或控制平面 VIP 位于不同的子网中,则可以使用隧道路由来建立连接。
有两种情况需要考虑
如果机器位于同一子网中,但 VIP 位于不同的子网中,则从 GPU 节点或管理工作站添加正确的 IP 路由(使用
ip route add 10.0.0.8 via <contro-plane-ip>)如果机器和 VIP 位于不同的子网中,则还需要隧道来启用上述路由命令成功,其中
<control-plane-ip>是控制平面隧道192.168.210.1。
控制平面#
设置隧道
$ ip tunnel add tun0 mode ipip local 10.117.29.41 remote 10.110.20.149
$ ip addr add 192.168.200.1/24 dev tun0
$ ip link set tun0 up
更新 DNAT 以支持通过隧道的控制平面 VIP
$ iptables -t nat -I PREROUTING -p udp -d 192.168.210.1 --dport 6081 -j DNAT --to-destination 10.117.29.41
GPU 节点或管理工作站#
建立与控制平面的连接
$ ip tunnel add tun1 mode ipip local 10.110.20.149 remote 10.117.29.41
$ ip addr add 192.168.210.2/24 dev tun1
$ ip link set tun1 up
$ ip route add 10.0.0.8/32 via 192.168.210.1
设置 DNAT
$ iptables -t nat -I OUTPUT -p udp -d 10.117.29.41 --dport 6081 -j DNAT --to-destination 192.168.210.1
配置管理工作站#
在设置集群之前配置管理工作站。
下载 Google Cloud SDK
$ wget https://dl.google.com/dl/cloudsdk/channels/rapid/downloads/google-cloud-sdk-314.0.0-linux-x86_64.tar.gz \
   && tar -xf google-cloud-sdk-314.0.0-linux-x86_64.tar.gz
$ google-cloud-sdk/install.sh
安装 Anthos 身份验证组件
$ gcloud components install anthos-auth
有关在本地环境中安装 Anthos 和设置集群的详细说明,请参阅 Anthos 安装概述。
在 GPU 节点上设置 NVIDIA 软件#
设置 Anthos 集群后,您可以继续在 GPU 节点上部署 NVIDIA 软件组件。
NVIDIA 驱动程序#
注意
DGX 系统包含 NVIDIA 驱动程序。可以跳过此步骤。
有关设置 NVIDIA 驱动程序的完整说明,请访问快速入门指南 https://docs.nvda.net.cn/datacenter/tesla/tesla-installation-notes/index.html。该指南涵盖了许多预安装要求以及在受支持的 Linux 发行版上成功安装驱动程序的步骤。
NVIDIA 设备插件#
要在 Kubernetes 中使用 GPU,需要 NVIDIA 设备插件。NVIDIA 设备插件是一个守护程序集,可自动枚举集群中每个节点上的 GPU 数量,并允许 Pod 在 GPU 上运行。
部署设备插件的首选方法是使用 helm 作为守护程序集。
添加 nvidia-device-plugin helm 存储库
$ helm repo add nvdp https://nvda.org.cn/k8s-device-plugin \
   && helm repo update
部署设备插件
$ helm install --generate-name nvdp/nvidia-device-plugin
有关部署守护程序集时更多用户可配置选项,请参阅设备插件 README
节点功能发现#
为了检测硬件配置和系统配置,我们将部署 Node Feature Discovery 插件
$ kubectl apply -f https://raw.githubusercontent.com/kubernetes-sigs/node-feature-discovery/v0.6.0/nfd-master.yaml.template
$ kubectl apply -f https://raw.githubusercontent.com/kubernetes-sigs/node-feature-discovery/v0.6.0/nfd-worker-daemonset.yaml.template
有关 NFD 的更多信息,请参阅 NFD 文档。
VMware Anthos 集群与 NVIDIA GPU 加速服务器#
本地运行的 Anthos 对支持的 vSphere 版本以及网络和存储要求都有要求。请参阅 Anthos 版本兼容性矩阵以获取更多信息:https://cloud.google.com/anthos/gke/docs/on-prem/versioning-and-upgrades#version_compatibility_matrix。
本指南假定用户已经在 vSphere 环境中安装了本地 Anthos 集群。有关在本地环境中安装 Anthos 的详细说明,请参阅 https://cloud.google.com/anthos/gke/docs/on-prem/how-to/install-overview-basic。
Kubernetes 提供对特殊硬件资源(如 NVIDIA GPU、网卡、Infiniband 适配器和其他设备)的访问,通过设备插件框架。但是,配置和管理具有这些硬件资源的节点需要配置多个软件组件,如驱动程序、容器运行时或其他库,这些组件既困难又容易出错。NVIDIA GPU Operator 使用 Kubernetes 中的 Operator 框架来自动化管理配置 GPU 所需的所有 NVIDIA 软件组件。
在 VMware vSphere 配置中,Anthos 使用 NVIDIA GPU Operator 在 Kubernetes 集群中配置 GPU 节点,以便这些节点可以用于调度 CUDA 应用程序。GPU Operator 本身是使用 Helm 部署的。本节的其余部分为用户提供了入门步骤。
配置 PCIe 直通#
为了使 VM 可以访问 GPU,您必须首先在 ESXi 主机上启用 PCI 直通。这可以从 vSphere 客户端完成。这将需要重启 ESXi 主机才能完成该过程,因此应将主机置于维护模式,并将 ESXi 主机上运行的任何 VM 迁移到另一台主机。如果您只有一个 ESXi 主机,则 VM 将需要在重启后重新启动。
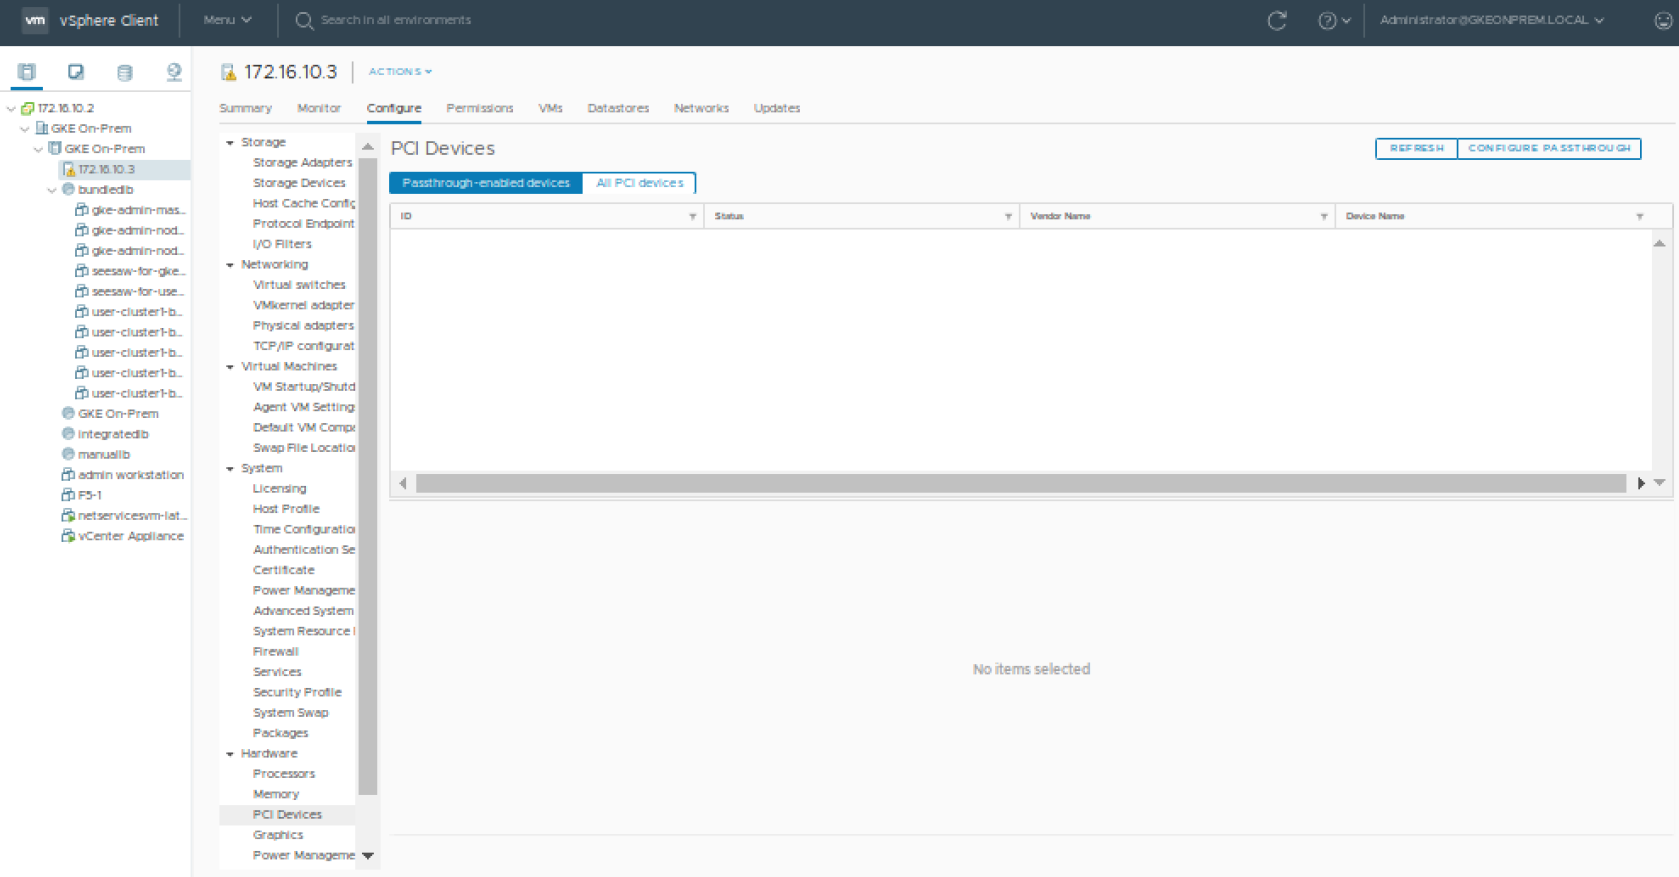
从 vSphere 客户端,从 VMware vSphere Client 的清单中选择一个 ESXi 主机。在“配置”选项卡中,单击“硬件”>“PCI 设备”。这将显示已启用直通的设备(此时您很可能找不到任何设备)。
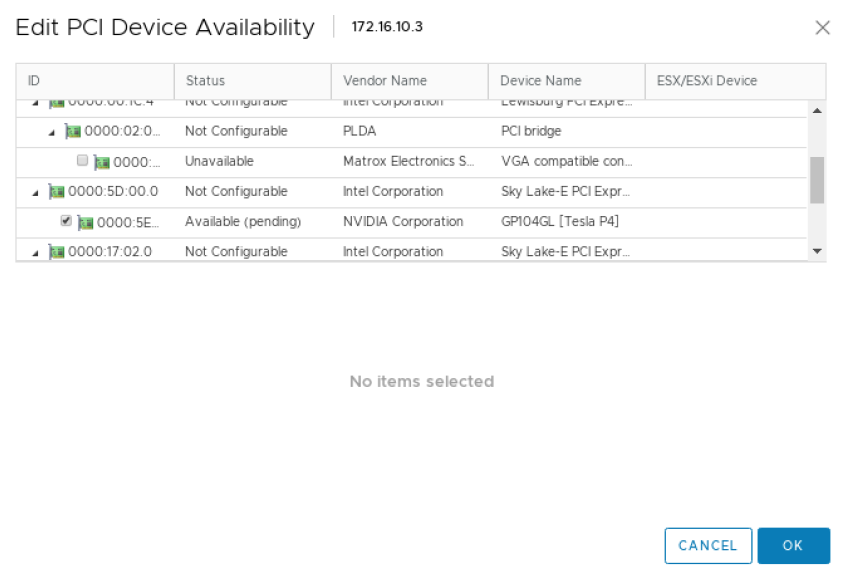
单击“配置直通”以启动“编辑 PCI 设备可用性”窗口。查找 GPU 设备并选中其旁边的复选框(GPU 设备可以识别为在“供应商名称”视图中具有 NVIDIA Corporation)。选择 GPU 设备(您可能有一个以上),然后单击“确定”。
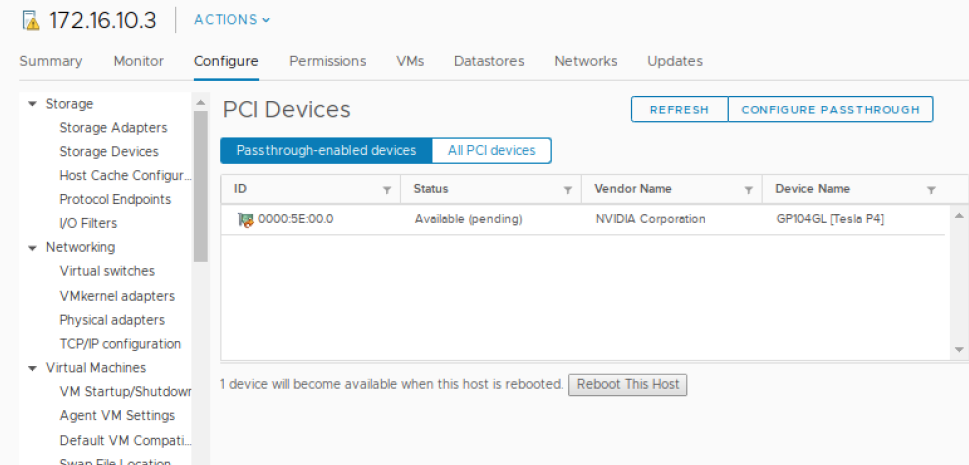
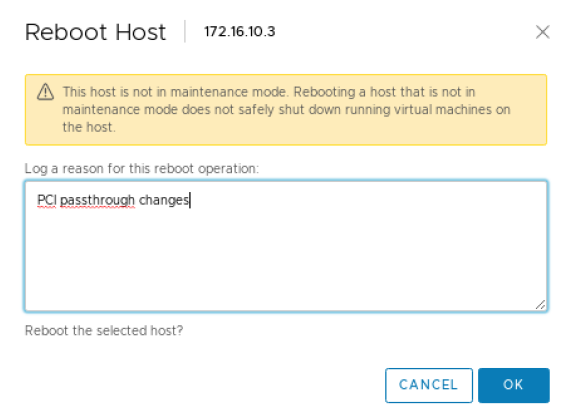
此时,GPU 将显示为“可用(待定)”。您需要选择“重启此主机”并在继续下一步之前完成重启。
VMware 的最佳实践是仅在 ESXi 主机处于维护模式且所有 VM 都已迁移到其他主机后才重启 ESXi 主机。如果您只有一个 ESXi 主机,则可以在不迁移 VM 的情况下重启,尽管首先正常关闭它们始终是一个好主意。
服务器重启后。确保删除维护模式(如果使用过)或重启需要停止的 VM(当仅使用单个 ESXi 主机时)。
向节点添加 GPU#
为 GPU 节点创建节点池#
注意
这是一个可选步骤。
节点池是指定 Kubernetes 工作节点池的好方法,这些节点池可能具有不同或独特的属性。在本例中,我们有机会创建一个节点池,其中包含手动分配了 GPU 的工作节点。有关本地 Anthos 的节点池的更多信息,请参阅 Google GKE 文档中的管理节点池。
首先,编辑管理工作站上的用户集群 config.yaml 文件,并添加一个额外的节点池
- name: user-cluster1-gpu
  cpus: 4
  memoryMB: 8192
  replicas: 1
  labels:
    hardware: gpu
在将节点池添加到配置后,使用 gkectl update 命令推送更改
$ gkectl update cluster --kubeconfig [ADMIN_CLUSTER_KUBECONFIG] \
   --config [USER_CLUSTER_KUBECONFIG]
Reading config with version "v1"
Update summary for cluster user-cluster1-bundledlb:
   Node pool(s) to be created: [user-cluster1-gpu]
Do you want to continue? [Y/n]: Y
Updating cluster "user-cluster1-bundledlb"...
Creating node MachineDeployment(s) in user cluster...  DONE
Done updating the user cluster
在 vSphere 中向节点添加 GPU#
选择一个现有的用户集群节点以添加 GPU(如果您在上一步中创建了节点池,那么您将从该池中选择一个节点)。确保此 VM 位于具有 GPU 的主机上(如果您启用了 vMotion,这可能就像右键单击 VM 并选择迁移一样简单)。
要在虚拟机上配置 PCI 设备,请从 vSphere Client 的清单中,右键单击虚拟机并选择电源 -> 关闭电源。
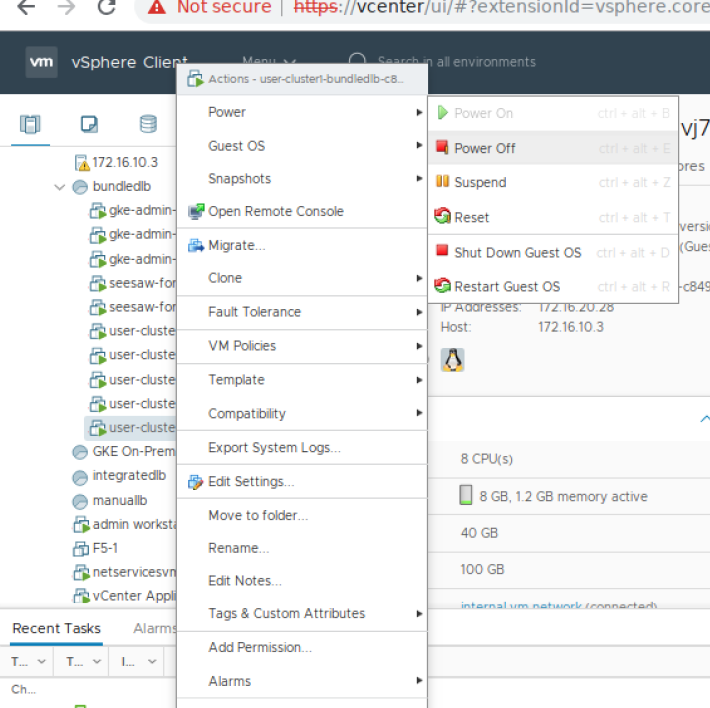
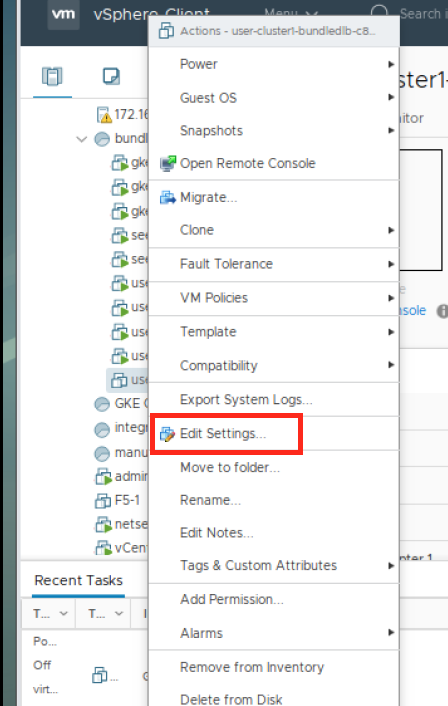
在 VM 关闭电源后,右键单击虚拟机并单击编辑设置。
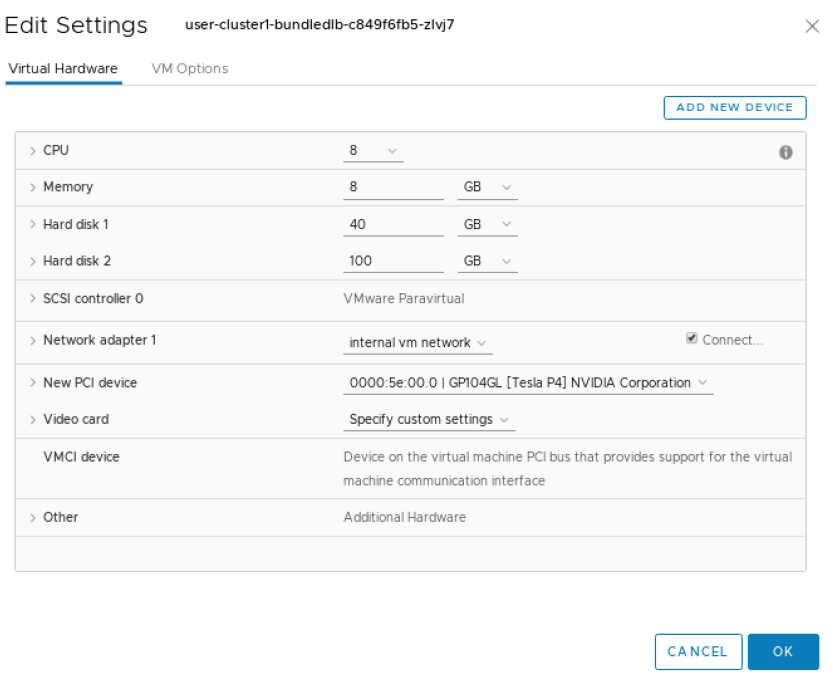
在“编辑设置”窗口中,单击添加新设备。
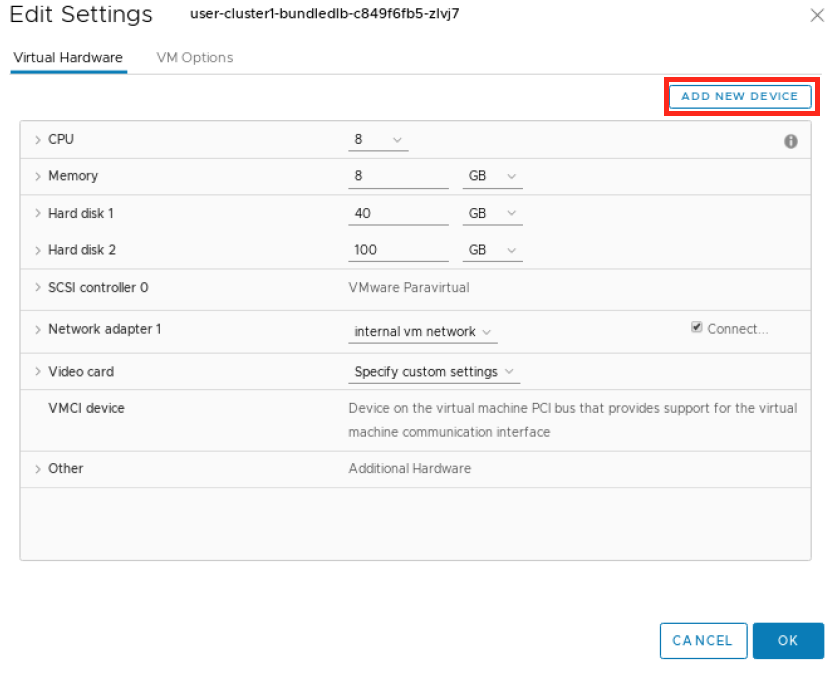
从下拉列表中选择“PCI 设备”。
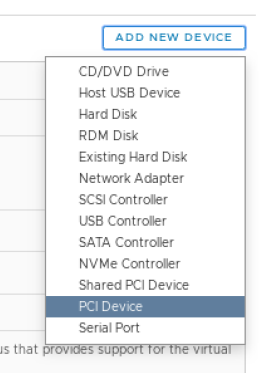
您可能需要选择 GPU,或者如果它是唯一可用的设备,则可能会自动为您选择。如果您没有看到 GPU,则可能是您的 VM 当前不在配置了直通设备的 ESXi 主机上。
展开 内存 部分,并确保选择“预留所有客户机内存(全部锁定)”选项。
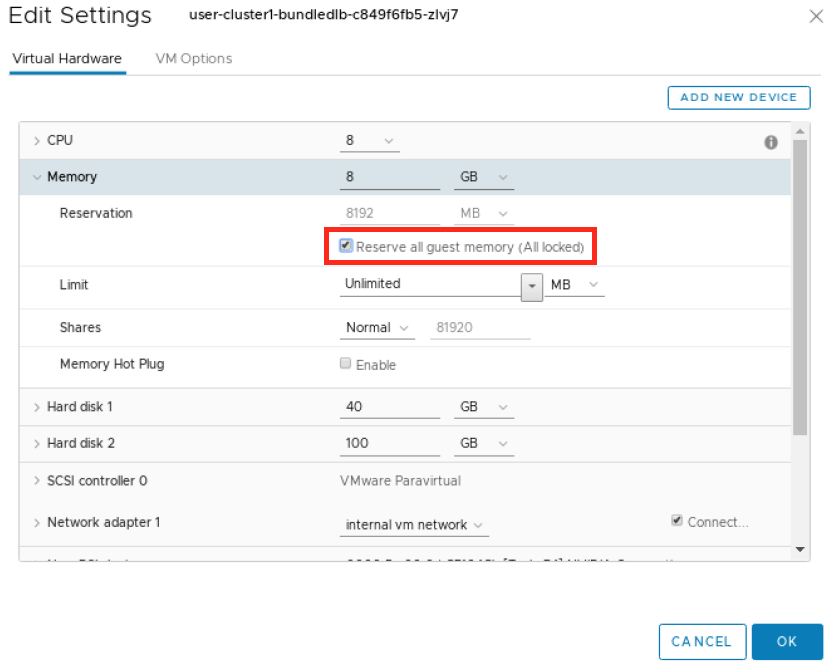
单击确定。
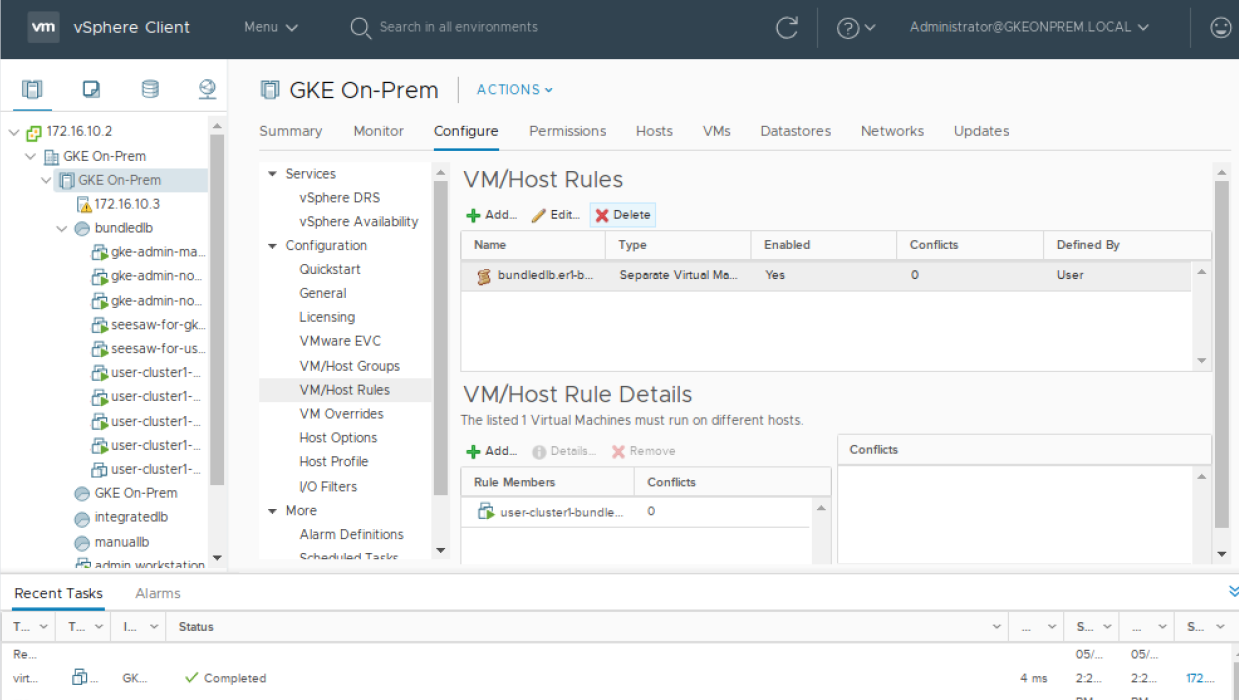
在 VM 可以启动之前,必须删除 VM 反亲和性 VM/主机规则。(请注意,如果集群的 config.yaml 包含 antiAffinityGroups.enabled: False,则此步骤可能不是必需的)。从 vSphere 清单列表中,单击集群,然后单击配置选项卡,然后在配置下选择 VM/主机规则。选择包含您的节点的规则并将其删除。
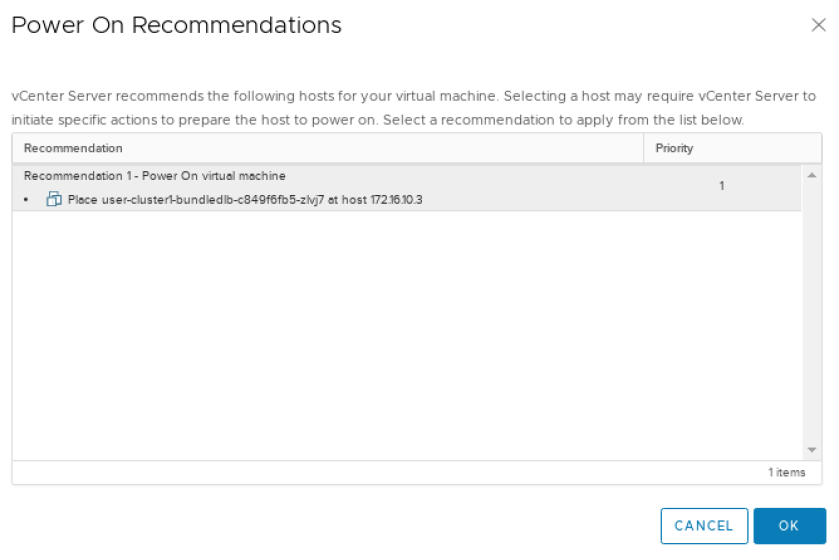
现在您可以打开 VM 电源,右键单击 VM 并选择电源>打开电源。
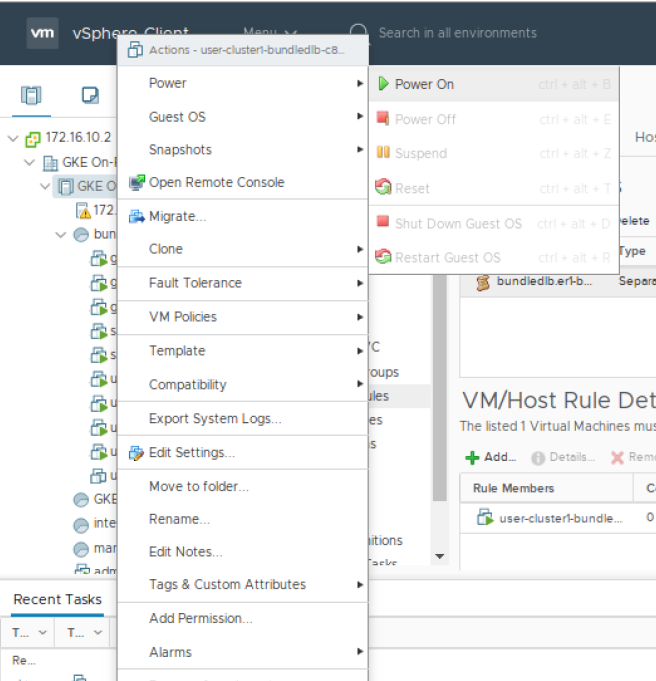
如果 vSphere 向您显示打开电源建议,则选择确定。
以下步骤应从您的管理工作站或其他能够使用 kubectl 与集群交互的 Linux 系统上执行。
安装 NVIDIA GPU Operator
$ helm install --wait --generate-name \
  -n gpu-operator --create-namespace \
  nvidia/gpu-operator
有关安装选项,请参阅 NVIDIA GPU Operator 文档中的 安装 NVIDIA GPU Operator。
运行 GPU 应用程序#
Jupyter Notebooks#
本节指南将引导您了解如何在 Kubernetes 集群上运行示例 Jupyter Notebook。
为 Notebook 创建 Pod 和 Service 的 yaml 文件
$ LOADBALANCERIP=<ip address to be used to expose the service>
$ cat << EOF | kubectl create -f -
apiVersion: v1
kind: Service
metadata:
  name: tf-notebook
  labels:
    app: tf-notebook
spec:
  type: LoadBalancer
  loadBalancerIP: $LOADBALANCERIP
  ports:
  - port: 80
    name: http
    targetPort: 8888
    nodePort: 30001
  selector:
    app: tf-notebook
---
apiVersion: v1
kind: Pod
metadata:
  name: tf-notebook
  labels:
    app: tf-notebook
spec:
  securityContext:
    fsGroup: 0
  containers:
  - name: tf-notebook
    image: tensorflow/tensorflow:latest-gpu-jupyter
    resources:
      limits:
        nvidia.com/gpu: 1
    ports:
    - containerPort: 8888
      name: notebook
EOF
查看 tf-notebook Pod 的日志以获取令牌
$ kubectl logs tf-notebook[I 19:07:43.061 NotebookApp] Writing notebook server cookie secret to /root/.local/share/jupyter/runtime/notebook_cookie_secret [I 19:07:43.423 NotebookApp] Serving notebooks from local directory: /tf [I 19:07:43.423 NotebookApp] The Jupyter Notebook is running at: [I 19:07:43.423 NotebookApp] http://tf-notebook:8888/?token=fc5d8b9d6f29d5ddad62e8c731f83fc8e90a2d817588d772 [I 19:07:43.423 NotebookApp] or http://127.0.0.1:8888/?token=fc5d8b9d6f29d5ddad62e8c731f83fc8e90a2d817588d772 [I 19:07:43.423 NotebookApp] Use Control-C to stop this server and shut down all kernels (twice to skip confirmation). [C 19:07:43.429 NotebookApp] To access the notebook, open this file in a browser: file:///root/.local/share/jupyter/runtime/nbserver-1-open.html Or copy and paste one of these URLs: http://tf-notebook:8888/?token=fc5d8b9d6f29d5ddad62e8c731f83fc8e90a2d817588d772 or http://127.0.0.1:8888/?token=fc5d8b9d6f29d5ddad62e8c731f83fc8e90a2d817588d772 [I 19:08:24.180 NotebookApp] 302 GET / (172.16.20.30) 0.61ms [I 19:08:24.182 NotebookApp] 302 GET /tree? (172.16.20.30) 0.57ms
从 Web 浏览器,导航到
http://<LOADBALANCERIP>并输入令牌以提示登录:根据您的环境,您可能无法通过 Web 浏览器访问公开的服务。您可以使用 SSH 端口转发/隧道 来实现此目的。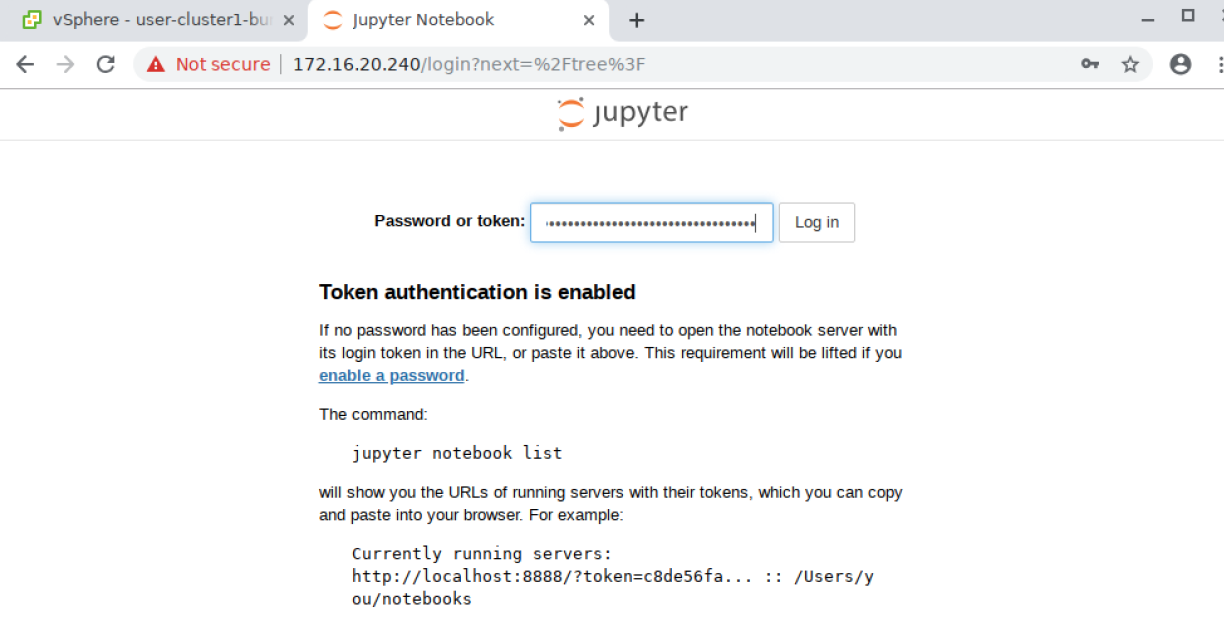
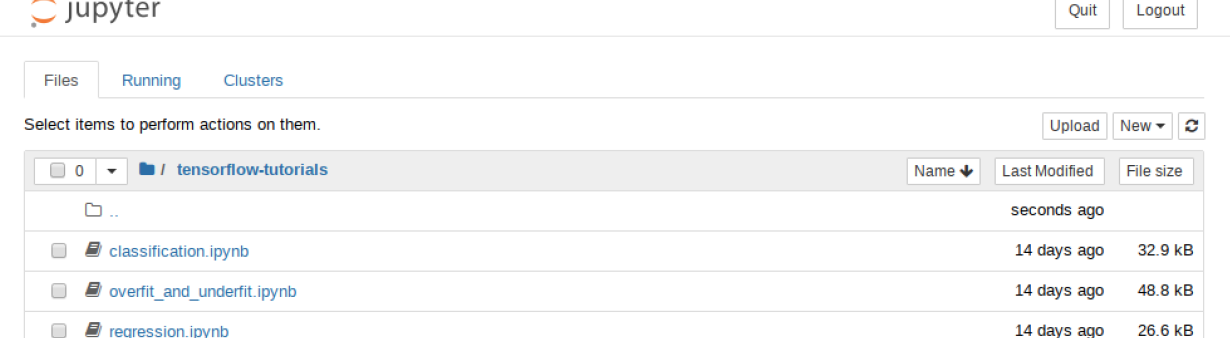
登录后,导航单击 tenserflow-tutorials 文件夹,然后单击第一个文件,classification.ipynb
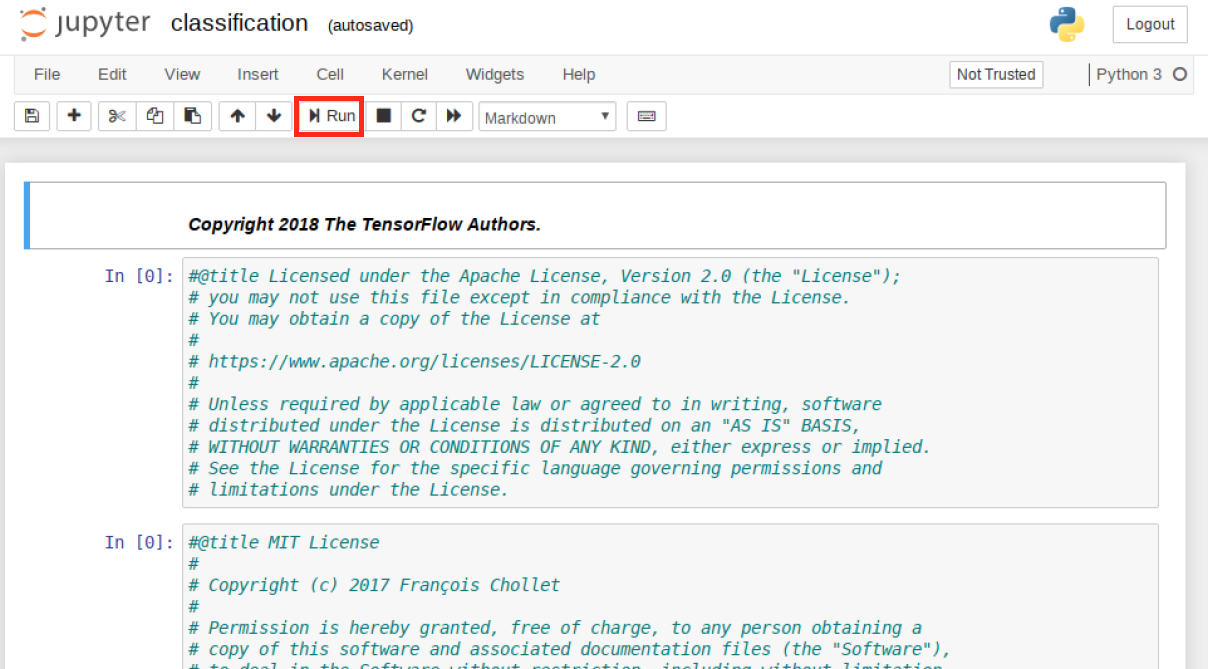
这将启动一个新选项卡,其中加载了 Notebook。您现在可以通过单击运行按钮来运行 Notebook。Notebook 将逐步执行每个部分,并在您进行时执行代码。继续按运行,直到到达 Notebook 的末尾,并观察分类程序的执行。
Notebook 完成后,您可以检查
tf-notebookPod 的日志以确认它正在使用 GPU=========snip=============== [I 19:17:58.116 NotebookApp] Saving file at /tensorflow-tutorials/classification.ipynb 2020-05-21 19:21:01.422482: I tensorflow/stream_executor/platform/default/dso_loader.cc:44] Successfully opened dynamic library libcuda.so.1 2020-05-21 19:21:01.436767: I tensorflow/stream_executor/cuda/cuda_gpu_executor.cc:981] successful NUMA node read from SysFS had negative value (-1), but there must be at least one NUMA node, so returning NUMA node zero 2020-05-21 19:21:01.437469: I tensorflow/core/common_runtime/gpu/gpu_device.cc:1561] Found device 0 with properties: pciBusID: 0000:13:00.0 name: Tesla P4 computeCapability: 6.1 coreClock: 1.1135GHz coreCount: 20 deviceMemorySize: 7.43GiB deviceMemoryBandwidth: 178.99GiB/s 2020-05-21 19:21:01.438477: I tensorflow/stream_executor/platform/default/dso_loader.cc:44] Successfully opened dynamic library libcudart.so.10.1 2020-05-21 19:21:01.462370: I tensorflow/stream_executor/platform/default/dso_loader.cc:44] Successfully opened dynamic library libcublas.so.10 2020-05-21 19:21:01.475269: I tensorflow/stream_executor/platform/default/dso_loader.cc:44] Successfully opened dynamic library libcufft.so.10 2020-05-21 19:21:01.478104: I tensorflow/stream_executor/platform/default/dso_loader.cc:44] Successfully opened dynamic library libcurand.so.10 2020-05-21 19:21:01.501057: I tensorflow/stream_executor/platform/default/dso_loader.cc:44] Successfully opened dynamic library libcusolver.so.10 2020-05-21 19:21:01.503901: I tensorflow/stream_executor/platform/default/dso_loader.cc:44] Successfully opened dynamic library libcusparse.so.10 2020-05-21 19:21:01.544763: I tensorflow/stream_executor/platform/default/dso_loader.cc:44] Successfully opened dynamic library libcudnn.so.7 2020-05-21 19:21:01.545022: I tensorflow/stream_executor/cuda/cuda_gpu_executor.cc:981] successful NUMA node read from SysFS had negative value (-1), but there must be at least one NUMA node, so returning NUMA node zero 2020-05-21 19:21:01.545746: I tensorflow/stream_executor/cuda/cuda_gpu_executor.cc:981] successful NUMA node read from SysFS had negative value (-1), but there must be at least one NUMA node, so returning NUMA node zero 2020-05-21 19:21:01.546356: I tensorflow/core/common_runtime/gpu/gpu_device.cc:1703] Adding visible gpu devices: 0 2020-05-21 19:21:01.546705: I tensorflow/core/platform/cpu_feature_guard.cc:143] Your CPU supports instructions that this TensorFlow binary was not compiled to use: AVX2 AVX512F FMA 2020-05-21 19:21:01.558283: I tensorflow/core/platform/profile_utils/cpu_utils.cc:102] CPU Frequency: 2194840000 Hz 2020-05-21 19:21:01.558919: I tensorflow/compiler/xla/service/service.cc:168] XLA service 0x7f6f2c000b20 initialized for platform Host (this does not guarantee that XLA will be used). Devices: 2020-05-21 19:21:01.558982: I tensorflow/compiler/xla/service/service.cc:176] StreamExecutor device (0): Host, Default Version 2020-05-21 19:21:01.645786: I tensorflow/stream_executor/cuda/cuda_gpu_executor.cc:981] successful NUMA node read from SysFS had negative value (-1), but there must be at least one NUMA node, so returning NUMA node zero 2020-05-21 19:21:01.646387: I tensorflow/compiler/xla/service/service.cc:168] XLA service 0x53ab350 initialized for platform CUDA (this does not guarantee that XLA will be used). Devices: 2020-05-21 19:21:01.646430: I tensorflow/compiler/xla/service/service.cc:176] StreamExecutor device (0): Tesla P4, Compute Capability 6.1 2020-05-21 19:21:01.647005: I tensorflow/stream_executor/cuda/cuda_gpu_executor.cc:981] successful NUMA node read from SysFS had negative value (-1), but there must be at least one NUMA node, so returning NUMA node zero 2020-05-21 19:21:01.647444: I tensorflow/core/common_runtime/gpu/gpu_device.cc:1561] Found device 0 with properties: pciBusID: 0000:13:00.0 name: Tesla P4 computeCapability: 6.1 coreClock: 1.1135GHz coreCount: 20 deviceMemorySize: 7.43GiB deviceMemoryBandwidth: 178.99GiB/s 2020-05-21 19:21:01.647523: I tensorflow/stream_executor/platform/default/dso_loader.cc:44] Successfully opened dynamic library libcudart.so.10.1 2020-05-21 19:21:01.647570: I tensorflow/stream_executor/platform/default/dso_loader.cc:44] Successfully opened dynamic library libcublas.so.10 2020-05-21 19:21:01.647611: I tensorflow/stream_executor/platform/default/dso_loader.cc:44] Successfully opened dynamic library libcufft.so.10 2020-05-21 19:21:01.647647: I tensorflow/stream_executor/platform/default/dso_loader.cc:44] Successfully opened dynamic library libcurand.so.10 2020-05-21 19:21:01.647683: I tensorflow/stream_executor/platform/default/dso_loader.cc:44] Successfully opened dynamic library libcusolver.so.10 2020-05-21 19:21:01.647722: I tensorflow/stream_executor/platform/default/dso_loader.cc:44] Successfully opened dynamic library libcusparse.so.10 2020-05-21 19:21:01.647758: I tensorflow/stream_executor/platform/default/dso_loader.cc:44] Successfully opened dynamic library libcudnn.so.7 2020-05-21 19:21:01.647847: I tensorflow/stream_executor/cuda/cuda_gpu_executor.cc:981] successful NUMA node read from SysFS had negative value (-1), but there must be at least one NUMA node, so returning NUMA node zero 2020-05-21 19:21:01.648311: I tensorflow/stream_executor/cuda/cuda_gpu_executor.cc:981] successful NUMA node read from SysFS had negative value (-1), but there must be at least one NUMA node, so returning NUMA node zero 2020-05-21 19:21:01.648720: I tensorflow/core/common_runtime/gpu/gpu_device.cc:1703] Adding visible gpu devices: 0 2020-05-21 19:21:01.649158: I tensorflow/stream_executor/platform/default/dso_loader.cc:44] Successfully opened dynamic library libcudart.so.10.1 2020-05-21 19:21:01.650302: I tensorflow/core/common_runtime/gpu/gpu_device.cc:1102] Device interconnect StreamExecutor with strength 1 edge matrix: 2020-05-21 19:21:01.650362: I tensorflow/core/common_runtime/gpu/gpu_device.cc:1108] 0 2020-05-21 19:21:01.650392: I tensorflow/core/common_runtime/gpu/gpu_device.cc:1121] 0: N 2020-05-21 19:21:01.650860: I tensorflow/stream_executor/cuda/cuda_gpu_executor.cc:981] successful NUMA node read from SysFS had negative value (-1), but there must be at least one NUMA node, so returning NUMA node zero 2020-05-21 19:21:01.651341: I tensorflow/stream_executor/cuda/cuda_gpu_executor.cc:981] successful NUMA node read from SysFS had negative value (-1), but there must be at least one NUMA node, so returning NUMA node zero 2020-05-21 19:21:01.651773: I tensorflow/core/common_runtime/gpu/gpu_device.cc:1247] Created TensorFlow device (/job:localhost/replica:0/task:0/device:GPU:0 with 7048 MB memory) -> physical GPU (device: 0, name: Tesla P4, pci bus id: 0000:13:00.0, compute capability: 6.1) 2020-05-21 19:21:03.601093: I tensorflow/stream_executor/platform/default/dso_loader.cc:44] Successfully opened dynamic library libcublas.so.10 [I 19:21:58.132 NotebookApp] Saving file at /tensorflow-tutorials/classification.ipynb
卸载和清理#
您可以使用以下命令删除 tf-notebook 和 Service
$ kubectl delete pod tf-notebook
$ kubectl delete svc tf-notebook
您可以使用以下命令删除 GPU Operator
$ helm uninstall $(helm list | grep gpu-operator | awk '{print $1}')
release "gpu-operator-1590086955" uninstalled
您现在可以停止 VM,删除 PCI 设备,删除内存预留,然后重启 VM。
您无需从主机中删除 PCI 直通设备。
已知问题#
本节概述了将 Google Cloud 的 Anthos 与 NVIDIA GPU 结合使用的一些已知问题。
将 GPU 连接到本地 Anthos 工作节点需要手动从 vSphere 编辑 VM。这些更改在本地 Anthos 升级过程中不会保留。当带有 GPU 的节点作为更新过程的一部分被删除时,替换它的新 VM 将不会添加 GPU。必须再次手动将 GPU 添加回新 VM。虽然 NVIDIA GPU 似乎能够优雅地处理该事件,但 GPU 支持的工作负载可能需要再次手动启动。
将 VM 连接到 GPU 意味着 VM 将无法再迁移到另一台 ESXi 主机。VM 本质上将被固定到托管 GPU 的 ESXi 主机。vMotion 和 VMware HA 功能无法使用。
使用 PCI 直通设备的 VM 要求锁定其所有内存分配。这将在 VM 上导致虚拟机内存使用率警报,可以安全地忽略该警报。
