入门#
先决条件#
设置#
NVIDIA AI Enterprise 许可证:NVIDIA NIM for VLMs 在 NVIDIA AI Enterprise (NVAIE) 许可证下提供用于自助托管。
NVIDIA GPU:NVIDIA NIM for VLMs (NIM for VLMs) 可在任何具有足够 GPU 内存的 NVIDIA GPU 上运行,但某些模型/GPU 组合经过优化。启用张量并行的同构多 GPU 系统也受支持。有关更多信息,请参阅支持矩阵。
CPU:此版本仅支持 x86_64 架构
操作系统:任何 Linux 发行版,需满足以下条件
具有
glibc>= 2.35(请参阅ld -v的输出)
CUDA 驱动程序:请遵循安装指南。
主要版本 |
EOL |
数据中心和 RTX/Quadro GPU |
GeForce GPU |
|---|---|---|---|
> 550 |
待定 |
X |
X |
550 |
2025 年 2 月 |
X |
X |
545 |
2023 年 10 月 |
X |
X |
535 |
2026 年 6 月 |
X |
|
525 |
2023 年 11 月 |
X |
|
470 |
2024 年 9 月 |
X |
安装 Docker。
安装工具包后,请按照 NVIDIA Container Toolkit 文档中配置 Docker 部分中的说明进行操作。
为确保您的设置正确,请运行以下命令
docker run --rm --runtime=nvidia --gpus all ubuntu nvidia-smi
此命令应生成类似于以下内容的输出,使您可以确认 CUDA 驱动程序版本和可用的 GPU。
+-----------------------------------------------------------------------------------------+
| NVIDIA-SMI 550.54.14              Driver Version: 550.54.14      CUDA Version: 12.4     |
|-----------------------------------------+------------------------+----------------------+
| GPU  Name                 Persistence-M | Bus-Id          Disp.A | Volatile Uncorr. ECC |
| Fan  Temp   Perf          Pwr:Usage/Cap |           Memory-Usage | GPU-Util  Compute M. |
|                                         |                        |               MIG M. |
|=========================================+========================+======================|
|   0  NVIDIA H100 80GB HBM3          On  |   00000000:1B:00.0 Off |                    0 |
| N/A   36C    P0            112W /  700W |   78489MiB /  81559MiB |      0%      Default |
|                                         |                        |             Disabled |
+-----------------------------------------+------------------------+----------------------+

+-----------------------------------------------------------------------------------------+
| Processes:                                                                              |
|  GPU   GI   CI        PID   Type   Process name                              GPU Memory |
|        ID   ID                                                               Usage      |
|=========================================================================================|
|  No running processes found                                                             |
+-----------------------------------------------------------------------------------------+
为 Windows 安装 WSL2#
某些可下载的 NIM 可在具有 Windows System for Linux (WSL) 的 RTX Windows 系统上使用。要启用 WSL2,请执行以下步骤。
请确保您的计算机可以运行 WSL2,如 WSL2 文档的先决条件部分所述。
按照 安装 WSL 命令中的步骤在您的 Windows 计算机上启用 WSL2。默认情况下,这些步骤安装 Ubuntu Linux 发行版。有关其他安装,请参阅更改安装的默认 Linux 发行版。
启动 NVIDIA NIM for VLMs#
您可以从 API 目录或 NGC 下载并运行您选择的 NIM。
从 NGC#
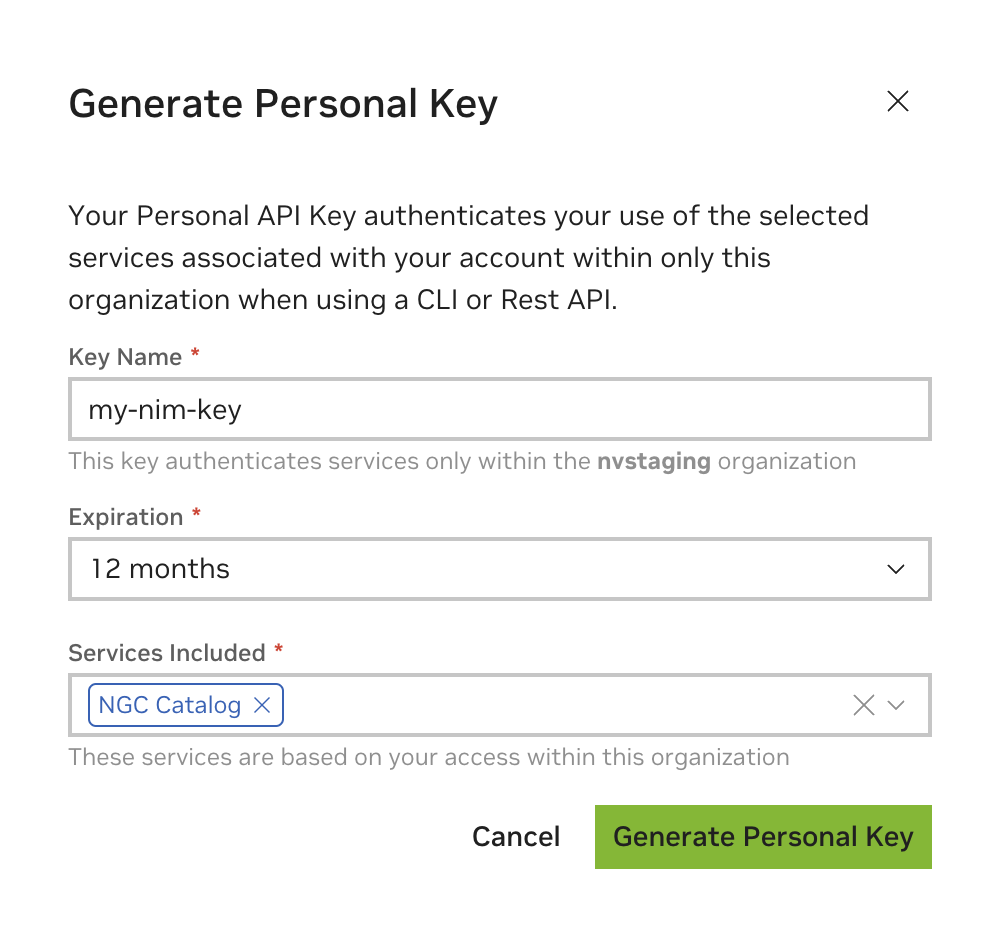
生成 API 密钥#
访问 NGC 资源需要 NGC API 密钥。密钥可以在此处生成:https://org.ngc.nvidia.com/setup/personal-keys。
创建 NGC API 密钥时,请确保从包含的服务下拉列表中选择至少 NGC Catalog。如果要将此密钥重用于其他目的,则可以包含更多服务。
导出 API 密钥#
将 API 密钥的值作为 NGC_API_KEY 环境变量传递到下一节中的 docker run 命令,以便在启动 NIM 时下载适当的模型和资源。
如果您不熟悉如何创建 NGC_API_KEY 环境变量,最简单的方法是在终端中导出它
export NGC_API_KEY=<value>
运行以下命令之一,使密钥在启动时可用
# If using bash
echo "export NGC_API_KEY=<value>" >> ~/.bashrc

# If using zsh
echo "export NGC_API_KEY=<value>" >> ~/.zshrc
其他更安全的选项包括将值保存在文件中(您可以使用 cat $NGC_API_KEY_FILE 检索),或使用密码管理器。
Docker 登录到 NGC#
要从 NGC 拉取 NIM 容器镜像,请首先使用以下命令向 NVIDIA Container Registry 进行身份验证
echo "$NGC_API_KEY" | docker login nvcr.io --username '$oauthtoken' --password-stdin
使用 $oauthtoken 作为用户名,NGC_API_KEY 作为密码。$oauthtoken 用户名是一个特殊名称,表示您将使用 API 密钥而不是用户名和密码进行身份验证。
列出可用的 NIM#
本文档在多个示例中使用了 NGC CLI 工具。有关下载和配置该工具的信息,请参阅NGC CLI 文档。
使用以下命令以 CSV 格式列出可用的 NIM。
ngc registry image list --format_type csv 'nvcr.io/nim/meta/*vision**'
此命令应生成以下格式的输出
Name,Repository,Latest Tag,Image Size,Updated Date,Permission,Signed Tag?,Access Type,Associated Products
<name1>,<repository1>,<latest tag1>,<image size1>,<updated date1>,<permission1>,<signed tag?1>,<access type1>,<associated products1>
...
<nameN>,<repositoryN>,<latest tagN>,<image sizeN>,<updated dateN>,<permissionN>,<signed tag?N>,<access typeN>,<associated productsN>

Use the **Repository** and **Latest Tag** fields when you call the ``docker run`` command, as shown in the following section.
启动 NIM#
以下命令启动 meta/llama-3.2-11b-vision-instruct 模型的 Docker 容器。要为不同的 NIM 启动容器,请将 Repository 和 Latest_Tag 的值替换为先前 image list 命令的值,并将 CONTAINER_NAME 的值更改为适当的名称。
# Choose a container name for bookkeeping
export CONTAINER_NAME=meta-llama-3-2-11b-vision-instruct

# The container name from the previous ngc registry image list command
Repository=llama-3.2-11b-vision-instruct
Latest_Tag=1.1.0

# Choose a VLM NIM Image from NGC
export IMG_NAME="nvcr.io/nim/meta/${Repository}:${Latest_Tag}"

# Choose a path on your system to cache the downloaded models
export LOCAL_NIM_CACHE=~/.cache/nim
mkdir -p "$LOCAL_NIM_CACHE"

# Start the VLM NIM
docker run -it --rm --name=$CONTAINER_NAME \
  --runtime=nvidia \
  --gpus all \
  --shm-size=16GB \
  -e NGC_API_KEY=$NGC_API_KEY \
  -v "$LOCAL_NIM_CACHE:/opt/nim/.cache" \
  -u $(id -u) \
  -p 8000:8000 \
  $IMG_NAME
Docker Run 参数#
标志 |
描述 |
|---|---|
|
|
|
容器停止后删除容器(请参阅 Docker 文档) |
|
为 NIM 容器命名以进行簿记(此处为 |
|
确保 NVIDIA 驱动程序在容器中可访问。 |
|
在容器内公开所有 NVIDIA GPU。有关挂载特定 GPU 的信息,请参阅配置页面。 |
|
为多 GPU 通信分配主机内存。对于单 GPU 模型或启用 NVLink 的 GPU,则不需要。 |
|
为容器提供从 NGC 下载足够模型和资源所需的令牌。请参阅导出 API 密钥。 |
|
从您的系统(此处为 |
|
在 NIM 容器内使用与您的系统用户相同的用户,以避免在本地缓存目录中下载模型时出现权限不匹配。 |
|
转发 NIM 服务器在容器内发布的端口,以便从主机系统访问。冒号 ( |
|
来自 NGC 的 VLM NIM 容器的名称和版本。如果在此之后未提供任何参数,VLM NIM 服务器将自动启动。 |
注意
有关其他配置设置的信息,请参阅配置 NIM 主题。
注意
如果您在本地缓存目录中下载模型时遇到权限不匹配问题,请将 -u $(id -u) 选项添加到 docker run 调用中。
注意
NIM 会根据您的系统规格自动选择最合适的配置文件。有关详细信息,请参阅自动配置文件选择
运行推理#
在启动期间,NIM 容器下载所需的资源,并在 API 端点后提供模型。以下消息指示启动成功。
INFO: Application startup complete.
INFO: Uvicorn running on http://0.0.0.0:8000 (Press CTRL+C to quit)
看到此消息后,您可以执行推理请求来验证 NIM 的部署。在新终端中,运行以下命令以显示可用于推理的模型列表
curl -X GET 'http://0.0.0.0:8000/v1/models'
提示
将 curl 命令的结果通过管道传输到 jq 或 python -m json.tool 等工具,以使 API 的输出更易于阅读。例如:curl -s http://0.0.0.0:8000/v1/models | jq。
此命令应生成类似于以下内容的输出
{
  "object": "list",
  "data": [
    {
      "id": "meta/llama-3.2-11b-vision-instruct",
      "object": "model",
      "created": 1724796510,
      "owned_by": "system",
      "root": "meta/llama-3.2-11b-vision-instruct",
      "parent": null,
      "max_model_len": 131072,
      "permission": [
        {
          "id": "modelperm-c2e069f426cc43088eb408f388578289",
          "object": "model_permission",
          "created": 1724796510,
          "allow_create_engine": false,
          "allow_sampling": true,
          "allow_logprobs": true,
          "allow_search_indices": false,
          "allow_view": true,
          "allow_fine_tuning": false,
          "organization": "*",
          "group": null,
          "is_blocking": false
        }
      ]
    }
  ]
}
要检查服务的就绪状态
curl -X GET 'http://0.0.0.0:8000/v1/health/ready'
,如果服务器已准备好接受请求,则将响应 200。
OpenAI 聊天完成请求#
聊天完成端点通常与 chat 或 instruct 调优的模型一起使用,这些模型专为对话方式而设计。使用此端点,提示以带有角色和内容的消息形式发送,从而提供了一种自然的方式来跟踪多轮对话。要流式传输结果,请设置 "stream": true。
重要提示
根据您正在运行的模型更新模型名称。
例如,对于 meta/llama-3.2-11b-vision-instruct 模型,您可以提供图像的 URL 并从命令行查询 NIM 服务器
curl -X 'POST' \
'http://0.0.0.0:8000/v1/chat/completions' \
    -H 'Accept: application/json' \
    -H 'Content-Type: application/json' \
    -d '{
        "model": "meta/llama-3.2-11b-vision-instruct",
        "messages": [
            {
                "role": "user",
                "content": [
                    {
                        "type": "text",
                        "text": "What is in this image?"
                    },
                    {
                        "type": "image_url",
                        "image_url":
                            {
                                "url": "https://upload.wikimedia.org/wikipedia/commons/thumb/d/dd/Gfp-wisconsin-madison-the-nature-boardwalk.jpg/2560px-Gfp-wisconsin-madison-the-nature-boardwalk.jpg"
                            }
                    }
                ]
            }
        ],
        "max_tokens": 256
    }'
或者,您可以使用 OpenAI Python SDK 库
pip install -U openai
运行客户端并查询聊天完成 API
from openai import OpenAI
client = OpenAI(base_url="http://0.0.0.0:8000/v1", api_key="not-used")
messages = [
    {
        "role": "user",
        "content": [
            {
                "type": "text",
                "text": "What is in this image?"
            },
            {
                "type": "image_url",
                "image_url": {
                    "url": "https://upload.wikimedia.org/wikipedia/commons/thumb/d/dd/Gfp-wisconsin-madison-the-nature-boardwalk.jpg/2560px-Gfp-wisconsin-madison-the-nature-boardwalk.jpg"
                }
            }
        ]
    }
]
chat_response = client.chat.completions.create(
    model="meta/llama-3.2-11b-vision-instruct",
    messages=messages,
    max_tokens=256,
    stream=False
)
assistant_message = chat_response.choices[0].message
print(assistant_message)
传递图像#
NIM for VLMs 遵循 OpenAI 规范,将图像作为用户消息中的 HTTP 有效负载的一部分传递。
重要提示
支持的图像格式为 JPG、JPEG 和 PNG。
公共直接 URL
传递图像的直接 URL 将导致容器在运行时下载该图像。
{
    "type": "image_url",
    "image_url": {
        "url": "https://upload.wikimedia.org/wikipedia/commons/thumb/d/dd/Gfp-wisconsin-madison-the-nature-boardwalk.jpg/2560px-Gfp-wisconsin-madison-the-nature-boardwalk.jpg"
    }
}
Base64 数据
另一种选择(对于网络上尚不存在的图像很有用)是首先对图像字节进行 base64 编码,并在您的有效负载中发送该编码。
{
    "type": "image_url",
    "image_url": {
        "url": "data:image/jpeg;base64,SGVsbG8gZGVh...ciBmZWxsb3chIQ=="
    }
}
要将图像转换为 base64,您可以使用 base64 命令,或在 python 中使用
with open("image.png", "rb") as f:
    image_b64 = base64.b64encode(f.read()).decode()
仅文本支持
某些客户端可能不支持聊天 API 的此视觉扩展。NIM for VLMs 公开了一种使用仅文本字段发送图像的方法,即使用 HTML <img> 标签(确保您正确转义引号)
{
    "role": "user",
    "content": "What is in this image? <img src=\"https://upload.wikimedia.org/wikipedia/commons/thumb/d/dd/Gfp-wisconsin-madison-the-nature-boardwalk.jpg/2560px-Gfp-wisconsin-madison-the-nature-boardwalk.jpg\" />"
}
这也与 base64 表示形式兼容。
{
    "role": "user",
    "content": "What is in this image? <img src=\"data:image/jpeg;base64,SGVsbG8gZGVh...ciBmZWxsb3chIQ==\" />"
}
仅文本查询#
许多 VLM(如 meta/llama-3.2-11b-vision-instruct)支持仅文本查询,其中 VLM 的行为与(仅文本)LLM 完全相同。
重要提示
并非所有 VLM 都提供仅文本功能。有关仅文本查询的支持,请参阅支持矩阵中的模型卡片。
curl -X 'POST' \
'http://0.0.0.0:8000/v1/chat/completions' \
    -H 'Accept: application/json' \
    -H 'Content-Type: application/json' \
    -d '{
        "model": "meta/llama-3.2-11b-vision-instruct",
        "messages": [
            {
                "role": "system",
                "content": "You are a helpful assistant"
            },
            {
                "role": "user",
                "content": "Create a detailed itinerary for a week-long adventure trip through Southeast Asia."
            }
        ],
        "max_tokens": 256
    }'
或使用 OpenAI SDK
from openai import OpenAI
client = OpenAI(base_url="http://0.0.0.0:8000/v1", api_key="not-used")
messages = [
    {
        "role": "system",
        "content": "You are a helpful assistant"
    },
    {
        "role": "user",
        "content": "Create a detailed itinerary for a week-long adventure trip through Southeast Asia."
    }
]
chat_response = client.chat.completions.create(
    model="meta/llama-3.2-11b-vision-instruct",
    messages=messages,
    max_tokens=256,
    stream=False
)
assistant_message = chat_response.choices[0].message
print(assistant_message)
多轮对话#
指令调优的 VLM 也可能支持多轮对话,用户和模型之间进行重复交互。
重要提示
并非所有 VLM 都提供多轮对话功能。有关多轮对话的信息,请参阅模型卡片。
curl -X 'POST' \
'http://0.0.0.0:8000/v1/chat/completions' \
    -H 'Accept: application/json' \
    -H 'Content-Type: application/json' \
    -d '{
        "model": "meta/llama-3.2-11b-vision-instruct",
        "messages": [
            {
                "role": "user",
                "content": [
                    {
                        "type": "text",
                        "text": "What is in this image?"
                    },
                    {
                        "type": "image_url",
                        "image_url":
                            {
                                "url": "https://upload.wikimedia.org/wikipedia/commons/thumb/d/dd/Gfp-wisconsin-madison-the-nature-boardwalk.jpg/2560px-Gfp-wisconsin-madison-the-nature-boardwalk.jpg"
                            }
                    }
                ]
            },
            {
                "role": "assistant",
                "content": "This image shows a boardwalk in a field of tall grass. ..."
            },
            {
                "role": "user",
                "content": "What would be the best season to visit this place?"
            }
        ],
        "max_tokens": 256
    }'
from openai import OpenAI
client = OpenAI(base_url="http://0.0.0.0:8000/v1", api_key="not-used")
messages = [
    {
        "role": "user",
        "content": [
            {
                "type": "text",
                "text": "What is in this image?"
            },
            {
                "type": "image_url",
                "image_url": {
                    "url": "https://upload.wikimedia.org/wikipedia/commons/thumb/d/dd/Gfp-wisconsin-madison-the-nature-boardwalk.jpg/2560px-Gfp-wisconsin-madison-the-nature-boardwalk.jpg"
                }
            }
        ]
    },
    {
        "role": "assistant",
        "content": "This image shows a boardwalk in a field of tall grass. ..."
    },
    {
        "role": "user",
        "content": "What would be the best season to visit this place?"
    }
]
chat_response = client.chat.completions.create(
    model="meta/llama-3.2-11b-vision-instruct",
    messages=messages,
    max_tokens=256,
    stream=False
)
assistant_message = chat_response.choices[0].message
print(assistant_message)
使用 LangChain#
NIM for VLMs 允许与 LangChain 无缝集成,LangChain 是一个用于开发由大型语言模型 (LLM) 驱动的应用程序的框架。
使用以下命令安装 LangChain
pip install -U langchain-openai langchain-core
使用 LangChain 查询 OpenAI 聊天完成端点
from langchain_openai import ChatOpenAI
from langchain_core.messages import HumanMessage

model = ChatOpenAI(
    model="meta/llama-3.2-11b-vision-instruct",
    openai_api_base="http://0.0.0.0:8000/v1",
    openai_api_key="not-needed"
)

message = HumanMessage(
    content=[
        {"type": "text", "text": "What is in this image?"},
        {
            "type": "image_url",
            "image_url": {"url": "https://upload.wikimedia.org/wikipedia/commons/thumb/d/dd/Gfp-wisconsin-madison-the-nature-boardwalk.jpg/2560px-Gfp-wisconsin-madison-the-nature-boardwalk.jpg"},
        },
    ],
)

print(model.invoke([message]))
Llama Stack 聊天完成请求#
NIM for VLMs 还支持 Llama VLM 的 Llama Stack Client 推理 API,例如 meta/llama-3.2-11b-vision-instruct。借助 Llama Stack API,开发人员可以轻松地将 Llama VLM 集成到他们的应用程序中。要流式传输结果,请设置 "stream": true。
重要提示
根据您正在运行的模型更新模型名称。
例如,对于 meta/llama-3.2-11b-vision-instruct 模型,您可以提供图像的 URL 并从命令行查询 NIM 服务器
curl -X 'POST' \
'http://0.0.0.0:8000/inference/chat_completion' \
    -H 'Accept: application/json' \
    -H 'Content-Type: application/json' \
    -d '{
        "model": "meta/llama-3.2-11b-vision-instruct",
        "messages": [
            {
                "role": "user",
                "content": [
                    {
                        "image":
                            {
                                "uri": "https://upload.wikimedia.org/wikipedia/commons/thumb/d/dd/Gfp-wisconsin-madison-the-nature-boardwalk.jpg/2560px-Gfp-wisconsin-madison-the-nature-boardwalk.jpg"
                            }
                    },
                    "What is in this image?"
                ]
            }
        ]
    }'
或者,您可以使用 Llama Stack Client Python 库
pip install llama-stack-client==0.0.50
重要提示
以下示例假设 llama-stack-client 版本为 0.0.50。如果您选择安装较新版本,请相应地修改请求。
运行客户端并查询聊天完成 API
from llama_stack_client import LlamaStackClient

client = LlamaStackClient(base_url="http://0.0.0.0:8000")

messages = [
    {
        "role": "user",
        "content": [
            {
                "image": {
                    "uri": "https://upload.wikimedia.org/wikipedia/commons/thumb/d/dd/Gfp-wisconsin-madison-the-nature-boardwalk.jpg/2560px-Gfp-wisconsin-madison-the-nature-boardwalk.jpg"
                }
            },
            "What is in this image?"
        ]
    }
]

iterator = client.inference.chat_completion(
    model="meta/llama-3.2-11b-vision-instruct",
    messages=messages,
    stream=True
)

for chunk in iterator:
    print(chunk.event.delta, end="", flush=True)
传递图像#
NIM for VLMs 遵循 Llama Stack 规范,将图像作为用户消息中的 HTTP 有效负载的一部分传递。
重要提示
支持的图像格式为 JPG、JPEG 和 PNG。
公共直接 URL
传递图像的直接 URL 将导致容器在运行时下载该图像。
{
    "image": {
        "uri": "https://upload.wikimedia.org/wikipedia/commons/thumb/d/dd/Gfp-wisconsin-madison-the-nature-boardwalk.jpg/2560px-Gfp-wisconsin-madison-the-nature-boardwalk.jpg"
    }
}
Base64 数据
另一种选择(对于网络上尚不存在的图像很有用)是首先对图像字节进行 base64 编码,并在您的有效负载中发送它们。
{
    "image": {
        "uri": "data:image/jpeg;base64,SGVsbG8gZGVh...ciBmZWxsb3chIQ=="
    }
}
仅文本支持
与 OpenAI API 情况一样,NIM for VLMs 公开了一种使用仅文本字段发送图像的方法,即使用 HTML <img> 标签
{
    "role": "user",
    "content": "What is in this image?<img src=\"https://upload.wikimedia.org/wikipedia/commons/thumb/d/dd/Gfp-wisconsin-madison-the-nature-boardwalk.jpg/2560px-Gfp-wisconsin-madison-the-nature-boardwalk.jpg\" />"
}
这也与 base64 表示形式兼容。
{
    "role": "user",
    "content": "What is in this image?<img src=\"data:image/jpeg;base64,SGVsbG8gZGVh...ciBmZWxsb3chIQ==\" />"
}
仅文本查询#
许多 VLM(如 meta/llama-3.2-11b-vision-instruct)支持仅文本查询,其中 VLM 的行为与(仅文本)LLM 完全相同。
重要提示
并非所有 VLM 都提供仅文本功能。有关仅文本查询的支持,请查阅支持矩阵中的模型卡片。
curl -X 'POST' \
'http://0.0.0.0:8000/inference/chat_completion' \
    -H 'Accept: application/json' \
    -H 'Content-Type: application/json' \
    -d '{
        "model": "meta/llama-3.2-11b-vision-instruct",
        "messages": [
            {
                "role": "system",
                "content": "You are a helpful assistant"
            },
            {
                "role": "user",
                "content": "Create a detailed itinerary for a week-long adventure trip through Southeast Asia."
            }
        ]
    }'
from llama_stack_client import LlamaStackClient

client = LlamaStackClient(base_url=f"http://0.0.0.0:8000")

messages = [
    {
        "role": "system",
        "content": "You are a helpful assistant"
    },
    {
        "role": "user",
        "content": "Create a detailed itinerary for a week-long adventure trip through Southeast Asia."
    }
]

iterator = client.inference.chat_completion(
    model="meta/llama-3.2-11b-vision-instruct",
    messages=messages,
    stream=True
)

for chunk in iterator:
    print(chunk.event.delta, end="", flush=True)
多轮对话#
指令调优的 VLM 也可能支持多轮对话,用户和模型之间进行重复交互。
重要提示
并非所有 VLM 都提供多轮对话功能。有关多轮对话的支持,请查阅模型卡片。
curl -X 'POST' \
'http://0.0.0.0:8000/inference/chat_completion' \
    -H 'Accept: application/json' \
    -H 'Content-Type: application/json' \
    -d '{
        "model": "meta/llama-3.2-11b-vision-instruct",
        "messages": [
            {
                "role": "user",
                "content": [
                    {
                        "image":
                            {
                                "uri": "https://upload.wikimedia.org/wikipedia/commons/thumb/d/dd/Gfp-wisconsin-madison-the-nature-boardwalk.jpg/2560px-Gfp-wisconsin-madison-the-nature-boardwalk.jpg"
                            }
                    },
                    "What is in this image?"
                ]
            },
            {
                "role": "assistant",
                "content": "This image shows a boardwalk in a field of tall grass. ...",
                "stop_reason": "end_of_turn"
            },
            {
                "role": "user",
                "content": "What would be the best season to visit this place?"
            }
        ]
    }'
from llama_stack_client import LlamaStackClient

client = LlamaStackClient(base_url=f"http://0.0.0.0:8000")

messages = [
    {
        "role": "user",
        "content": [
            {
                "image": {
                    "uri": "https://upload.wikimedia.org/wikipedia/commons/thumb/d/dd/Gfp-wisconsin-madison-the-nature-boardwalk.jpg/2560px-Gfp-wisconsin-madison-the-nature-boardwalk.jpg"
                }
            },
            "What is in this image?"
        ]
    },
    {
        "role": "assistant",
        "content": "This image shows a boardwalk in a field of tall grass. ...",
        "stop_reason": "end_of_turn"
    },
    {
        "role": "user",
        "content": "What would be the best season to visit this place?"
    }
]

iterator = client.inference.chat_completion(
    model="meta/llama-3.2-11b-vision-instruct",
    messages=messages,
    stream=True
)

for chunk in iterator:
    print(chunk.event.delta, end="", flush=True)
停止容器#
如果使用 --name 命令行选项启动 Docker 容器,则可以使用以下命令停止正在运行的容器。
# In the previous sections, the environment variable CONTAINER_NAME was
# defined using `export CONTAINER_NAME=meta-llama-3-2-11b-vision-instruct`
docker stop $CONTAINER_NAME
如果 stop 没有响应,请使用 docker kill。然后,如果您不打算按原样重启此容器(使用 docker start $CONTAINER_NAME),请在其后跟 docker rm $CONTAINER_NAME。在这种情况下,您将需要重新使用本节顶部的 docker run ... 说明来为您的 NIM 启动新容器。
如果您没有使用 --name 启动容器,请查看 docker ps 的输出,以获取您使用的镜像的容器 ID。
从本地资产提供模型#
NIM for VLMs 提供了实用工具,可以使模型下载到本地目录,作为模型存储库或 NIM 缓存。有关详细信息,请参阅实用工具部分。
使用先前的命令启动 NIM 容器。从那里,您可以查看并在本地下载模型。
使用 list-model-profiles 命令列出可用的配置文件。
您可以使用 download-to-cache 命令将任何配置文件下载到 NIM 缓存。例如
download-to-cache --profile 09e2f8e68f78ce94bf79d15b40a21333cea5d09dbe01ede63f6c957f4fcfab7b
您还可以让 download-to-cache 通过不提供要下载的配置文件来决定给定硬件的最佳配置文件,如以下示例所示。
download-to-cache
气隙部署(离线缓存路线)#
NIM 支持在气隙系统(也称为气墙、气隙或断开连接的网络)中提供模型。如果 NIM 检测到缓存中先前加载的配置文件,它将从缓存中提供该配置文件。使用 download-to-cache 将配置文件下载到缓存后,可以将缓存传输到气隙系统以运行 NIM,而无需任何互联网连接,也无需连接到 NGC 注册表。
要查看实际效果,请勿提供 NGC_API_KEY,如以下示例所示。
# Create an example air-gapped directory where the downloaded NIM will be deployed
export AIR_GAP_NIM_CACHE=~/.cache/air-gap-nim-cache
mkdir -p "$AIR_GAP_NIM_CACHE"

# Transport the downloaded NIM to an air-gapped directory
cp -r "$LOCAL_NIM_CACHE"/* "$AIR_GAP_NIM_CACHE"

# Assuming the command run prior was `download-to-cache`, downloading the optimal profile
docker run -it --rm --name=$CONTAINER_NAME \
--runtime=nvidia \
--gpus all \
--shm-size=16GB \
-v "$AIR_GAP_NIM_CACHE:/opt/nim/.cache" \
-u $(id -u) \
-p 8000:8000 \
$IMG_NAME

# Assuming the command run prior was `download-to-cache --profile 09e2f8e68f78ce94bf79d15b40a21333cea5d09dbe01ede63f6c957f4fcfab7b`
docker run -it --rm --name=$CONTAINER_NAME \
--runtime=nvidia \
--gpus all \
--shm-size=16GB \
-e NIM_MODEL_PROFILE=09e2f8e68f78ce94bf79d15b40a21333cea5d09dbe01ede63f6c957f4fcfab7b \
-v "$AIR_GAP_NIM_CACHE:/opt/nim/.cache" \
-u $(id -u) \
-p 8000:8000 \
$IMG_NAME
气隙部署(本地模型目录路线)#
气隙路线的另一种选择是使用 NIM 容器内的 create-model-store 命令部署创建的模型存储库,以创建单个模型的存储库,如以下示例所示。
create-model-store --profile 09e2f8e68f78ce94bf79d15b40a21333cea5d09dbe01ede63f6c957f4fcfab7b --model-store /path/to/model-repository
# Choose a path on your system to cache the downloaded models
export LOCAL_NIM_CACHE=~/.cache/nim
mkdir -p "$LOCAL_NIM_CACHE"

export MODEL_REPO=/path/to/model-repository
export NIM_SERVED_MODEL_NAME=my-model

docker run -it --rm --name=$CONTAINER_NAME \
--runtime=nvidia \
--gpus all \
--shm-size=16GB \
-e NIM_MODEL_NAME=/model-repo \
-e NIM_SERVED_MODEL_NAME \
-v $MODEL_REPO:/model-repo \
-u $(id -u) \
-p 8000:8000 \
$IMG_NAME